Home » Equipment » Warm floor
Warm floors are necessary to maintain comfortable conditions in the house. However, not everyone can create such conditions, especially if it is necessary to lay warm floors under PVC, linoleum and other floor coverings.
Today we will find out what types of heated floors can be combined with such flooring as PVC tiles.
Advantages and disadvantages of PVC tiles
Pros of using tiles:
- the product retains the heat accumulated by underfloor heating well;
- The elements included in the coating are completely environmentally friendly. The possibility of releasing caustic vapors when the structure is heated is also excluded;
- the material is antistatic, that is, it does not conduct electric current and is compatible with electric heating systems;
- the structure quickly warms up due to its small thickness (up to 5-7 mm);
- the coating is endowed with heat resistance and can withstand sudden changes in temperature;
- high-quality sound insulation;
- affordable price;
- pleasant outer layer of coating;
Minuses:
- despite the fact that the tiles are made from high-quality environmentally friendly materials, they are not hypoallergenic;
- the coating tolerates temperature changes in the environment, but not direct exposure to high temperatures when heated. Be careful;
- the material is not resistant to acetone and similar liquids;
- to install the material you need a perfectly leveled base;
An operational life of around 10 years cannot be accurately attributed to a positive or negative quality, since each person evaluates this period in his own way. Someone may not change the flooring at all throughout their life, while others change the design of the room every couple of years, this is purely personal.
One thing is for sure: PVC tiles are an excellent option that is used everywhere. It can be laid either manually or using services. Fortunately, there are plenty of them in Moscow.
We recommend: How to install Onor heated flooring?
The craftsmen will carry out repair work in such a way that even the disadvantages will become advantages. Do not neglect their help, otherwise you risk constantly overpaying for repairs of both the floor covering and the entire heated floor structure.
Advantages of heated floors
Below we will look at perhaps the simplest heated floor - IR flooring under tiles.
Its advantages are as follows:
- The air in the room does not lose its freshness, because this type of heating does not affect it in any way.
- An infrared heated floor under tiles, emitting waves of great length, heats not only the surface of the floor itself, but also the entire body of the person who is currently walking on it.
- This method of heat transfer allows it to be re-released from previously heated objects, which increases the overall temperature in the room even more.
- The content of negative ions in the air increases at least 4 times.
- During operation, infrared film does not emit dust, noise or vibration.
- The amount of electromagnetic radiation generated is so small that it can be neglected.
- This type of heating is perceived much more pleasant by humans at initial low temperatures in the room than in the case of water heating.
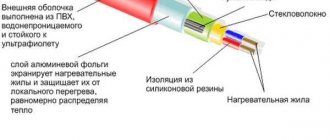
So what is a film infrared heated floor laid under the tiles? By and large, infrared heating consists of a thin film 0.3-1 mm thick, equipped inside with an electrically conductive element. Below we will describe methods for installing infrared heated floors under tiles.
What is the best heated floor to lay under PVC?
Installation of heated floors is carried out both independently and with the participation of professionals. However, for both, it is necessary to know what types of heated floors are allowed to be laid under this covering.
Also keep in mind that polyvinyl chloride coating is considered one of the “coldest”; you need to choose high-quality materials for the selected type of heated floor. Keep this in mind when choosing building materials.
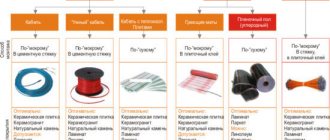
PVC flooring is compatible with:
- water heating systems;
- infrared film systems;
- with cable (single- and two-core, as well as self-regulating) systems.
The choice of floor type also depends on whether it is a private house or a multi-storey one, on the skills, desires of the owner and his financial component.
Advantages of using quartz vinyl flooring and heated flooring
- Thermal conductivity. Quartz vinyl tiles retain heat.
- Fast heating. Thanks to the small thickness of PVC tiles (up to 7 mm), heat spreads quickly and evenly.
- Environmental Safety. There are no harmful and toxic additives in the structure of quartzvinyl: there is no emission when heated.
- Antistatic. Static voltage does not accumulate on the surface, PVC tiles do not conduct current, and are absolutely safe in combination with a film heating system.
- Stability. Quartz vinyl tolerates temperature changes without consequences.
- Versatility. Quartz vinyl tiles of adhesive or interlocking type are compatible with all types of heating. Please note that you should use infrared film flooring with caution: only a high-quality system can guarantee precise control of surface heating, which is very important for PVC tiles .
Quartz vinyl tiles can be used together with infrared heated floors, however, it is necessary to protect the system from overheating: heating a vinyl floor above +50°C is critical.
An alternative is SPC laminate: thanks to its mineral base, the material has a very low coefficient of thermal expansion, which allows the use of heated floors with surface heating up to 40°C (depending on the manufacturer) .
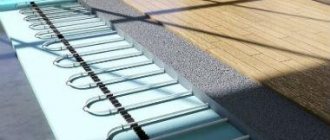
Laying schemes for PVC flooring
The first version of the scheme may include:
- wooden base;
- a pipe circuit laid between wooden joists;
- layer of plywood/chipboard;
- polyvinyl chloride tiles.
Second option:
- cement-sand base;
- waterproofing layer;
- water floor contour;
- additional screed layer;
- self-leveling mixture to correct differences;
- finishing coating.
Third option:
- concrete base;
- heat/moisture insulating layers;
- electric heating cable (single-core/two-core/self-regulating);
- cement-based screed to level the surface;
- polyvinyl chloride tiles.
Fourth option:
- cement based screed;
- plywood sheets;
- moisture/heat insulating layers;
- film infrared floor;
- finishing coating (in this case tile);
Each option is unique in its own way, as it is installed based on personal preferences and skills, and is also installed in different types of houses.
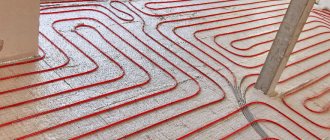
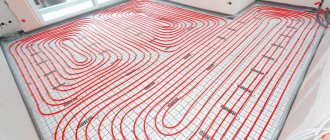
Water heated floor and PVC tiles
It is a complex, closed structure consisting of pipes, a pump, a distribution manifold, shut-off valves, fittings, an air vent, and fasteners.
One of the main advantages of this model is its minimal heat loss. In addition, it is environmentally friendly and does not create electromagnetic radiation (unlike electric floors).
Most often they are installed in private houses and cottages, since the installation of a heating boiler is necessary. In apartments - hydraulic compatibility with the pre-installed heat exchange system of the room will be required.
Water models are demanding in terms of thermal conductivity of finishing materials. In this context, PVC tiles are the best choice.
Disadvantages include the risk of leakage and labor-intensive installation.
Installation of the most suitable heated floors under PVC tiles
Laying water heated floors. Water heated floors are much more difficult to install than their electric counterparts. But no other type is better suited for installation in private homes, since its installation in apartments is very difficult and requires special permits.
We recommend: How to lay heated floors over wooden joists?
Most often it is laid according to 3 schemes, which are given above:
- first of all, a manifold cabinet with all its components (circulation pump, valves, etc.) is installed;
- First you need to completely clean the base of debris, unevenness and differences. Then the coating is vacuumed, washed with water and completely dried for 1-2 days;
- lay a thermal insulation layer;
- Now damper adhesive tape is glued around the perimeter of all walls. It is necessary in order to restrain the screed, preventing it from damaging the walls and “blurring” when it expands to the sides;
- A reinforced mesh is laid on the thermal insulation layer in order to attach the future pipe circuit to it with special clamps/fasteners. Do not fasten the pipe too tightly or too loosely to the mesh. In the first case, the pipes will deteriorate prematurely due to overtightening, and in the second, they may move after pouring the screed mortar;
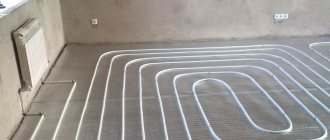
- we retreat 5-7 cm from the walls and begin to lay the pipe contour according to a pre-selected pattern (snake/snail/combined);
- after installation is completed, the pipes are connected to the collector, and the system is checked for functionality;
- upon successful start-up, the pipe circuit is filled with solution and left until completely dry;
- if necessary, the floor is additionally leveled so that there are no differences on it;
- laying the finishing coating - PVC tiles;
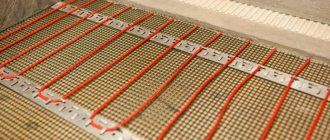
Laying infrared film under PVC The floor is laid according to 4 options:
- level the base, remove construction debris;
- level with a screed layer;
- we place sheets of plywood at intervals of 1-2 mm to hide the cable in the spaces between the plywood;
- we lay moisture and heat insulation layers;
- choose a place for the thermostat in the wall and make a vertical groove down;
- a small recess is cut in the thermal insulation for a temperature sensor;
- we install a film heating system;
- we connect all the wires of the sheets to create a single system. The wires are connected to the sheets by soldering, as this method is the most reliable. If you do not know how to do this, seek the help of a specialist;
- Additionally, we glue the heating sheets of the system with glue to avoid shifts during installation of the finishing coating. Glue is applied at the boundaries of the connection of the canvases with each other. For convenience, the boundaries are marked with a pencil;
- connect the temperature controller, sensor and film;
- We start up the system and lay PVC tiles.
We recommend: How does automatic floor heating work?
Laying cable floors. We install according to 3 schemes:
- Moisture- and heat-insulating layers are laid on the prepared base. The cable should not be laid on thermal insulation, as overheating may occur. Floor kits include detailed instructions that describe the details of laying the cable on the thermal insulation, this is individual for each type of cable;
- lay the cable in accordance with the manufacturer's instructions;
- install a thermostat on the wall and a temperature sensor between the cables;
- we connect the elements of the system;
- Apply tile adhesive to the structure and install the tiles.
Installation of tiles on heated floors
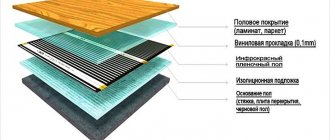
The “warm floor” heating system for all floor covering options is composed of the following elements:
- thermal insulation material at the bottom of the structure to direct heat and cut off cold surfaces;
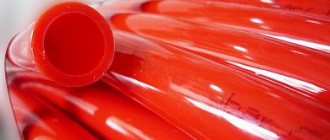
- specialized pipes for coolant;
- mesh for reinforcement and pipe fastening components;
- concrete screed;
- PVC tiles for flooring.
Preliminary calculations are made for the placement of heating pipe circuits. Their number is limited by the power of the heating boiler to warm a certain volume of liquid. One circuit - no more than twenty-five linear meters of heating pipe.
It is recommended to carry out work in the following sequence:
- A layer of thermal insulation is laid over the surface of the rough coating, and a damper tape is used to compensate for the thermal expansion of concrete.
- For fastening pipes - guides. In a simple version, it is enough to lay the reinforcing mesh and fasten the pipes with clamps every twenty to twenty-five centimeters. The fastener should fix the pipe, leaving room for thermal expansion.
- Installation of pipes near the walls is carried out at a distance of 70 mm.
- The order of laying the pipes involves leading the ends to the distribution manifold.
- After laying the pipes, they check the tightness and bring the temperature of the liquid to 20 - 25 degrees, pour the screed.
- After the finishing screed has dried, they begin to prepare and lay PVC tiles.
- The surface of the screed is thoroughly cleaned of dirt, defects are eliminated, and dust is removed.
- Leave the tiles in the room at room temperature for at least 12 hours so that they take on dimensions and straighten out.
- Tiles with a locking fastening system and a self-adhesive base will not be difficult to install. Mount from the far corner of the room with a ledge of each row by 1/3 or 1/2 of the slats. At the same time, the protrusions of the following tiles are inserted into the grooves of the locks without excessive effort. Self-adhesive tiles are straightened during the laying process to allow air to escape under the product and for strong adhesion of the coating.
- Tiles that are supposed to be installed using adhesive require careful selection taking into account operating temperature conditions.
Installation option
Having become familiar with the conditions and requirements for the installation of a water-based “warm floor” system, the owners of the premises can easily choose the appropriate material for the floor covering from an aesthetic point of view and practical application in order to solve the issue of energy saving. It is of interest to install a heated floor system under PVC tiles. The initial costs of purchasing equipment and carrying out installation work will more than pay for themselves in a short time.
One of the methods of laying the finishing floor covering from PVC tiles is shown in the video below.
Laying PVC tiles
average rating 0
more than 0 ratings
Share link
Comments
serj 03/17/2019 12:44
Hello, I really liked the article about underfloor heating. Everything is clearly and clearly explained and shown. I want to make floors like this for myself. I thought about hiring specialists, but now I’ll try to do it myself
Features of laying tiles
When the material is purchased, it is laid in the room where the installation will be carried out so that the tiles “soften”.
The tiles are:
- with glue included;
- self-adhesive;
- with locking fastenings.
Tiles are laid along a long wall. Also keep in mind that solid elements are glued first, after which the cut ones are added.
Interlocking quartz vinyl tiles
When laying interlocking tiles on a “warm floor”, the condition must be met - to leave compensation gaps along all walls from 5 to 10 mm. The gaps allow the tiles to move as they expand without damaging the joints.
Art
East
interlocking tiles are recommended for use with electric heating systems; it is not advisable to use water heating. Heating temperature no more than 28 ° C. In general, interlocking tiles are sensitive to temperature changes and change their size. The temperature gap must be left at least 1 cm. This applies to installation with “warm floors” and use on balconies and rooms on the south side, where heating in the sun may occur.