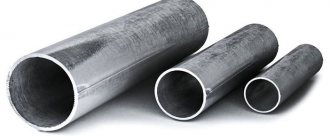
Warm floors made of metal-plastic pipes are a common and cost-effective option for heating apartments, private houses and public spaces. When installing a pipeline, it is important to choose high-quality material at an affordable price, and also pay attention to the durability of the system elements.
Types of pipes for heated floors
A water floor is most often used as an independent heating system. Less often it is mounted as an additional heating element.
Structure of a metal-plastic pipe
Let's consider the types of pipes used in the installation of heated floors, their advantages and disadvantages:
| Types of pipes | Advantages | Flaws |
| Metal-plastic | • resistance to corrosion and chemicals; • low expansion coefficient; • smooth surface provides good pressure; • service life 40-50 years; • withstand water temperatures up to 95 degrees; • anti-oxygen protection guarantees against separation of elements from connection with metal parts; • pipes bend easily, laying them in the form of a snake is not difficult. | • Due to the difference in expansion of aluminum and polyethylene, a low-quality pipe may delaminate; • scale may form on threaded fittings; • if the fitting is tightly clamped, the pipe may burst. |
| Copper | • highest thermal conductivity; • durability up to 50 years; • withstand water temperatures up to 300 degrees, pressure up to 400 atm; • are not afraid of rodents; • are not subject to corrosion. | • complex installation, requires special equipment for connecting elements and work experience; • connecting elements must only be made of brass. |
| Made from cross-linked polyethylene | • practically do not deform under the influence of high temperatures; • resistant to mechanical stress, abrasion, shrinkage; • service life more than 50 years; • flexibility, resistance to freezing/defrosting; • easily restore shape; • do not crack under internal pressure. | • the pipe does not have a frame, it is quite difficult to shape it by laying it in a snake; • if the installation technology is not followed, the anti-diffusion protection on top of the pipe can be damaged. |
Metal-plastic pipelines for heated floors are used more often than others due to the optimal price-quality ratio.
We install heated floors
The installation of a heated floor begins with drawing up a project.
We recommend that you familiarize yourself with: Safety valve for relieving excess pressure in the pipeline system
In addition to the metal-plastic pipe, the following materials are needed:
- Insulation and waterproofing. You will need a backing under the screed to protect against possible leakage and retain heat.
- Mesh to strengthen the screed.
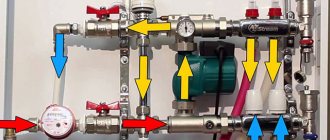
- Collector.
- Fasteners.
- Damper tape around the perimeter of the room. It serves as a buffer between the floating floor and the wall. On large areas, the tape is embedded as a screed separator between the heating circuits.
Before purchasing a metal-plastic pipe, you should calculate its length. Why do we draw a laying plan on paper indicating the dimensions.
There are several configurations for laying pipes for heated floors:
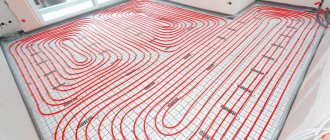
- Spiral. More difficult to install, but more important in efficiency and uniformity of room heating. Hot water is supplied in the center and disperses to the edges of the room.
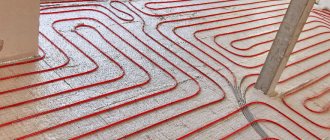
- Snake. Easier to install, but there is a risk of uneven heating of the floor.
- Double snake. Effective when laying a hot circuit along “street” walls. Allows you to cut off cold air flows from the room and enhances the circulation of hot flows in a natural way.
When drawing up a project for laying heating communications, we take into account:
- “empty” areas under appliances or furniture;
- step length between adjacent sections.
The optimal distance is considered to be from 20 to 35 cm, but it all depends on the desired temperature, location of the room, climate and pipe diameter. We calculate the material according to the drawing and add 10% to the resulting length for insurance.
Note! For an efficient system, the length of one heating sector should not exceed 120 meters.
If a warm floor is installed in a large room, then it is advisable to take a metal-plastic pipe of a larger diameter, twenty. It can be laid with a large distance between turns. This technique will maintain high heat transfer with a shorter length of communications.
Installation instructions
The surface for mounting the heating system must be level. The presence of a difference in floor level will cause the formation of air locks in the system.
We recommend that you familiarize yourself with: Metal hose in a sheath with PVC insulation to protect the cable
Step-by-step instructions for laying an insulated floor:
- Glue damper tape around the perimeter. Its width corresponds to the height of the floating floor.
- Roll out the heat-insulating material onto a leveled surface and lay it end-to-end. If it is foil-foil foamed polyethylene, then add a metal layer to the room.
- Spread moisture-proofing polyethylene film over the heat insulator. At the joining points it is necessary to make an overlap of 20 cm. Secure with construction tape.
- Lay the mounting mesh for the screed.
- Install the manifold cabinet. Connect the pipe.
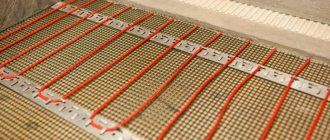
- Lay metal-plastic pipes and secure them. Fastenings are installed 3 at each bend and every meter on straight sections.
- Upon completion of laying communications, connect the second end of the pipeline to the collector.
- A shut-off valve is required on the supply, and an air release valve on the return.
- Pressure testing of the system when the coolant pressure is supplied 1.5 times higher than the planned norm.
- Fill the screed.
Full operation of the heating system can begin no earlier than in a month. This time is necessary for the screed to dry completely throughout its entire thickness.
Note! Using a self-leveling floor instead of concrete to install the screed is more convenient, but more expensive.
All about metal-plastic pipes
Metal-plastic pipes are lightweight and do not weigh down the supporting structure.
The structure of a metal-plastic pipe includes 5 layers:
- The inner layer is made of cross-linked polyethylene. Ensures that the working shape of the pipe is maintained when exposed to elevated pressure and temperature.
- The next layer is applied with an adhesive composition, which fixes the aluminum layer to the inner polyethylene.
- The aluminum layer is made of foil 0.2-2.5 mm thick, which is butt-welded or overlap-welded into a pipe shape. The thickness of the layer depends on the diameter of the product.
- Adhesive composition.
- Protective outer layer made of cross-linked or regular high-density polyethylene.
Warm floors made of metal-plastic are lightweight. Due to their structure, the pipes have good flexibility, which greatly simplifies their installation in a snake or spiral shape.
The durability of the pipe depends on the quality of the glue; if the adhesive composition loses its elasticity, the product delaminates and leaks begin at the joints.
To check the quality of metal-plastic, you need to heat it to a temperature of 100 degrees. If layers are visible when heated, it means the pipe is of low quality.
Description of metal-plastic
Pipes made of cross-linked polyethylene, which is made using peroxides, can withstand high temperatures up to 110 0C and an internal pressure of 10 bar. Manufacturers have improved the material through a metal insert. It is made of aluminum.
Metal-plastic pipes have the following structure:
- the inner layer is made of cross-linked polyethylene;
- aluminum insert;
- outer shell made of polyethylene;
- all layers are connected with glue; products do not delaminate; operational period more than 50 years.
Metal-plastic increases the maximum operating temperature to 120 0C. The coolant can be supplied under pressure up to 25 bar. This allows you to maintain the integrity of the line in the event of a water hammer.
When the temperature rises to 140 0C, the material becomes soft and the polyethylene separates from the aluminum insert. Recommended mode up to 95 0C. Liquid pressure up to 15 bar.
Manufacturers offer pipes for “warm floors” with a diameter of 16-40 mm. You must always remember that when calculating the heating system and when choosing fittings for connecting the line, the internal diameter of the product is taken into account.
- External diameter 16 mm – internal 12 mm.
- 20 mm – 16 mm.
- 26 – 20 mm.
- 32 – 26 mm.
- 40 – 33 mm.
We recommend: How to install cable heated floors?
Metal-plastic can withstand the load of the concrete screed and does not react with the chemicals of the solution. The outer and inner shell of the plastic is smooth; does not retain salt deposits; fungus does not form on them. The aluminum insert is an additional frame for the pipe, which holds the shape of the product and prevents deformation under elevated thermal conditions.
Warm floors made of metal-plastic pipes require certain installation rules. The bending diameter must be at least 5 diameters.
To turn the line in a certain direction, a pipe bender is used. It is a cylindrical spring. The spring is put on the pipe and bent.
Separate sections of the circuit are connected using fittings. Use a crimp connection or press crimp. Fittings are selected depending on the diameter of the pipe. The indicator is indicated on the surface of the product. How to connect a metal-plastic highway?
Material calculation
Before you start purchasing material, you need to correctly calculate the flow rate of the pipe that will go to the heated floor. Metal-plastic can be laid:
- spiral;
- snake;
- double helix.
Installation with a snake is easier, but has a significant drawback. Hot water enters the pipeline from one side of the room, and as it moves along the snake to the other part of the room, it gradually cools down. As a consequence, one side will always be warmer than the other.
The circuit, laid in a spiral, heats the floor more evenly
Installation with a spiral promotes uniform heating of the floor, because the pipe from the insert goes to the middle of the room, then goes in a spiral to the collector. There are fewer bends in this system, so you can use a heated floor pipe with a smaller bend radius.
Large rooms need to be divided into several sectors. For effective heating, the length of the pipeline laid in a spiral should not exceed 60 m in each circuit.
Installation diagrams:
When designing a heated floor system, you need to think about the location of the pipe and choose the most suitable installation scheme.
It is better not to lay pipes under furniture and household appliances.
The distance between the turns must be at least 30 cm
. To calculate the required quantity, we first draw a pipeline layout diagram on paper. The optimal distance between turns is 30 cm; if it is reduced, the floor surface will overheat; if it is increased, the floor between the pipes may not be heated well. We retreat 150-200 mm from the walls to the metal-plastic pipe.
We calculate the number of turns and multiply the resulting number by 2 (pipeline with cold and hot water).
Then we calculate the length of the pipe in a coil and add 10-15% in reserve (for defects and waste).
If you can’t calculate the length yourself, you can use an online calculator. In order for the program to produce the correct result, you need to know the following pipe parameters:
- diameter;
- material;
- thickness of screed and finishing floor covering.
The length of the pipeline in one circuit should not exceed 120 m, the difference between the circuits should not be more than 15 m. The pump power is also taken into account.
Laying a metal-plastic heating system
Step 1. The first thing you need to do is purchase all the necessary materials and tools for installing water heating. That is, first of all, the metal-plastic pipes themselves, sold in large coils with a length of up to 50 m. In some cases, coils with a pipe length of 80 m can be purchased directly from the manufacturer. You will also need clamps for fixing the pipes on the reinforcing mesh, heat-reflecting material, the mesh itself, the required number of fittings to create connections between individual pipe sections, cement mixture for pouring the screed. It is best to buy pipes with a diameter of 16, 20 or 25 mm.
Preparing everything you need
Heated floor pipe circuit length calculator
Go to calculations
Step 2. Next, you need to prepare the rough foundation by laying waterproofing and insulating materials on it, as well as a reinforcing mesh with large cells. The individual mesh sheets are connected to each other using clamps. It is best to lay individual sheets so that they overlap each other by at least one cell. A damper tape must be glued along the walls, which is necessary to ensure that the poured concrete screed does not deform.
Laying reinforcing mesh
Step 3. After this, you need to select the correct location of the collector box. This is a very important indicator, since the pipe flow rate will depend primarily on the correct choice of location. You need to install the collector box itself.
Installation of the collector box
Step 4. Next you need to lay out the pipes according to the chosen pattern. They can be laid in a snake or in a spiral. In the first case, installation is usually done starting from the walls or windows. Laying in a spiral involves parallel arrangement of supply and return pipes - this is an option for spacious rooms, unlike the previous one. It is important to maintain the required pitch between the pipes. The laying step can vary and be 10, 15, 20 cm. Less often, it can be increased. Near the windows the step should be small - 15 cm.
There are several schemes for laying underfloor heating pipes. You can choose the right one based on your needs
Pipes are laid out according to the selected pattern
Another photo of the installation process
Step 5. In order to bend the pipe correctly, a pipe bending spring is used. It is put on the pipe itself and after that, adjusted to the required places, the desired radius is formed.
Using a bending spring
Step 6. The pipes must be fixed to the reinforcing mesh approximately every 1.5 m using plastic clamps. They should not be over-tightened, otherwise the pipes may be deformed during thermal expansion when heated.
Pipes are fixed on a reinforcing mesh
Step 7. After the pipe circuit has been laid and fixed, they need to be connected to the collector and the water supply checked. Then you can pour the screed directly on top of the pipes. But at this moment they should be filled with water. Otherwise, the pipes may bend.
The fixed circuit must be connected to the collector
Important! When installing a water floor heating system made of metal-plastic pipes, it is important to pay attention to the integrity of the material and the absence of damage or deformation. Otherwise, this will affect the quality of the final work. And the total length of the pipes should not exceed 80-90 m. The best option is 50-60 m. If the total length of the pipes is greater, then two circuits should be installed, and the collector should have 2 outlets.
Video - Installation of a water floor
Materials for system installation
Thermal insulation will prevent heat from dissipating downwards.
In addition to metal-plastic for a heated floor, you will need:
- Hydro- and thermal insulation material will help keep the room warm, rather than heating the neighbors below. We purchase expanded polystyrene or polystyrene as a heat insulator. Polyethylene film is most often used to protect coatings and materials from moisture.
- To strengthen the concrete screed you will need a reinforcing mesh.
- The damper tape is glued along the perimeter of the walls and serves as an expansion joint when the screed expands under the influence of heat. Protects the base of the floor from deformation and cracking.
- Clamps in the form of an anchor for fastening pipes.
- If not all rooms in the house have a heated floor system, you need to buy a mixing unit.
- The collector distributes the supply of hot water to the various circuits of the system. For the secrets of installing a metal-plastic water circuit, watch this video:
If the circuits in the system are of different lengths, then a coolant flow regulator must be installed on the collector. At the same time, we take into account that a long circuit takes longer to heat up than a short circuit, so you need to regulate the pressure and degree of heating.
Crimping method
There is no need to purchase separate tools to make a crimp connection. Use fittings, a press ring, and a wrench.
A pipe cutter is needed to remove uneven edges. To increase the internal diameter of the pipe, calibration with a countersink is intended. How to make a crimp connection?
- The edges of the pipes must be smooth. To do this, measure 2-3 cm from the end of the product and set a mark. Using this mark, a pipe cutter is used to form the correct chamfer; remove part of the outline.
- Fittings are selected depending on the size of the diameter of the circuit, but the connecting elements have round rubber inserts-seals. To prevent their deformation, it is necessary to slightly increase the diameter of the pipe. To do this, use calibration with a countersink. The tool is inserted inside the contour and rotary movements are performed. Chips are removed from the inner surface. This increases the diameter.
- A crimp ring is placed on the pipe.
- Insert the fitting.
- Press the ring onto the fitting. Screw the crimp nut by hand. In the future, 2 keys are used. One is for holding the fitting, the other is for tightening the press-on nut.
- Check the assembly of metal-plastic pipes.
We recommend: Which is better, warm floors or radiators?
This connection method is used most often. Installation is quick and does not require expensive equipment. The crimp nut securely holds the metal-plastic contour.
Press crimping with electric crimper
In order to connect individual sections of the highway using a crimp, an electric crimper is used. The kit includes nozzles with holes that correspond to a certain pipe diameter for “warm floors”. Pressure testing is carried out as follows:
- carry out preparatory work: form a chamfer and increase the diameter of the product using calibration with a countersink;
- install the fitting;
- a compression ring is put on one end;
- a nozzle is attached to the tool; it is made in the form of tongs; they are separated, a pipe is inserted;
- connect the tool to the electrical network;
- connect tongs; a click will be heard;
- hold them in place for 2-3 seconds;
- disconnect the pliers and check the crimping area.
Installation is quick. The line connects reliably, withstands high coolant pressure, and no leaks occur. The disadvantage is the use of expensive equipment. IN
In place of an electric crimper, you can work with a hydraulic tool. It costs less, but crimping requires physical effort.
Press crimping with hydraulic device
The hydraulic crimper is a pliers. Nozzles for pipes of a certain diameter are installed on them; they have the shape of a semicircle; use nozzles in pairs.
The diameter size is indicated on the surface of the product. One semicircle is located on the body of the forceps, the other on the head. The nozzle is inserted into the grooves until it clicks.
- Preparatory work is carried out: a chamfer is formed and the diameter is increased.
- Put on the crimp nut and insert the fitting. The fitting has holes. They determine the correct location of the pipe.
- Place the junction on the body of the forceps and close the head.
- Enlarge the handles of the crimper. This will increase the load during crimping. The handles are at an angle of 1800.
- Connect the handles. At the same time, the forceps are compressed. The fitting and ring are connected.
- The handles open and the head of the device opens. To open the head, you need to hit it with your palm.
- Remove the pipe and test the connecting assembly.
If there is a rupture in the line, then the space on the floor is cleared of the screed and the circuit is opened. Wash the internal and external walls. Make sure that debris does not get inside the pipeline.
Connect individual sections of the circuit. It is recommended to cover the unit with pipe insulation. The material will protect the fittings from oxidative processes. Fill the line with a building mixture for “warm floors”.
Manual hydraulic press Viar
Connection nodes are installed closer to the boundary of the water circuit so that they are easily accessible; They do not open the entire “warm floor”. The fittings are protected with plastic or insulation. The circuit diagram is transferred to a sheet of paper in order to further determine where the main connection nodes are located.
We recommend: How to install heated floors in a toilet?
Metal-plastic pipes for “warm floors” are a good alternative to polyethylene products. When using the main line, it is necessary to monitor the heating mode.
Do not allow increased pressure in the water circuit to exceed 10 bar, or liquid temperature to exceed 90 0C. The “warm floor” is connected to the boiler, to the collector or to the radiator.
YouTube responded with an error: The request cannot be completed because you have exceeded your quota.
- Related Posts
- How to install a heated floor?
- How to choose material for a warm water floor?
- How to lay heated floors on a balcony?
- What characterizes Rehau underfloor heating?
- Is it possible to lay laminate flooring on a heated floor?
- How is polystyrene foam used for heated floors?
Heating installation
Before laying the water heating circuit, you need to prepare the surface. We seal all cracks and chips on the slab with cement mortar. If the difference in height is more than 5 mm, leveling the base is required. If the pipeline is laid on a surface with a slope, an air lock may form in the pipes. Watch all the stages of laying the floor from screed to contour in this video:
For better adhesion to concrete, we wet the surface with water. Then, to increase strength, you need to prime the base in two layers.
There must be metal or metal-plastic fittings under the water circuit
Installation sequence of the heated floor system:
- After preparing the surface and removing dust from it, we stick damper tape along the perimeter of the walls to the entire height of the screed.
- We lay thermal insulation. If the material has a foil surface, place it with the foil facing up.
- We spread the waterproofing material. When using rolled material, we lay the strips overlapping by 15-20 cm, and fix the joints with tape.
- We install the reinforcing mesh and we will attach pipes to it.
- We install the cabinet for the manifold and the distributor itself. We install supply and return pipes into the cabinet, on which we install valves. We connect the manifold to the valve, install a drain valve on one side, and an air release system on the other.
- We connect the end of the pipe to the manifold and lay metal-plastic pipes for the heated floor, according to the provided diagram. We attach the pipe with clamps to the reinforcing mesh. We place the fasteners at a distance of 1 m from each other.
- Upon completion of laying the entire circuit, we connect its second end to the collector.
- We test the system, supplying water pressure 1.5 times higher than the operating pressure.
- If the system is working correctly, there are no breaks or leaks, you can begin installing the screed.
The heated floor is covered with a screed 3–5 cm thick - Mix the ingredients according to the instructions until you obtain a homogeneous mass of creamy consistency. Fill the screed with the resulting solution to a thickness of 30-50 mm.
- Cover the concrete base with polyethylene and moisten it with a spray bottle once a day to prevent cracking.
- A month after the screed has completely dried, you can put the water heated floor system into operation.
We perform the screed using:
- cement-sand mortar in a ratio of 1:3 with the addition of a plasticizer;
- mixtures for self-leveling floors.
The second option is easier to install, has increased strength, but costs much more than cement.
A pipe with a diameter of 16 mm is capable of heating an area 10-15 cm wide around it.
Do-it-yourself floor heating installation
The construction of a water floor as an auxiliary source of heating in a small room can be done independently, taking into account our recommendations. It is better to entrust a large amount of work to professionals.
To install on your own, you need to calculate the material, purchase it and prepare the tools.
Required tools and materials
The required materials include more than just pipes. You will need:
- Collector.
- Matching fittings.
- Damper tape.
- Fasteners.
- Materials for waterproofing and insulation.
- Components of a concrete mixture.
The tool is selected according to the type of work:
- Pipe bender or spring.
- Plastic scissors.
- Shovel, trowel, spatula, etc. for concrete work.
Drawings and diagrams
Water floor structure
Options for laying underfloor heating pipes
Installation technology
Pipe laying schemes suggest mainly two options: snake and snail.
The first one is considered simpler and more convenient to install. However, according to this scheme, hot water gradually cools down as it moves through the pipeline and it turns out that the temperature in one part of the circuit will be lower than in the other. The issue is resolved by installing a pump.
The option with a snail allows you to heat the circuit evenly. The method involves fewer bends, which is important for plastic with its possible creases.
Work progress
- First, the concrete base is leveled by all available means.
- Laying lines are marked taking into account the selected step, and fasteners in the form of clips are installed along them.
- Next, waterproofing and insulating materials are laid.
- A special tape is attached near the walls to protect the concrete pouring from cracks in the event of pipe deformation.
- Install the collector, place the ends of the bends there.
- Unwind and install the pipes along the marking lines, snapping them into clips.
- A special spring is used to bend the loops. It is put on the pipe and with its help the product is bent to the desired radius.
- Connect the pipes to the cabinet.
- The installed system is pressure tested by filling it with water under pressure.
- If the result is successful, begin pouring the screed.
Video - installation of a water floor
Installation features
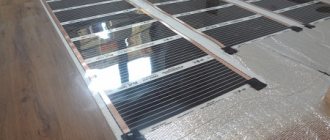
Previously, polystyrene foil was laid as a thermal insulation layer. Now profile slabs made of polystyrene foam have appeared, equipped with special bosses for easy installation of flexible pipes.
In cases where it is not possible to make a screed, a slatted floor is installed. The bars are fastened between the turns and the floor covering is laid on them.
Advantages of water floors
Compared to other types of heating, the water system has advantages:
- cost-effectiveness compared to electrical systems;
- lack of visible heating elements compared to central heating using radiators;
- reliability and safety;
- uniform heating of rooms.
A water heated floor system using metal-plastic pipes, if installed correctly, will last more than 50 years.
Flaws
Two layers of screed will significantly raise the floor level
. Like all other systems, water floors have disadvantages:
- complexity of installation;
- installation of a water pump is required to increase water pressure in horizontal pipes;
- reducing the height of the room due to several layers required for the installation of such a system;
- are not suitable for use in apartments, since such a system reduces the water pressure in the risers. For more information about the advantages and disadvantages of this design, watch this video:
Most often, a water floor is used for heating private houses, in which case it is fully justified in terms of durability and economic benefits.
It is best to involve specialists who will perform all the work, strictly adhering to installation technology. They will help you correctly calculate the consumption of materials and pipe laying pitch.