What tools are needed?
Without tools it is impossible to create a chair. Even if you can do it with your hands, it will hardly be possible to sit on it.
To make a chair you need a number of “helpers”. A saw or hacksaw is necessary first. Hammer, screwdriver, jigsaw, chisel, plane, mallet, grinder, stapler (construction), clamps, square and tape measure.
This is the list that we will need to prepare the stool
Preparing for work
In order to make a wooden chair with your own hands, you will need the following devices and tools:
- Miter saw;
- jointer;
- thicknesser;
- a circular saw;
- band-saw;
- pattern for marking legs;
- ruler;
- square;
- slotting machine;
- tenon cutting machine;
- hand eccentric sander;
- hacksaw;
- wooden hammer;
- spray bottle for applying varnish.
Necessary materials:
- wood;
- glue;
- putty;
- varnish
Let's get to the chair
So now we get to the chair itself:
First of all, prepare 4 bars forty by forty mm and 440 mm long.
The most important thing when working with wood is to remove burrs. They can always bring pain, become a thorn and simply ruin your mood. For this you need the same sandpaper. Absolutely every wooden stick must be sanded.
It is necessary to prepare 4 drawers, which will act as jumpers between the legs. The seating area will subsequently rest on these legs. Typically, their parameters are 20x50x280 mm. However, here you can make a choice.
Now we need 4 more jumpers that will help strengthen the legs (or rather, what will be between them - the legs). Dimensions will be 30x20x280 mm. How to make a chair out of wood? Now you'll find out.
The main task of a chair is to seat. It is necessary to make it as comfortable as possible, which means using a wide board.
The next step will be the task of preparing the spikes. They must be done on all sides.
You need to make grooves in certain places on the legs. Their length and depth should be 2 centimeters, but the height of the grooves for securing the legs should be 27 centimeters from the floor.
Now we put it all together into a single structure, like a construction set. This way you can determine whether the seat is level and whether corrections are needed.
If everything is in order, we assemble the structure together, first connecting all the elements with wood glue. It is advisable to strengthen all this with self-tapping screws.
Then we simply screw long screws into all the legs. The places where the caps will be located must be thoroughly recessed in the wood so that they are not visible. After this, paint the chair thoroughly. That's all.
Decoration
Furniture assembly work ends with decoration. Before decoration, the surfaces are treated with sheets of sandpaper and coated with clear varnish. Decoration is carried out using the techniques of decoupage, patination, engraving, simple or artistic coloring, etc.
Wood carving allows you to create original patterns and engravings. The design can be contour, geometric, relief, etc. Fine carving will give the room lightness and airiness. After engraving, the product is coated with transparent varnish or thick paint. The design method is suitable for rooms in the Art Nouveau, Baroque, and Shabby Chic styles.
Antique chairs are decorated with your own hands using decoupage techniques. Furniture is complemented with floral prints or reproductions of art paintings, artificially aging the surface. The work is completed by varnishing the surfaces. The decor will suit rooms in retro, vintage, Provencal styles.
Coloring allows you to harmoniously fit furniture into the interior, making models contrasting or neutral. When applying enamel, it is possible to use patination techniques, stylization like marble and glass. Paints can be translucent or dense depending on the interior design.
A soft chair
If you are interested in how to make a soft chair, then the answer is simple - you need to add a special pillow to the seat and back.
To do this, it is enough to use a pillow made of wood and soft material inside. Feathers won't work since it's a chair.
Restoration
A situation often occurs when an old, once beautiful chair no longer meets all the requirements and begins to require replacement. In this case, restoration of chairs is suitable if there is no desire to get rid of them and buy new ones.
If the chair was made of high-quality material, then over time it only lost its appearance, some of the fastenings became loose. To restore it, it must first be disassembled.
After this, you need to remove the old layer of varnish, sand the surface, coat it with special agents against fungus and mold, and then coat it with varnish again. Various metal elements such as fasteners, screws and bolts must be replaced, since the old ones are most likely covered with rust.
We recommend reading:
- Do-it-yourself furniture decoupage: review of the best techniques, original ideas and beautiful design (140 photos)
How to update furniture with your own hands - a review of the best ideas for beautiful restoration of home furniture (120 photo ideas)
Furniture care: best secrets and simple tips for caring for all types of furniture in an apartment or house
After this, it will be possible to assemble the structure back, as a result of which it will be possible to return the old chair to its former appearance, get rid of the squeak and give it stability. If you wish, you can additionally make chair covers with your own hands. Completely different materials can be used for this. As a rule, fabric or wool protrudes; it is easier to form covers from them.
Paper chair
There is also an option to make a table out of paper. This is a great way to make a children's cuddle chair. For example, if a small child wants to create a small house in which his characters will live.
However, for this you need to already learn how to work with paper. You can find out how to do this on the Internet.
Now about the improvements
1. After upholstering the knee pads, the thought immediately came to me that making three rectangular pads would be much easier
2. I cut the planks into the support bars by 20 mm, plus glue and confirmations. On the first pine chair we had to put corners, because my daughter somehow managed to loosen the glue.
3. I strengthened the part of the support bar that comes from the seat. That is, I have not 2 strips there, but 5. And they are also embedded into the beam by 20 mm.
4. Made the seat and knee pads composite. There is a supporting part, and there is the seat itself and knee pads already with foam rubber and covered. To connect the seat and knee pads, I inserted M8 bolts (M6 is also possible), the heads of which were filled with epoxy (you can use liquid nails or other reliable glue with filler).
5. Seat angle adjustment system. Already tried it and am satisfied. The chair became a little higher than before, and I had to change the height for my daughter using a bar. It was so easy to set a comfortable angle, which could not be done in the basic model. You can supplement the system with a series of holes along a different radius and thereby obtain an almost perfectly smooth adjustment of the seat tilt.
Well, I’ll just share where I found the beech. It’s easier for those who have such boards, but I couldn’t find them in my region. And I found beech steps in a large store and right there in the store they gave me one meter (1000*400*40, it seems) step on 40*22 slats and several 40*45 bars and I happily went home to make chair No. 2. And now I want to make chair No. 3, making the parts not prefabricated, but solid.
My daughter went to first grade and I see that the child’s seat in such a chair is really different than in a traditional one. The child has a straight back without any effort. For an adult, IMHO, you need to make a chair out of iron. I (100 kg) carefully sat down on the first pine chair, but there are still doubts that it would have supported me for a long time.
Why are folding chairs needed?
We make folding chairs in order to use them in places where they will not be located for a long time. For example, in nature.
If you go somewhere outdoors, then a folding chair would be an excellent option. It is easy to install and does not need to be assembled for a long time.
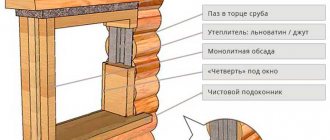
With backrest
The manufacturing process is similar to assembling a stool. But in this situation, you need to make a backrest.
In addition to the basic material, the following tools and compositions are required:
- wood glue;
- screws;
- chisel;
- cutter;
- hammer;
- other carpentry equipment.
Guided by the list of parts and the drawing for making a chair with a back, we begin to work.
Having prepared all the parts, they need to be carefully polished. In the process, getting rid of sharp corners and various defects. Use a cutter to select grooves in the right places to connect the elements and glue the entire structure. The assembled product is first coated with stain and then several layers of varnish.
At the final stage, the seat can be covered with dermantine, leather or other material.
Tables 2021 - 150 photos of exclusive new items from the furniture catalog. Modern design of tables, and the best options for combining them in the interior- Wooden chairs - main types, types of wood and modern models (90 photos and videos)
Adjustable chair - features of choosing a design and tips on choosing a material (145 photos)
To avoid damage to the floor, it is advisable to attach rubber or felt pads to the legs.
Photos of chairs
https://www.youtube.com/watch?v=BsUOyE1nz5k
How to make a chair for your garden with your own hands.
Buying a chair for a summer house can be expensive and unjustified. Seasonal accommodation, of course, comes with amenities. I would like to sit comfortably on a garden chair in a gazebo or under the canopy of trees, relax on the veranda or by the river. But this is precisely what requires garden furniture to be practical, aesthetically pleasing and affordable.
In order not to spend money on furniture, show your skills and please your loved ones with an unusual design, we suggest you make a chair for your dacha with your own hands from scrap materials.
Assembly order
The chair is assembled in the following sequence:
- The front part of the chair is assembled from the front legs, transverse drawer and lower jumper (if any).
- The back is assembled from the rear legs and all transverse parts.
- Tsars and longitudinal jumpers are inserted into the grooves on the front surface of the backrest, and a part of the chair called the apron is assembled.
- The apron connects to the front.
- A seat is mounted to the finished frame.
The frame is first assembled dry, the correct joining of all elements is checked, oblique diagonals are measured, and the absence of distortions is checked. If necessary, the parts are adjusted, and only after that the assembly is carried out in the same sequence with the gluing of tenons, grooves or tongues. If you use a filler mill, which ensures the most precise fit of all parts, you can do without pre-assembly. All frame parts are connected without metal fasteners, and only the seat is fastened with self-tapping screws, which are screwed in from the drawer side.
Soft vs hard
If you notice that there is a profitable sale somewhere where they offer interesting chairs, do not rush to choose. If you make a mistake at the initial stage, you will have to pay for it with a low level of comfort.
Having previously decided on the type of suitable chair, the rest will be much easier. In fact, chairs that have a seat with a high back can be divided into 2 categories. These are soft and hard.
Upholstered chairs are called less practical. Especially when it comes to fabric seats. Although their high level of comfort speaks in their favor. The soft covering is suitable for those who like to spend a lot of time in the kitchen. Here it is extremely important to correctly decide on the choice of coating itself, since not all materials are easy to care for. Regarding care, I will give some recommendations at the end. For now, I will say that it is best to buy such chairs with initially high-quality and durable material.
A design with a hard seat will be a competitor to a soft chair.
In general, they are considered to be a classic solution. They are made from wood, metal, particle boards, sometimes even rattan or bamboo. Most materials are easy to wash and easy to care for.
Such chairs, as practice shows, last much longer and cause fewer maintenance problems than their soft counterparts.
But hard products are often not chosen for a completely objective reason. This is their low level of comfort. Yes, you can sit on them for 30-40 minutes without experiencing any special problems. But over time, the feeling of comfort will quickly disappear. Such designs are not designed for long-term gatherings. Although the problem can be solved by purchasing soft pads or special pillows. But even here it turns out that they will also have to be looked after.
As a result, soft chairs have slightly more advantages. Especially if you initially choose upholstery made from practical and easy-to-care material.
Design of future furniture - corner or chairs?
Kitchen chairs
Quite often, when arranging a kitchen, many people think about what is better to choose: a corner or chairs? It is almost impossible to answer this question unambiguously. After all, the choice will depend not only on the personal preferences of the residents of the house or apartment, but also on how much kitchen space allows you to place various pieces of furniture.
For example, a small kitchen is unlikely to be able to accommodate even the most compact corner. And if you do find a way, no one will want the sofa to take up all the free space in the kitchen. Firstly, this will make it difficult to move around, which is especially critical when cooking, and secondly, the corner in a small kitchen will look rather awkward and cumbersome.
In such situations, the ideal solution would be a folding chair, which when folded takes up very little space and can be stored in any, even the smallest room. But as soon as you unfold the folding chair, you immediately get an additional, comfortable seat for family members or house guests.
Moreover, if you have the most basic knowledge and skills in carpentry, it will not be difficult to make such furniture with your own hands. It is enough to find the most suitable drawings and work plans, and soon you will have a beautiful and comfortable collapsible chair, ready to serve its owners or their guests at any time.
Kitchen chairs: main selection criteria
When we choose furniture for the kitchen, the main selection criteria are always reliability, high quality workmanship, convenience and structural strength. And that’s right, when using a chair, corner or any other piece of furniture, we must first of all be sure that it will not break and cause injury.
When planning to make stools or a chair for the kitchen with your own hands, the first thing that every person thinks about is the type of material from which he will make such important furniture elements.
Preparation of parts
To make a chair from solid wood with your own hands you will need:
- planed timber with a section of 40x60 and 40x40;
- edged board 10-15 mm thick;
- a ready-made furniture panel for seating or a board for gluing it yourself.
A beam of larger cross-section is cut into 2 pieces of 80 cm each - the rear legs (dimensions can be changed). The front and back edges of the workpieces are smoothly planed along the bias to give them a bend, as in the drawing. As a result, straight blanks with a rectangular cross-section should turn out to be curved at a slight angle with a square cross-section of 40x40. 2 straight front legs 44 cm long (or another, depending on the height of the future owner) are cut out of 40x40 timber.
On adjacent faces in the upper part of the front legs, grooves for drawers measuring 20x40 mm and 15 mm deep are marked at a distance of 10 mm from the edges. They are hollowed out with a chisel or selected using a milling cutter and thoroughly cleaned. At a similar height, grooves are made in the rear legs. The 40x40 timber is cut into 4 blanks of 35 cm each for longitudinal (side) drawers and treads, as well as 2 or 4 (depending on the presence of front and rear treads in the design) of 42 cm for transverse ones. Tenons are cut out at the ends of these parts, exactly corresponding to the grooves.
If you make the longitudinal drawers oblique with straight tenons, and select grooves for them on the front and rear legs at different heights, the rigidity of the structure will increase. To cut such tenons, you definitely need a router with a mandrel that allows you to accurately maintain the desired angle.
Backrest strips 42 cm long are cut from an edged board; the number and width may vary. Tenons are also made at the ends of the planks, and grooves of the appropriate size are selected on the inside of the rear legs (back supports).
It is quite difficult to carefully and accurately select grooves and especially cut tenons using hand tools; there is a high risk of sawing the base of the tenon or leaving excess wood that prevents it from fitting tightly into the groove. Therefore, it is better to use a router for these operations; in its absence, you can connect the parts not according to the tenon-groove principle, but using furniture dowels. Holes are drilled under them in the legs, drawers and legs. But for this joining technique it is better to use not a drill, but an additive milling cutter.
A blank for a seat is cut out of a massive shield. If there is no ready-made furniture panel of the required size, it can be glued together from boards. The lamellas are cut to the required size, the side edges are coated with glue, the resulting web is clamped in body clamps and left until completely dry. The seat should protrude slightly beyond the edges of the frame formed by the drawers; at the points of contact with the back, corners are cut out for the rear legs.
All parts must be carefully sanded, the corners of the seat must be rounded, the edges chamfered and slightly rounded. It is advisable to chamfer the lower ends of the legs on all sides so that they do not wear out so intensively and become frayed. Sanding is carried out in several stages, the grain size of the sandpaper is reduced.
Producing countries of stylish wooden chairs
This type of kitchen furniture has long become popular in many countries and their production has become widespread. They are made from high-quality wood in Europe, China, Russia, Belarus, Ukraine, Malaysia, America and many others.
Despite the emergence of new technologies and materials for the manufacture of furniture, solid wood is still in great demand. It is popular due to its durability, environmental friendliness and practicality in operation.
The manufacturer is trying to take into account all the trends of the modern world in relation to the standards of manufacturing wooden products, so that the sales of these products increase, as well as expand the range of their products.