Peculiarities
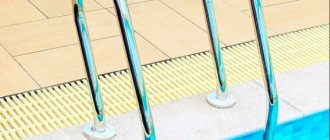
As a rule, heated floors under ceramic tiles are installed in rooms with high humidity, for example, in the kitchen, bathroom, saunas, and swimming pools. Thanks to heating, the floor covering in these rooms becomes comfortable and warm, even if you walk on it barefoot.
Floor tiles themselves are a material that is resistant to moisture and mechanical abrasion. Combined with heating, it becomes even more functional and in demand.
An electric floor heating system is one of the types of heated floors. There are also water heated floors, which are heated by water. This system is only suitable for private houses, since when used in an apartment building, there is a high probability of flooding of neighbors below, as well as interruptions in heating of neighboring apartments.
Where and when is the best time to do it?
Water heated floors are not suitable for apartment buildings, because... The building design is usually not designed to accommodate the additional load on the heating system. In typical houses, heated floors are usually installed during construction. So you can install heated floors in private houses or apartments with the permission of the architectural and construction inspectorate in the case where the heating system has a sufficient safety margin for such installations.
This is interesting: Furniture made from driftwood: absolute exclusive (25 photos)
Kinds
Electric floors are based on heating cables, which can be of 2 types:
- Resistive , that is, releasing heat evenly. There are single- and double-core cables, all of them are characterized by constant resistance;
- Self-regulating , which can only be multi-core, which almost completely eliminates the risk of overheating at certain points of the cable.
Depending on the systems used and installation method, electric flooring is divided into the following types.
Cable
The floor is based on a resistive (single- or two-core) or self-regulating cable. The first system usually has a thermostat, while the second system self-regulates the temperature depending on the room conditions. For example, windows and doors heat up more intensely than areas under furniture.
However, natural uneven heating can be achieved even when using resistive cables, since during installation you can adjust the pitch of the heat cable. In areas where more heat is required, the cable is laid more tightly.
The cable sheath in such a system can withstand temperatures up to 70C. The advantage of cable underfloor heating is its good compatibility with tiles, as well as the efficiency of heating when turned on.
The disadvantages include the fact that it is not recommended for use in apartment buildings. This is due to the installation features of the cable floor.
It is laid in a concrete screed, the height of which should be about 4 cm. Thus, after installing the heating system and flooring, the height of the floor in the room rises by 5-6 cm. In addition, the load on the floors increases. Among the disadvantages of cable flooring, one can note the high energy consumption and the complexity of self-installation.
Heating mats
The mats are a reinforced mesh into which heat cables are mounted. Due to the small (no more than 3 mm) thickness of the material and their low weight, they are suitable for installation in any premises, including apartment buildings.
Depending on the type of cables used, mats with two-core cables and single-core cables are distinguished. The former have a higher cost and increased elasticity. The last indicator is important when laying cable heated floors.
If we talk about heating mats, where the cables are already laid in a mesh, there is no need to spend money on material with a more expensive two-core cable. In other words, it makes no difference whether the mat has a two-core or single-core cable.
The heating mat cables can withstand high temperatures, and the system has a thermostat. For the most effective and safe combination with tiles, when installing mats, a layer of thermal insulation is laid as the first layer.
The advantages of heating mats are ease of installation with your own hands, fast heating and the ability to regulate temperature.
However, such a system is not suitable as the only heating source. In addition, its operation will be more expensive compared to using cable electric flooring.
Film
The film floor is a thin infrared film into which carbon plates are mounted. Due to the peculiarities of its structure and functioning, such an electrical system is considered the most efficient and heat-saving.
The low weight and thickness of the film determines its versatility in use.
A special feature of the film system is the creation of a comfortable microclimate in the room - objects and people are heated, and the heated objects, in turn, give off heat to the air. The latter heats up evenly without drying out.
Another advantage of an infrared floor is that if one section of the coating fails, the system continues to work. This is possible thanks to the parallel connection of elements.
The use of film requires the installation of fiberglass mesh as the electrical system is not compatible with tile adhesive. It is worth noting that the cost of an infrared floor is higher, compared to the prices of the systems discussed above.
Rod
Rod flooring is an improved type of film flooring. The principle of its operation is also based on infrared radiation. Thanks to the use of carbon rods embedded in a polymer-based film, it was possible to achieve higher mechanical strength of the floor. This allows you to lay it even under massive interior items.
Laying the rod system does not require additional substrates; the material is well compatible with floor tiles.
Like the infrared floor, the rod version continues heating even if individual sections fail. Determining the location of dysfunction is quite simple - the floor in this place remains cold.
Naturally, having such significant advantages compared to other systems, the rod floor has the highest cost.
Water heated floor
It is a pipe system through which heated coolant circulates. The pipeline is located between the base of the floor and the top covering. Water is used as a coolant. It can be taken from the heating system, or special equipment can be used for heating. As the water passes through the pipes, it gradually cools, so in such systems it is not recommended to use pipes that are too long.
During installation, metal or polymer pipes are usually used. When choosing them, reliability and durability play an important role, because in the event of a leak, complex and expensive repairs will have to be performed.
The operation of such floors is relatively economical. Their use makes it possible to reduce energy consumption. This value in different cases can be 20-60% depending on the specific situation. The coolant temperature during operation does not exceed 50-60 degrees.
The installation is quite complicated and requires the participation of specialists.
The water heated floor is a multi-layer structure. When installing them, it is necessary to ensure high-quality thermal insulation so that the heat does not escape outside the home.
If a heated floor is installed in a residential building that was left for several days during frost, then there is a danger that the liquid in the pipes may freeze. To prevent this from happening, the system is left turned on for this time at a reduced coolant temperature or liquid is pumped out of the pipes during absence.
Electric water
In recent years, another type of underfloor heating has gained popularity, in which both electric heating and coolant circulating through pipes are used to generate heat. This type of heating uses pipes that are made of structured polyethylene. Their diameter is two centimeters. Antifreeze is used as a coolant in the pipes. A chromium-nickel electrical cable is laid parallel to them, which is in a sheath made of Teflon. Pipes and cables are covered with concrete screed.
If a leak occurs, a clearly visible stain will appear on the floor surface, which will allow you to accurately determine the location of the breakdown and take action.
The cable warms up the antifreeze, which circulates through the pipes. As a result of the heat, the liquid quickly boils, which leads to rapid heating of the floor.
An important feature of this type of heated floors is that electrical energy during their operation is consumed efficiently and at the same time economically. This system has good resistance to overheating, which allows it to be installed in the right places, including under massive furniture.
Basic flooring methods
When understanding the question of whether a warm floor is needed in the bedroom, it would be useful to study information and the method of installing a floor heating system. After all, if you need to carry out quite labor-intensive work with a high level of costs, you can safely abandon this idea, and use a non-standard solution at moderate costs.
Manufacturers offer different systems that can be installed in different ways, but the most common installation methods remain the following:
- concrete screed;
- wooden floor;
- Self-leveling floors.
Modern methods of installing floor heating systems, which are special fasteners, deserve special attention. The fastening elements are placed on a strong and wear-resistant fabric, the reverse surface of such material is covered with a heat-insulating layer.
By fixing heating cables or flexible pipes with coolant, you can avoid using a concrete screed or lumber, which will significantly reduce the cost of installing the system.
Laying IR film
Comparing different systems according to the installation method, we can highlight the infrared film used to heat the floor covering. The film is installed even without dismantling the base materials, provides excellent heating, and one of its sides already has thermal insulation characteristics.
This modern solution helps distribute heat to the necessary areas of the room and reduce installation costs, without the use of a concrete screed or additional base.
Calculation and installation
Work on installing a heated floor with your own hands should begin with a detailed calculation of the power of the device and drawing up a step-by-step plan for laying its elements.
It is important to keep the following aspects in mind:
- If the system is functionally a basic heating option, then its power should be 150 W/sq. m. For lower floors it can be a little more - 180 W/kV. m. The area of its installation should occupy at least 70% of the area of the entire room. If you plan to use the system as an additional one, then its sufficient power will be 110-130 W/sq.m. m. In places where furniture is permanently placed, heating elements are not installed due to possible overheating of the cable;
- The gaps between the walls and the nearest turns of the cable must be at least 50 mm, and the gap between the central heating pipes and the cable must be at least 100 mm. The interturn cable pitch depends on the power of the device, the length of the conductor and the heated area.
Н = S*100/L, where
- H – interturn distance (cm);
- S – heating area;
- L – conductor length.
The length of the conductor is calculated using the formula:
L = S*Рs/Pk, where
- S – heating area;
- Рs – required specific power per 1 sq. meter of area;
- Pk is the specific power of the conductor according to the passport per 1 linear meter.
When laying the conductor, you immediately take into account the place where it is connected to the junction box and the temperature control device. Crossing cables is not permitted.
It is very important to provide in advance in the arrangement the location of the temperature sensor, which should be placed exactly in the center of the loop at a distance of about 40-50 cm from its edge.
The procedure and features of laying a heated floor may differ depending on the type of device, but the sequence of its implementation is almost the same:
Photo of electric heated floors
- External tiling work - features and unusual solutions
DIY welding machine: simple instructions for creating and using the device
Wall-mounted curtain rods: mounting options, review of modern models
Read here! How to remove a chandelier from the ceiling with your own hands - step-by-step instructions with photos and videos. Review of non-standard solutions from the masters!
What power heated floor to choose
Let's start with the fact that the floor temperature is regulated by sanitary standards (SNiP 2.04.05*91*, clause 3.16). According to this document, the floor cannot be heated above:
- 26°C - in rooms where people are constantly present (residential);
- 31°C - floor in rooms where people are temporarily (bathroom, toilet, etc.).
At the same time, the maximum heating temperature above the heating element is also limited. It should not be higher than 35°C. In fact, you feel comfortable if it’s about 26-29 degrees under your feet. It is, of course, a personal matter, but a warmer floor feels hotter.
Why do we need floor temperature? But because the required power per square meter depends on it. If you do everything according to the rules, you need to calculate the heat loss of the room, take into account the heat capacity of the materials, the presence and quality of insulation. Calculating the power of a heated floor is a whole process. But it can be made simpler.
There is an “average temperature in the hospital.” The data collected on the basis of actually working structures is shown in the table.
But this does not take into account the layer of glue and the thickness of the tile. These are really “average” indicators. How can I correct them? If the adhesive layer, tiles or porcelain tiles are thick, add about 20%. This will give the required temperature. In general, it is better to take power with a reserve. There are two reasons.
- Firstly, operating at the limit damages the equipment. It breaks down faster. This also applies to heating elements.
- Secondly, in case of extreme cold or the main heating is turned off, you will have some reserve. True, an increase in the maximum power of the heating elements leads to an increase in the diameter of the wires in the power line and the power of the machines. But in electrics, a power reserve is always better than a lack. More safely.
Water heated floor in the apartment
The main nuance is the skeptical attitude of the authorities towards such initiatives. It is explained simply: water for the floor will be taken from a common riser, as a result of which everyone else’s pressure will weaken and the temperature will drop. To avoid this, you need to construct the floor in specific ways, acting carefully and competently. And, of course, you still need to prove to the authorities that the installation of the water heated floor was carried out according to all the rules and will not harm anyone. In addition, you need to take into account that not all standard floors of a multi-story building can withstand heated floors.
Self-leveling heated floor
Calculation example
In the table we have standards, but they are for one square meter. To calculate the required power for the entire room, you need to calculate the heated area. We multiply the resulting figure by the selected norm.
Let us show with an example how to calculate the power of a heated floor. We will lay the electric warm mat only in the free area. In the bathroom this is 3.5 square meters.
Based on the table, a bathroom requires 150 W of heated floor power per square meter. But we will be laying thick tiles, so we will take the power with a reserve. Let's count 180 W/m?.
A total of 180 W/m² * 3.5 m² = 630 W is required. That is, you will need to find a cable mat that will produce at least 600 W of heat over 3.5 square meters.
Electricity consumption
Electricity consumption depends on the type of floor. When laying cable systems, the consumption depends on how densely the cable is laid. In mats and film floors, the cable layout is fixed, as is the energy consumption.
For efficient operation of the floor, a certain power per 1 sq. m is required.
For interior tiles, this figure is 110-180 W/sq. m, for street ones - 2-3 times higher.
It is important to take into account the characteristics of the room. The less heat loss, the less powerful the floor heating system can be. For cold buildings, electricity consumption per 1 sq. m can reach up to 300 W. In other words, when organizing a heated floor on a balcony, for example, a more powerful version of the system is required.
The type of flooring is also important. If the power system under a wooden floor can have a power of 110-130 W/sq. m, then the tile requires an option with a power of at least 150-180 W/m. sq.
A special formula allows you to select the optimal power. For example, for a bathroom in a standard apartment (where there is central heating), the floor power is 1 sq. m averages 150 W.
This indicator should be multiplied by the area of the room, having previously excluded from it the area for plumbing and furniture. On average, this is 3 sq. m. So, we multiply 150 W/sq. m by 3 sq. m, we get 450 W.
Taking into account the resulting indicator, you can select the length of the electric floor cable. This is the optimal power value. When it decreases, the efficiency of the heated floor decreases; when it increases, unreasonable expenses on electricity cannot be avoided.
How do heated floors work?
Systems based on heating wires and mats work as follows: when electric current flows, the conductor heats up. Heating is carried out due to convection: the screed is then heated by the wire, and it itself heats the floor covering.
If we consider the installation of a heated film floor, then heating is carried out due to the fact that the carbon layer emits heat under the influence of current. Thanks to this radiation, the floor covering, as well as objects that stand on the floor, heat up.
A temperature sensor with a thermostat allows you to adjust the temperature, so it’s easy to create an optimal microclimate in the room.
Heating time
The heating time of an electric floor depends on whether the heating system is laid directly under the tiles or built into the screed. In other words, it depends on the type of system.
There are certain forms for estimating heating time, often understandable only to specialists. In this regard, let’s discard the calculations and give the standard heating time for different types of floors:
- A heating mat laid under a 1.5-2 cm thick tile has a heating time of just under an hour (45-50 minutes);
- Cable system in a 5 cm thick screed without thermal insulation in a heated room – 2-2.5 hours;
- A similar system with thermal insulation – 1.5 hours.
Thus, the minimum heating time is demonstrated by a system of mats and films installed immediately under the floor covering. When using powerful models, the time indicator can be reduced to 30 minutes.
Compared to mats under tiles, cables in a screed take 3 times longer to warm up. However, this value can be reduced by 2 times if the screed is provided with a layer of thermal insulation. It is also necessary in cases where there is an unheated room or ground below.
When talking about floor heating time, power indicators, the location of the temperature sensor, and the features of installing thermal insulation should be taken into account.
If the power is calculated incorrectly, the system “does not work”, the floors do not warm up or take a long time to warm up. If the temperature sensor is located too close to the heating element, it reaches the desired temperature faster than the floors in the room and turns off prematurely. If there is no thermal insulation or the thickness of its layer is insufficient, heat loss exceeds the heat generated, so it seems that the floors take longer to heat up, and the desired temperature is not reached.
Geometry of equipment laying
Experienced builders offer several simple options for laying infrastructure and elements of a floor heating system. The choice of geometric shape determines how effective the heating of the floor covering will be and what level of comfort can be achieved in an isolated room:
- spiral laying;
- parallel type;
- sequential installation.
An interesting solution could be to lay the necessary heating elements not along the entire perimeter of the floor in the bedroom. The mobility and lightness of the design allows the elements of the system to be laid in areas where it is most necessary to warm the floor, for example, next to the sleeping area, near an armchair or wardrobe.
Installation
Installing a warm electric floor with your own hands will begin with drawing up a cable laying diagram. The following recommendations help to install the floor correctly:
Cables should not be laid under stationary furnishings. Otherwise, this may lead to overheating of the elements, since there is no heat exchange between the floor and the air in the room. In addition, heating is harmful to furniture, it cracks and dries out.
Finally, heating the floor under bulky cabinets and sofas is not practical from an economical point of view.
When installing the cable from walls and stationary furniture, an indent of 0.5 cm is made; from risers and other elements of the heating system - 1 cm.
For the floor heating system to function effectively, the coverage area must be at least 70% of the room area.
You should immediately determine the location of the temperature sensor. It is located at a height of 30-100 cm from the floor and should be easy to access.
It is important to remember that heating wires are always laid in parallel.
After all calculations have been made, installation begins. The technology is the same for all types of systems and includes the following steps:
- Floor preparation - removal of old coating, leveling;
- Installing the thermostat at a height of 0.5-1 m from the floor.
- Laying shrink tape around the perimeter of the room;
- Pouring the first layer of screed;
- After the screed has dried, the mounting tape is laid, and heating cables (mats) are placed on top of it;
- Installation of temperature sensors, connection via cables of the thermostat and the electric floor system, checking them;
- Pouring the final layer of screed.
When mounting mats and films, steps 4 and 7 are omitted. When using an infrared floor, a layer of mounting mesh is laid between it and the tiles.
It is important to ensure that the surface is absolutely flat, since any bending of the cable will lead to overheating and failure. To obtain a smooth surface, leveling compounds are used.
There are 3 types of cable laying schemes using cable ties:
- Screed installation (used for kitchens, balconies under cable systems);
- On top of the screed under the tile;
- Directly onto the screed (film floors).
If the presence of thermal insulation is implied, then it must be placed between the floor and the heating system. When the humidity of the room is high, waterproofing materials are laid on top of the thermal insulation materials.
For heated rooms, foil insulation with a thickness of 2-4 mm is sufficient.
To insulate unheated rooms, it is recommended to create a “pie”: lay thermal insulation material based on polystyrene foam 5-10 cm thick under a layer of foil insulation.
Types of water heated floors
Methods for laying warm water floors are not too varied. The basic principle of operation of a water heated floor always remains the same: pipes are installed under the floor, which, when turned on, are filled with hot water. Only the nuances differ.
Water heated floor under tiles
The classic system implies that the pipes are filled with a material that will conduct heat and retain heat, and in addition, make leaks impossible. A substrate is laid on top, tiles or other floor covering are placed on it, and the entire system is connected to the main heating system. In some cases, the subfloor is tightly filled with concrete, and the water floor is securely fixed.
The process of laying water heated floors
Concrete conducts heat well and retains it, but cannot be installed in an apartment building - the floors simply will not withstand the total weight.
Water heated floor in the bedroom
Electric water floors
In this case, the pipes are not connected to the main system. They simply lie in a special conductor of electricity, which, when current is applied, begins to heat the water. This option is very easy to use: just plug it into a power outlet for it to work.
Water heated floor screed
Flooring system
Flooring means that there is no single base that fills all the space between the tubes. There is a special fastener on which they are installed. A covering is laid on top of the warm water floor. This method is much easier for a craftsman who decides to assemble the entire structure with his own hands. Happens:
- Polystyrene - in this case they use polystyrene, which is much lighter than concrete and hides not 10 centimeters, but only 3-4. In addition, in this case, the base is laid first, then aluminum conductors are inserted into the grooves in it and pipes with water are placed in them.
- Rack - in this case, wooden slats are used, in the spaces between which tubes are installed.
Installing a heated water floor
It is important to remember that choosing a heated water floor is easy in itself. It is easy to find a thermostat for a water heated floor, and it is easy to use it as a kitchen covering. But it is just as easy to violate building codes, act incorrectly and get an unpleasant result: it will be very difficult to eliminate a flood without destroying the entire structure.
Water heated floor in the bathroom
Only accuracy and responsibility will make it possible to create a floor whose results will delight all the inhabitants of the house with warmth and comfort.
Required materials and tools
To install a warm tiled floor, you need to buy a set of heating mats, as well as auxiliary materials and assemble (buy, rent from neighbors, friends) a set of tools:
a set of mats with a single or double-core cable, which should contain:
- the mats themselves;
- cold ends;
- corrugated tube;
- temperature sensor with wires;
- thermostat;
- waterproofing mastic;
- foil insulation;
- box for thermostat;
- tile adhesive;
- tile.
If the kit does not contain anything from the above list, then such an element of the system is purchased separately.
In addition, you will need:
- terminals in the form of a sleeve (one for each connection) with heat-shrink insulation;
- heat-shrink tubing;
- silicone glue.
The tools you should have on hand are:
- perforator;
- Bulgarian;
- knife or special device for removing insulation from wires;
- Phillips screwdriver;
- tester;
- construction hair dryer or lighter;
- scissors.
General step-by-step installation technology
To install a heated floor under ceramic tiles, you need to competently perform installation work in 10 stages.
Surface preparation
The area for laying mats or cables must be level and clean. For pronounced unevenness, cracks and protrusions, it is best to use a cement screed that will hide all the flaws. If the flaws are insignificant, it is enough to fill the cracks and sand the protruding areas.
Then the floor is cleared of debris, thoroughly swept and treated with a primer.
The next stage is started only when the primer is completely dry.
Create a schema
Regardless of the type of electric floor, preparation of the thermostat is necessary. It can be powered from an already installed outlet or directly from the network. As a rule, the connection diagram for the thermostat is indicated in the instructions. Also, two channels are grooved in the wall: one for the corrugation of the temperature sensor, the second for the power wires of the heating cable.
Important! The cable and mats should be laid in such a way that there is a distance of about 10 cm from the walls.
- The easiest way to lay a cable is considered to be a snake. The mats are laid either straight or randomly in those areas where more intense heating is required. When laying the cable, both ends are led out to the thermostat, and the coupling is subsequently hidden under the tie.
- Then a temperature sensor is mounted in a special plastic pipe and all the wires powering the heating system are connected.
Material calculation
The number of heating mats and linear meters of cable is calculated according to the diagram given above.
In addition you will need:
- thermal insulation materials;
- damper tape;
- connecting wires;
- tile adhesive;
- tile;
- fasteners;
- thermostat and temperature sensor;
- grounding copper cable;
- RCD protection system.
The amount of tiles and thermal insulation is calculated based on the floor area with allowances for trimming. The amount of tile adhesive will depend on the curvature of the floor.
But you can rely on the instructions from the manufacturer of the product per square meter.
Checking old electrical wiring
The larger the area of the room intended for underfloor heating, the more powerful the wiring should be. Therefore, you must first calculate the cable cross-section in terms of power, current and length so that the core does not heat up and melt the insulation.
- The calculation takes into account the rated power of the cable and electrical appliances that it must power.
- If the core diameter is too small, the wiring will have to be replaced and adjusted to the new system.
- Also, do not forget that the residual current device and the circuit breaker must correspond to the new electrical load.
Surface thermal insulation
The quality of heated floor installation will largely depend on the quality of the base insulation. A properly laid base will not only reduce heat loss, but also increase the efficiency of the electrical system.
Penofol is best suited for thermal insulation purposes. This is a modern multilayer material with a polyethylene base and a self-adhesive base. The outer part of the penofol is made of foil, which prevents heat from escaping from under the floor.
Penofol is glued to the floor, joint to joint, extending 3-5 cm onto the walls. The joints are sealed with foil tape, and damper tape is laid around the perimeter of the room, preventing direct contact with the heating elements.
Advice! For rooms with low ceilings, it is recommended to use polystyrene foam or polypropylene instead of penofol.
Universal heating system and its advantages
The main cost item allocated for the maintenance of a private home remains payment for the energy resources necessary for the operation of the heating system.
Such a universal solution as a warm water floor, equipped with your own hands, allows you not only to save money, but also to receive a number of benefits:
- the most uniform distribution of coolant and optimal heating of a certain floor area;
- the ability to remove all heating devices and bulky devices, which will increase the aesthetics of the interior solution;
- absence of convection air flows that provoke the appearance of drafts and disrupt the microclimate of the room;
- complete heating of a house of any size with minimal energy consumption and heat retention.
An additional feature of such a floor heating system is the thermal zoning of rooms and individual rooms.
With the use of programmable thermostats, it is possible to effectively automate and regulate the operation of the complex, differentiating operating modes according to time frames.
Installing a temperature sensor and thermostat
The thermostat is designed to turn the system on/off, as well as adjust the heating temperature. It is mounted on the wall near the outlet.
The temperature sensor is designed for independent operation of the heating system and its optimization without control by the owners. The sensor is mounted directly into the floor in a corrugated pipe laid in a groove.
It should be installed centrally between two turns of the cable. The inner end of the corrugation is insulated with sealant, the outer end is connected to the thermostat.
Control test
The cable or mats are checked before they are laid on the surface - for this purpose their resistance is measured with a multimeter. The resistance should not differ from the specified passport parameters by more than 10%.
If the indicators are within normal limits, you can begin installation.
Attaching the heating element
- The easiest way to install thermomats is to spread them along the floor plane in the selected position and connect to the thermostat.
- The cable is laid in a snail or snake pattern and secured with mounting tape. To make the work easier, you can use plastic clamps to secure the electric floor. It is very important to maintain the same distance between the turns of the cable, otherwise the site will heat up unevenly.
- After laying out the material, it is necessary to check the resistance again - it should coincide with the data of the first measurement.
Filling the screed
The screed serves as the basis for the cladding and promotes better heat distribution across the floor. Traditionally, a cement-sand screed consisting of three parts sand and one part cement is used for pouring. Water is added to them until a viscous consistency is obtained and PVA glue is added to increase the viscosity of the solution.
To save cement, crushed stone is added to the solution - 5 parts to 1 part cement. The recommended pouring thickness is about 3-5 cm.
Important! You cannot add a large amount of water to the solution, otherwise cracks will appear in the screed as it hardens.
If mats are chosen as the heating element, no screed is required - tiles can be laid directly on the film.
Laying tiles
Laying a floor with a cement screed can only be done when the mortar has set. Complete drying may take a month, but you can start covering the surface 2-3 days after pouring the screed.
Ceramic tiles are laid on a heated floor according to the same principle as on any other base.
It is better to place it on glue, which will not “steal” additional centimeters of height. The adhesive must be specially marked “warm floor” or indicate the permissible temperature range. The adhesive composition must be applied to the mat very carefully with a soft spatula so as not to damage the system.
When using a solution, you need to ensure that there are no voids in the layer, which could cause the cable to overheat.
Within a day you will be able to walk on the heated floor. It is recommended to fully start the system and grout the seams when the glue, mortar and cement base are completely dry.
How to properly install a warm water floor with your own hands, installation tips
- Content:
- How to calculate the footage of a heated floor pipe
- Types of laying underfloor heating pipes Shell or snail
- Snake
- How to pressurize a heated floor
According to reviews from installation team specialists, almost all problems in the operation of water heated floors are associated with violations during installation work. Moreover, the complexity is not only the installation process, but also the preparation stage.
Recently, professional installers were asked to tell us how to properly install a heated water floor, check the quality of the assembly, and also what are the most common mistakes made when assembling a heating system.
How to calculate the footage of a heated floor pipe
Calculation of the pipe length for a water heated floor is done as follows:
- The calculation of a pipe per 1 m² is performed depending on the pitch between the spirals. If the distance between the turns of the circuit is 10 cm, about 10 linear meters will be required. consumables, 30 cm – 3.4 l.m. The pipe consumption for water heated floors remains unchanged for any installation method. The difference in footage is affected solely by the distance between the turns of the circuit.
- The maximum number of meters in one water circuit is no more than 70 m. With a minimum step of 10 cm, 70 meters of the circuit is enough to install a heating system of 7 m². Therefore, to warm a room of 20 m², you will need to install three separate circuits.
- The calculation of the amount of pipe is also influenced by the future location of the furniture. There is no need to lay floors in the place where the furniture will be placed. The water circuit cannot be laid close to walls and partitions. The minimum distance is at least 20 cm. To calculate the pipe, it is necessary to subtract the dimensions of the indents from the total area. For a standard room of 20 m², this will be about 3.6 m².
If we take into account all three aspects: calculate the maximum step frequency for laying water heated floor pipes (10 cm), the number of circuits and the unheated area, we can come to the following results. For a room of 20 m², you will need three heating circuits of 55 lm each. pipes.
Types of laying heated floor pipes
There are several basic ways to install a warm water floor. The simplest scheme for laying pipes for a water heated floor is “snail”, which allows you to perform independent installation, without the involvement of specialists. The low heat transfer and efficiency of the “snail” method somewhat reduces its popularity.
There is also a type of styling - “snake”. Carrying out correct installation with a snake is quite problematic and requires certain professional skills. But with the help of the snake installation option, it is possible to reduce heating costs.
Each installation method has the following advantages and disadvantages:
Shell or snail
The floor is laid in a spiral. It turns out that between the hot water supply pipes there is a return pipe in which the temperature is significantly lower. Correctly laying the floor pipes with a snail is quite simple.
The only drawback of the method is the appearance of cold zones with a large laying step, which must be taken into account when it is necessary to calculate the pipe. The optimal solution would be to take a step of no more than 10 cm.
Snake
Installation can be performed by conventional or double laying of the pipeline. Proper laying of pipes for water heated floors in a snake allows you to avoid the appearance of cold zones or uneven heating of the air. To facilitate the installation process, there are special mats for attaching pipes. Following the installation instructions, you can install the heating system yourself.
To unfold the pipe like a snake, special fixing elements are used. It is extremely important that the contour is not tightly fixed. The pipe will expand and contract under the influence of hot water. It is important to avoid deformation of the water circuit after installation.
When choosing a laying method, you should take into account the total heated area of the room, the availability of professional skills and appropriate tools. Correctly connecting a water heating system can only be done by strictly following the recommendations and installation steps specified by the manufacturer.
Pipe laying sequence
Another effective installation method is “polystyrene”. In this case, installation is carried out on heat-reflecting plates. The basis for laying the pipe is special mats with grooves and latches.
The polystyrene system has several main advantages:
- The principle of pipe laying is simple. Self-installation of the water circuit is possible in any way. The mats have a special bracket for attaching the pipe with a latch lock that provides the necessary reliable fixation.
- There is no need for additional concrete work. The mats have metal thermo-reflective plates. A red pipe for the supply and a blue pipe for the return are placed in the plates. Fill the top with a special solution. It takes 1-2 days for the surface to dry. You can immediately lay laminate or linoleum, or any other type of floor covering on the floors, which reduces the installation time.
- Speed of installation. The polystyrene method is the most effective technology for fastening water heated floor pipes. There is no need to tie and secure the circuit using mounting tape or harpoons. The fastening brackets are arranged in such a way as to fully comply with the necessary technical requirements. Thus, it is impossible to violate the minimum bending diameter of the pipe, which is a common mistake when laying without mats.
- Maximum heat transfer. Aluminum heat distribution plates are laid on top of the water circuit and inserted into the mats. This device allows you to distribute the resulting heat evenly throughout the room. Alternatively, you can use metal or galvanized heat distribution plates.
How to fasten water floor pipes
The decision on where to attach the pipes is influenced by the chosen method of installing the heating system and the size of the total heated area. For large rooms, it is recommended to use installation panels and ready-made clips. In small rooms you can get by with clamps.
Is it necessary to do pressure testing of a water floor?
As practice shows, this is necessary. It is necessary to pressurize pipes, if only for the reason that installation does not always take place in compliance with the necessary norms and rules. So, often wanting to save money, owners allow the installation of not a solid circuit, but twisting from several parts of the pipe. And, after the finishing coating has been laid and the heating system has been started, it turns out that there are leaks.
When pouring pipes with concrete mixture, pressure testing is extremely important. Pipes under operating pressure expand slightly, and when filled with cement screed in this state, they do not exert pressure on the surrounding screed when the coolant temperature changes.
Pressure testing of a water-heated floor can be done with your own hands. The relatively minor difficulties associated with conducting an audit will fully pay off.
How to pressurize a heated floor
Today, equipment for crimping is no longer a rarity. Moreover, if previously only industrial installations were used for this purpose, now you can purchase a mechanical manual crimping machine.
How is this procedure carried out?
- The hot water supply pipe is connected to the pressure tester. The return remains connected to the water manifold, at which the shut-off valve is closed.
- Pressure testing is carried out with air or water. Using the installation, the pressure in the water circuit rises. Practice shows that it is enough to create a pressure of 5-6 atm.
- The closed water circuit is left for a day with the device connected. This makes it possible to increase the pressure during pressure testing if necessary.
- After a day, the pressure in the system is checked with the previous values. During this time there should be no changes in pressure.
The procedure for testing a heated water floor system includes checking each individual circuit connected to the collector. In the presence of fistulas, localization can be found using a regular stethoscope, or visually by pressure testing with water.