Do you want to please your daughter and give her a doll house? Read how to make a house for Barbie, Monster High with your own hands from cardboard, plywood and MDF.
What girl doesn’t love dolls and doesn’t dream that they have a real house with spacious rooms and furniture? Such a toy will not only entertain the baby, but will also make her director's play more complex and varied. As you know, while playing, children learn and develop, and parents must make an effort to organize the conditions for this development.
Do-it-yourself dollhouse for Barbie: diagram, photo
Of course, there are simpler options for making a doll house for your daughter:
- Buy ready. But they cost exorbitant amounts of money. At the same time, the plastic parts turn out to be fragile, they are poorly attached to each other, and the house constantly falls apart.
- Organize your home in a closet, nightstand or bookcase. Probably, my parents did this themselves in their early childhood. The good thing about this option is that, firstly, there is no need to spend extra money, and secondly, the child will learn to use substitute objects in the game. The downside is that sooner or later the daughter will say that the house is not real, she will want to have something more believable, with wallpaper, windows, etc.
Then mom and dad will have to decide how to make this toy themselves. First of all, decide on the sizes. If the house is intended for a doll like Barbie or Monster High, it will turn out to be oversized. The height of each room will be at least 30 cm, the width, so that you can put a doll bed in the house, 40 cm or more. For baby dolls and toys-figurines, you can make a more compact “housing”.
DIY plywood house for Barbie.
IMPORTANT: In practice, a doll's house takes up space as a full-fledged piece of furniture. Having decided to make one, you need to think about where it will stand in the room.
The next stage is the selection of materials. As a rule, dollhouses are made from:
- Cardboard boxes and cardboard. This is a budget option; you don’t need to spend a lot on purchasing materials. Also, you don’t need to think about what kind of fastenings to assemble the house with; you only need any glue and adhesive tape. The big disadvantage of the house is that it is fragile, hygroscopic, and gets dirty easily. You cannot place heavy furniture on thin shelves. A cardboard doll house is not suitable for small children who do not know how to calculate strength during play.
- Plywood. A more practical and also cheaper option. A sheet of plywood is applied to parts for a toy house with your own hands using an ordinary jigsaw. The toy turns out better. But porous plywood must be painted or glued so that it does not absorb dust and moisture, does not swell, and fungus does not grow in it. Another disadvantage of this material is that thin sheets of plywood are not easy to connect together so that they hold tightly and the house does not fall apart.
- Wood, MDF. The most practical and expensive option. The house will be of very high quality and durable, stable and safe. It will not fall apart, even if a child hangs on it with all his weight. MDF is easy to process, the structural elements are firmly connected to each other with self-tapping screws, and their caps can be recessed into the thickness of the material. MDF gives absolute freedom to house decor ideas.
An interesting dollhouse made of cardboard with lighting.
IMPORTANT: You need to remember that a child will play with the house, and, most likely, this large toy will be in the children's room. Materials for it must be hygienic, environmentally friendly, hypoallergenic, and non-toxic. If after priming or painting the house emits an odor, you need to let it air out.
Beautiful homemade doll house.
Although the house is intended for children from 3 years old, that is, the age at which the director’s play has already been formed, you need to pay attention to the presence of small parts in it that can cause choking. Before you start purchasing materials for a dollhouse and directly move on to assembling it, you need to make a plan or diagram. It will help you calculate how much material you will need to buy. The parts will correspond to each other, they will be firmly connected. A stable and beautiful house for toys will delight the child and will not spoil the interior of the apartment.
Scheme of a doll house with dimensions.
Material selection
Having decided to make a house, parents first think about what material to use. Several types of sources can be used for the design:
- Laminate.
The main advantage of using the material is its durability, which is ensured by its special strength. A house made of laminate holds its shape well when gluing or joining with screws and lends itself to any type of decoration. Instead, other wood options (OSB or chipboard) are sometimes used, but they are less durable.
- Drywall.
The material is durable and cheap, but the structure can break under strong pressure, and the elements can only be fastened together using small self-tapping screws. Often, pieces of drywall remain after repairs, which is why you don’t even have to spend money on buying them.
- Styrofoam.
The use of the material is considered a budget option for making a house. The advantages of polystyrene foam are ease of gluing and very low weight. But compared to other materials, it stands out due to its increased fragility, which is why it was given the title of least reliable.
- Cardboard.
The material is the cheapest. Making houses for Barbie out of cardboard is very simple, and you can even use double-sided tape, without the need for classic glue. The big disadvantage of the design is its fragility. The product can easily tear due to careless actions.
- Textile.
A fabric-based playhouse is convenient because it can be folded and put away in a closet when the child is not playing with it. You can use cardboard to strengthen the walls, which will increase the reliability of the product. But the process of sewing and securing the design can be difficult, especially if the father is doing the work. This option is more suitable for mothers.
- Furniture.
Instead of ordinary materials, you can use old cabinets, chests of drawers or shelves. You only need to do decorative work, making an attractive house out of unnecessary furniture. The downside of this option is the inability to change the shape of the base structure.
You can make a doll house from any materials that seem most attractive. They all have their pros and cons, but they do their job well. However, there is an option that is superior to all others - plywood.
Advantages of plywood
Plywood sheets are made by gluing together several layers of veneer. This is what provides it with special properties that make it stand out against the background of laminate, chipboard and OSB. Plywood is ideal for creating a house with your own hands.
Main advantages:
- beautiful appearance - the top layer of plywood has a pleasant color shade and stands out with a unique textured pattern;
- high strength - the house can last for several years until the child loses interest in it;
- ease of manufacture - it is very simple to assemble the necessary structure, using available tools and materials that are found in almost every home;
- reasonable cost - the price of plywood is quite attractive, and very little of it is required;
- low thermal conductivity - the material always remains warm, which is very important for the child.
All the advantages contribute to such a wide popularity of plywood as the basis for creating a house where little girl dolls will live. When choosing this material, the final result will depend only on the quality of workmanship.
Important! Plywood must be marked E0 or E1, indicating low formaldehyde content. Their volume should not exceed 9 mg per 100 g of material.
How to make a dollhouse from a box?
The girl is really asking for a dollhouse, have you decided to urgently and cheaply make it out of cardboard boxes? Well, then you will need:
- the actual boxes (according to the number of rooms, from 2 to 6 pieces)
- thick cardboard
- scissors
- stationery knife
- ruler
- PVA glue or any other for paper
- paints, colored paper, self-adhesive wallpaper, kitchen oilcloth, corrugated paper, ribbons, braid, bows, other available materials for house decor
IMPORTANT: Any boxes will do, as long as they are the right size and thick enough. For dolls the size of Barbie (29 cm or 31 cm, scale 1:6) or Monster High (26 -28 cm), the most common ones to take are drawers from under household appliances.
A beautiful home for toys made from boxes.
- The boxes are stacked on two floors of two rooms. On the second floor you can also arrange one room and a veranda.
- The boxes are fixed with glue and adhesive tape. To ensure that the parts stick well, use a press made of ordinary clothespins.
- The roof of the house can be made from a box, cut in half diagonally, or cut out from sheets of cardboard.
- Windows are measured, drawn and cut out in the side walls with a utility knife.
- The interior decor of the house is being completed. Ceilings, floors and walls are covered with colored paper, remnants of wallpaper, self-adhesive or oilcloth. You can also make cornices, window sills, baseboards, and other surroundings from available materials.
House for a doll from boxes: tools and materials.
House for a doll from boxes: stages of production.
Manufacturing stages
The dimensions of a DIY Barbie house are of particular importance. They need to be determined before the main work begins, and only then proceed to drawing up a drawing and manufacturing the structure. It is important that the house does not take up too much space in the room, but at the same time its dimensions should provide a certain amount of space. The ceiling level should be made twice as high as the height of the dolls. The depth should be from 30 to 50 cm. The width is determined individually, taking into account the number of rooms.
Preparing a sketch
After determining the dimensions, you should begin creating a sketch. The drawing of the Barbie house should reflect the future layout and dimensions of the main parts. It is very important not to violate the proportions in scale if you need to change the size of one of the components during the work.
What to include in the drawing:
- back wall;
- side walls;
- base;
- floor of each floor;
- interior partitions;
- roof components.
If some parts consist of several separate elements, then each of them should be displayed separately. This is especially true for the roof, since most often it is created from two rectangles that are connected to each other, forming a triangle.
Important! The front wall can be installed as desired. If you refuse it, then it will be much more convenient for the child to play.
Required Tools
You can build a house only if you have the necessary tools. Some of them can be replaced with analogues.
List of tools:
- electric jigsaw;
- wood glue;
- mounting tape;
- self-tapping screws;
- sandpaper;
- roulette;
- ruler;
- pencil.
We must not forget about materials. Plywood should be correctly calculated using a drawing in order to immediately purchase the required quantity and not face a shortage during the work process. In most cases, one sheet measuring 1.5 × 1.5 m will be enough. For decoration, you need to prepare a special self-adhesive film, wallpaper scraps, cardboard, paint and various parts for creating furniture. It is advisable to purchase special legs so as not to spoil the floor covering and make the house more stable.
Image transfer
Using the created dollhouse diagram with your own hands, you need to transfer the parts to plywood. It is important to maintain clarity of lines and the ratio of all sides. To do this you will need to use a ruler and pencil. When transferring a drawing, it is recommended to save space and place elements close to each other.
At this stage you need to draw windows and doors on the house. Their dimensions and location should be measured so that they have the same appearance in all rooms. It is important to take into account the location of the furniture to eliminate the possibility of blocking window openings. If the house does not have a front wall, then you can refuse to cut out windows.
Assembly
When the drawings are transferred to plywood, you can proceed to the main stage. It includes cutting out the parts and assembling the house itself. It is important to do everything carefully so as not to encounter the need to prepare the elements again.
Step by step steps:
- Use a jigsaw to cut out the elements transferred to plywood from the drawings, and windows and doors. Sand all edges with sandpaper until completely smooth.
- Connect the base of the structure with the side walls using glue, tape or self-tapping screws. In the first two cases, you can glue the internal corners with slats.
- Fix the floors inside the structure, as well as interior partitions, using the same connection methods.
- Create a ladder by gluing it from a wooden ruler cut into rectangles or by gluing accordion-folded cardboard onto a stick and install it.
- Secure the back wall by connecting it to the main structure. Assemble a roof from two slopes or several elements in the form of tiles. You can use cardboard.
After assembly, the house must be left for several days so that the glue sets and the structure acquires the necessary strength. If the elements are connected using self-tapping screws, then no waiting is required.
Important! The gable roof needs to be strengthened with a special partition, which will need to be installed at the junction of the two main elements.
Window and door decoration
The windows and doors of the finished house must be decorated. If desired, they can be made swinging. To do this, you need to attach thin plywood to the cardboard base and install it on small metal door hinges. It is allowed to cover the windows with regular cardboard with a pattern. The child will be especially interested in wire bolts, which can be used to close doors.
Internal passages between rooms can be closed with special curtains. It is enough to cut a small piece from a beautiful fabric and secure it in the doorways. It is permissible to use other options that your imagination suggests.
Furniture and decor
Creating furniture and decorating is the most interesting stage in creating a house, which will arouse genuine interest in any girl. There are no instructions for this, and everything depends solely on the child’s imagination.
First you need to decide what will be used for the main finishing. You will have to choose between wallpaper and paint. In the first case, it is recommended to use wallpaper without a pattern, since large patterns will look rather ridiculous. The paint you should choose is one that is approved for use in children's toys. A more unusual design can be made using cardboard, special film, pieces of fabric, beads, artificial flowers and various boxes. They are also suitable for creating furniture and objects that should be arranged immediately after assembly.
How to make a doll house with your own hands from cardboard?
Parts for a doll house can be cut out of thick cardboard, perhaps all from the same boxes of household appliances. Here you definitely need a drawing, for example, like this:
Cardboard house diagram for Barbie.
This house will look like this.
You will need:
- cardboard
- scheme
- pencil and ruler
- glue, tape, electrical tape
- stationery knife
- paints, felt-tip pens, old wallpaper, oilcloth, corrugated paper for decorating the interior and exterior of a house
Three-story toy house made of cardboard.
- The drawing is drawn or found on the Internet and printed. The details of the house are cut out.
- Make markings on cardboard. It is better to cut cardboard parts not with scissors, but with a knife, then their edges will be smooth.
- Sections that will not join together can be trimmed with tape or tape.
- The cut out parts of the house are assembled into grooves or glued together.
- Create the interior decoration of the house. If mom and dad are creative, they can paint the house by hand.
A simple cardboard house.
Cardboard house for toys.
Cardboard house.
A house made of cardboard, assembled into grooves.
Cardboard house for small toys with a drawing.
Interior design - toy furniture and decor
Interior design is a real holiday for a girl, so it’s worth inviting her to help with interior design and furniture making. The latter can also be very diverse. The most affordable option is cardboard.
Everything that is in the house will be used for finishing:
- wallpaper remnants;
- pieces of fabric;
- beads;
- artificial flowers;
- toothpicks;
- cardboard boxes and so on.
Everything depends only on the imagination of the manufacturer. You can make beautiful curtains, bedspreads, tablecloths, even pictures for the walls yourself. This will not take much time, but it will be fun and will help to attract the girl to housework and sewing.
Video tutorial on creating furniture from plywood:
Video tutorial on creating foam furniture:
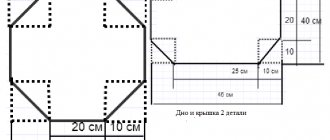
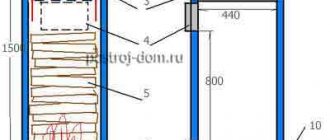
Drawing of a plywood dollhouse with dimensions
Making houses out of plywood is no longer so easy. Most likely, mom can’t cope alone. You need to attract dad, the little princess will definitely thank him for the unique toy with her incomparable happy smile. To make a house for Barbie prepare:
- plywood
- jigsaw
- hammer
- sandpaper
- wood glue or PVA
- masking tape
- nails
- wood primer, paint
- scissors, pencil, ruler
- materials for house interior decoration
Drawing of a dollhouse made of plywood.
Assembly diagram for a plywood dollhouse.
The final version of assembling a dollhouse from plywood.
- The details of the house are very carefully cut out of plywood. They must correspond exactly to the drawing. Window and door openings are also cut out, if provided. Windows can be made rectangular, round or triangular.
- All plywood parts are carefully sanded with sandpaper to prevent the child from driving in a splinter while playing.
- The parts of the house are connected using construction glue, PVA glue or nailed together. It is necessary to make a reservation: a glue gun with silicone will not hold plywood.
- Prime and paint the plywood.
- They think over and create the interior of a dollhouse. The walls in the rooms can be hand-painted, painted in one color, decorated with leftover wallpaper or wrapping paper.
- The floor is also painted, pieces of carpet are laid on it, etc. It is recommended to make a staircase to a two-story house for dolls from wooden rulers cut to size.
- Any furniture for a plywood house will be available - purchased specifically for dolls in toy stores, made with your own hands from cardboard, the same plywood, or improvised means.
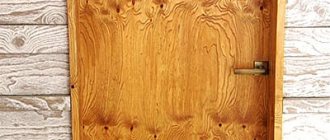
Making a house for Barbie from plywood: stage 1.
Making a house for Barbie from plywood: stage 2.
Making a house for Barbie from plywood: stage 3.
Making a house for Barbie from plywood: the back side.
Making a house for Barbie from plywood: rooms.
Furniture
Of course, dolls simply need furniture! And playing with an empty house is not interesting. What can you think of?
Bedroom furniture
Bedroom furniture can be made from paper using the origami technique, glued from cardboard and laid out, but the most comfortable and beautiful option is upholstered furniture made from cardboard, foam rubber and fabric. You can glue everything using regular PVA, although it will take a long time to dry. Instead of foam rubber, you can take padding polyester or batting, or in extreme cases, cotton wool.
Bed MK
Step-by-step photos of production - enlarge when clicked:
Armchairs
Photos enlarge by click
Kitchen
The kitchen can be filled with a refrigerator, stove, countertop, beautiful chandelier and dining table. Cardboard and ice cream sticks are also suitable materials.
If you have a 3D pen, you can make furniture out of plastic.
Cardboard plate
Lockers
Cabinets, shelves, and a refrigerator are simply made from cardboard. Easy to glue with hot glue.
Furniture for kitchen
Furniture - chairs, a table - very beautiful ones made from ice cream sticks. You can cut such sticks with large scissors, but be careful, they can crack in half. You can glue with instant or hot glue.
Little things for the kitchen
You can put a bird in a cage in the kitchen, or put a box of fruit or flowers. Detailed master classes in the photo. Enlarge on click.
Fruits, vegetables, dishes
The easiest way to make fruits, vegetables, and dishes is from plasticine . To prevent the product from getting dirty and losing its shape, it is coated with transparent nail polish.
You can make vegetables from salt dough - they dry out and look like they came from a toy store. Play do is also used to make food, but my play do cracks after it dries. Therefore, I prefer to make salt dough: 1 glass of flour + 1 glass of fine salt + water, knead a very stiff dough.
Also a very good option - air self-hardening plasticine (new material). It is cheap, bright, and when it hardens it is elastic, somewhat similar to hard rubber. We sculpt as from ordinary plasticine and leave to dry overnight.
Do-it-yourself wooden doll house: drawings and dimensions
A girl from 3 to 10-12 years old will play with a dollhouse. This toy, if it is beautiful and of high quality, will stand in the house for many years, constantly delighting the baby and surprising guests. It is definitely worth the effort and investment. Therefore, the best option would be to make it from MDF.
- At the first stage of work, the design of the house is thought out. You need to decide on the size, number of rooms, their shape, and roof configuration. A universal solution is a two-story house with 4 rooms with a pitched roof and an attic.
- For such a house you need the main parts: a back wall, two side walls, two planks for the ceilings of the first and second floors, two vertical lintels between rooms, a plank for the roof slope. It is better to order cutting of these parts from a furniture or carpentry workshop. MDF of the same thickness is used for all of them. Or you can make the back wall and sides, that is, the load-bearing parts of the structure, thicker, and the rest, the auxiliary ones, thinner.
- Window openings are cut in the side walls, and, if desired, in the back walls.
- It is better to order window frames laser cut, then they will turn out perfectly smooth and already trimmed. MDF is a heavy material; glue or ordinary screws will not take it. The parts of the house are connected with self-tapping screws. The caps are sunk into the material and then masked with shavings and glue or polymer clay.
- The attic with a round window looks beautiful on the roof. It is also better to order it laser cut. The plywood attic is attached to the roof of the house using glue.
- To imitate tiles and beautifully decorate the roof, buy thin bamboo roller blinds, cut them to the size of the slope and glue them onto it. The attic is decorated in the same way. If the roller blinds are on one thread, they may fall apart when cut. Then they need to be pre-glued with regular PVA.
- It is convenient to mount the roof of the house on hinges so that it can open. In the “attic” it will then be possible to store the dolls and their dowry.
- Window frames are placed in the openings.
- Next, we move on to decorating the walls. The simplest thing is to prime them and paint them one color. You can also make an imitation of brickwork. The bricks are first marked with a pencil, then cut out with a wood router. MDF is primed and painted in the desired color. After the soil has dried, the recesses between the bricks are marked out using a simple pencil or marker. To make the masonry look natural, the heterogeneity of color is created using crayons.
- “Bricks” of different sizes are cut out of porous egg trays and glued around the windows.
- The exterior decor of the house is completed with artificial small flowers. They are glued at the base of the side walls, on the roof and attic.
- The ceilings and floors of the house are painted in the desired colors.
- The Barbie doll is a conventional model of a person 1 to 6, respectively, and her house. Scraps of old wallpaper or gift paper will look rough in it. A good solution is for everyone to find wallpaper with a design they like on the Internet, reduce it proportionally in a photo editor and print it in a printing house. It is important to choose good paper. A regular Xerox machine will soon be worn out, glue may appear on it, or it will wrinkle during pasting. Photo paper may not adhere well. Wallpaper is glued using PVA.
Blanks for a dollhouse made of MDF.
Window markings.
Assembled house frame.
Laser cut window frames.
Round attic window.
Attic on the roof.
Design of window openings and imitation brick.
Wallpaper 1:6 in a children's doll's room.
House interior decoration.
Finished roof with imitation tiles and flowers.
The girl will play in such a house for hours.
IMPORTANT: The girl will play in the Barbie house for a long time. To make it more comfortable for her, it is better to make it on a leg. The raised design above the floor also makes the toy easier to clean.
How to make a doll house for monster high with your own hands?
Moms and dads have mixed feelings about Monster High dolls. Some people can’t stand them and consider them crippling to the child’s psyche. Others are inclined to think that stylish monsters stimulate a child’s cognitive interest in myths and legends, and also raise his self-esteem. Be that as it may, girls love monster dolls. And at some point, the daughter may ask her parents to make her a house for them.
House for Monster High from whatnot.
IMPORTANT: The dimensions and design of the Monster High house are different from what is intended for Barbie. But you will have to tinker with the finishing.
- Before you decorate a house for monsters, you should learn more about the Gothic style.
- Monster High likes an interesting color palette: they combine gloomy black with rich pink, fuchsia, neon yellow and green. The same combination of colors should be used in the interior of the doll house.
- You need to think about how to play up the glitter and black lace. There should be gold and silver in the monsters' rooms.
- The interior of the Monster High doll house is also complemented by elements that imitate artistic forging: chandeliers, candelabra, fireplace grates, stair railings.
- Monster High symbols are used in the interior and exterior of the house.
House with Monster High symbols.
Interior in the Monster High house.
House - panorama for Monster High dolls.
How to make light in a dollhouse?
A toy house will look just like a real one if you make light in it. Thanks to master classes on the Internet, you don't need to be an electrician for everything to work.
Lighting in a doll's house.
Typically, lighting for doll rooms is done:
- from Christmas garland
- from flashlights
- from LEDs
The lighting can be powered from a general network or from batteries.
Light bulb in a doll's house.
Wiring in a doll house.
Doll house lighting diagram.
Lighting
Making lighting in the house seems almost impossible, because connecting to the network and the presence of wires is far from safe. Especially if the home is made of wood or cardboard. In the event of a short circuit, a fire may occur.
However, there is a simple, safe solution - small LED bulbs that run on batteries. Their voltage is very low, and fastening is simple - using double-sided tape.
Making a dollhouse is a fascinating and long process in which not only parents, but also their children should participate. Even a small child can make small parts or hold tools. At the same time, working together brings people together, and children will learn the acquired skills much faster and the process will be interesting.