In modern apartments and houses, hallways often have non-standard shapes and sizes, so skillful owners have a desire to make a hanger themselves.
The idea is attractive because the design will best suit the needs and interior of the room. At dachas and country cottages, a hanger made by yourself from wood will also be in demand in the bathhouse and auxiliary outbuildings, where you can leave a working set of clothes, raincoats, capes, and towels.
Types of design and construction
The appearance of the structure itself is very important in the interior of a room. It should not only fit into the overall concept, but also be pleasing to the eye. A special atmosphere in the hallway will be created by wooden wall hangers made from improvised materials with your own hands. To make them, you don’t have to be a master - just show a little creativity, imagination and desire to create.
A wooden hanger made by yourself will look attractive and original, which guests will certainly notice.
You can make the device from any available materials: wire, perfume caps, bottle caps. Also from natural materials, be it an original tree branch or antlers of a deer or elk.
The creator does not need any special skills - anyone can do it.
Before making a hanger, you need to pay attention to the features of the hallway and its shape. For simple rooms, any model is suitable. If the corridor is long enough, it is better to give preference to a long hanger.
The simplest and most common type of construction is considered to be a wooden board with hooks located on it, attached to the wall of the room. There may be shelves designed for hats.
The base of the structure can be made of two or three smaller boards fastened together.
Wooden wall hangers are used not only in the hallway, but also in the bathroom, children's room or kitchen. To add creativity to the interior, you can do it yourself.
The main requirements are strength, lightness, simplicity, compactness, and availability of materials.
Depending on the type of installation, the structure can be ceiling, wall or mobile.
In the wall-mounted version of a do-it-yourself wooden clothes hanger, it is possible to use a corner design. A floor-mounted device can hold more weight than a wall-mounted one. But it should be borne in mind that the floor structure takes up a lot of usable space, so they are not used in the bathroom or kitchen.
An integral part of any corridor, as well as an item that is simply necessary in every apartment.
Additional recommendations
To avoid making mistakes when making a wooden hanger, you need to follow the recommendations of experienced specialists:
- all holes for dowels must be made in stages, that is, gradually;
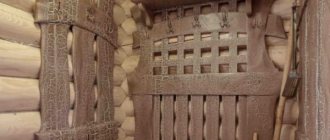
Cedar bath hanger
- to mark centers as accurately as possible, use thin nails;
- be sure to treat the wooden structure with water-based varnish to extend its service life;
- Regardless of the type, the hanger can be made in almost any size. You just need to follow the assembly algorithm;
- You can complement the interior with a wooden bench installed under the hanger. This will make the room more cozy and comfortable.
Sign-hanger for a bath
Having studied all the above instructions in detail, you can forever discard the idea of coat hooks that are simply nailed to the wall in the bathhouse. They can be replaced with a unique hanger made by yourself.
Wooden hanger and example of a drawing of the device
If you want to show your creativity, you can combine different options. For example, you can design a wall hanger with reinforced, supplemented floor support. You can also create an excellent design for the nursery by making the main part in the form of a cloud or a tree.
An original do-it-yourself fence or antlers hanger will fit into the hallway.
These devices are divided according to the type of hanging clothes:
- with hooks;
- with a barbell under the shoulders.
In the first case, a hanger with hooks takes up less space, but clothes on it may wrinkle. In the second, you can hang any outfit on hangers, and at the same time it will remain neat and not wrinkled.
You can build a wall hanger yourself using all the necessary tools.
The product can be given an original appearance and completeness using various decoration methods:
- decorate with decoupage;
- cover with craquelure or glissal;
- paint.
The material option may be different, the best of course is wood.
First, using a wire brush, you need to clean the wooden surface of the hanger from dirt, dust and grease. After cleaning, using a spray bottle or roller, you need to apply a layer of primer, very carefully filling all the cracks.
Using the decoupage method, it is possible to create products that will fit original into any interior.
You can recreate pattern elements on furniture with an antique effect.
For work, use blanks with drawings and scissors. The wrong side of the picture is smeared with glue and placed on a wooden surface and leveled to avoid the formation of air bubbles. After the glue has dried, the surface of the product is coated with furniture varnish. It is better to complete the work using craquelure.
There are more interesting options for this craft.
Glizal is a transparent paint that forms a textured surface. It is diluted with water and applied to the surface using a textured sponge, creating the desired pattern. This must be done quickly, as everything will harden within half an hour.
Craquelure is a type of varnish that is used to achieve the effect of artificially aging wood.
Floor and wall hangers are considered a kind of classic.
Making the lower part
First of all, you need to start making the cross. Cut the prepared bars in half, sand them to remove burrs, and connect them at right angles. For a tighter connection, use a chisel to select indentations on the elements of the cross across the entire width of the block. Having connected the selected areas, you will see that they are fastened together. Next, using a fitting, cut out 4 bars - supports for the trunk of the product. You screw them with self-tapping screws to the legs and trunk.
Useful tips:
- Before you start screwing in the screw, drill a hole with a drill. In this way, it will be possible to avoid the appearance of small cracks in the wood, which will shorten the service life of the product.
- The diameter of the drill must be smaller than that of the self-tapping screw.
- Fill the holes with glue, and only then screw in the screw.
Glue rubber to the finished bottom part, make sure that the product does not slip.
Materials and tools for work
The necessary equipment for a homemade wooden hanger can be purchased at any hardware store.
We are preparing a board that will serve as a wall hanger.
Arsenal of tools:
- grinder saw;
- screwdriver or drill;
- dowels;
- self-tapping screws;
- screwdriver;
- level, pencil, tape measure;
- sandpaper;
- hooks, magnets, suction cups, glue;
- jigsaw;
- material for making hangers.
Depending on its condition, we bring it into ideal shape. If necessary, we sand and varnish.
For decoration you will need:
- craquelure or glisal varnish;
- blank drawings for decoupage;
- glue and textured sponge;
- paint brush or roller;
- primer.
Material selection
In order for the manufactured structure to be durable and of high quality, the choice of material from which it will be made must be approached with all responsibility. Let's consider the main criteria for choosing wood:
- for the hanger in the dressing room, it is imperative to use wood so that the clothes and wet linen that are hung on them are not stained by rust that has arisen on the metal structure;
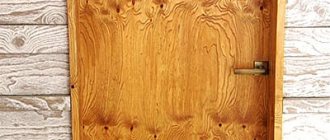
The hanger in the bath must be wooden
- choose wood that has low thermal conductivity. This is necessary to protect the skin from possible burns, because the temperature in the bathhouse is very high;
- It is advisable to use hardwood to make the hanger. They are more suitable for use at high temperatures;
- all wooden elements must be processed so that there are no irregularities or burrs on the surface;
- for work you will need only high-quality boards that do not have even the slightest traces of rotting;
- If possible, use hardwood to make the hanger. They are more durable and can last much longer.
Give preference to hard wood
Diagram of a simple wooden hanger
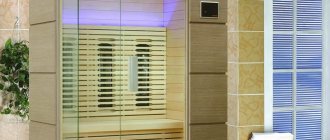
Shelf for a bath hanger
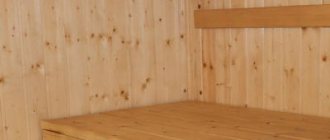
Construction boards
Wooden wall hanger: manufacturing
A wall hanger is a fairly simple design. However, you need to take its creation very seriously, and then it will last a long time.
Additionally, there is an option to make a shelf so that you can place a scarf, hat, and other small things there.
The base for the hanger should be chosen from dry, strong wood without cracks. An excellent option is a board or edged timber.
The length of the workpiece must correspond to the length of the structure. To begin with, the wood is treated with an antiseptic. Then it should be treated, for example, with sandpaper to avoid splinters during operation. Afterwards, hooks are attached to the panel in two or rows.
Using different types of hooks you can emphasize a particular interior style.
In the photo you can see drawings for a hanger in the hallway.
Drawing of a wall hanger.
This design is suitable for a hallway, bedroom, pantry or bathhouse. And if you decorate the hanger with images of your favorite fairy-tale or cartoon characters, it will become an excellent addition to the children's room, and children will be happy to look after their clothes.
The word “wood” often means not just wooden material, but pieces of real natural wood.
You should not attach the hanger to a wall covered with plaster, so as not to stain your clothes. It is better to place a sheet of plywood, polyethylene or thick paper under it.
If you approach the creation process creatively, the panel can be made in the form of a sun, heart, oval or wave. Use spools of thread, dry branches or roots as homemade hanger hooks. The finished product is varnished.
Painting and varnishing
Any procedures with paint and varnish products can only be carried out with gloves.
The first layer of varnish should be uniformly thin; carefully ensure that the product is evenly distributed over the surface. Then wait for it to dry completely, after which the varnishing must be repeated.
The hanger is almost ready. If you wish, you can burn out a decorative ornament or design on some parts before the varnishing stage. If it is necessary to complete the work in a short time, purchase ready-made decor from thin plywood and glue it onto the surface of the wood.
To achieve complete harmony with the interior of the room and satisfy functional needs, you should think in advance what will be better in your case - varnish or paint. There is a huge selection of paints and varnishes for wood on sale, which indicate the operating conditions of the coatings. Read them carefully; it is apparently not worth varnishing a bath product, but rather painting it. A hanger for the hall in the house will look great in a varnished state, especially since the tone of the composition can be selected with precision.
DIY wardrobe hanger hanger
When making a coat hanger for your closet with your own hands, you will need large-section wire, a small plastic bottle placed on a wire base, a metal plate bent at the corners, and a cut-off branch of a suitable shape.
The hanger will undoubtedly attract attention and also brighten up the boring atmosphere of the room.
First you need to wrap the base of the hanger using thin foam rubber. Then cover this base with fabric of a matching color. Then they pick up a hook and hang it in the closet. You can decorate a children's hanger with your own hands using a funny face or decorate it with ribbons and lace.
From tassels
The idea to make hooks from brushes came to designer Dominic Wilcox when he remembered leaving painting tools in paint after work, only to find them frozen and unusable the next day. Well, brushes with curved bristles can still serve in the household. To make these, you'll need curing paint or some reliable glue.
Plywood coat hanger
There are many different ways to make DIY clothes hangers. This design can be made in half an hour.
For a hanger made of plywood, you will need: whatman paper, sandpaper, a pencil and a jigsaw, and the material itself.
A drawing is made on a sheet of A2 size. The width of the hangers is 40 cm, it is better to use plywood with a thickness of 15 mm.
It is necessary to cut out a template, which is then transferred to a plywood sheet. After this, the pattern applied to the plywood is cut out with a jigsaw. The resulting workpiece is treated with sandpaper - first coarse, then fine.
The finished chipboard hanger can be varnished.
Sample
First you need to put the idea on paper, make an accurate drawing, taking into account the size of the boards and the specifics of the project. Then the resulting template should be carefully transferred to the boards and outlined with a pencil. Sketches of products are presented in large quantities in virtual sources, from which you can take only an idea or print a ready-made template on a plotter, if one is within reach.
The most accessible and simplest is the rectangular shape. A more intricate wooden wall base for hooks will have to be cut out. You should not choose too complex templates, especially for a novice master.
From perforated sheet by yourself
A hanger made of perforated sheet will, in every sense, reflect the phrase “I can also cross-stitch.” It will reveal talent and creativity and will become an original decoration for your home.
Materials for production:
- metal or plastic panel with perforation;
- hooks (4 pieces);
- multi-colored floss threads (you can use yarn for knitting);
- scissors.
Perforated sheets can be purchased at any construction or furniture store.
Material of the required size is purchased and cross stitch is performed using embroidery threads. A simple drawing or a word you like will do. The main thing is to calculate everything correctly so that the spaces between the letters are the same, and also not to go beyond the contours of the sheet. After completing the embroidery, you need to secure the hooks in the finished holes of the panel. All that remains is to hang the hanger, again using the already prepared holes in the panel.
Demonstration of work
Well, now, I will demonstrate the operation of this device.
For this, in addition to the device itself, I will need the following accessories:
Materials and tools
Materials:
- Steel wire with a diameter of 3 mm.
Tools:
- The device itself with two nails with a diameter of 4 mm:
- Clamp;
- Electric drill with a device for rounding wire ends;
- Hammer with anvil;
- Pliers.
Extraordinary ideas for a wooden hanger
Based on the technology of making a hanger from scrap materials, we can derive a single formula for the creativity of creation. The base can consist of any elements - from a finished board to the use of old items.
It is not necessary to buy standard factory hooks for hangers - you can make them yourself from improvised materials or remove them from clothes hangers.
Attached individual hooks on the wall should look like decorative elements.
Hangers for children's clothes in the shape of animal figures can be cut out of plywood (chipboard) with a jigsaw with your own hands and painted with bright colors and decorated with applique.
Old or broken toys can be repurposed to make hooks. This hanger can be made using a couple of screws and a glue gun. It will decorate the hallway or children's room.
Perfume lovers can use caps from any perfume as hooks on a hanger.
This hanger is a very creative solution.
Sea pebbles, which are usually brought from the sea and then don’t know where to put them, will look very stylish on the wall. To assemble such a hanger as easily as possible you will need: a board, screws and metal cylinders (should be a little wider and a little shorter than the screws). They must be inserted into the cylinders and screwed into the base of the board. Then universal glue is applied to the screw heads and the stones are glued.
Scandinavian-style wooden hanger hooks can be made from thick forked branches, collected from the park or yard. Such designs are perfect for scarves and hats.
There is nothing easier than picking up a few screws and attaching several wooden spools of old thread to the board.
Give your cutlery a second life and yourself a wonderful, unusual hanger.
An excellent solution for homemade hooks is to use old wrenches. True, in order to bend them, you will first have to heat them red-hot over a fire. A hanger with such hooks will be an excellent decor for a garage or technical station.
Before you start making a new hanger, you should pay attention to the interior style of the hallway or room. Using different types of hooks, you can enhance the emphasis. An extraordinary hanger will undoubtedly attract attention and become a decoration of the room.
Hook options and wall mounting
The final stage is perhaps the most important, because the meaning of the idea is lost without hooks and reliable fastening of the entire structure to the wall.
There are many possibilities for making hooks, ranging from a variety of ready-made products made from metal alloys and wood to homemade devices made from hemp, metal staples, and leftovers from wooden coat hangers.
If a wall hanger is planned to be used in outbuildings to place garden tools, then a rake is sometimes secured with the teeth up as a set of hooks. It turns out powerful, reliable and durable.
The finished wooden structure is nailed or fixed to the wall using a drill or hammer drill.
Installation of any hooks and the final fastening of the hanger are usually easy to do using ordinary tools (screws, dowels, drills), sometimes you may additionally need universal glue. After assembly and the glue has completely dried, test hang a load with the maximum planned weight and observe the hanger. Surely the result will please you, the product will serve for a long time and reliably.
Types of hooks
Accessories for hangers can be made from a wide variety of materials and differ from each other in appearance and size. A hanger hook should not only have an attractive design, but also be of high quality.
When choosing hooks, purchase only those parts that will not lose their original appearance even after long-term use.
When purchasing furniture hooks, you need to consider their main characteristics:
- dimensions that must correspond to the furniture where the products will be attached;
- the number of horns, on which the versatility of the hook depends;
- method of fastening accessories. So, some parts are simply glued, while others will require more serious installation using self-tapping screws;
- color design, which must match the style of the hanger and the room itself where it is located;
- material. Most often, aluminum hooks are purchased, which do not deform when used and retain their original appearance;
- design. Coat hooks should be selected so that they are combined with the main furniture fittings.
Furniture hooks have different designs
The process of creating and installing bathroom holders
Making a towel holder with your own hands is quite simple, provided you follow the basic rules and carry out competent calculations. Many will think, why fool yourself trying to create such a product if the shelves of modern stores are replete with a variety of towel holders? The main advantage of a hanger created by yourself is originality and individuality. In addition, this is a great opportunity to save your family budget. Even a novice designer can build a simple towel holder, so why not show off your creativity?
To work, you will need some available materials, as well as a tubular structure - a solid metal tube that is used to create various furniture. Other necessary tools include: fasteners, connectors and tube plugs.
As for the methods of attaching towel holders, there are 3 of them:
- Open. These are ordinary holes in the strip with hangers, allowing you to install a self-tapping screw into the wall. The process of installing such structures is quite simple: you need to attach the hanger to the wall, mark the holes with a pencil, drill them, install plastic plugs in them and tighten the fastener.
- Hidden. This option is the most popular. In this case, an embedded structural part is used, which is attached using a method similar to that described above, only the hanger is put directly on the pipe and secured with a decorative screw.
- Suction cup or Velcro. This option is mainly used for plastic holders. It is less popular, since neither the suction cup nor the Velcro can withstand heavy weight. For this reason, the bar with hangers of this type is made in the form of a single hook, designed for a single towel.
When you decide to make your own towel holder, it is best to choose an open mounting method. Stage 1 involves the installation of fasteners, which must be placed horizontally. Stage 2 consists of installing identical sections of pipes with connectors at the end, which should be at an angle of 90 degrees. At stage 3, you need to insert the tube into the connectors and secure it with screws, and put plugs on them.
Types of bathroom towel holders
The interior of a bathroom will not be complete without a towel holder - a necessary part for daily use, which must be correctly, conveniently and securely attached. Today, there are a variety of options for towel hangers. Standard and universal models are replaced by creative design solutions, which, in addition to their practical function, also perform a decorative one, setting the tone for the entire interior of the room.
Towel hangers are:
- Over the door. Often, such devices are used when there is no free space on the floor and walls. The best option would be to attach a strip with several hooks to the door. A good alternative to hooks is a ring towel holder, which can also be installed on the door.
- Floor-standing. Such structures can be mobile or stationary. We are talking about racks with many holders. The main materials used to make floor towel racks are metal and plastic.
- Wall-mounted. This type of towel holder is the most common. This is due to the fact that in every bathroom there is a place to place towel holders on the wall. Wall hangers are usually made in the form of tubes and a pinwheel. The first option ensures faster drying of fabric items.
In addition, modern designers have come up with a type of towel holder called a half-chair. That is, the back of the chair is attached to the wall with its front part, while at the same time there is no seat in front. On the back of a chair with several openings, you can hang as many towels as you can install slats in the form of wooden strips. This type of wooden furniture, coated with special anti-water paint emulsions, was created almost recently and is suitable for the interior of spacious and modern bathrooms. Thanks to the paint coatings, fumes and moisture are not a problem for the “chair back” hanger.