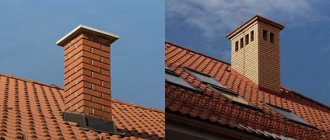
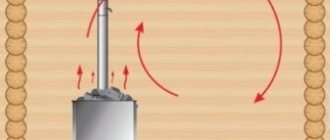
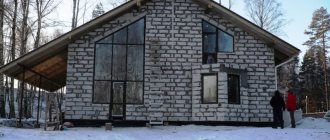
In the bathhouse at Kolchin in Kuznetsy, the stove is brick
06/27/2012. village Blacksmiths (Pavel Posad).
Evgeny Kolchin, a real and big fan of the bathhouse, is waiting for me on the porch of his own bathhouse.
The weather is fine, sunny. Nearby there is a forest and a lake. In the lake there is a boat, ducks, fish. In short - hunting and fishing, mushrooms and berries - just 2 steps from the bathhouse.
It’s been a while since I picked up checkers in this area.
1. Summer kitchen - barbecue. There is an umbrella with a design on the pipe. British lawn.
2. Key mode in the bath: T=53-60°C, A=50-65%. Evgeniy is a supporter of a moderate, mild healing climate in the sauna. Extreme is no use.
The powerful oven maintained a stable temperature with a smaller gradient in height.
Evgeniy is a fan of dousing the walls to obtain moisture in the sauna (they doused them with cold water). At the same time, the heat of the stones is saved and a mild climate is achieved. I completely agree with him.
While I was hanging and setting up the devices, I was sweating profusely under the influence of the pleasant elastic warmth of the stove..
Rice. 3. Fragment of recording by a new sensor (up to T=125C) of indicators in the sauna.
The change in time step occurs at times when the comp. “fell asleep” (when they went to CO) and the recording stopped.
Raises of the burgundy line occur when steam is supplied (and T rises) or when walls are poured (T decreases). Some small jumps down occurred during calibration (subtracted 2-5 units).
Because the steam room is new, some of the steam went into the gap between the pipe and the ceiling. And part of the steam goes into the pipe through an incompletely closed valve. We saw this at the end when I poured a lot of about 1 liter of water on the stones, but the humidity did not rise, and the temperature dropped a couple of degrees. (:-( Similarly, with the doors not tightly closed (there are only 4 of them one after the other), the steam quickly disappeared, but even with this the steam was wonderful.
Calibration was done using the DVT-03 device (up to T = 120C, manual recording). We were debugging a new meter and measurement channel. Due to this, not everything provided is suitable for work.
4 . The interior of the bathhouse is a relaxation room, a dressing room with a warm stove wall (there will be a bed and the possibility of gentle heating from the stove), a dressing room with a font, a steam room. The floor is a tile with a drain, heated from the stove to 45-55°C. Ceiling - 68°C (difference of about 15° per 2.4 m is good). The top of the stove is about 90°C, the walls are 65-67°C.
5 . The stove is brick. Above the door there is a curtain made of a blanket so that the steam does not escape when the door is opened. Very comfortable look.
6. Temperature distribution on the surface of a brick stove at the beginning of steaming. It remained approximately the same after 3 hours.
7. The shelves at the bottom are not “wired” - easy to clean. We also checked a bunch of household thermometers and hygrometers.
8 . Evgeniy likes to drink delicious (green) tea in the sauna in a light steam. He made extremely tasty steam - three varieties: with garlic; with mint; and, of course, wormwood.
Plus, in one situation, he dropped some anise drops on my hat. Until then, the aroma of anise lingers throughout the apartment, which overpowers the less pleasant aroma of wool.
There were many measuring instruments. Electronic, alcohol thermometer, hygrometers and thermometers with a spring bimorph element and with a thread. They all work differently and show different humidity levels in a wide variety of ranges. Thanks to this, it makes sense to calibrate home hygrometers, for example, at T=60 and A=50%. Then in the range of interest to us (60C x 60%), the difference is minimal
9. A font with fresh water from the lake. Easy to empty and very easy to fill. It's essentially a dip in a lake.
10. And, of course, in addition to temperature and humidity, health was measured - before and after the sauna (cardiogram recording). With this information, you need to go to a cardiologist to understand the effect of the bath on your health. Previous measurements using a cardiovisor and angioscan showed severe stress on the body.
11. The side meter did not want to stay on the body for long and moved away. I had to duplicate measurements.
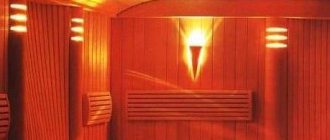
In general, the atmosphere was calm, peaceful, and relaxing. Because heat affects understanding (demagnetizes), something was forgotten - both distant events and momentary ones (for example, the furnace valve). But there was time and opportunity to appreciate the comfort of the bathhouse and sauna. It’s small, the shelves are wide, the burgundy hot stove is a meter away from me. Comfortable, like being in a walnut shell. Pleasant hot tea, greenery outside the window, clean air. Well, my favorite thing - I understood how hygrometers of different designs behave. Sergei had a similar cozy atmosphere in Priozersk on Ladoga.
And when the test takes place in a crowd of talkative and excited bathhouse fans entering and exiting the steam room, when knowledgeable people are waving brooms and knocking down appliances - this is a completely different song. “I don’t need that kind of hockey!”
Types of adhesives and solutions for lining furnaces
The facing adhesive can be one-component - for laying tiles without cutting joints, and two-component - respectively, for laying tiles with cutting joints. Based on their properties, adhesives are divided into heat-resistant and heat-resistant.
The term “heat-resistant” describes compositions that can withstand thermal cycles with temperature fluctuations of no less than 150⁰C. Only compositions that can withstand prolonged heating of 500⁰C are called heat-resistant. For stove cladding, only heat-resistant adhesives are used; for fireplaces, heat-resistant adhesives are acceptable.
For fireplace linings, domestically produced compositions have been tested in practice - Moment-Crystal, Vetonit Weber, Plitonit SuperKamin and others. Among the recognizable import brands is Ceresit-SM. For a decorative fireplace that is lit only periodically, these compositions are quite suitable, but heat-resistant compositions are required for stoves. For example, a two-component composition K-77 with a primer of the same name, which has a high load-bearing capacity. Complete hardening of the composition occurs after three to four weeks, and it is unacceptable to start the accelerating firebox before the curing period of the glue has expired. When this facing composition gains strength, the room temperature should be within 18-28⁰C. There are special compositions for terracotta and majolica. The market offers quite a lot of heat-resistant and heat-resistant compounds, and you should carefully study the scope of application and follow the recommendations indicated on the packaging.
It is also possible to lay tiles on clay mortars filled with quartz sand or sawdust.
When using clays, it is important to choose the correct proportion depending on the fat content of the clays, so that the solution is sufficiently plastic, but does not subsequently crack. Filler/clay proportions for fatty clays 4:1, for normal clays 3:1, for lean clays 2.5:1
In addition to fillers, fireclay powders are added to clay solutions to increase resistance to high temperatures and changes, this is especially justified in the case of a coal furnace. Some craftsmen add salt additives to the solution - up to one glass of table salt per bucket of water. Salt retains water in the mortar mixture, and there is less risk of cracks. The usual ratio of clay and water in solution is 4:1, but selection is carried out experimentally and also depends on the fat content of the clays used. One of the recipes, which is considered classic, includes cement. One part clay, three parts sand, one part chalk and one part cement. The amount of water is selected according to the type of clay. This composition provides not only good adhesion to bricks and tiles, but also higher strength compared to clay mortar.
Brick sauna stove projects
It is extremely rare to find a ready-made brick stove design that is 100% satisfactory. We have to modify and redo the finished order. In this case, make the necessary adjustments, drawing each brick row in detail, and show the corrected order to a professional.
Brick sauna stove project
If even small changes have been made, consultation is highly advisable. The stove in the bathhouse should be harmless, therefore the opinion of a qualified professional is especially important.
When correcting the project, it is necessary to remember several properties of the masonry of stoves made of brick:
- In most cases, the firebox in heaters is of an impressive size and to ensure the natural combustion process, it is necessary to ensure good air flow. Due to this, the blower and the blower flap should also have good dimensions.
- To ensure good air flow into the fuel chamber, it is better to lay the grate bars along the blower channel. But finding a grate of the required size is often problematic, so it is often necessary to install several grates of shorter length across the ash pit.
- If the heater is above the combustion chamber, the height of the firebox should be at least 55cm. A suitable option is 8 or 9 brick rows. In this case, the stones will heat up to high temperatures. Reducing the height of the firebox will not lead to faster heating, but to a decrease in the temperature of the stones and the accumulation of soot in between them.
- If wooden structures are not protected by heat-resistant materials, then the distance to a brick stove cannot be less than 30 cm.
- Before laying the bricks on the clay-sand mortar (information about the mortar is located in the article Materials for a brick stove for a bath), lay them dry according to the plan, starting from one of the corners, select bricks of the required size so that the width of the seams is not more than 5 mm. And only then put it on the solution.
- After laying each row, it is checked for verticality and horizontality using a level for construction work. The accuracy of the angles can be checked using installed plumb lines. Correct even the smallest deviations.
- When installing the sashes, laying begins from it, fixing it tightly. All doors, where they are adjacent to the bricks, are pre-wrapped with asbestos cord or asbestos strip. They are secured in place using wire or strips of steel secured at the seams. For a more rigid fixation, grooves are cut in the bricks under the wire.
- Much attention must be paid to the passage of the pipe from the brick stove through the ceiling, roof or wall. Here the pipe is first of all insulated with stone wool or other insulation materials that can withstand high temperatures.
The video shows how you can attach the ash and fire doors, as well as the preparatory process for the clay solution.
Here is a project for sauna stoves, in which the tank for heating water is adjacent to the heater and is additionally heated due to heat transfer from the chimney. This oven is small in size and easy to manufacture.
A stove made of brick with an iron heater and a side-mounted water tank: 1 - tank support; 2 — water tank; 3 - smoke pipe; 4 — hatch for watering stones; 5 — heater cover; 6 — wire clamps; 7 - stones; 8 — heater grill; 9 — heater pedestal stands; 10 — grate; 11 — combustion chamber flap; 12 — blower flap
The container for the heater, measuring 530x510x500 mm, is made of steel with a thickness of 8-10 mm, the water tank is made of pipes with a diameter of 40 cm (capacity about 50 liters). The support for the heater is a frame welded from corners (take a corner 50x50 mm), a sliding support is made for the water tank.
The heater has a lid through which stones are placed and water is released. In order for the stones to heat up to higher temperatures, the lid is closed, and if it is necessary to reduce their temperature, they are opened. After installation on the frame, the heater is finished with a brick placed on its edge.
Here is also a small stove made of brick for a bathhouse with a closed heater and a water tank located on the side.
A stove made of brick with a closed heater and a side-mounted water tank: 1 - water heating tank; 2 - oven; 3 - smoke pipe; 4 - stones; 5 — heater cover; 6 — hole for water supply; 7 - iron vault; 8 — screen; 9 — grate; 10 — combustion chamber door; 11 — ash door
The procedure for such a stove is simple and does not require a lot of time and materials.
Arrangement of a stove with a closed heater and a side-mounted water tank
Materials and tools
To arrange a brick “blacksmith’s shop” for a house or bathhouse, first of all, you should prepare working drawings and procedures. The author himself has developed over a hundred different stoves with step-by-step instructions for their construction.
The order of the stove is a complete guide that clearly explains the correctness of laying each individual row in the prescribed sequence. Beginning craftsmen are advised to strictly follow the order of Kuznetsov furnaces, which will allow them to build a reliable and durable structure.
To carry out construction work, it is necessary to prepare basic materials and working tools:
- solid red fire-resistant brick;
- fireclay brick;
- fire-resistant clay of medium fraction;
- mountain sand (twice the volume of clay);
- steel wire;
- metal corner;
- structural elements: doors for the ash pit, fireboxes, grate for the grate, valve, stove for the hearth.
Attention! If desired, instead of clay and sand, you can purchase a ready-made mixture for masonry, which is sold in specialized stores. It contains all the necessary proportions of the main components.
When purchasing bricks, it is recommended to check the material for defects and mechanical damage.
Do-it-yourself Kuznetsov stoves have their own subtleties of construction, so before starting work, the layout of the device must be carefully studied.
Arrangement of sauna stoves
This oven cannot be called small. A continuous oven designed by Anatoly Zabolotny can heat a steam room for 4 people. Stones can be loaded into a closed heater only after the stove has completely set.
Placing Anatoly Zabolotny's stove in a bathhouse for 4 people
The main nice feature of this stove is the ability to organize ventilation/drying of the space under the floor. What is a simple corrugated hose used for?
Anatoly Zabolotny continuous furnace
To lay this stove you need 700 pcs of bricks for stoves, 40 pcs of fireclay, about 30 buckets of sand, 15 buckets of clay (12 liter bucket). 2 pieces each for stove doors, vent doors and cleanout doors. You also need 2 grates and 2 valves, and a 30x30 metal corner, cut into pieces of 50 cm (9 pieces) and 35 cm (2 pieces). You will also need a panel with one burner and a cabinet for stones.
Anatoly Zabolotny continuous furnace
The cabinet for stones is made of stainless steel - only it can withstand temperatures up to 800 o C, to which stones can be heated in this oven. To give the heater better rigidity, additional hard ribs are welded onto the side surfaces.
Arranging a continuous brick stove by Anatoly Zabolotny
It is necessary to lay this furnace from the base-zero row, in which the formation of the ventilation duct begins. Strictly follow the placement pattern of the bricks, checking the verticality and horizontality of each row and ensuring that the corners are perfect.
The damper is mounted in the 3rd row. Here the formation of ash pits of two independent combustion chambers begins and doors are placed on them. In the next 4th, the damper is blocked transversely by a channel placed to clean soot. In the same row a sash is placed on it.
The closing of the blower flaps occurs in the 5th. Jumpers are also placed here to transition to the development of the butt. The thickness of the metal for the jumpers is 3 mm. In the next row, the shaft is zoned, for which two grates are installed. The combustion chamber shaft is laid with refractory bricks using a specialized mortar. Under the grates, a recess is cut out in the bricks with a similar calculation, so that there is clearance for the thermal expansion of the grates (6-10 mm on all sides). This is where the independent chimney channels begin, for which strips of metal are also laid.
In the 7th row, the refractory brick is placed on a spoon (sideways), the doors of the combustion chambers are installed, the chimney channels do not change. At the same time, the doors of the combustion chambers are installed. The 8th row is similar to the previous one, we line the doors. Next, they are covered with iron strips on which the floor bricks will rest.
In the 10th, the doors on the top are locked with bricks, for which they are filed if necessary, it all depends on the shape. After the end of the 11th row, a slab platform is placed over one shaft, and on the other, refractory bricks are placed exclusively on the short sides of the combustion chamber. After the container for the stones has been installed, there will be chimney channels here.
In the 12th row, a box made of metal for stones is installed, and one of the chimney channels is laid. The next two rows are unchanged, and only in the 15th row a door is installed to remove soot. Further, in the 16th, two iron lintels are added over the key shaft.
In the 17th, the chimney shaft is again divided into 2 channels (as in the 5th), and two iron lintels are attached above the slab, which will serve as the basis for the second row of bricks. The next two are unchanged, and only in the 18th is a chimney door added, and in the 19th are jumpers placed on the other side of the stove, which will serve as the basis for its final covering and the development of the furnace roof.
Row 21 is similar to row 12, but there are chimney channels. The next two rows there is a narrowing of the fuel shafts, and in 24 the shaft where the container for stones is placed is completely blocked.
Formation of a chimney in a brick sauna stove
Then the second fuel shaft is closed, only the chimney remains, and from the 27th row it is the only one to go down.
Seams in stove masonry
When applying the mortar to the masonry not with your hand, but with a trowel (21), it is recommended to moisten the surface of the brick with water. Place a mound of mortar on the brick and quickly level it. Place a moistened or soaked brick on the mortar, press it tightly, rub it in and remove the excess. The mortar is applied to the bonded edge with a trowel or the brick itself. Refractory brick is only rinsed with water.
Seams in stove masonry are made in different ways. If the masonry is supposed to be plastered, the seams are hollowed out, i.e. they are not filled with mortar to a depth of 5... 10 mm. When plastering, the solution flows into the seams and adheres better to the surface of the stove.
If the masonry is not plastered, the seams are completely filled with mortar and they remain in the same plane with the wall surface. This type of masonry is called undercut. If you want to give the surface of the stove a more beautiful appearance with the help of seams, separating the bricks from each other with seams, then the seams are given a convex or concave shape, making masonry for jointing.
In this case, a tool is used - a jointer, which is made of roofing steel, giving it the desired shape, which has the reverse image of the seam.
The jointing technique consists of cutting the extruded mortar into an undercut, applying the jointing to the seam and running it over the mortar (22).
The mortar should be such that with slight pressure on the brick during laying, the excess is easily squeezed out of the seams.
Figure 23 shows the main parts of a brick. The brick is laid flat in half a brick or flush on an edge in a quarter of a brick and upright (24).
This suggests that the furnace walls and channels can be laid out in different thicknesses. A half-brick masonry is considered normal, a quarter-brick masonry or thin masonry is considered (25, a). The most common laying is flat or flush (25, b). The same thickness of masonry can be obtained from two-fours laid on an edge (25, c). Laying three-quarter bricks is done in half a brick and a quarter of a brick, i.e. on an edge (25, g).
When it is necessary to completely cover the seams, the masonry is laid from two-fours on an edge, but so that one row of masonry is 5...6 cm higher than the other (25, d).
When laying the first row of the furnace, its shape and dimensions are checked using a rule, a square, a meter or a cord stretched across the corners of the masonry (26). The first row is first laid out dry and only after that on the solution, carefully observing the dressing of the seams. Each laid out row must be checked horizontally with a rule with a level, vertically with a rule with a level or plumb line, and for rectangularity with a square or a cord along the diagonals (27). Identified inaccuracies are corrected. Frequent inspections are time-consuming, so to improve productivity, guide posts or racks with movable formwork, which are installed strictly vertically, have been proposed.
The box can be made for several rows of masonry. In this case, the last row of masonry, for example the third, must be strictly on the same level with the top of the box.
Furnace designs
A small stove made of bricks for a bathhouse
This small stove made of brick for a bathhouse is extremely simple and economical. It is suitable for small steam rooms.
A small stove made of bricks for a bathhouse
The procedure for her is extremely simple. It contains a relatively small weight, and, provided the required thickness of the transverse beams is observed and fire safety measures are observed, it can be folded without a foundation.
A small stove made of brick for a bathhouse. Order
In reality, as many baths as there are probably so many stove projects - any owner tries to make the most of the existing space, so changes and adjustments are almost necessary. If you have even a little skill in working with bricks and mortar, you can completely build a brick stove with your own hands. However, if you are not confident in your own abilities, then you need to think about inviting a skilled stove maker, at least as an expert. This can save you a lot of money: rebuilding a stove and removing defects often costs much more than installing a new stove.
In most cases, it is easier to install a metal stove (for example, “Heat”) and line it with brick.
Types of structures
I.V. Kuznetsov was involved in the design of all types of heating structures. Among them the following varieties can be noted:
- cooking structures used for cooking;
- heating models to maintain optimal temperature in residential premises;
- fireplace stoves that allow you to create a unique interior;
- street “blacksmiths” used as barbecue devices:
- stoves for baths or saunas.
Moreover, the structures can be combined. Heating - equipped with a functional hob, a spectacular fireplace heats the house with high quality. Designs with beds add a touch of coziness to the interior, characteristic of houses equipped with a spectacular Russian stove.
Bell-type heating solutions are often equipped with beds
Step-by-step ordering of a brick sauna stove
The construction of a sauna stove structure is considered one of the complex processes. To build such a structure, you must strictly follow the rules and guidelines for the construction of sauna stoves. To simplify the process, you need to become well acquainted with this article, which will certainly help in carrying out what you have come up with.
After all the preparation work (choice of location, layout, size), we need to start construction work on our project. To simplify the process, we will consider the construction of a medium stove (size 4x5 bricks). This project will show the entire masonry order of our building. You can change the dimensions of your stove based on your project. The height of the oven will be 2 meters and 10 centimeters.
Rehearsal for the future oven
Gaining experience in this craft is quite easy. To do this, you will have to make small bricks yourself, for example, five times smaller than standard ones, and build a stove five times smaller. Wait until the solution sets and try to heat it.
In this way, you can check the level of acquired skills. Then you can disassemble the stove and try to assemble another model, thereby training your hand on different models and their features.
The main attribute of any stove is the pipe. Folding the pipe is one of the main points in laying the entire furnace, so you must strictly follow all instructions.
Project selection
This stove project is suitable for many types of baths. The dimensions of the structure will allow you to heat the room (10-15 m2) up to 50 degrees, and when steam is supplied, up to 90 degrees. A tank with a capacity of 180 liters is built into the stove and satisfies all the necessary hot water for a comfortable washing process for all household members. To allow the heater to cool for a longer time after the end of the combustion chamber, iron pipes are provided (6 pieces, next to the water tank).
The pipes also support the stones above the combustion chamber. The pipes heat up quickly, and after the heating process is completed, they gradually release heat. There is a hole above the cobblestones through which water will be supplied to generate steam.
Having formed the project, you need to begin the assembly process itself. Assembling a stove with your own hands is not difficult. Guided by masonry drawings, the process takes little time.
How to lay bricks on edge
Using facing bricks, you can give the building an unusually beautiful look. Laying bricks on edge is not as simple a process as it seems at first glance. All sides of this material have specific names. The largest part is called the bed, the smallest #8212; poke, middle #8212; spoon. The brickwork is placed directly on the most stable part #8212; bed.
Brick laying on edge is used for facing work and the construction of various partitions in the room.
What is required to start construction?
This material can be of 2 types: single and one-and-a-half. The wall is usually built from blocks of both the first and second types, with the width being half a brick. Thanks to this method, the most optimal consumption is formed: 52 pieces per 1 m² of masonry. You can reduce it even further by placing the brick on its edge.
This technique is suitable in the case of a single brick, since saving one and a half bricks will take too much effort. A single brick made of clay (both hollow and hollow) is usually placed on the spoon. In order to begin laying bricks on edge, it is worth preparing the following tools:
Bricklaying tools.
- container (for example, a 20-liter trough) for cement mortar;
- construction trowel;
- stone pickaxe;
- level for construction;
- wooden blocks;
- long rope;
- board (the entire length of the wall);
- thick pieces of wire;
- medium power hammer drill;
- several scaffolds;
- grinder with a metal disc;
- hammer.
The following is allowed as a building material:
- cement with grade 400;
- sandbags;
- superplasticizers;
- lime;
- brick materials;
- reinforcement rods or wire.
Having prepared all the necessary materials, you can proceed directly to work.
Mixing the solution
When preparing the solution, care should be taken, because if the mixture is too thick, it will be poorly distributed over the surface, and if it is thin, it will spread over the brick.
During preparation, you must use clean river sand. As a last resort, you can sift it using a sieve. If there is debris in it, the seam will not come out smooth and it will be extremely difficult to achieve the desired thickness.
The mortar requires the following ratio of materials: 2 parts of cement mixture and 1 part of lime are added to 9 parts of clean sand.
The resulting solution is stirred until homogeneous. Next, everything is mixed with water, which makes up 1% of the total amount of cement mass. By pouring water into the resulting mixture, the resulting solution is brought to a homogeneous state within 10 minutes.
It should be remembered that the more water base is contained in the solution, the worse the brickwork and wall will be (that is, its strength).
Arrangement of sauna brick stoves
The order of the sauna brick stove is provided in full and detail. Let's divide each row and start with the description:
1. The initial row does not ask for anything unusual. We place the size of your structure evenly, without deviations.
2. Here we will begin the formation of the ash pit. We install the door for the ash pan purchased in advance. You should leave gaps between the Base and your sash of 5 millimeters on all sides. We will fasten this part, like everything else, like this.
Each sash is equipped with specialized ears, through which we thread a wire (5 mm thick). We leave a length of about 10-15 cm from each ear of the part and place it in the prepared opening (you need to insert an asbestos cord into the opening, for this we left a gap). And along the course of the furnace masonry, the sash is walled up in the structure. By mounting with this option, you provide a high-quality structure for fixing the part.
3. Let's continue installing the ash pan. We strengthen the door. We check the perfect installation and mounting (remove distortions).
4. We lay the base of the combustion from fireclay bricks. We install the grate bars into the grooves prepared in the bricks.
5. We form the dimensions of the firebox, the entire masonry is made exclusively of heat-resistant material.
6. Install the combustion chamber door. Mounting is completely similar to the process described above for mounting the ash pan door. With large sizes of specialized ears on parts, it is necessary to use thicker wire for better fastening of our part.
7. We lay the entire row with fireclay bricks, continuing the formation of the combustion chamber.
8. We raise a large row of masonry with fireclay bricks.
9. Closing the firebox door with fireclay bricks. Continuing the laying of the combustion chamber.
10. On the side walls you need to lay out quarters of fireclay bricks to form openings where our iron pipes will be mounted. On this row we prepare a place for installing a water tank. We assemble the pipes; if there are gaps between the parts and the bricks, they should be filled with basalt cardboard. Assembling the water tank.
11. The installed pipes are laid with simple bricks.
12 -18. The base of the furnace is installed with simple bricks. It is necessary to remind you that you need to check for any bending of the stove. Don't forget to check the level of the masonry often. A stove that is not level will not serve you for long.
19. At this stage, the space inside is filled with cobblestones. The row rises, like the previous ones.
20. Preparing the water tank cover. Metal strips should be placed above the surface of the tank to prevent contact between the tank and the construction material.
21. The water tank is closed. A place is being prepared to install a door (or you can simply leave a hole) to supply water to the stones.
22 – 25. We build the structure of the stove, keeping the hole for the door (the door must be inserted with the first row of the beginning of its construction). We check the level of the building.
26. We check the durability of the mounted door. We install two metal strips above the sash to eliminate contact of the second row of masonry with the metal part.
27. The steam outlet is blocked. Now it is necessary to prepare the covering of the entire stove. The distance is very large. To do this, you need to make overlaps (two thick metal plates). We make the necessary cuts in the masonry and install the plates. Heating iron causes the metal to expand. Don't forget to leave small gaps for this.
28. The entire oven is shut down. Space is left for the chimney. A hole is made to fit the chimney valve. The valve is installed.
29-30. The roof of the building is being prepared.
31 -… . A smoke exhaust pipe is being formed. Determine the height required for your design according to what you need.
Using the above diagram for ordering the construction of a stove for a bath, you can build the desired stove yourself with enough effort. The considered project was made for the general concept and structuring of the correct order of construction of the structure. You can change the size, appearance, configuration to your liking and color.
Tile installation
Surface preparation is standard - if the stove has old plaster or finishing, it is knocked down with a chisel and cleaned with metal brushes, and then dusted. Then the joints are done - if it is decided to install the tiles on a grid with jointing. Prepare the adhesive composition according to the instructions. Pour the dry mixtures into the water, portionwise, with constant stirring. The speed of the drill or mixer is adjusted so that the glue does not foam; air is not needed in the structure. Leave the glue for as many minutes as indicated in the preparation instructions - usually up to 15 minutes. Start facing from the bottom. Apply glue or primer (if cladding is done using jointing) for four tiles horizontally. Fix the reinforcing mesh. Along cut seams - on wire staples, without cutting - on dowels. The adhesive is applied with a notched trowel, the first tile is pressed and slightly rotated to secure it tightly. Crosses are used to calibrate seams, but not all craftsmen recommend crosses, and some designs involve the illusion of unevenness of the seams - to imitate ancient masonry. Verify the horizontality of the tiles using a level, then the vertical. The first row is the most responsible
Deviations are corrected carefully by moving the tiles with light blows with a rubber hammer. Seams for different types of tiles can be from 8 to 12 mm, except for clinker ones, the thermal expansion of which is so insignificant that a neat seam of only 3 mm is possible
All tiles of the first grip are verified with a level and plumb line. The first three rows of tiles after laying should be left until the adhesive composition sets. Plastic adhesive may not hold heavy tiles, and the trim will slide off from its own weight. Furnace linings do not require high speeds. Pauses between grips are about three hours, depending on the properties of the glue or solution used. For fitting and trimming, use tile cutters or a grinder. They usually try to hide the cut tiles adjacent to the wall or in other inconspicuous areas. After the glue has completely set - after 24 hours, remove the crosses and clean the seams from glue deposits.
Grout the seams only after the glue has completely cured, according to the instructions for the composition, otherwise you may end up with microcracks in the grout or the tiles peeling off. Mineral grouting is done manually - with a spatula, or with a mounting gun if the seam is made convex. Grouting with silicone compounds is very sticky and is only possible with the use of mounting guns.
The first fire is possible only after the glue has completely cured, from a week to a month, depending on the composition used.