The first material that comes to mind when thinking about building a bathhouse is, of course, wood. But progress does not stand still, and new materials appear on the market that make it possible to build reliable and budget-friendly buildings. These include aerated concrete. Aerated concrete baths are not as popular as wooden ones, but the popularity of this material is steadily growing.
Bathhouse made of gas silicate blocks: reviews from owners
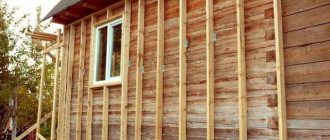
Cladding walls with siding
Let's first define the terms. Two completely different building materials are used in construction: sand-lime brick, usually white, obtained by pressing from sand and lime, and gas silicate block, obtained from sand, water and lime with the addition of gas-forming additives, usually by autoclave processing.
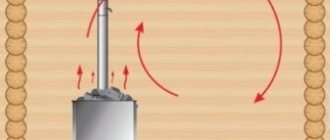
I have already written many times that a bathhouse should be insulated with mineral wool from the outside (see here, here). You were correctly told that it is impractical to insulate the inside with mineral wool; it will quickly become unusable. If the bathhouse is rarely used, then it will in any case cool down to the outside temperature.
And, indeed, before using it, the walls will need to be warmed up well each time. No matter how you insulate the walls from the inside, the internal insulation will still not be able to retain heat so much that the walls remain cold (even from gas blocks), especially the walls of the steam room. The main purpose of the insulation inside is to prevent moisture from entering the walls.
Now about the external protection of the walls of your bathhouse with siding. Most often, this term refers to plastic siding. I have already written several times about the dangers of using this material for the construction of a bathhouse. In addition, it is necessary to correctly make a multi-layer insulation cake when covering external walls with siding.
Experienced craftsmen have a saying that there is no building material from which a steam room cannot be built. The only exception may be frankly toxic building blocks, with a high content of bitumen, phenol and sulfur cements, used for arranging foundations on swampy soils.
Therefore, building a bathhouse from gas silicate with your own hands can be considered quite realistic, especially if the area in which the bathhouse is planned to be built is replete with strong winds. In this case, bathhouse projects made from gas silicate materials turn out to be much more interesting than frames or buildings made from rounded logs.
The gas silicate block is interesting for two reasons:
- You can make it yourself or order it from the manufacturer. At the same time, it is possible to include in the block those characteristics that are most important for building a bathhouse;
- The low price of gas silicate with a fairly high durability of the material. For the money spent on the construction of a timber bathhouse, which will last for a maximum of 10-12 years before repair, you can build a gas silicate box with a service life of 30 years.
Important! Gas silicate is often confused with another cellular material - foam concrete. The technologies for producing blocks are very similar, only the raw materials and conditions for stabilizing the final product differ.
Gas silicate blocks are “printed” from lime and purified quartz sand, in this they are more similar to sand-lime brick. Whereas foam concrete is made from concrete mortar saturated with plasticizers and pore-forming additives.
In order not to resort to listing characteristics and indicators, it can be mentioned that gas silicate blocks of the same density as foam concrete materials have higher strength, retain heat better and do not give secondary shrinkage.
It turns out that building a bathhouse from gas silicate blocks, on the one hand, is very profitable, since with lower costs for walls and compliance with technology, the room turns out to be very warm.
On the other hand, when agreeing to build a bathhouse from gas silicate blocks with your own hands, you need to understand that the high absorption capacity of the walls will haunt the owners of the steam room and bathhouse building for the rest of their lives. If you do not properly insulate the surface, the walls of the bathhouse will absorb odors and water from the atmosphere and soil until they turn into an eternally wet and completely frozen monument.
Not everything is as bad with gas silicate as opponents of the new material sometimes try to present the situation. If gas silicate blocks were not suitable for the construction of bathhouse walls, then no one would use foamed silicate material. Despite all the pros and cons, gas silicate baths are actively being built; according to the most conservative estimates, their number is approximately 31% of all new bath buildings.
To the advantages listed above, you can add several more important advantages:
- The bathhouse box turns out to be light, so the building can be erected on relatively weak soils; all that is needed is proper drainage of surface and “deep” water;
- Gas silicate blocks are easy to process, cut with a regular hacksaw, their low weight simplifies the laying of walls;
- If you use the porosity of gas silicate correctly, you can achieve the formation of a special microclimate in the bathhouse.
We are not talking about a steam room or a waiting room; there is always high humidity, so porosity can only do harm. Another thing is a relaxation room or a glassed-in veranda of a bathhouse. In this case, gas silicate blocks can select and release water vapor, creating a certain microclimate in the bathhouse.
Unfortunately, such miracle projects - saunas from gas silicate blocks are rarely created with your own hands. For cladding the internal walls, a dense gas silicate material with micropores is used, allowing only air and water vapor to pass through, but blocking any other heavy gases and volatile substances. Such material is quite expensive, and in addition, special knowledge and skills are required. This is the main disadvantage of gas silicate blocks; you cannot build a good bathhouse “by eye”.
In addition, gas silicate is afraid of moisture and strong temperature changes, accompanied by the formation of water condensate. When planning the stove and chimneys, one must take into account the fact that the material cannot withstand heating above 400°C.
The construction of a full-size bathhouse from a light and non-rigid material will require special measures, such as reinforcing and strengthening the walls with concrete belts, using a full-fledged slab foundation or installing piles. Therefore, either professional builders or desperate fans undertake to build a full-fledged bathhouse 6x6 m or 6x7 m from gas silicate blocks.
Most lovers of good steam are limited to bathhouses with a maximum wall size of no more than 6 m. There is also a positive side to this; due to the high popularity of 6 by 4 m bathhouse projects made from gas silicate blocks, choosing a suitable option will not be difficult.
The construction of a bathhouse measuring 6x4 m will fit perfectly into a home yard. Despite the fact that this is not a tiny annex steam room with a dressing room, which is extremely difficult to use without a shower in the house.
Thanks to the use of gas silicate blocks, a warm and spacious building is obtained, so much so that there is enough space for a full-fledged recreation room and a small terrace covered with a roof slope.
It should be noted that there is a very correct layout of the interroom passages inside the bathhouse. Thanks to the use of a “snake”, that is, a layout when the doors in the passage rooms are located at the maximum distance from each other, the steam room is well protected from drafts. And four window openings provide a qualitatively high level of ventilation in the room.
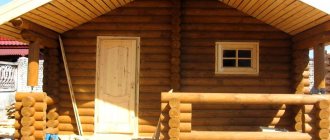
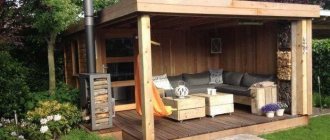
A simpler version of a home sauna made of gas silicate is shown in the photo below.
In this project, the design of the bathhouse is simplified to the minimum; most of the free space is allocated for a relaxation room and steam room.
This is more of a summer version of a bathhouse for a summer cottage. In this case, most of the time between visits to the steam room is spent under a canopy.
If the size of the garden plot allows, then using a standard design for a sauna building made of gas silicate blocks, you can easily expand the structure and turn it into a place for a summer vacation for the whole family.
We suggest you read How to build a sauna on wheels
In this case, you will need to abandon the terrace in favor of a full-fledged canopy with a brick stove and barbecue, a place for a guest table and a kitchenette in the corner. In this option, the rear partition covering the stove and the canopy space is built from heavier red brick, so the area in front of the entrance to the bathhouse will need to be concreted with a screed.
The smaller the size of the walls, the easier it is to install a gas silicate box, the smaller and lighter the foundation for the building is required. In some cases, it is possible to make a foundation for a bathhouse from gas silicate blocks, such as Minsk. Due to the high density and closed structure of the bubbles, the material practically does not absorb liquid water, and thanks to the excellent thermal insulation of gas silicate, the bathhouse building is well protected from freezing of the base and partially from soil heaving.
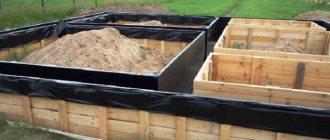
The first step when building a bathhouse is to make a full-fledged cushion under the foundation, remove turf and clay to a depth of at least 50 cm, and remove all layers of soil in which moisture can accumulate.
Most bathhouse projects made from gas silicate blocks, photos, require a solid foundation.
It is best if it is a concrete slab laid on a sand and gravel bed and EPS insulation. Walls made of gas silicate, even in a one-story version, require support, so a rigid concrete foundation will be the best solution to the problem.
The second step is to lay out the plinth and waterproofing of the walls. The starting and last rows of aerated concrete blocks are always reinforced with a concrete belt with a reinforcement frame. The roof and floor must be insulated, most often with fill-in insulation.
Immediately after installing all the elements of the roof and roof, you need to complete the external finishing of the walls, before rain and dampness destroy the bathhouse frame.
Important! To avoid the blocks getting wet, the building is covered with a protective film.
As soon as the roof and ceilings of the bathhouse are assembled, you can close the walls; it makes no sense to start finishing earlier, since the walls have not taken their size under the weight of the rafters and beams.
Exterior decoration
Semyon Stepanovich Ivliev, 69 years old, Tver:
We built a gas silicate bathhouse ourselves. A month later, a crack appeared along the blank wall. Experts said the cause was shrinkage of the foundation. It was made just according to the mind, to match the brickwork. It turned out that the box was too light and the soil was heaving. They caught it in time; the neighbors across the street had a wall that was completely bent into a bubble. We had to dismantle part of the masonry and seal it with concrete, in the end we lined the bathhouse box with bricks, as planned, and that was the end of it.
Valery Eduardovich, 60 years old, Moscow:
My son-in-law bought a ready-made sauna project using gas silicate blocks. They built according to the accompanying note to the plan. The walls are made of gas silicate, 50 cm thick, despite the fact that the box itself is only 6x5 m. The foundation is slab, and the roof is made of ready-made sections, covered with corrugated board. It turned out to be a little more expensive, but the sauna box has been in use for three years now, and no problems. But some kind of smell appears in the spring, in the summer, as the sun warms up, everything disappears.
Preparatory work
The first step when building a bathhouse from aerated concrete is to draw up a plan for the future construction and a list of planned works - this will speed up the process significantly. But before this, it is important to prepare, namely, purchase the necessary tools and learn how to choose the right quality raw materials, because as they say, “the miser pays twice.”
Carefully select tools according to the characteristics of the material.
Required tools and materials:
- Wall chaser. It is used to create special channels in which reinforcement is placed to strengthen the structure;
- Electric drill. Helps drill holes for various needs;
- Electric cutter . Used for processing grooves when laying the same fittings or electrical wiring;
- Hacksaw . Needed for cutting blocks when they have uneven geometry;
- Rubber hammer;
- Level . The evenness of the blocks is checked;
- Carriages and buckets for adhesive solution . Used for applying adhesive solution to horizontal and vertical surfaces of gas blocks;
- Grater. It is used to smooth out walls before applying plaster;
- Other marking tools;
- Cement;
- Sand;
- Construction adhesive;
Geometric shape is very important when choosing aerated blocks
When choosing aerated concrete blocks, pay attention to:
- Color. If the color is uniform, this indicates a higher quality of the blocks;
- Size. All purchased blocks should ideally be the same size, unless you plan to create some unusual design;
- Form. Each block must be symmetrical, have smooth and even edges;
*The cheaper the price, the lower quality the blocks will be.
- State. Naturally, the material should not have any cracks, chips or other deformations;
- Storage method. According to the rules of transportation and operation, gas silicate blocks must be hermetically packed in polyethylene.
Aerated concrete bathhouse: interior decoration of the steam room
> Construction
Aerated concrete is a building material known for its thermal insulation properties. That is why it is most often used for the construction of baths. The buildings are heat-resistant and durable. In terms of their characteristics, they are practically in no way inferior to those built from wood. However, the service life of a building depends not only on the properties of aerated concrete.
The size of the steam room depends on the number of people who can be in the room at the same time
- 1 Steam room
- 2 Floor design
- 3 Wall decoration
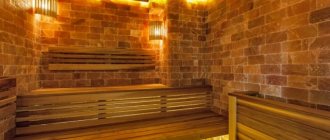
Steam room
The interior decoration of aerated concrete bathhouse begins with the steam room. This room will need additional insulation. It is not recommended to use polystyrene foam for these purposes - this material has a low level of environmental friendliness. Mineral wool is also not worth taking. Its use is allowed in extreme cases.
Taking into account the above, it is better to use foam glass for finishing the steam room. Its properties resemble polystyrene foam. But there is one important difference: when exposed to high temperatures, glass does not become toxic.
Foamed glass comes in the form of small tiles. In order to cover the steam room with them, you will need tile adhesive. It is also used as putty. There is no need to apply the glue in a thick layer, since the top will be covered with clapboard.
Floor decoration
The next step after finishing the steam room is working with the flooring. Tile is used as a finishing material. To perform the work as efficiently as possible, you must adhere to several recommendations:
- The first step is to install a drainage system. To do this, you need to install ladders.
- To finish the floor, you can use any tile without exception. It is used only to ensure that sanitary standards are met in the room.
- Sloping plums must be trimmed with special attention. It is important to avoid the formation of counterslopes.
- You can buy tiles cheaper, but you shouldn’t skimp on grout. High-quality grout will help ensure that moisture does not seep through the seams.
- It is strictly forbidden to lay tiles on so-called slips. The temperature inside the room will constantly change. As a result, moisture will collect under the tile, which can tear it off at the first sharp cold snap and frost.
Laying tiles should be done using a building level
You will also have to tinker with the floor in the dressing room. You need to lay the tiles there after the “warm floor” system is installed. Many do not see the need for it, believing that the heat from the steam room is enough to heat this room. But this is not so, and heated floors are a completely reasonable solution.
Installing a heated floor is not difficult. The work is carried out in several stages:
- First of all, you need to do the marking. The detailed plan marks the location of the grooves, sensor and other elements.
- Next comes the manufacture of grooves - recesses in the floor. There will be a temperature sensor inside. After the wires are routed from it to the thermostat, the groove can be covered with a solution of cement and sand.
- The next stage is cleaning and priming the working surface. It is better to choose a deep penetration primer.
- Now, strictly adhering to the markings, you need to lay out the heating mats.
- Next, to check the correct connection and functionality, you need to connect the system to the network.
- After checking, you can lay out the tiles.
The finishing of the floor in the dressing room is carried out using a special technology, different from that used in other rooms. Particular attention should be paid to the thickness of the adhesive layer - it should be at least 1 cm. Because of this, the floor will take a little longer to dry than in other cases.
Laying scheme for heated floors
Wall decoration
The finishing of the walls in a bathhouse built from aerated concrete begins only after the wiring has been done and the tiles have been laid in the steam room and dressing room. How to decorate the walls in the bathhouse? In most cases, lining is used. It is suitable for both the steam room and the dressing room. You can use several types of lining:
- aspen;
- alder;
- fake.
Such wood will heat up much less than, for example, oak or elm.
Do-it-yourself interior decoration of aerated concrete bathhouse begins with sorting the material. It is necessary to carefully review all the lining that is available. It is better not to use defective elements (with chips or knots).
The lining must be installed on a perfectly flat surface. Therefore, it is reasonable to mount it on a frame made of support rails.
When laying out the lining, it is worth remembering one important feature: the space under the material must be ventilated. This can be achieved in several ways:
- It is necessary to make gaps between the bars.
- Ventilation openings should be made both under the floor and under the ceiling.
- If you lay the lining horizontally, ventilation will be better than in other cases.
We suggest you familiarize yourself with How to insulate the floor in a steam room of a bath
During the work you need to remember some nuances:
- When decorating walls in a bathhouse, it is not recommended to use nails. The ideal option is clamps (special staples). They should fit tightly. It is important to tighten the screws to the end.
- The space near the heater should not be lined with clapboard. In this place it is better to use tiles, stone or brick.
- When finishing the walls in the steam room, the lining must be sanded, and in the dressing room it must also be covered with a layer of paint and varnish materials.
- Don't forget about the wiring. In places where switches will be located or wires will come out, you need to make holes.
After the lining is laid, there are a few simple steps left to perform:
- install platbands;
- nail baseboards and corners;
- install sockets and switches;
- connect the underfloor heating system.
Of the variety of skirting boards and platbands, you should choose the most suitable option
You also need to inspect the walls of the bathhouse for defects and then eliminate them.
There is one important caveat to keep in mind regarding lining. After visiting the bathhouse, it must be thoroughly ventilated. A humid environment is a good place for mold, mildew and corrosion to grow. Moreover, this applies to both wooden elements and aerated concrete itself.
The interior decoration of a sauna or bathhouse is carried out in several stages. First you need to tackle the steam room, then the floors, and lastly, covering the walls using clapboard. At all stages, it is important to strictly adhere to the pre-prepared plan and take into account the described nuances.
How to properly complete the interior decoration of a bathhouse made of aerated concrete Link to main publication
Aerated concrete blocks are one of the best materials in terms of thermal insulation characteristics. Baths built from them are distinguished by good heat resistance, not inferior to wooden buildings, and durability, comparable to structures made of stone. Since aerated block is a porous material, its weight is significantly less than cinder block or brick, so lightweight construction does not require a powerful foundation. However, for the durability of an aerated concrete bathhouse, careful internal and external finishing is required.
Types of floors for saunas made of gas block
The next step after building the walls and roofing is installing the flooring. Inside the bathhouse, floors can be of three types:
- wooden leaking;
- wooden solid;
- concrete.
A flooring option that is easy to make yourself is a leaky wooden floor. As with any flooring, you will first need to install and secure the joists and rest them on the edges of the foundation (or make special bookmarks). Parallel to one of the walls of the bathhouse, boards or beams are sewn onto the beams, and gaps of several mm are left between them.
All draining water on such a floor will flow directly into the underground room. This option is most suitable for baths located in areas with a mild climate, or for country steam rooms, which are used only in the warm season.
A wooden non-leaking floor has a more complex design and is made of 2 layers: rough and finishing. It is possible to place insulation between the floorings. The upper floor boards are placed at a slope to the place where the water will be collected. This can be either a hole in the floor connected to the drainage system, or a tray located at an angle, installed along the entire wall of the bathhouse and leading into the sewer.
A concrete floor in a bathhouse built from aerated concrete will be a practical solution. It is also made of 2 or 3 layers, the top of which is sloping towards the places where excess water is collected. The optimal coating for such a floor is ceramic tiles with a rough surface.
You should take a responsible approach to choosing wood for cladding. The greatest resistance to decay is inherent in coniferous species, but when heated they are capable of releasing resin. Therefore, it is better to use them when covering a dressing room or washing room. Of the deciduous species, oak has the optimal resistance; however, when wet, it becomes slippery.
Windows and doors in the bathhouse
It is advisable to make them wooden, for which pine or ash are suitable, and varnishing is allowed only on the outside, otherwise harmful fumes cannot be avoided. For the same reasons, it is not recommended to use polyurethane foam as a sealant; it is better to use natural materials, such as felt.
The windows in the bathhouse serve only for lighting, therefore, in order to reduce heat loss, they are made small and placed low.
Electrical wiring in the bathhouse
When installing the electrical network yourself, you should not forget that in aerated concrete walls the cable, wound into a corrugated tube, is laid along grooves cut into the blocks. It is first recommended to carefully develop a layout of electrical appliances, as well as lighting points, sockets and switches inside the room.
Wall decoration
| ROOM PARAMETERS: | |
| Wall height (m): | |
| External walls: | |
| Density class: | |
| Wall length (perimeter) (m): | |
| Thickness of walls (block)*: | 100 mm.150 mm.200 mm.250 mm.300 mm.375 mm.400 mm.500 mm. |
| Area of door and window openings (m2): | |
| PARTITIONS: | |
| Density class: | |
| Length of partition walls (perimeter): | |
| Thickness of partition walls: | 50 mm.75 mm.100 mm.150 mm.200 mm. |
| Area of door and window openings (m2): | |
| Total per room: | |
| APPROXIMATE VOLUME OF BLOCKS: m3 | |
| VOLUME OF PARTITIONS: m3 | |
| NUMBER OF GLUE BAGS**: pcs. | |
| * - wall thickness according to the project ** - glue consumption: 25 kg per 1 m3 of aerated concrete blocks with an adhesive layer thickness of no more than 3 mm and block size 600x375x250. | |
Stage one: making a plan
Drawing up a plan for a future bathhouse is a very important stage, since right now it is necessary to decide on the appearance, take into account all the features and characteristics of this material, and think about the arrangement of steam and waterproofing of all rooms. As already mentioned, it is best to have a dry steam room in an aerated concrete bathhouse.
Take the design of your future bathhouse as seriously as possible
Typically, professional construction agencies are involved in drawing up such a project, and a person can choose the size and shape of the building independently. One of the key points at this stage will be sealing door and window openings. They can be covered with a special fabric, which will significantly reduce the level of moisture absorption. You can also install special membranes that will release steam only in one direction, as well as ventilated facades.
Please also note:
- the presence of a dressing room, a relaxation room, a shower room, and the steam room itself, their location and dimensions;
- arrangement of drainage and supply of other communications;
- type of foundation (strip, nested, monolithic, etc.);
- a list of all materials used, both for external and internal cladding;
- type of stove, its dimensions, location and cladding material;
*If you are planning a major construction of a bathhouse with a total area of more than 50 square meters or with several floors, it is better to contact specialists rather than try to draw up a project yourself.
Proper insulation of a gas silicate brick bath
- Cement;
- Gypsum;
- Lime;
- Quartz sand;
- Aluminum powder;
- Water.
These ingredients don't just mix together. They are fed into special autoclaves along with gas, which foams the mixture. The result is cellular concrete, the closed pores of which are filled with gas.
Air clogged in the pores retains heat well
The thermal conductivity of the material is comparable to the thermal conductivity of wood, so a bathhouse made of aerated concrete blocks retains heat very well.
The advantages of aerated blocks as the main material for constructing walls include:
- The stable shape and large size of the products allows you to quickly and easily build smooth walls. You can do this with your own hands, if you have minimal experience in such work.
Aerated concrete blocks
- Light weight, which also facilitates installation without requiring the use of construction equipment. In addition, such a bathhouse does not require a powerful foundation, since the load on it will be small.
- Environmentally friendly - the material is made from natural components without the addition of synthetic substances.
- Ease of processing - blocks can be cut with a regular hacksaw, chainsaw or any other household tool.
The photo shows that you can cut the block with a regular hacksaw
- Fire safety. Unlike wood, aerated concrete is not subject to combustion.
- Resistant to mold, damage by insects and rodents.
- Low thermal conductivity, which makes the material suitable for the construction of baths and saunas.
- Affordable price: walls made of aerated concrete will cost at least half as much as log or lumber walls.
- Manufacturer's stated durability.
- No shrinkage and the ability to begin finishing immediately after completion of construction.
The main disadvantage of aerated concrete is its high ability to absorb moisture and is difficult to release it. But if the waterproofing of a bathhouse made of aerated concrete is done efficiently and according to all the rules, there is no need to be afraid of this.
However, low moisture resistance limits the choice of finishing options. For example, it is not recommended to paint or plaster the outside of aerated concrete, as these coatings will prevent moisture from escaping.
If we talk about the size and location of the premises, then the design of a bathhouse made of aerated concrete blocks can be of any configuration. This is what’s good about them - there is no need to take into account the size of the blocks to minimize waste. They are easy to cut, do not crumble or break.
You can consider ready-made projects of aerated concrete baths. For example, from those shown above. Or create your own project, in accordance with your capabilities and needs.
We suggest you familiarize yourself with How to hang an interior door yourself
By the way, a built-in bathhouse in a house made of aerated concrete is also an excellent option. The main thing is to think through the supply of communications in advance and provide high-quality waterproofing.
As mentioned above, aerated concrete is a fairly lightweight material due to the presence of many voids in its structure. Therefore, the best foundation for buildings made from it is a strip, shallow foundation. Moreover, it is suitable for any soil.
Bathhouse foundation
When installing it, it is important not to forget to leave holes for communications. It is also very advisable to immediately establish an even horizontal level on all sides - this will make it easier to lay the blocks in the future.
Walling
Work on the construction of walls begins with waterproofing the foundation. We remember that aerated concrete for baths has a high ability to absorb water. Therefore, it should not come into direct contact with the foundation; the base must be covered with two layers of roofing felt.
Next begins the masonry, which differs little from the masonry of walls made of brick or cinder blocks. But some nuances are still present.
- First, corner blocks are laid on the cement mortar.
- A cord is stretched between the corner elements, along which the first row is laid. Its horizontalness must be constantly checked with a building level.
- The next rows are placed on a special glue designed for aerated concrete. Many manufacturers of gas blocks also produce it. The thickness of the adhesive layer should not exceed 0.5-0.7 cm.
- If a country bathhouse is built from ordinary blocks, glue is applied to all surfaces in contact with other elements. If the blocks have special joining grooves, there is no need to coat the side surfaces. The need for this arises only if a cut block is laid in a row: glue will have to be applied to the cut surface.
- To increase the strength and reliability of the structure, the instructions recommend that every fourth row of masonry be reinforced with a metal belt. To do this, parallel grooves are cut out in blocks along the entire perimeter. Reinforcement is placed in them and concrete is poured.
- To form lintels over window and door openings, monolithic reinforced blocks or special aerated concrete trays are used. Under them, supports are temporarily installed in the opening, and reinforcement is laid inside and concrete is poured.
- The top row of masonry is also reinforced with a stiffening belt. When pouring the solution, reinforcement and anchors are installed in this concrete belt to fix the roof elements.
Roofing device
The load-bearing capacity of aerated concrete is limited. Therefore, houses no higher than two floors are built from it, and the simplest and lightest roof structure is chosen: single- or double-slope, hipped.
Diagram of the rafter system for a bathhouse made of aerated concrete
First, the Mauerlat is attached to the embeds pre-installed in the concrete belt, then the rafters are installed - and then according to the technology.
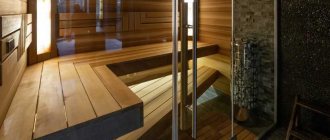
Interior decoration
The interior decoration of a bathhouse made of aerated concrete begins with waterproofing the walls and floor. There is no need to insulate the premises from the inside. And the best finishing material will be wooden lining made of aspen, alder or linden.
| Stage of work | Description |
| Liquid glass – good protection against moisture | There are two options for waterproofing. One of them is coating the surface of aerated concrete with liquid glass. It will not only make it hydrophobic, but also increase its thermal insulation properties. |
| Wall protection with foil film | The second option is to cover the walls and ceiling with foil film or a polymer membrane. |
| Installation of sheathing for lining | Wooden sheathing slats are screwed directly to the blocks using self-tapping screws. They will also create a ventilation gap between the walls and the cladding. |
| Floor construction | The next stage is pouring the floor with concrete. Roofing material must be laid underneath it with an overlap on the walls to avoid contact of moisture with aerated concrete. You can lay tiles on the concrete screed or install wooden ladders. |
| Installation of lining | The finishing will be completed by lining the walls and ceiling with clapboard. |
Exterior decoration
External walls also need protection from atmospheric influences, and primarily from moisture. But if you still want to insulate a bathhouse from aerated concrete, then it is better to attach the insulation from the outside.
The ideal option would be ventilated facades with frame cladding with siding, block house, and decorative panels.
Diagram of a ventilated façade
https://www.youtube.com/watch?v=
But first, it is advisable to coat the walls with a hydrophobic primer. Mineral wool or expanded polystyrene are suitable as insulation.
> Construction
Wall decoration
The blocks are lightweight, making them easy to work with.
It is heat resistant.
The cost is much less than, for example, concrete slabs.
In terms of their thermal insulation qualities, they are second only to timber, and even then only slightly. They retain heat perfectly; this is the most important quality for baths.
It is fire resistant, which is necessary for the construction of baths.
Retains heat indoors for a very long time.
The material is quite durable; if used correctly, it can last for decades.
Aerated concrete itself is not susceptible to mold development and insect and rodent populations.
In terms of cost, it is much superior to wood, so the costs of constructing such a bathhouse will be minimal.
In order for the building to last as long as possible, it requires thorough finishing both indoors and outdoors.
Floor installation
The construction of floors is one of the main works for the treatment of a bath room.
Depending on where the floor covering will be placed - in the steam room, locker room, relaxation room or washroom, the type of flooring depends on:
- Made of concrete;
- Leaking;
- Solid.
The easiest to implement is a leaking wooden floor. This option is perfect for those who are engaged in construction on their own, without the involvement of outside finishers.
To do this, you need to place the logs and lay them on the foundation base (you can make special bookmarks).
The beams or boards are sewn parallel to the wall, leaving a small distance of a few millimeters between them.
In this case, the water will flow directly into the underground. This option is perfect for use in summer or for areas with moderate (mild) climatic conditions.
The non-leaking floor option looks much more complicated and takes longer to install. To do this, it is necessary to construct a structure consisting of 2 floorings: rough and main.
Insulation can be placed between them. Water will accumulate at the slope where the hole is placed.
The liquid will flow from it through the drainage system into the sewer system.
It is best to lay ceramic tiles on such floors (to avoid injury, it is best that they have a rough surface).
To conduct electrical wiring in a bathhouse, you must first select a suitable cable to avoid overloads and overheating.
Since this room has high humidity, to ensure maximum safety, it is necessary to carefully insulate the wire.
Wall decoration
Features of materials
Interesting features of various materials:
- Foil can be replaced with liquid glass . But it must be used immediately after the waterproofing layer.
- Linden is a very beautiful material with a pleasant smell. But it requires careful and timely care, as it very quickly loses its appearance.
- Alder has a pleasant appearance and emits a cognac aroma . But you will have to pay a lot of money for such material.
- Aspen is not an acquired taste material. Although it has a beautiful appearance, not every visitor to the bathhouse may like the bitterness in the smell.
Choosing material for interior decoration is the most enjoyable process. There are many types of wood on the market.
Stage four: roofing
Before erecting the roof, it is necessary to provide a concrete reinforcing belt on which twisted wire reinforced with anchors must be installed. The belt is poured around the entire perimeter, and bookmarks (special pins) are made in the screed itself for attaching the Mauerlat. They help secure the roof more securely and ensure its resistance to strong winds. A wooden frame is placed on the rafters. After which the roof covering is mounted on it. Coverage may vary. Depends on the financial situation and personal preferences of the owner.
Roof roofing diagram for aerated concrete structures
Let's look at the example of a gable roof:
- A rafter system is installed, which includes a rafter leg, a base and a crossbar, made from 4x10 cm edged boards;
- First, the front triangles of the bathhouse are assembled;
- Lathing is being done. It is made either solid, or wooden beams are placed at a distance of half to one meter;
- The attic floor is laid, in which holes for ventilation are made in advance;
- The pediment is sheathed;
- Waterproofing is laid on the frame and the roof is covered with roofing material.
The finishing ceiling is mounted from the inside. In bathhouses, unlike ordinary residential buildings, vapor barrier of the ceiling is mandatory, since hot steam rises.
Stage two: foundation construction
As with the construction of any other building, the first and most important stage will be the construction of the foundation. The peculiarity of gas silicate blocks is that you can save quite a lot of money on building the foundation.
Usually they use a strip foundation because it is more reliable, although a nested foundation can cope with this task perfectly. It all depends on the personal preferences and financial capabilities of the owner.
When installing a strip foundation, do not forget to drill holes for supplying communications
Step-by-step instruction:
- Preparing and leveling the soil surface;
- Carrying out markings regarding the bathhouse project;
- Formation of a trench with a depth of 50 cm - 70 cm and a width of 30 cm;
- Laying a layer of sand and crushed stone 15-20 cm high on the bottom;
- Pouring cement mortar 15-20cm thick;
- Installation of wooden formwork from OSB sheets, plywood and so on.
- Sometimes reinforced belts are used for a more reliable and strong structure. A frame of metal rods is assembled along the entire perimeter and connected to each other with wire;
- Filled with cement mortar. For a small bathhouse, a height of about 80 cm is suitable;
- Leave the foundation for several days until the concrete dries completely. Afterwards, waterproofing work is carried out using roofing felt (rolled roofing material made by impregnating special cardboard with fusible bitumen from petroleum products).
Installing a monolithic foundation would also be a good option. This method is less labor-intensive but more expensive due to the large amount of solution and other materials used.
The monolithic foundation is poured over the entire area of the future bathhouse
- A pit is dug across the entire area of the future building to a depth of 80 cm;
- A layer of sand (10-15 cm) is placed on the bottom, leveled and compacted;
*Use a level for a more accurate calculation.
- A layer of crushed stone (10-15 cm) is poured on top, leveled and compacted;
- Formwork is installed around the entire perimeter of the bathhouse;
- The foundation is poured with a large amount (which is why the pit is so deep) of concrete solution;
- After the foundation has completely dried, it is isolated from moisture with the same roofing material.
Financial expenses
The cost of construction work depends on how complex the project will be. On average, when constructing a small bathhouse, the price per square meter is 10,000 rubles. The more complex the project, the higher the price. If you do not use the services of professional builders, the main expense column will be the purchase of building materials.
If you use aerated concrete instead of natural wood as the main material, then the final cost of construction drops by almost three times. In order for a bathhouse made of aerated concrete to serve you for many years, you need to be extremely careful about the choice of material. What to look for when purchasing was discussed earlier.
A gas silicate sauna is 2-3 times cheaper than a regular wooden sauna!
But you will have to pay for the design of a future building in any case. Numerous positive reviews from developers indicate that even an inexperienced home craftsman can build a good bathhouse from aerated blocks with his own hands.