From the first lines it is worth agreeing that partitions appear when the bath is being remade. Otherwise, when it comes to building a new bathhouse, they are called “non-load-bearing walls” and are erected at the same time as all the others. Accordingly, the materials used are also design materials.
In this material we will only touch on what concerns the brick partition in the bathhouse. It is characterized by a certain uniqueness of requirements, which is better to discuss separately, without lumping together all existing types of partitions.
Brick bath
For brick there are fewer restrictions in choosing a place for construction and in implementing the configuration of premises. Fire-resistant material is chosen for the building of the bathhouse.
Brick bathhouse: pros and cons
The advantages of a brick bath include:
- fire safety;
- life time;
- environmental friendliness;
- variety of projects;
- ease of operation.
The clay from which I make bricks is a natural material, so we can talk about its environmental friendliness. At the construction stage of the bathhouse, wood is treated with fire retardants and anti-rot preparations, which carry harmful impurities with them. It is impossible to set the blocks on fire, which is important for the building, since they use solid fuel stoves, in the firebox of which the temperature reaches 600°. A brick bathhouse will last 60 years or more with proper care. A structure made of timber can withstand the same period, but maintenance costs are 2-3 times higher. Rounded or planed timber does not bend, which interferes with the creation of designer buildings. The shape of the block bath wall is made curvilinear if the project requires it.
When choosing a material, consider the disadvantages:
- heat capacity;
- the need for insulation;
- moisture absorption;
- price;
- foundation.
The thermal conductivity of brick is higher than that of wood, so it is necessary to insulate the bathhouse with an insulator. Micropores in the blocks absorb moisture, collapsing from temperature changes and losing strength. A bathhouse project made of brick can be more expensive than one of the same dimensions made of rounded logs. The weight of the structure requires a solid foundation, which also increases costs and creates problems on unstable soils.
Which brick is better to build a bathhouse from?
When constructing the walls of a brick bathhouse, well masonry is used, the peculiarity of which is the presence of an air gap between the planes. This approach allows you to insulate the surface from the inside. The following blocks are used:
- red ceramic brick;
- red porous brick.
Ceramic is suitable for cladding and masonry. Blocks are produced solid or hollow. The former have greater load-bearing capacity, the latter - thermal insulation properties. Solid brick is laid in two rows if bathhouse walls are being built from it. Hollow is not suitable for plinths and chimneys.
Porous blocks are a molded mixture of clay to which sawdust is added. When fired, the latter turn into ash, forming voids, which is important for thermal insulation properties. Thermal conductivity is comparable to that of rounded timber. Advantages: sound insulation, light weight and durability.
Advice! If it is planned to insulate the walls of the bathhouse with mineral wool and install waterproofing, then sand-lime brick is also suitable for construction.
How to build a brick bathhouse
Before building a brick bathhouse, choose a location on the site in accordance with SNiP standards. It is removed 1 m from the neighbor’s fence. In this case, the roof slope must end on the owner’s property. If there is a wooden building on the neighbor’s territory, then the distance from the bathhouse to it should be more than 15 m. The same distance is maintained to open sources of drinking water and forests. A brick bathhouse not adjacent to the house is removed 8 m from the roadway and 5 m from the roadway.
After selecting the territory, a project is determined, which is necessary for calculating the building materials and calculating the supplied communications. The number of blocks for walls is determined by dividing the surface area by the area of the brick. Take into account the thickness of the seam so that there is no excess. Choose the type of pitched or flat roof for a brick bathhouse. The latter is not suitable for areas with heavy snowfall in winter. To reduce the project cost, the roof is covered with a profile sheet. Its quantity is determined by the example with bricks.
Windows and doors for brick baths are made of plastic. They are resistant to moisture and do not deform due to temperature changes. Laminated frames with imitation wood are suitable for red brick. One sash is made openable for ventilation. A small window is placed inside the steam room to reduce heat loss. The entrance door to the bathhouse is made of wood or plastic.
Walling
Material
To build the box, it is best to use facing and sand-lime bricks. Even before starting construction of the bathhouse, you need to calculate the required amount of material.
The calculation is purely mathematical - the planned height and width of the walls must be divided by the multiplied height and width of the brick. Another 5 percent must be added to the resulting number of bricks in case the material is damaged.
Advice! It is better to lay the outer walls in one and a half or even two bricks, but the internal partitions in the steam room can be made in one brick.
Necessary tool
To build a sauna with your own hands from brick, you need to prepare the following tools:
- Trowel;
- Shovel;
- Plumb;
- Rule (one and a half to two meters long);
- Level;
- Roulette;
- Hammer-pick;
- Square.
Types of brick bath masonry
Types of masonry
When building a bathhouse, masonry can be done in one of several ways:
- With air gaps up to 6 cm wide;
- Ring-shaped masonry, when thermal insulation is poured between the inner and outer rows.
- No internal voids. In this case, it is necessary to use good, dense bath insulation on the inside.
The most economical option is the second option, since the thickness of the masonry is significantly less and the thermal performance is very good. The only thing you need to pay attention to is the neatness of the seams and careful dressing.
Masonry technology
The brick part of the foundation and the plinth located below the waterproofing must be made of solid bricks, and above the waterproofing you can use hollow bricks. When laying subsequent rows, you can use chipped bricks.
Instructions for building walls are as follows:
- First of all, you need to make a solution in a ratio of 1:2.
- The solution is then applied to the foundation, protected from moisture.
- Before moving on to laying the walls, you need to lay out several bricks in the corners.
- Depending on the chosen type of masonry and dressing scheme, the walls themselves are then laid.
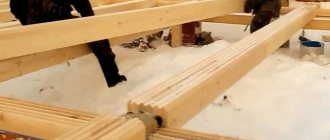
- After the masonry is completed, pins must be driven into the walls and the beams must be secured to them. Floor beams are installed in special nests directly on the bricks, but they must first be wrapped in roofing felt. The ends of the beams must be left open, and the gaps between the walls and beams must be filled with thermal insulation material.
Advice! The laying of rows should be carried out using a mooring cord, which must be pulled on each row and fixed with nails.
Bath roof diagram
Erection of the roof and insulation of the ceiling
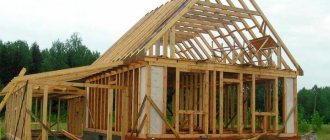
Creating a roof for a bathhouse is no different from constructing a roof in other buildings:
- Initially, you need to install the Mauerlat on the walls using anchors.
- Then the rafter system is attached to the Mauerlat.
- A wooden sheathing is installed on top of the rafter system and the roofing material is fixed.
This entire structure is installed according to the design, so no difficulties should arise. When the roof is ready, it is necessary to create the ceiling of the bathhouse. As a rule, tongue-and-groove or planed boards made of larch, cedar, pine needles or aspen are used for these purposes.
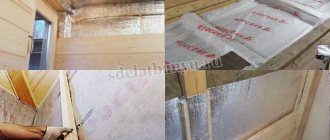
In the photo - wall insulation
Brick bath projects
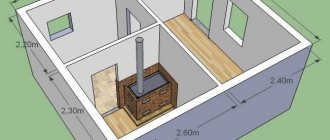
Above is a project for a brick bathhouse measuring 6 by 4. It is being implemented in small areas in country houses or dachas. The building is divided into three parts. Half is occupied by a relaxation room, which is equipped to suit personal preferences. The furnace furnace for the steam room is brought into it. The washing room is transitional; it is combined with a bathroom to save space inside the bathhouse.
This brick bathhouse project has an attic with a billiard room and a gym. The shower and toilet are separated, there is a guest room that will allow you to receive relatives and friends. The steam room area is enough for 3-4 people who can be inside at the same time. A grill or barbecue is installed on the terrace.
The option shown in the drawing is a full-fledged brick country house with a bathhouse inside. It is distinguished from the previous one by its large area and the presence of a font. The latter is filled with cold water for a contrasting effect on the human body. It replaces the pool and is cheaper. There is a separate room for storing firewood, which allows you to avoid cluttering the rest room. The terrace surrounds the brick bathhouse on both sides, expanding the area for outdoor recreation.
Project of a one-story brick bathhouse, in which the bathroom is separated from the shower. To reduce heat loss and store firewood, a vestibule is equipped. The steam room can accommodate 5 people at the same time. In the recreation room there is a corner for the kitchen.
Advice from the experts
There are no high temperatures in a brick washing bath, but the materials are affected by moisture. Therefore, the walls can be finished with tiles. The surface is first leveled with plaster. The layer is applied with a thickness of 15 mm. Once the ceramics have been laid, the solution is removed with a rag if it gets on the surface of the cladding.
The foundation, floor, walls, windows - all these are parts of a single whole - the baths. Therefore, for its finishing it is better to use materials that combine with each other. For cladding walls, for example, you can use clinker tiles for interior work, and for arranging the foundation, clinker for difficult operating conditions.
Do-it-yourself brick bath: step-by-step instructions
When the building material is delivered to the site where the brick bathhouse will be built, the area is cleaned. Remove debris, branches and grass, remove the turf layer.
Foundation
The cleared area for the bathhouse is marked out for the foundation according to the selected project. Two pegs are driven into the corners, as shown in the photo above. A fishing line or twine is pulled between them. Control the right angle. To do this, measure the diagonals according to plan and compare them with the actual ones. If something doesn’t fit, then one of the corners is shifted to the middle or outward. The posts are secured so as not to damage them during excavation work.
They dig a pit under the strip foundation of a brick bathhouse. Its depth should be below the freezing point. In areas where the air temperature in winter drops to -35°, they decrease by 1.8 or deeper. This is necessary for strength so that the heaving soil does not squeeze out the structure and lead to cracks.
Advice! On unstable soils, a strip foundation is also used for a brick bathhouse, but it is reinforced with screw or bored piles. The latter are lowered below freezing of the soil, and the tape is left on the surface.
The walls of the pit are cleaned and leveled so that they do not crumble. A two-layer cushion is placed at the bottom, which consists of sand and crushed stone. The level of each is 10 cm. The first one is compacted and leveled. So that the surface settles, it is soaked with water. The cake is completed with waterproofing. Use roofing felt or a similar material that will prevent the capillary rise of moisture from the foundation to the brick walls of the bathhouse.
Wooden formwork is installed on top of the trench under the brick bathhouse to a height of 40 cm. The panels are made of moisture-resistant plywood with a laminated coating, which improves the quality of the base, or from boards. The waterproofing material is laid with an overlap so that the solution does not squeeze it out. A metal sheathing made of reinforcement is placed inside the gutters. The boards are reinforced with spacers and jumpers on top.
After pouring the foundation for the brick bathhouse, the concrete is compacted with an internal vibrator, which eliminates cavities and increases the strength of the mixture. The surface is leveled with a trowel to make it easier to maintain it when removing walls. If the tape is poured under a brick bathhouse in the summer, then the structure is wetted once a day and covered with oilcloth so that the surface does not crack due to moisture evaporation.
Walls
Before starting to remove the brick walls of the bathhouse, the surface of the foundation is waterproofed. To do this, it is cleaned and the resulting deposits are knocked down. The top is covered with bitumen mastic, on which roofing felt is laid. An overlap of 15 cm is made between the sheets. Do not use continuous wall masonry, in which the outer and inner planes are located without a gap. This scheme consumes material and requires external insulation.
Metal beacons are placed in the corners of the future bathhouse. They are verified by level in the horizontal and vertical plane. A cord is pulled between the posts to the height of the row, taking into account the thickness of the seam. Laying begins from one of the corners. The string is rearranged as you go. The evenness of the plane is controlled by a plumb line or a line between the beacons. To do this, the latter is moved outside the wall. The base of a brick bath is constructed from blocks without cavities, the walls are erected from hollow ones. If work is carried out in late spring or summer, the bricks are additionally moistened to prevent the mortar from drying out.
Roof and floor
For greater strength, an armored belt is mounted on top, which will prevent the destruction of the brick walls of the bathhouse. Formwork is constructed around the perimeter of the building, metal sheathing is laid and concrete is poured. After 2 days, the shields are removed and the influx is knocked down. After gaining strength, the upper plane is covered with bitumen mastic and roofing felt is laid to protect the roof supports from moisture. A Mauerlat is installed on top of the armored belt. The latter is a wooden beam with a cross-section of 10 by 10 cm. It is attached to the walls of the brick bathhouse with anchor bolts or on studs that were laid during pouring.
Install a rafter system for the roof of a brick bathhouse. It is supported and fixed to the Mauerlat. The lower part of the trusses acts as ceiling beams or they are mounted separately. They fasten the sheathing, waterproofing and roofing. From the bathhouse, the rough ceiling is lined with boards and a foil vapor barrier is laid. From the attic, cover the surface with a membrane vapor barrier and place mineral wool between the joists. Cover the insulation with another layer of vapor barrier.
The space inside the foundation of a brick bathhouse is filled with sand and compacted. At the base level, a wooden beam is laid, which serves as the basis for the floor. Use a log with a section of 25 or 15 by 10. It is fixed with anchor bolts to the foundation or corners to the wall. Boards are placed underneath to hold the insulation. Cover the surface with waterproofing and lay mineral wool. Another layer of waterproofing is placed on top and the subfloor in the bathhouse is laid.
Exterior and interior decoration
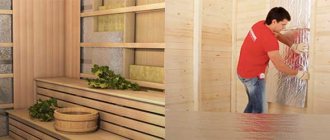
After installing the subfloor and ceiling, they begin the interior and exterior finishing of the brick bathhouse. In the steam room, the walls are covered with aluminum foil, which acts as a vapor barrier. A sheathing of timber with a cross-section of 5 by 5 cm is stuffed on top. An electrical cable is pulled through the corrugation and conclusions are made for the lamps. A lining made of larch or oak is mounted on the frame, and shelves are attached.
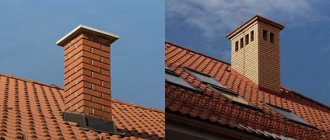
Information! A separate brick foundation is built under the stove in the steam room of the bathhouse. The perimeter walls are protected with stainless steel sheets or stripped of insulation and finishing. Pay attention to the node where the chimney passes through the ceiling so that rainwater does not flow down it into the bathhouse.
The rest room and dressing room are covered with wooden clapboard or block house, having previously installed the frame. In the washing room of a brick bathhouse, wood is used on the ceiling. The walls and floor are laid with ceramic or porcelain tiles.
If the walls of the bathhouse were laid using the well method with insulation inside, then external finishing is not required, since it is replaced by facing bricks. In other cases, the walls are insulated with mineral wool, secured with glue and plastic dowels. After this, a metal or wood sheathing is installed and the bathhouse is sheathed with a block house, clapboard or siding.
Insulation and waterproofing
The bathhouse must be insulated. To do this, the empty space between the walls of the masonry must be filled with a mixture of sawdust, light and slag and fluff lime in a ratio of 2:2:1. The mixture should be poured in layers and a lime solution of creamy consistency should be poured on top of each layer.
There is another option for insulation - tiled.
It is performed as follows:
- Wooden plugs are installed in the brickwork, onto which slats are placed.
- The space between the slats is insulated with slab material or mineral wool.
- Then a vapor barrier layer is created; foil-coated polyethylene can be used for this.
- Next, the sheathing material is attached to the slats.
You can insulate the foundation using mineral wool. In this case, the soil under the floor should be covered with a thick layer of slag or expanded clay so that damp cold does not come from under the logs. If the floor in the bathhouse is solid, you can lay mats and mineral wool on it and waterproof it on top.
Vapor barrier
Advice! In order for the bathhouse to have a traditional Russian style, it can be covered with siding.
No less attention should be paid to insulating the ceiling in the bathhouse, since the preservation of heat in the steam room depends no less on this. The most popular material is also mineral wool.
If the bathhouse does not have an attic compartment, then you can insulate the ceiling using a mixture of clay and sawdust. After this, it is necessary to perform steam and waterproofing. It is best to use foil material for these purposes, which is easily attached to the beams.
The vapor barrier should be laid in such a way that the edges of the material by 10 centimeters lie on the walls. After this, you can begin finishing.
Turnkey brick bathhouse
If the bathhouse is not used seasonally, it will be equipped with heating. This is necessary to maintain the same temperature, so that the wood trim does not suffer from changes and the brickwork does not pick up moisture. Install a solid fuel or gas boiler if the heating is water. Install radiators under the windows or a heated floor circuit. In the latter option, the floor in a brick bathhouse, after compacting the sand, is filled with a concrete screed, waterproofing is laid, insulation is insulated and a pipe is laid. Only after this the finishing is applied.
Advice! As electric heating for a brick bath, infrared film or mats are used, which are mounted under the tiles.
They provide supply and exhaust ventilation, which accelerates the exchange of moisture inside the bath with the environment. At the junction of the channels with the steam room, a valve is installed that blocks the flow of hot air into the relaxation room. The lighting is made from LED chandeliers and strips to reduce consumption and make construction economical.
Construction of the foundation
The most convenient foundation for a brick bathhouse is a strip foundation. It must be buried at least a meter into the ground; on clay soils, the foundation is made even deeper.
It is performed as follows:
- First of all, you need to dig a pit and fill it with a layer of sand 15-20 cm thick.
- Then it must be watered and compacted.
- Next, a mixture of cement-sand mortar and crushed stone 10 cm thick is laid out on the sand. Then sand again, and in this way several layers should alternate.
- After this, it is necessary to install formwork and reinforcement cage, which is filled with cement mortar.
- After the concrete has hardened, it is necessary to lay a vapor barrier consisting of several layers. In addition, to protect from rain, you need to build a blind area one meter wide, which is made of clay and gravel.
- Then a comprehensive drainage and drainage system is installed.
Of course, such a foundation requires certain costs, but for a brick bath this is the best option.
Brickwork of the future bathhouse
Brick bath: photo
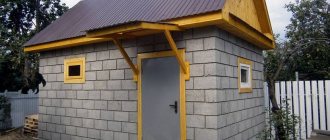
The photo shows an example of a bathhouse with 1.5 bricks. The insulation is done inside the wall, so no external finishing is required. There is a window only in the rest room to reduce heat loss. Metal tiles were chosen for the roof, which are more expensive than corrugated sheets, but are visually superior.
A small brick bathhouse, the walls of which are lined with a well method. There is a dressing room for outerwear and firewood storage.
Brick bathhouse with terrace. In the summer, the latter is used as a place to relax, installing garden furniture and a barbecue.
A completed bathhouse project in which the area of the relaxation room was expanded with a bay window. The advantage is good natural lighting.
A brick bathhouse with a pitched roof is suitable for areas where there are strong winds in winter but little precipitation. The advantage is that the roof is cheaper, the disadvantage is that it is impossible to equip an attic.
In the steam room of a brick bath, a metal stove is installed or it is laid out from fireclay bricks. The space behind it is left open so as not to spoil the finish.
If necessary, install two heaters. One is made of bricks, the second is electric. Power is calculated based on the volume of the steam room in the bathhouse.
If the masonry inside the brick bath was done for jointing, then installation of the lining is not required. At the same time, they think about vapor barrier of surfaces.
When laying a wooden floor in the rest room of a brick bathhouse, make a recess under the firebox window. It is decorated with tiles or metal sheets.
Advantages and disadvantages of buildings
Classic Russian baths are often built of wood, but they are in many ways inferior to brick buildings. Advantages of a brick bath:
- Service life more than 50 years.
- High level of fire safety.
- Reliability, durability.
- Environmental friendliness. The brick is made from natural raw materials and does not emit harmful substances during operation.
- Resistance to external factors - temperature changes, ultraviolet radiation, high humidity.
- Easy care.
- Attractive view. If a brick bathhouse was built by a person with practical experience, there is no need to do additional finishing of the walls on the outside. If the seams are located asymmetrically, you can cover them with decorative material.
Flaws:
- High heat capacity. Warming up a brick building takes longer when compared to a wooden bathhouse.
- High cost of building materials.
- Increased hygroscopicity. Without high-quality hydro- and thermal insulation, the premises will constantly have a high level of humidity.
You also need to pay attention to the base. A brick building must be erected on a strip or monolithic foundation. This increases construction costs.
Preparatory work
- Before starting work, it is necessary to prepare all surfaces for work and clean them. If this is a partition in a wooden bathhouse, then the walls and floor, in the places where there will be a partition, are freed from wooden cladding.
- Make markings: outline the contours of the future structure and pull the string to control evenness.
- Prepare the material (soak), tools (trowel, level, pieces of reinforcement or steel strips, hammer or pick for breaking bricks) and take care of lighting.
- To prepare the solution, a ratio of 1:3 is used: Take, for example, 3 buckets of sifted sand and 1 bucket of cement (grade no lower than M500).
- Gradually adding water, a plastic mixture of homogeneous consistency is mixed.
- The solution is prepared in small quantities and stirred every 15-20 minutes so that it does not harden.
How to do it?
If a brick partition is planned in a wooden bathhouse, then before this the structure must be stable, that is, shrinkage.
To connect the main walls of the bathhouse with the partition, pieces of reinforcement are mounted at one end into the wall and at the other into the masonry joints. The diameter of the rod should be 6 mm. If a brick partition in a bathhouse is placed near the stove, then it would be correct to leave a window for the combustion channel. The progress of masonry work is carried out in the following order:
- The first thick layer of mortar is laid, leveled with a trowel, and creates the base of the wall. We need to give it time to catch on.
- Then another layer - thinner - under the first row of bricks. The mortar is applied to the ends of the outer bricks with a trowel, pressed tightly against the wall and excess mortar is removed. Using a stretched string, the evenness of the rows is controlled. And the level shows horizontal and vertical.
- The laying of the second and each even row begins with halves of material. This - dressing - is done to evenly distribute the load.
- Every 3-5 rows, pieces of reinforcement or steel wire are placed on the cement to provide strength.
- In a similar way, the entire wall is driven completely up to the ceiling. The remaining gap is filled with small pieces and fragments soaked in solution. Small cracks are sealed with tow.
- If the bulkhead is planned with a door, then the frame is set up in advance. It is attached to the brickwork using steel strips. The bricks are laid close to it. Do not forget to control the horizontalness and evenness of the masonry by moving the stretched string higher.
- After the solution has hardened, the seams are sanded.
Between the sink or rest room and the steam room for ventilation during drying, you can place a small hole that can be closed during bath procedures with a shield or plug. After the partition is erected, the wall on the washing side is tiled, and in the steam room it is insulated, thermal insulation foil is laid and covered with clapboard.