Malfunctions and their elimination
To ensure trouble-free operation of a pellet boiler, it is first necessary to correctly position and install the heating equipment.
The installation area must be strong, capable of supporting not only the weight of the equipment itself, but also the weight of the bunker filled with pellets. Walls and floors must be insulated with non-combustible materials. Installation of ventilation and smoke exhaust is carried out only from non-flammable, durable and high-quality materials.
There are several relatively simple malfunctions in the operation of pellet equipment, which can easily be corrected independently:
- an increased level of fuel consumption can be caused by low-quality pellets, or a sharp drop in temperature outside;
- the appearance of sparks from the chimney pipe is most often caused by clogging of the ash pans with combustion products;
- the appearance of smoke and popping noises when opening the door of the heating boiler is usually the result of clogged fire and chimney pipes;
- Insufficient heating of the room is observed when the boiler power is incorrectly selected, the number of heating radiators is insufficient, or there is an air lock in the system.
As practice shows, it is advisable to purchase the most complex components and elements in ready-made form. A burner, firebox, oven doors, sensors and programmers, a fan and a factory-assembled electric motor are always preferable to do-it-yourself equipment.
Boiler Assembly Guide
Pellet boilers have a rather complex design. The instructions for assembling them will also be difficult and multi-step. For greater convenience, the assembly process of each main unit is considered separately. Buy or make the necessary elements, and then simply assemble them into a single system.
Burner
Burner
It is highly recommended to buy this element of a pellet boiler ready-made. The burner is where you will spend the most money.
Making a burner yourself is almost impossible for the reason that this part of the boiler is not simply a container for igniting loaded pellets, but a complex control and regulatory mechanism.
Pellet burners are equipped with special sensors and have several preset programs that allow you to achieve the most efficient fuel consumption and ensure the most efficient heating of your home.
Housing and heat exchanger
You can handle the assembly of the housing and the manufacture of the heat exchanger yourself. It is best to make the boiler body horizontal - with this placement of the unit, maximum heating efficiency is achieved.
It is recommended to use fireclay bricks to make the body. You simply assemble a kind of box without a top cover and place a heat exchanger in it with connected pipes and other elements. Brick is recommended for the reason that it accumulates heat much more efficiently than cast iron, steel sheets and other popular materials.
Fireclay brick
The heat exchanger of a pellet boiler is a system of pipes interconnected and connected to the heat supply pipes of a private house.
First step. Assemble a rectangular heat exchanger from square pipes. To do this, cut the pipes into pieces of the required length and weld them into a single structure.
Second step. Make holes in the profile that serves as a vertical post for connecting round pipes.
Third step. Prepare holes in the remaining front pipes for drainage and water connection pipes. Hot water will be discharged through the top hole, cold water will be supplied from below.
Use metal pipes with a length of 150 mm. Next, you can use polypropylene pipes. Be sure to install ball valves where the pipes connect to the boiler. Additionally, you can install filters if necessary.
Fourth step. Weld the back of the unit to its front and weld the side pipes.
At the same stage, select a convenient place to connect a chimney pipe with a diameter of 10 cm. At the bottom of the heating unit, provide a small chamber for collecting ash. Also, the design of a pellet boiler necessarily includes a firebox. More about him later.
Pellet boilers
Firebox
In the firebox, as already noted, pellets are stored and from here they are supplied to the burner.
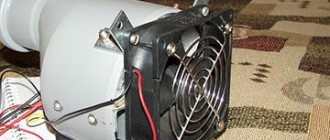
First step. Prepare the necessary materials and equipment. You will need an auger with a diameter of 7.5 or 10 cm, an electric motor and a metal casing. You will connect the engine to the pellet burner control unit.
The function of a metal casing can be performed by any container of suitable volume with sufficiently thick walls.
Second step. Install the inlet pipe of your auger into the discharge mouth of the casing. Connect a corrugated plastic pipe to the other part of the auger to supply granular fuel to the burner.
In conclusion, all you have to do is assemble all the listed elements into a single structure. Do this and proceed to installing the boiler.
DIY making
In order to make a stove with your own hands, you need to buy some structural components. They are quite complex and impossible to make on your own.
You can make simple elements yourself. Then assemble and install the unit.
Burner
This unit is just for sale. It is complex because there is a regulatory element built into it. In addition, the burner is equipped with sensors. The program regulates fuel consumption.
Frame
You can actually make this part yourself. The material used is fireclay brick. Externally, it is a box without a lid. A heat exchanger will be placed inside. Fireclay brick is considered the optimal material for retaining heat.
Heat exchanger
A homemade stove is equipped with a heat exchanger. It is a welded pipe structure connected to the heating system.
It is made as follows:
- A rectangular structure is welded from square pipes.
- Holes are made in the vertical posts for round pipes.
- Round pipes are welded through which the heating connection is made.
Firebox
Pellets are poured here and fall into the burner.
Operating procedure:
It is necessary to purchase an auger with a diameter of 7.5 to 10 cm, a metal container and an electric motor. The motor is connected to the burner control unit. You can use any thick-walled casing as a metal container. An inlet pipe is connected to one part of the auger, and a corrugated tube is connected to the second. The fuel supply will pass through it.
Principle of operation
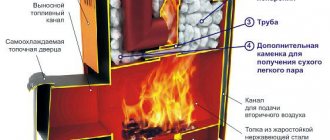
Fuel is supplied to the combustion chamber via a transport auger from a special container designed for storing pellets. The device does not have a direct source to provide natural draft, so it is equipped with a burner. Thanks to the presence of a special fan, it pumps air and ignites the fuel the moment the device turns on.
Thermal energy is transferred to the coolant through a heat exchanger. Flue gases are removed through a chimney pipe. Due to the presence of a small amount of mineral elements in the pellets, a small amount of ash is formed.
Through the grate, the ash is removed into a special ash pan chamber. As soon as the pellets in the combustion chamber burn out, the temperature drops. This is recorded by a special sensor. After this, using an auger, the pellets are automatically fed from the loading tank into the combustion chamber.
Pellet boilers must be installed in compliance with certain requirements for the installation site.
Choosing a place
It is better to install the unit in a separate room due to its impressive dimensions. The best option is a room with a temperature of at least +10 °C.
Installation outside the building is not recommended. However, when placing equipment outdoors or in a garage, pipes should be located underground below the freezing level to reduce heat loss.
Preparing the floor and walls
It is necessary to level the floor in the place where the equipment will be installed. The platform must be strong enough to support the weight of the device itself and the pellet hopper. Non-flammable plates should be fixed to the walls and floor. There must be a place for pellets near the device.
Ventilation and chimney
We install ventilation and a chimney made of non-combustible material. The latter, as a rule, is displayed on the roof, protruding above its surface by at least half a meter. It should be protected from precipitation and insulated.
The cross-section of the chimney pipes must be larger than the diameter of the hole intended for removing exhaust gases from the equipment.
Care should be taken to maintain the chimney by providing a special tightly closing opening for cleaning it.
Installing equipment
Having prepared the site, we install the device itself. We install and connect the burner, hopper, auger and automatic control panel. Communications are connected to the equipment through ball valves.
This will make the system easier to maintain. It is advisable to install filters. After connecting all the elements, a test run of the heating system is performed.
Device
The structure of a pellet boiler with the designation of the most important elements and components (click to enlarge)
Before you start work, you should evaluate your strengths. Making a boiler requires good training, knowledge, skills and is much more difficult to make than a gas or electric one. It is no coincidence that finished products of this class are very expensive.
In addition to the pellet burner for the boiler. which is almost impossible to do at home, all other elements of the design will have to be done independently. It will take a lot of work for the result to meet expectations.
Having experience in such work, assembling a heat exchanger and laying out a combustion chamber from fireclay bricks is quite a feasible job. You can also handle installing the burner, but you will have to work hard with the fuel supply system. This most important node in each specific case turns out to be exclusive. It is necessary to ensure an uninterrupted and reliable supply of fuel pellets to the burner (read about boilers with automatic fuel supply here).
The density of pellets is high, and a large number of them cannot burn at the same time.
Please note: the supply of fuel and air in pellet boilers is always forced. It is almost impossible to ensure the correct mode during manual control unless you are constantly nearby
Therefore, the device is equipped with automatic systems, and they cost a lot
It is almost impossible to ensure the correct mode during manual control unless you are constantly nearby. Therefore, the device is equipped with automatic systems, and they cost a lot.
This is a factor in the high cost of the entire structure. One or more programmers cope with the task without outside interference. Even a small fuel bunker can autonomously heat a house for up to three days. If you assemble a more solid structure with a large supply of pellets, then the service life can be increased significantly.
Expert advice: It is very important to accurately calculate the air supply. If there is not enough air, pellets may not burn, but smolder, and if there is too much air, there will be heat loss, which will be blown into the atmosphere
Additional costs will also be incurred for the purchase of a motor for the screw mechanism and its automatic connection. Before assembling a pellet boiler with your own hands, you need to draw up drawings of the future boiler, calculate its dimensions depending on the area of the available space for its installation.
The main part of a pellet boiler is the burner
The decision to make a pellet boiler with your own hands is not a cheap one, but the finished product will cost even more. The main element of the device is a burner, which is purchased separately.
Similar to factory models, the main focus is on assembling the body and fitting all components. Assembly kit includes:
- Sheet steel 4-6 mm for the manufacture of the boiler body.
- Bunker material. It can be made from sheet metal (a thickness of 1-2 mm will be enough), multi-layer plywood, or wood.
- Screw. It is selected according to size or, if you have the skills, you can do it yourself.
- Chimney pipes. Metal or asbestos and mounting kit.
- Control system. Provides automatic control over the operation of the boiler.
- Motor for operating the screw mechanism.
- Pipes for heat exchanger. Square cross-section products are recommended.
- Pipes and fittings for connecting the heating system.
- Fireclay brick, if the combustion chamber is made stationary.
- Grate. It will provide air access to the combustion site.
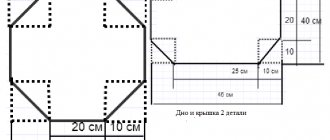
Pellet boiler diagram ↑
Below is the boiler assembly in the drawings.
The figure shows what main components a pellet boiler is assembled from
Schemes and drawings for assembling a pellet boiler: 1 - Boiler; 2 — fuel bunker; 3 — automatic feed unit; 4 - control device; 5 - recirculation unit; 1.1 - firebox (door); 1.2 — front fence (door); 1.3 — hatch; 1.4 - rear door; 1.5 — atmospheric shutter handle; 1.5.1 the shutter is open - the boiler does not work; 1.6 - place of gases; 1.6.1 - atmospheric shutter; 1.7 - feed; 1.8 - recoil; 1.9 — supply to the collector; 1.10 — return from the collector; 1.11 - ash pan; 1.12 burner in the top chamber; 1.13 - firebox; 1.14 - radiator; 2.1 — bunker hatch; 2.2 - fuel dump; 2.3 - stirrer; 2.4 auger conveyor; 3.1 gearbox; 3.2 Fan; 3.3 Air seal; 4.1 — thermometer for smoke; 4.2 - pressure gauge; 4.3 - supply thermometer; 4.4 - three-way valve; 4.4.1 minimum temperature supply; 4.4.2 — temperature supply (maximum); 4.5 - emergency thermostat; 4.6 — change of modes; 4.6.1 Off; 4.6.2 - on fuel supply (only); 4.6.3 - on air supply (only); 4.6.4 - Automatic; 4.7 - thermostat; 4.8 - output thermometer; 5.1 - safety (shutter); 5.2 - for recycling; 5.3 - shutter (ball); 5.4 - filter; 5.5 recirculation pumping; 5.6 — output from recirculation; 5.7 drainage hole
Visual diagram of a pellet boiler
Starting and maintaining the boiler
Before the first launch of the structure, you will need to invite a specialist to check all elements for compliance with safety requirements. It is not recommended to switch it on yourself.
Start-up is carried out only after checking the unit for compliance with the selected scheme. The tightness of the chimney, bunker and the boiler itself must be checked. Before starting, you need to make sure that the heating system is full and the pressure in it corresponds to parameters suitable for operation. All instruments and automation must be in working order.
Caring for the unit is not difficult. As it burns out, it is necessary to add fuel, clean the stove from ash, and also monitor the performance of the automation elements. Separately, you will need to check how the burner and ignition system work.
Advantages and disadvantages of pellet boilers
The advantage of a wood pellet boiler is that:
Diagram of the arrangement of some parts of a pellet heating boiler.
- it can take care of your hot water and heating needs;
- suitable for local economy;
- such boilers are seamlessly integrated into the existing heating system;
- wood is a sustainable resource;
- environmentally friendly fuel;
- works with high efficiency;
- The cost of wood pellets is much cheaper than other types of fuel. Pellet consumption is approximately 50-70 g per 1 kW of thermal energy for a medium-power boiler.
But there are also disadvantages that should be taken into account before converting your heating to use wood pellets:
- although unlikely, it is possible that there will be a shortage of wood pellets in the future (if you deal with an unscrupulous supplier);
- For some people, the smell of the granules may be unpleasant;
- can be expensive if you do not replace the old fuel oil heating system.
You can make a pellet boiler yourself, but this will require quite a lot of materials. You should start with what the boiler will be like, or rather its body. It can be steel or cast iron. The service life of a steel casing is about 20 years, a cast iron casing is twice as long.
The second feature of the boiler is the fuel supply system:
Operating diagram of pellet heating boiler No. 1.
- manual;
- vacuum (granules are sucked or extruded into the boiler from storage), in this case the boiler must be in close proximity to it;
- mechanical (pellets from the storage are transferred to the boiler by a screw).
When making boilers with your own hands, the optimal (and most affordable) option is to choose an electric auger.
You can try to automate the pellet supply system a little, then you will need a bunker, which at the same time will be a storage for the working stock of pellets. The size of the bunker will be determined by this reserve. It is best to have at least a 2-3 day supply.
Features of a pellet boiler
Solid fuel pellet boiler
The unit in question is one of the modifications of an ordinary solid fuel boiler, optimized for operation using special pressed pellets as fuel.
- The granules used are a very inexpensive fuel, second only to main gas in this indicator.
- By assembling a pellet boiler, you can provide economical and efficient heating of your own home.
- In addition, pellet boilers are one of the safest types of heating equipment for private use.
Using pellet equipment
An elegant stove can be used as an additional equipment for heating one room and as the main heating unit for the entire house.
If it is necessary to heat several rooms, an air heating system for the building is installed. To do this, a fireplace with special convection channels is purchased to warm up the air masses to a certain temperature, and an air duct system is laid. Metal corrugated hoses are installed in all rooms requiring heating in fireproof, non-combustible boxes or in special insulation. Warm air enters the premises by pumping fans or turbines.
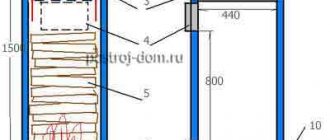
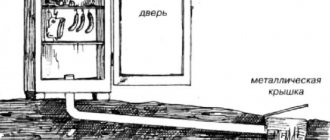
How to load fuel correctly
Firebox and chimney
The picture shows an empty firebox. How does the stove work and how to use it?
Unlike, for example, “bubafoni”, the blower pipe is inserted directly into the firebox with the pins down. They should rest against the bottom, with the blower located in the center.
- Fuel loading begins.
- Fuel is loaded up to the chimney level.
- Sawdust must be compacted.
- The better the sawdust is compacted, the more efficiently the stove operates, and this significantly affects the operating time.
- In this case, as the fuel is compacted and loaded, the blower must be slightly rocked to the sides so that a small gap is formed between the blower and the compacted fuel.
- Otherwise, the ignition process will be significantly delayed.
Sawdust boiler cost
Scheme of operation of a solid fuel boiler.
Heating with sawdust is quite profitable. It is necessary to clarify that the design itself usually has a decent cost, but during operation it justifies itself. After all, you can heat your apartment with any waste; a long-burning boiler will process everything. You don’t have to constantly search for fuel; it is consumed very economically. Such a boiler can warm the space around it for about a week, depending on how much raw material is put into it. Of course, the most profitable thing would be not to buy it in a store, but to make it yourself.
If we talk about how long a long-burning furnace can operate, we cannot fail to mention the Popov boiler. It has a very high efficiency, as it is capable of generating 1 kW of energy per hour from 100 g of sawdust. That's a pretty decent amount of heat. In practice, this figure causes a lot of controversy. Some owners of such heating devices confidently state that they are not capable of producing more than 500 W per hour. Whether this statement is true or not, a long-burning boiler is very expensive on the market. How to make a long-burning boiler with your own hands? Now no one doubts that it is very profitable to use sawdust on the farm. Making it yourself is not as difficult as it seems. Although it is necessary to have a good understanding of the principles of its operation. The raw materials that enter the oven must be well compacted; they are laid in several layers. The more firmly it is compacted, the better, thereby increasing the efficiency of the device. After all, even an ordinary stove can show good results if you use carefully dried firewood (but it will take at least 2 years to dry). This is too labor-intensive a process, which is why no one does it.
The simplest homemade sawdust boiler may outwardly resemble the familiar potbelly stove. But such a stove will be able to work for a good half of the day with only one refill. A similar design can be used not only for heating, but also for smoking meat or fish.
Before starting work, you need to prepare all the materials:
Diagram of a long-burning boiler.
- raw material tank;
- steel sheets 2-3 mm thick;
- steel sheets 4-5 mm thick;
- welding machine;
- Bulgarian;
- brick;
- cement mortar;
- rectangular pipes with a profile 60x40 mm;
- round pipes with a diameter of 40 and 50 mm.
The first step is to make 2 cylinders from steel sheets. The diameter of one cylinder should be slightly larger than that of the second. The smaller cylinder will need to be inserted into the larger one and a lid attached on top. You can also make the lid yourself from the same steel. The bottom must be welded from below. The thickness of the bottom and lid should be twice that of the walls of the tank (approximately 5 mm).
The pipes need to be selected so that they fit perfectly into each other: then it will be easier to assemble the structure. The rectangular pipes will be in a vertical position, and all the others should fit into them. Therefore, holes of the appropriate diameter must be made in rectangular pipes. 2 pipes must be connected to the boiler. One for hot water output, and the second for cold treatment. Therefore, holes with a diameter of 5 mm are also made in the walls of the boiler.
Now you can start welding the pipes. This must be done very carefully so that there are no gaps left. Water pipes should be welded last. The open ends of the pipes are thoroughly welded with small pieces of steel.
A homemade sawdust boiler should not allow water or smoke to pass through. Therefore, it must be checked for leaks. This is easy to do with ordinary water. It just needs to be poured into the pipes. If a leak is found, the holes will need to be sealed.
Now that the entire structure is fully assembled, it will need to be mounted into the furnace frame. This frame may look like a regular box. To assemble it, you will need bricks and cement mortar. It is best to assemble such a frame in advance, and not at the last moment.
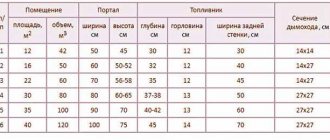
How to correctly calculate boiler power
Before you start making boilers with your own hands, find out what area you are going to heat with their help. Knowing the condition of the heated room and the average annual temperatures outside will allow you to accurately calculate the required boiler power. Therefore, having measured the length, width and height, calculate the area of the walls, ceiling, windows, and floor.
Diagram of a hot water boiler using pellets.
Then, using the reference book, determine the heat transfer resistance coefficients of the materials from which they are made. Divide the difference between indoor and outdoor temperatures by the R-value. Finally, multiplying the surface area by the resulting value and summing this data will give you the total amount of heat loss in the room. The power of your boiler should be 10-15% higher than these losses. If all this is very difficult for you, then use the Internet and find a calculator that will very quickly make all the calculations you need.
To make a boiler you will need:
Materials:
Operating diagram of pellet heating boiler No. 2.
- carbon steel, sheet 3 and 6 mm thick;
- square steel pipes with a wall thickness of 4 mm;
- 2" round pipes, wall thickness 4 mm;
- sheet asbestos;
- asbestos sealing cord;
- electrodes;
- rod (circle 20 mm);
- grate;
- fireclay brick for the combustion chamber;
- oven doors 2 pcs. (you can make them yourself from a corner and a steel sheet, in this case you only need hinges and a latch);
- electric motor for auger;
- fan;
- pellet burner (due to the complexity of the design, it is better to purchase a ready-made one; it is quite expensive, but the costs quickly pay off).
Tools:
- tape measure or ruler;
- Bulgarian;
- welding machine;
- drill.
Quality control
Before loading and igniting the unit, it is necessary to check the tightness of the water jacket and check the quality of the welded joints. This will require an air compressor. You can test seams in two ways, which are very reliable:
- Hydraulic. The entire container is filled with water, a compressor is hermetically connected to the fitting, which should create an excess pressure of 2-3 bar. Water does not have the property of being compressed, so it will flow through all uncooked places.
- Pneumatic. Pressure is created without water, and all welds are coated with soap foam using a brush. The bubbles will show where air is leaking through. During the test, the pressure drop can be monitored using a pressure gauge on the compressor.
There is such a type of solid fuel heating source as a sawdust mine boiler. Its design and operating principle are different and more complex, although it is also quite possible to make it on your own. It works due to the fact that sawdust is burned in the lower part of the unit, pouring there from the bunker, this can be seen in the figure.
The process continues in smoke pipes, which intensively heat the coolant. The principle of afterburning wood gases (pyrolysis) is used. Operation efficiency is increased by installing an air blower - a blower fan. Making a boiler using sawdust and tyrsa with your own hands is not so difficult in practice, but it will definitely give a noticeable economic effect both during production and during further operation.
Homemade pellet boilers ↑
Speaking about homemade boilers in general, the majority of those interested in efficient heating systems still regard this possibility with considerable doubt. It seems to everyone that this is a very complex engineering structure. But you can’t screw things up here—mistakes in an area like heating can be costly. This is, of course, correct. But as for the pellet boiler specifically, it is possible to make it yourself even in the absence of special knowledge and skills.
However, I will not claim that this is a completely simple and unpretentious matter - this is not at all the case. But if you, in principle, have no fear of household technical tasks, then you can easily cope with this.
Before you decide on such an important task, you will need to decide on the material - that is, understand and imagine what metal your boiler will be made of: steel or cast iron. If it is steel, then the product will be lighter in weight, it will be somewhat easier to manufacture and install, but the service life will be noticeably shorter (about 20 years). If you choose a cast iron body option, this is probably optimal. The service life of the product will be about 40-45 years, and the material should not corrode or deteriorate. In practice, cast iron boilers are made from module sections, so that if necessary (if damaged) they can be quickly replaced. Boilers can be independent or dependent on electricity. Volatile boilers are usually equipped with an automatic pellet loading system and are equipped with a special fan. It is also possible to assemble a similar option with your own hands, but this will require a lot of time and some basic engineering skills and ideas. In the case of a non-volatile system, the boiler will be designed according to the principle of natural circulation. Here a large diameter pipe is used, placed obliquely.
Design and principle of operation of pellet boilers
To install such a solid fuel installation yourself, you will need to work hard, and first understand how it works and what it consists of. The heart of the pellet unit is the burner device, which performs almost all the main functions and is connected to the boiler controller, acting on its commands. Burners designed for burning pellets are of two types:
The difference between them is as follows. A retort pellet burner is a bowl (retort) filled with fuel from below via a screw, and air is supplied to the combustion zone by a fan through holes located on the sides of the bowl. During operation, the flame column is directed upward, which must be taken into account by the design of the boiler. The flare burner device is a pipe, which is also the combustion chamber, where a screw feed of pellets occurs at one end, and a powerful flame torch, directed horizontally, comes out of the other. This is achieved by forcing air into the chamber from the same side as the fuel.
Note. Flare-type burners are used more often than retort burners, since the latter have problems with supplying low-quality pellets. To assemble a boiler installation with your own hands, it is also preferable to use a flare burner device; below we will explain why.
In the future, we will consider the operation of the unit with a torch burner, since this design is better suited for our purpose. So, the combustion chamber in the form of a pipe is located inside the boiler, and the outer part of the burner consists of a housing with a feed screw and a fan for forcing air. To operate the electric ignition and maintain the flame, the design also includes a control board, a photosensor and an incandescent element. At the top of the housing there is a fuel supply pipe.
The process goes like this: at the controller’s command, the auger delivers a small amount of pellets into the chamber and stops. The glow element turns on and at the same time the fan turns on, causing the fuel to ignite. The appearance of a stable flame is detected by a photosensor and notifies the control unit, which turns off the incandescent element. Then work begins in normal mode, the screw conveyor resumes supply, and the fan pumps in the required amount of air. At the command of the same controller, pellets are poured into the burner through the nozzle, moved there from the loading hopper by an external screw conveyor.
Note. Many manufacturers use a fuel hopper mounted directly above the burner nozzle, which allows pellets to pour into it independently without an additional conveyor.
Now it’s worth considering the design of the pellet boiler as a whole. The design of the unit body is typical for all solid fuel installations; it consists of an internal chamber made of steel or cast iron, enclosed in an outer casing filled with water - a water jacket. To extract heat from flue gases, the design can provide 2 types of heat exchangers:
In a water-tube heat exchanger, the coolant flows through pipes, washed by combustion products and transferring their heat to it. But such a device is rarely found in solid fuel boilers; usually the opposite is true in them: flue gases pass through the pipes, giving off combustion energy to the water jacket, this is a fire-tube heat exchanger. In order for the boiler to operate efficiently, the heat exchanger is made of two or three passes. This means that the flue gases, passing through the flame tubes, change their direction to the opposite direction twice or three times, making 2 or 3 moves. This allows them to transfer maximum heat to the water jacket, and at the exit to the chimney to obtain a temperature of no more than 150 ºС.
The working process goes like this: the burner burns fuel and heats the chamber walls, which heat the coolant. In turn, combustion products, under the influence of natural draft and fan operation, pass through the flame tubes, also giving off heat to the water jacket, and are discharged into the chimney. The combustion intensity is controlled by the controller based on a signal from a temperature sensor immersed in the coolant at the outlet of the unit. This is the operating principle of pellet boilers: to automatically regulate the combustion process and, if necessary, increase or decrease the supply of fuel and air to the burner.
Industrial model
On the modern market of heating devices, there are many models of boilers that use wood, or more precisely, its crushed waste, as fuel. Depending on the technical characteristics of the product, sawdust stoves can heat only a house or, in addition, outbuildings. There is a standard scheme that allows you to provide hot water supply for the heating system and household needs, where the main element is a double-circuit solid fuel pyrolysis boiler. Heat productivity in this case depends on the power of the sawdust boiler, as well as the quality and quantity of the specified fuel.
Advantages of modern units
The main advantages of factory-made heating devices for the home are:
- maximum automation of fuel combustion and stable maintenance of the required temperature. Chip boilers independently control how full the storage hopper is, from which sawdust is fed into the boiler by screw. Due to the fact that the automatic safety system is triggered in time, the fire augers do not allow the flame to spread back to the bunker;
- The automatic mode of ash ejection into a special collection relieves owners from stopping the system for manual intervention in the cleaning system. In this case, heating boilers using sawdust stop their operation only in case of problems in order to eliminate them;
- The sawdust heat generator is environmentally friendly, because here combustion is not accompanied by the release of ash from the chimney into the atmosphere, and the heated air goes through several degrees of purification from heavy particles, and only then enters the room. Meanwhile, the ash deposited by a special cyclone is disposed of without harming the environment;
- the vast majority of boilers operating on pressed or loose sawdust are distinguished by reliable operation and high heat transfer efficiency;
- full automation of the control system, which scans equipment for faults and alerts the operator about possible errors in operation, if any.
Disadvantages of factory-assembled boilers
This type of device that generates heat has practically no disadvantages, except that their cost, depending on the brand and model, can be very high. Also, sometimes problems arise with replacing failed components, which need to be ordered from the manufacturer and wait for the goods to be delivered, which is problematic during the heating season, when stopping the system is very undesirable.
- The process begins with the automatic feeding of sawdust into a hopper equipped with a system of moving floors, from where it enters the conveyor.
- The compressed or loose wood material is stored in a hopper until the sawdust burner compartment is empty, after which the movable floors come into operation. When the tank is completely filled, fuel will not be supplied until the tank begins to empty.
- At the next stage, wood chips from the hopper are fed into the boiler using a wood chip and sawdust auger.
- After entering the combustion chamber, the fuel is burned in full due to air supply. Further, the boiler operates continuously according to the same cycle discussed in these four points.
Types of equipment
Pellets are used as fuel in the structures. These are compressed briquettes, which contain sawdust, shavings, peat, cake and many other industrial wastes. Depending on the heating area, boilers of different capacities are produced. Those used in residential areas are called fireplaces.
Pellet fireplaces
A pellet fireplace has a power of 6 to 15 kW. Used to heat a separate room or a room with a small area.
There are three varieties:
- Convection type. They only heat the surrounding air.
- Equipped with a water circuit. The air and water are heating up.
- Using not only pellets, but also firewood as fuel.
Pellet boilers
A pellet stove is used for heating industrial buildings or large residential buildings. Their power ranges from 15 to 100 kW. A separate room or basement is provided for such furnaces.
Divided into 3 types:
- Powered by pellets.
- Equipped with grating. Sawdust or firewood is used as fuel.
- Combined or universal ovens. It can be used for both firewood and pellets.