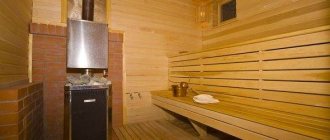
Nowadays, many people, when building their own houses, often build baths at once. They are not considered a sign of luxury, philistinism or the privilege of the rich; even in the courtyards of middle-income people, this structure is not uncommon. A bathhouse is not just a place where people can wash, but also a great place to relax and heal the body. Here you can strengthen the immune system, harden your body, and with the right combination of steam and herbal infusions, even defeat diseases that have already begun. To prevent a visit to the bathhouse from causing harm, this structure must be properly built, because temperature conditions play a very important role here.
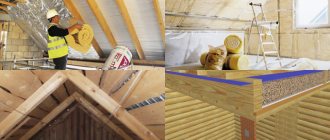
Bathroom ceiling insulation diagram.
To create a comfortable microclimate, ceiling insulation plays an important role in the proper construction of a bathhouse. Thermal insulation is needed to prevent condensation from collecting and to reduce heat loss. After all, if you don’t insulate the ceiling, water will collect under the roof and mold and mildew will appear from the dampness, the ceilings will begin to rot, and using the bathhouse will become less comfortable. 20% of all heat in the room escapes through an uninsulated ceiling, but the most important thing for a steam room is steam and high temperature. It is not recommended to make the ceiling of the bathhouse from plywood, plastic or fiberboard, as they are deformed when water gets in. If you use paint or drying oil for protection, then at high temperatures they will release substances that are toxic to humans. Let's look at how you can insulate the ceiling.
What is the reason for the popularity of the method?
Close attention has always been paid to home insulation. The modern market offers a wide range of thermal insulation materials. All insulation materials have their pros and cons. Despite this, insulating the ceiling with sawdust in private homes still remains relevant. What is this connected with? Why do we still insulate houses using this material? Firstly, the method is quite effective, as proven by many years of using sawdust. And numerous positive reviews confirm this. Secondly, the material retains its properties for a long time. Thirdly, insulating the ceiling with sawdust will be very cheap. Compared to all modern insulation materials, wood shavings are several times cheaper. This factor is especially preferable for consumers. Moreover, some construction companies give away the material completely free of charge or offer it at a purely symbolic price. And fourthly, this method is easy to install. Even a person without experience will be able to cope with the work with his own hands.
Properties and uses of clay
The modern building materials market offers a wide range of means to improve the thermal insulation performance of premises. Next, we will consider whether the clay-sawdust mass is inferior to them in its parameters.
An undeniable advantage is the low cost: often all the ingredients are obtained completely free of charge. Further maintenance and, if necessary, minor repairs of adobe coverings also do not require special costs.
The disadvantages of the material most often include labor intensity: in order for the mixture of clay and sawdust to become insulation, it must be subjected to a number of manipulations .
Types of sawdust
Sawdust is particles of processed wood that are formed during the sawing process. In appearance they resemble dust. There are also wood wastes such as shavings. They are formed as a result of drilling or planing. The chips are large in size, which is the main difference. The length can vary from 30 to 50 mm.
Sawdust is divided into different fractions, which differ in size. The length depends on the characteristics of the technological process and the equipment used. The size can vary from 5 to 30 mm.
To insulate the ceiling of a house, it is better to choose the middle fraction. Large chips have less thermal insulation properties, and material that is too small is more difficult to work with. When insulating, elements scatter, generate dust, and become clogged in the respiratory tract.
Sawdust produced in chamber-drying carpentry production has good properties. This material does not need to be dried additionally, which increases the service life of the insulation. If waste was generated as a result of processing wood with natural moisture, then it will have to be dried before use. Sawdust is placed under the canopy. It is forbidden to cover them with polyethylene, as they will rot and begin to rot.
It is recommended to choose shavings from deciduous wood for the ceiling in the bathhouse, and from coniferous wood for the house. They contain resin, which increases resistance to external influences. In addition, this material is less susceptible to damage by bugs and insects.
To insulate the ceiling, you should take shavings that have lain for 6-12 months. During this time, sugar comes out of the particles, which contributes to the development of rot. If you keep sawdust for more than a year, they can also begin to rot.
For thermal insulation, you should take clean sawdust, free of debris and foreign inclusions. If necessary, the material is sifted through a construction sieve.
It is recommended to pre-treat sawdust with an antiseptic or fire retardant solution. After drying, you can mix the insulation with a 10% lime solution and copper sulfate (or borax).
Clay preparation
Clay also requires preparation. The ideal component is clay, filled with water for the winter and thawed in the spring. The type of clay also matters; it is determined by the geographic location of production and a number of criteria.
The main one is fat content: breeds are divided into “fat” and “skinny” . The higher the fat content, the better the plasticity characteristics. At the same time, when drying, fatty rocks shrink significantly, as a result of which characteristic cracks can form on the surface.
Attention! If you have to deal with “oily” clay, you need to add sand to the mixture.
A very important point is to maintain proportions so that the insulation retains its strength for a long time. Here are its main components:
- clay;
- sawdust;
- water;
- sand.
The weather outside also matters. is most favorable for work, so that the mass has time to dry.
Technological solutions are the key to successful results and quality of the heat insulator. You will need :
- concrete mixer;
- buckets;
- two barrels: for kneading and the resulting mixture.
The clay is soaked in one of the barrels for several hours. Stirring it periodically, you will see when the mass becomes homogeneous. Using a bucket, pour a certain amount into a concrete mixer, add sawdust in the proportion of 1 bucket of clay to 2/3 bucket of sawdust .
industrial salt is added to the composition to improve thermal insulation qualities, which is especially important in cold latitudes.
Attention! When technical salt is added to the composition, the proportional ratio of clay and sawdust changes: 1:1 - a bucket of clay to a bucket of sawdust.
Transfer the resulting mixture to a second barrel or other container of sufficient size. The finished insulation needs to be installed.
The most common installation methods :
- removable formwork;
- installation of slabs;
- fixing the insulation using a grid of bars;
- design features as formwork for ceiling insulation.
Removable formwork
Formwork is constructed from boards nailed together. The mixture is filled with the space between the formwork and the insulated surface; when it hardens to the point of being able to maintain strength on its own, the formwork is removed.
Installation of slabs
Another method is quite popular: molds are made from boards in the form of slabs or bricks , the mixture dries in them and in this form is mounted on an insulated surface.
This method is especially relevant in rooms where renovation work has already been completed, as it reduces pollution to a minimum. The slabs are fixed end-to-end on the surface, the joints and gaps between them are treated with the remainder of the clay mixture.
Fixing the insulation using a lattice of bars
The bars are packed onto the insulated surface in such a way that they form a lattice with square or diamond-shaped cells approximately 300 x 300 mm and at least 100 mm deep.
If necessary, a plywood sheet is pre-attached to secure the grille if the surface features require it. The cells are filled with the prepared solution.
Attention! It is not recommended to dry the insulated clay structure in direct sunlight. The room should be shaded during drying.
Recommendations for ceiling insulation
Laying insulation on the ceiling in private housing construction is a mandatory step. After all, up to 20% of heat can be lost through this overlap. An insulated wooden or stone house requires lower heating costs. Insulating the ceiling with sawdust is the cheapest method of thermal insulation.
If you decide to insulate using sawdust material, you should take into account the peculiarities of working with it. It is necessary to select chips of appropriate quality and carefully prepare them before laying.
It is first necessary to carry out a number of operations aimed at improving the protection of wooden elements from fire and rotting. This is due to the fact that sawdust, also a derivative of the woodworking industry, is a combustible material and is susceptible to fungi and rot.
Insulation with wood shavings can be carried out in two ways: dry and wet. In the first case, the usual filling with dry sawdust occurs. Insulating the ceiling in a bathhouse is not recommended using this method. Such thermal insulation is still flammable. It is better to use a clay-sawdust solution. It doesn't matter which method is chosen. Insulate your house correctly, and then you will be provided with reliable protection from the cold.
When carrying out work, it is necessary to provide for the installation of an insulating layer of sawdust with a thickness of at least 15 cm. Sawdust, as ceiling insulation, is also used in thermal insulation of bathhouses. How to insulate the ceiling in a bathhouse? The process is similar to processing houses. But the bathhouse is insulated with a sawdust mixture that uses clay.
How to properly prepare a mixture of clay and sawdust?
It is worth saying that there are several ways to use clay with sawdust as a material for insulation, therefore the method of preparing the mixture may differ slightly, as well as the entire technology for further laying the finished material. If desired, you can use a still wet mixture, which is poured onto the ceiling from the attic side. However, there is another option, which involves making panels from clay and sawdust, which are then laid in a dried form in approximately the same way as all modern panel materials intended for insulation.
First of all, it is necessary to prepare all the necessary materials that will be needed not only during the preparation of the mixture, but also during its use for insulation. The work may require the following materials and tools:
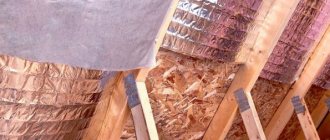
Scheme of insulating walls and ceilings with sawdust.
- Clay.
- Sawdust.
- Water.
- Bucket.
- Large trough for mixing the composition.
- Hoe.
- Wooden blocks for making molds for panels.
- Sheet of plywood.
When making an insulating mixture, it is very important to maintain the correct proportions, as this will allow you to avoid severe cracking of the finished surface in the future. If you plan to use a mixture intended for application in a wet state, take 2/3 of a bucket of sawdust for 1 bucket of clay. First of all, you need to fill the clay with water to get a thick porridge. It is difficult to say exactly how much water should be taken, since in this case it all depends on how dry the clay was initially. Clay can be saturated with water for quite a long time, especially if it was initially dried to the state of stone. If desired, you can speed up the process of soaking the clay with water by constantly stirring it, but even this method will not give a fast enough effect.
It is best to immediately soak the required amount of clay and let it sit for several days until it reaches the desired consistency. After diluting the clay to a liquid state, you can add sawdust. Clay and sawdust should be thoroughly mixed until a homogeneous thick mixture is obtained. You can mix the clay and sawdust with a garden hoe, but if possible, you should use a household concrete mixer.
To prepare insulating boards, clay and sawdust are taken in equal proportions. In this case, you need to immediately prepare molds into which the solution will be poured in the future. To make the mold, it is necessary to put together a lattice with cells of at least 50x50 cm from bars, the height of which should be at least 15 cm. This lattice is then laid on a plywood sheet to make it more convenient to pour the solution into it. In addition, the use of plywood allows the slabs to have one flat sidewall. The prepared solution of clay and sawdust is poured into molds and left until completely hardened. After pouring the solution into the molds, you must carefully level the surface with a spatula. Avoid drying insulation panels in direct sunlight as this will cause severe cracking. It is necessary to make a canopy over the forms or, in extreme cases, throw grass on top to ensure a sufficient level of shading.
Preparatory work
How to insulate a ceiling with sawdust in a private house? Whatever method is chosen, preliminary preparation of the wooden base is required. Initially, the elements on the ceiling are processed. As a rule, during construction they use material that has already undergone appropriate processing. However, in some cases this procedure is skipped. Then you need to do it yourself.
The treatment is carried out with special protective compounds. It is carried out in several stages, since comprehensive protection is required. Initially, wooden parts are coated with antiseptic compounds designed to protect against rotting and insect damage. Next, fire-bioprotective agents are used, which increase the material’s resistance to fire and exposure to elevated temperatures. The next stage is treatment with water repellents. They prevent previously applied compounds from being washed out of the wood structure, help remove excess moisture from the material, and protect against water penetration.
For processing, it is recommended to choose drugs from the same brand. Some manufacturers offer products that perform several functions at once, for example, protect against fire and high temperatures, prevent rotting and insect damage. The bathhouse must be treated with special products that are resistant to high humidity and high temperature.
After processing and drying of wooden structures and ceilings, the substrate is laid.
Initially, all gaps and cracks should be sealed. To do this, use polyurethane foam and acrylic sealant. Large cracks are treated with foam. Gaps and joints are sealed with sealant. It is allowed to use bitumen mastic, but not for finishing the ceiling of a bathhouse. This is due to the low resistance of the material to high temperatures.
You need to seal not only the holes in the wooden ceiling, but also in the roof itself. This increases the thermal insulation properties and eliminates the impact of external factors on the internal elements of the roof.
After drying the sealant and foam and removing excess material, the substrate is laid. It is necessary to protect the interior space of a private house from the penetration of dust from sawdust, and serves as a vapor barrier between the ceiling and sawdust insulation. The substrate must be vapor-permeable, since warm air and steam rise up. If it does not pass through the ceiling and further into the space under the roof, condensation will form. This will lead to gradual rotting, the formation of mold and fungi.
An excellent and inexpensive option is to lay cardboard. It can be any type of material. The main condition is that the cardboard must be dry. The sheets are laid directly on the ceiling, with an overlap of 15-20 cm on each other. If the cardboard is thin, then it should be placed in 2-3 layers. The joints are fastened with staples. The perimeter of the junction of cardboard and walls is treated with polyurethane foam or sealant.
PVC film is often used as a backing. It is also laid with an overlap of 10-15 cm, and additionally secured with staples using a stapler. The edges of the film around the perimeter should extend onto the walls/roof by 10-15 cm.
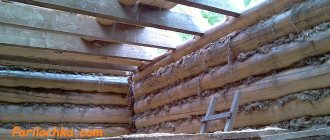
Insulation of the floor ceiling in the bathhouse
The floor ceiling consists of edged strong boards lying close to each other, supported by the load-bearing walls of the bathhouse. To give rigidity, the boards are fastened across with beams. The seams between the boards and contacts with the walls are covered with clay. The design is strong enough that heavier types of insulation than mineral wool can be used as insulation.
This type of ceiling opens up many more insulation options, including traditional ones:
- Clay with sawdust
- Expanded clay
- Earth
- Sawdust
- Basalt mineral wool
Clay with sawdust
A traditional, time-tested option is to insulate the bathhouse ceiling with clay and sawdust. It is naturally environmentally friendly, safe and inexpensive.
Clay with sawdust
For different climatic zones, the clay layer will be different. Both its weight and the pressure on the wooden flooring will differ. This is perhaps the only disadvantage of choosing clay as a ceiling in a bathhouse.
Made from natural material, the ceiling will retain its heat-saving properties for several decades.
Insulation of the ceiling in a bathhouse with clay and sawdust is achieved with a layer thickness of 10-15 cm.
Installation procedure:
- Restrictive boards are installed along the perimeter of the flooring above the bathhouse, so as to create a “bucket”. In a wooden bath house, an L-shaped cutout is made in the top log, where the horizontal platform is used as a stop for the flooring, and the vertical one as a limiter.
- Two layers of vapor barrier are placed inside the “bucket”, in the form of a special film, foil or ordinary polyethylene.
Our advice! Since destructive processes begin in polyethylene with increasing temperature, we recommend using aluminum foil.
- Prepare a clay solution mixed with wood sawdust. To prepare it, dry clay is dissolved in water to the consistency of sour cream, and then mixed with wood sawdust in a concrete mixer, or manually.
- The resulting composition is evenly applied to the vapor barrier layer until the calculated thickness of the insulation is obtained
- Allow the solution to dry for several days
- After drying, cracks that appear are covered again with clay.
- A waterproofing layer can be laid on top of the clay. This procedure is optional in this option.
Conclusion: the traditional way to insulate the ceiling of a bathhouse with clay and sawdust is still relevant today.
Expanded clay
Insulating the ceiling in a bathhouse with expanded clay, a natural material, is very effective.
Expanded clay is round granules of foamed clay after heat treatment. Natural lightweight material perfectly preserves heat and is not at all afraid of moisture.
Weighs more than half as much as its analogue made from clay with sawdust.
Insulation of a bathhouse ceiling with expanded clay
How to insulate a ceiling with expanded clay correctly:
- In this option, the presence of a “bucket” is also mandatory; expanded clay is a very light material and has great “fluidity” /
- We place two layers of vapor barrier in the “bucket”/
- Fill with an even layer of expanded clay. Depending on the climate zone where the bathhouse is located, its thickness ranges from 15 cm to 30 cm.
- It is not advisable to cover expanded clay with a water barrier.
Conclusion: if you put expanded clay on the ceiling of a bathhouse, then we will get a guarantee of heat preservation.
Earth is insulation
Probably the most budget-friendly option would be to insulate the ceiling in the bathhouse with earth or its mixture with peat.
But you will have to pour a rather impressive layer - at least 20 cm, which should be loose enough so that air can be retained in it.
Insulating the ceiling in a bathhouse with earth
There are a lot of disadvantages to this option. This is both a lot of weight and a change in heat-saving characteristics over time.
This method is even more undesirable, in view of the germination of various plants in the ground and the destruction of bathhouse structures by their roots.
This option has a very short service life. In a year or two you will have to replace it - a couple of cubes of earth from the roof and a couple more cubes back.
Conclusion: insulating the ceiling in a bathhouse with earth is not a rational solution.
Sawdust
The insulation of the ceiling in a bathhouse with sawdust is widely known and probably the most controversial. This option has a lot of supporters who know exactly how to insulate the ceiling in a bathhouse with sawdust.
Insulation of a bathhouse ceiling with sawdust
The sawdust should be small, and its layer should be about 20 cm high.
To be honest, it is hard to believe that organic sawdust, without the protection of inorganic clay, will be able to independently, easily and repeatedly withstand temperature changes for many years. Destructive processes will still begin, and sawdust will constantly lose its heat-saving properties.
In two or three years you will have to completely replace the sawdust with new ones.
Conclusion: insulating the ceiling in a bathhouse with sawdust is not a rational solution.
Dry installation of insulation
After the preparatory work, you can begin laying dry insulation. It is recommended to pour the shavings in 2 layers. To create the first, sawdust of a large fraction is used, for the second - a small fraction. This device prevents dust from entering the house and provides good thermal insulation.
The first layer of the coarse fraction is laid 10-15 cm thick, then thoroughly compacted. A layer of fine sawdust of the same thickness is placed on top, which is also compacted. The better the insulation is rolled, the better it will retain heat in the house. For greater shrinkage, it is allowed to slightly moisten the sawdust. With a thickness of 20-30 cm, the insulating layer provides reliable thermal insulation.
It is recommended to lay clay, sand, and slag on top of the layer of shavings. This powder improves thermal insulation properties and provides additional protection against mold, fungi and insects.
Insulation with sawdust and cement
To insulate the ceiling of a house using this method, it is necessary to use sawdust that has been stored for at least 12 months. At the same time, they should be slightly damp, but not have areas of rotting, mold, or fungus.
Wood-based material, water and cement are mixed in proportions of 20:3:2. First, cement is combined with sawdust, and then water is poured in in a thin stream. The solution continues to be stirred.
It is better to prepare the composition in small portions in order to use it in time, since due to the presence of cement, the solution quickly begins to harden.
It is important to remember that sawdust must first be treated with special protective compounds and mixed with copper sulfate and lime. If no treatment has been carried out, these components are added to the solution.
Sawdust and cement are poured onto the ceilings, distributed evenly between the floor beams, and then compacted. For good insulation, a layer 7-10 cm thick is sufficient. The solution hardens quickly. After final drying, you can walk on it without fear. When moving, a slight crunch may occur, which is normal.
If frequent foot traffic is planned on the installed insulation, it is recommended to make a flooring of boards or other hard material on top.
Insulation with sawdust and clay
It is best to insulate the ceiling of a bathhouse with sawdust in the following way. For work, take shavings that are treated with lime, but in no case with brownstone or copper sulfate. These materials emit harmful fumes when heated, which can lead to human poisoning.
The clay must be clean, free of debris and foreign matter. If necessary, you can pass it through a sieve. Insulating the ceiling of a bathhouse with clay and sawdust begins with preparing a solution. To do this, mix wood-based material, clay and water. The proportions of the components are 10:5:10. The amount of water can vary between 7-14 parts; it is added until a mixture of the required consistency of clay and sawdust is obtained.
The clay solution is prepared as follows. The clay is filled with 2 parts of water. It is left until completely soaked. After this, mix it thoroughly, add water until a creamy consistency is formed. The clay should be homogeneous, without lumps. The prepared sawdust is gradually added to the mass, constantly stirring it. The result should be a thick and viscous solution.
The finished mixture is laid on the ceiling and evenly distributed between the beams. The thickness of the insulation should be 10-15 cm.
Instead of clay, you can use gypsum. But this solution dries very quickly, so you have to prepare the mixture in small portions. As a result, the complexity of the process increases.
The heat insulator takes about a day to dry. Complete hardening occurs in approximately 1-2 weeks. A vapor barrier is applied to the surface of the insulation. If necessary, make flooring. This completes the insulation of the ceiling with clay and sawdust.
Methods
The easiest way to insulate with clay begins with covering the ceiling with boards. Their minimum thickness should be 4 cm, but it is better if it is 6 cm. Before carrying out work, the boards must be thoroughly dried. In no case should you paint or varnish boards, because many paints and varnishes are simply not adapted to high temperatures and, under its influence, can begin to release toxic resins and polyesters into the space.
In general , it is better not to use chemicals in a bathhouse unless you intend to constantly inhale its destructive fumes.
After completing the sheathing, you must carefully and carefully cover the gaps between the boards with clay and wait for it to dry completely.
The next stage begins with preparing a mixture of sand and clay, which should be quite thick. All boards laid on the ceiling are covered with this mixture. The thickness of the layer should be at least 5-7 cm. Next, you should wait until the layer is completely dry, and this can take quite a lot of time. A thick layer of sand is laid on the dried clay.
Then the ceiling is impregnated first with liquid steam and then with dry steam. The clay, accordingly, first gets wet, and then finally dries and acquires the ability to retain the heat of your bath for many years.
In order for the insulated ceiling to retain its heat-insulating properties for as long as possible , there must be ventilation in the attic. The simplest and at the same time reliable way to create ventilation is two windows opposite each other.
Another method is insulation with several layers of clay with intermediate layers of sawdust or expanded clay. In order to prepare the clay, it is slightly moistened and thoroughly mixed with straw until smooth. The straw is pre-chopped. The final consistency should be similar to soft plasticine or mortar, which is used in laying brick walls.
The clay layer will again be 5-8 cm. After application, it must be carefully smoothed. Seal the perimeter of the ceiling requires special care. The clay will dry in 20-30 days, provided that the outside temperature is above zero. After drying, cracks may appear. This is normal. You can apply another thinner clay layer to the cracks, and cover it with sawdust, expanded clay or wood chips on top.
To make the ceiling later look more aesthetically pleasing, it can be sheathed with boards or fiberboard.
Brick sauna stove. You will read about this in our next article. And this article talks about a columnar foundation for a bathhouse.