Often, when performing repair work or restoration of furniture, it becomes necessary to remove stains from the wooden surface, which can be caused by:
- the appearance of mold, which was subsequently removed, but the memory (in the form of local darkening of the surface) of its vital activity remained;
- natural aging of wood;
- contact with the wooden surface of various organic and inorganic dyes;
- the ingress of chemically aggressive substances that caused a change in the structure and natural color of the tree.
On a note!
When creating an interior, it may be necessary to completely bleach the entire area of the wooden panel, which will then be treated with coloring and decorating compounds. Inviting a specialist to perform this work is sometimes costly and impractical, and sending furniture for restoration is quite expensive.
Whitening (lightening) solid wood and removing various stains from its surface can be done independently using:
- specialized chemical bleaches and antiseptics, which can be purchased at household chemical stores;
- self-prepared bleaching solutions according to folk recipes.
Cracking of a log house
It is impossible to completely prevent cracking of wood, but you can minimize the likelihood of their occurrence. The most dangerous thing is not the cracks themselves, but their depth. They can be found reaching up to the middle of the log; they greatly affect the strength of the wood, deteriorating it. Cracks form mainly due to uneven drying of the log house, i.e. The tops of logs dry out much faster than their middles. This happens mainly due to shrinkage of the house, heating system, and exposure to sunlight.
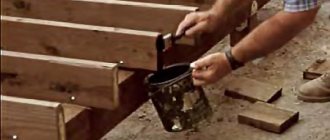
When a house shrinks, cracks appear mainly during the first year. In order for the wood to more easily endure this difficult period, the ends of the logs need to be treated with special compounds that contain lime. They will prevent moisture from rapidly evaporating, which will help minimize the appearance of cracks. For several years after construction, the house cannot be heated; stove heating can also upset the balance between the inside of the log and the outside, which will also lead to the appearance of cracks.
The most dangerous are spring sun rays, so before March it is necessary to carefully treat the outer walls of the log house with protective agents that will not allow moisture to evaporate. The choice of protective equipment must be taken seriously, because low-quality compositions can lead to unpleasant consequences that will be impossible to correct. There is one proven product from the popular company Neomid that can prevent cracking of logs. And it is Neomid Thor Plus, it has already been appreciated by many buyers.
What are the dangers of self-processing wood?
Non-professionals often incorrectly calculate the concentration of the product, violate the proportions, and do not include the necessary components in the composition, which negatively affects the wood.
It is necessary to strictly follow the technology of applying and rinsing off the product. The slightest violation of the technological process can lead to very sad consequences.
To avoid mistakes and prevent negative consequences, it is necessary to entrust bleaching of a wooden surface to specialists.
We employ professional craftsmen who know exactly the technology of wood bleaching and have successfully carried out this operation more than once.
If the walls of your wooden house are corroded by fungus, darkened and acquired a blue tint, contact our company. We will efficiently and quickly carry out all the necessary measures to whiten and renovate your home, which will again regain its lost beauty.
On the “Contacts” page you will find all our coordinates where you can contact us in a way convenient for you.
Calculate the cost of painting and insulating your home right now
Neomid Thor Plus
This product is intended to protect timber, logs and their ends from cracking and rotting. They can be used to process a log house both inside and outside. Suitable for application to residential buildings, bathhouses, gazebos. Thor Plus creates a kind of barrier in the log fibers that can repel water, which protects against excess moisture. A coating is formed on the treated surface that does not interfere with the “breathing” of the wood.
This composition does not need to be diluted before use and does not degrade or alter the natural structure of the wood. It should be applied only in special clothing, because... skin contact with it may cause irritation. It dries completely on Neomid Tor Plus logs within 24 hours.
Other whitening methods
Some home craftsmen, when performing bleaching, want to not only remove stains and dirt from wooden surfaces and update their appearance, but also strive for color changes, more texture and the creation of various effects. Let's consider the most widely available methods that are safe for home use.
To bleach hardwood products, while simultaneously emphasizing their texture, you can use lime milk. To prepare it, 10.0 grams of baking soda and 80.0 grams of bleach are dissolved in 350.0 milliliters of water. The resulting composition is kept in complete darkness for one and a half to two days. The solution loses its properties during storage and requires immediate use.
For accelerated lightening, it is fashionable to use the following recipe. In one liter of water, successively dissolve:
- 20.0 grams of sulfuric (battery) acid;
- 15.0 grams of oxalic acid powder;
- 25 grams of sodium peroxide (peroxide), which can be replaced with 10.0 grams of hydrogen peroxide.
The solution is chemically aggressive and toxic, so when using it you should wear rubber gloves and a respirator:
- For shallow bleaching, you can prepare a mixture of 40.0 grams of potash and 150.0 grams of bleach, which are dissolved in 1.0 liter of water. With its help you can lighten fairly large areas of wooden surfaces. The solution is applied with a paint roller, and the degree of lightening is checked visually. When the desired effect is achieved, the surface is washed with water.
- For decolorization, you can use food grade acetic or citric acid, which is dissolved in an amount of 50.0 grams per 1.0 liter of water.
When using any bleach solution for the purpose of local discoloration or stain removal, you should treat not only the stain itself, but also the area outside it. Thanks to this, you can get the most unexpected effects. By changing the shutter speed or the amount of applied composition, smooth transitions of halftones from darker to lighter are obtained. In addition, some brightening solutions can impart color shades that are unusual for wood.
On a note!
However, treating boards infected with fungus or affected by mold with these solutions is quite labor-intensive and costly.
Blackening of the log house
An equally serious problem with a log house is the blackening of wood. But any tree, regardless of its species, can darken, which is quite natural. These two processes should not be confused, because blackening appears after serious mold damage to the log house. And in order to restore the “health” of the wood, you need to carefully sand it, get the same light shade and then treat it in several layers with antiseptic agents. If, after a while, signs of mold appear again in the same place, then you need to pay attention to the conditions in which the wood is located: is it thoroughly ventilated, and does not water get on it from time to time, etc.
In general, it is initially necessary to impregnate the wood during cutting, so it will better withstand both transportation and the construction process. But, unfortunately, many carpenters neglect these actions, which can lead to the appearance of mold even during construction. Therefore, after erecting a log house, you need to carefully treat it with antiseptic protective compounds. And in the future, to prevent the log house from turning black, it is also necessary to periodically impregnate it for preventive purposes.
There are a lot of antiseptics now, so purchasing them will not be a problem. But quality products are much more difficult to find. Many people recommend trying Neomid 440; judging by the reviews, the results of this product are impressive.
Renewing old darkened wood
In recent years, the trend of not only building new wooden houses, but also restoring houses and already battered buildings has become increasingly popular.
It's no secret that over time, wood loses its pristine beauty: the golden, warm color of this natural material fades and darkens within a few years. And constant exposure to precipitation, temperature changes and other factors lead to the formation of mold and mildew. How to restore old, darkened wood, returning it to its former attractive appearance? There are currently several different ways to solve this problem.
Some people prefer to use radical methods, such as siding or facing a wooden structure with bricks. But such options do not initially imply the preservation of WOOD, so we will not dwell on them in detail. Let's consider only those methods that allow you to restore, renew and refresh damaged wood, and not hide it “out of sight”:
| Recovery methods | Advantages | Flaws | Result |
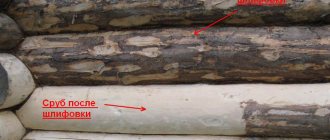
| 1. Grinding is a mechanical method that allows you to remove existing biological damage and remove the top darkened layer of wood |
|
| The wood will look completely new and fresh, but we must not forget about the need for its MANDATORY further treatment with bioprotective and antiseptic compounds. Otherwise, the result will be very short-lived. |
| 2. Coloring - usually with inexpensive enamels or paints |
|
| A building treated in this way will look refreshed and updated for some time, but, unfortunately, it will no longer look very wooden. And non-breathable coatings that form cheap paints and enamels will lead to the destruction of wood from the inside. |
| 3. Wood bleaching – the most popular currently are chlorine bleaching compounds. |
|
| As in the first case, we will get practically new wood with a fresh and light color. But there is still a lot of work ahead - bioprotective treatment and, if desired, giving the wood the desired color. |
| 4. Use of a restorative composition - for example, Aquatex Restorer |
|
| The result is impressive. After applying just two layers of the composition, we get not just renewed wood, but a durable coating of the desired color, providing bioprotection and strengthening the aged wood. |
There can be no consensus on the best way to renew wood that has darkened over time. Radical measures are necessary only in extreme cases; most often the problem can be solved with minimal effort. When choosing a method that is optimal, remember that we are talking about your home and the comfort in it. Excessive savings are hardly appropriate here. It is worth taking into account all the circumstances and giving preference to the most effective means that will allow you to restore wood efficiently and quickly.
| Old, unpainted house | House coated with Aquatex Restorer |
Of course, all of the listed methods of wood renewal are quite viable and have a right to exist. But now it can be argued that the use of a restoration composition, such as Aquatex Restorer, is exactly the way through which we get the desired result with minimal effort.
Neomid 440
Neomid 440 Eco antiseptic is designed to protect the log house both inside and outside from rot, mold, insects, and fungi. It can be used to process wood located in rooms with a high percentage of humidity. The use of Neomid 440 is suitable both for preventive purposes and for direct control of already emerging biodegraders.
This antiseptic is lying around as a concentrate and must be diluted with water before use. Their ratio depends on the degree of damage, but basically it should be 1 to 9. After treatment, the wood may change its shade slightly, but its structure will remain the same. The bioprotection period of the log house will be at least 20 years.
The use of such agents as Neomid 440 and Neomid Thor plus for preventive purposes will practically eliminate cracking and blackening of the log house. This will allow you to preserve the strength and aesthetic appearance of the entire house for many years.
Treatment with chlorine-containing agents
Wood can be bleached with bleach. Before applying the product, it is necessary to remove the resin from the tree; to do this, the surface is treated with soda ash. Next, you need to dilute bleach with water in the following proportion: 2 kg of dry matter per bucket of liquid. Add 250 g of soda to the diluted solution, mix everything and let stand for a while.
The product is applied with a brush or roller, and 5 minutes after treatment the surface is wiped with acetic acid. After about fifteen minutes, the wood should lighten. If the wood is not lightened enough, the procedure can be repeated.
Another chlorine-based bleach is bleach. It is especially effective for outdoor use. The wood is generously moistened with the liquid and then rubbed well into the surface. When using white, you must protect your eyes and hands from contact with the product.
Leveling: do-it-yourself repairs
Wooden structures are distinguished by the fact that they require correct installation, taking into account the characteristics of the wood. When building a bathhouse, simple rules are not always followed, which leads to deformation of the surfaces and the structure as a whole.
Bulging of the lining
Incorrect installation, high initial moisture content of the wood, accumulation of moisture behind the lining, and improper use of the bathhouse lead to swelling of the lining from which the inner lining is made. Insufficient ventilation leads to the same result.
To avoid deformation, it is important to follow the rules
To eliminate irregularities, the following work is carried out:
- Removing uneven elements and ordinary parts located next to them;
- You need to make sure that the walls are insulated correctly. Otherwise, complete installation of hydro- and vapor barrier is required;
- Installation of the lining is carried out carefully, using the tenon-to-groove method.
The joining of the lining should not be tight, since wood expands when exposed to moisture. It is also worth providing a ventilation gap between the sheathing and the wall insulation.
Correction of a log house
Long-term operation, improper installation of the log house on the ground, high humidity, and ground movement lead to distortion of the structure. Often the building is slanted on only one side, which allows you to correct the situation.
Curvature of a log house is possible for various reasons.
The technology for leveling a bathhouse frame is similar to the technique for replacing the lower crowns. In doing so, follow the following rules:
- installation of at least 2 jacks;
- lightening the building, that is, removing furniture and other items from the inside;
- jacks are raised gradually;
- at one time the lifting height should not exceed 5 cm;
- under the rickety crowns you need to put a new support and boards.
The method of leveling a log house depends on the type of foundation on which the bathhouse is installed. In any case, the structure is leveled or tightened with metal corners.
Preventive action
To prevent the development of fungus before shipping, it is advisable to coat them with transport antiseptics, which protect the wood for 10-15 days. Even despite these measures, blue discoloration (the result of fungal activity) often appears even after treatment. Then the question arises: how to bleach a log?
Here everything is much worse: white mold has been added to the blue, and it must be fought mercilessly: it destroys the structure of the tree. Therefore, it definitely requires treatment with bleach and then a powerful bioprotective impregnation.
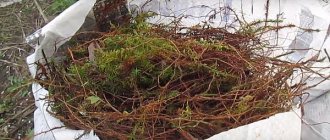
To prevent or stop/slow down the development of fungus, it is important to properly store lumber until the construction of the log house begins. It is not always possible to lay a frame straight from the wheels. Even if it was planned this way, in most cases there are hiccups. And an incorrectly folded log is quickly damaged by fungus.
Therefore, immediately make ventilated stacks. They should be located on a dry area of soil, preferably in the shade. But questions of light and shadow are not fundamental. It is much more important to find a dry area.
It is equally advisable to protect the logs from precipitation: install a temporary canopy. At the same time, do not close the sides. In this case, good ventilation is more important than inaccessibility to droplets.
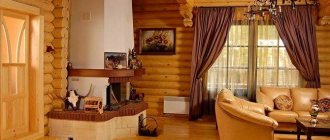
Interior decoration of the house with clapboard: photos of beautiful interiors of the living room and kitchen
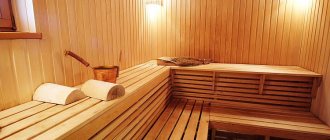
Cladding boards can decorate the interior of any room. It is especially often used in country houses, dachas, and for finishing the interior and exterior walls of residential buildings and offices. Cladding trim (the video demonstrates the whole process) is found on balconies and loggias. It is indispensable when constructing gazebos, saunas, baths and much more.
The clapboard finish perfectly levels the walls and provides the required sound insulation. Such cladding will not lose its relevance and attractiveness for many years. Repairing wood trim is quite simple; just use decorative wax.
In city apartments, the interior is finished with clapboards (photos of various interiors are included in this article). Such premises require natural materials. The appearance of wood finishes is calming and creates comfort and coziness.
It is not necessary to cover the entire apartment with wood; it is enough to use lining in the kitchen (the photo shows various options).
Such a room will become a favorite place for all residents. It will be filled with warmth and a pleasant forest aroma. It is recommended to finish with cladding boards only in the dining area, and for the kitchen apron to select ceramic tiles that match the texture. An interesting solution would also be to decorate a room with clapboard or a hallway.
Sequencing
Specific actions depend on what stage the construction of your bathhouse (house) is at.
Before construction starts
If the logs have just been delivered, and some are already affected by blue staining, they need to be treated with bleach before being placed in the log house. If only part of the materials is affected and there are absolutely clean logs or beams, then it is better to coat only the affected ones, leaving the rest as is.
After treatment with bleach, the surface is treated with an antiseptic (after drying the bleach). Don't forget to process the bowls as well as the ends.
Just don’t get it mixed up: after bleaching, treat not with a finishing film-forming composition, but with a water-based or solvent-based antiseptic (they are not very popular because they are not environmentally friendly). Precisely an antiseptic, preferably of deep penetration, which does not form a film.
If the log did not need bleaching, it is not coated with an antiseptic. The fact is that after drying you will have to sand the frame. And wood treated with an antiseptic does not sand well. If the log is clean, and there is a season ahead with minimal precipitation or low temperatures, then without moisture or heat, fungi will not develop without any treatment.
After drying, the logs or beams are sanded. There is a high probability that all the blue will be removed
After installing the log house, it is covered with a roof and in this state is left to dry out/shrink. There is one point: during this period, you should not cover the cut window and door openings with film. You can fill it with boards, but with cracks so that moisture can escape freely. You can also use vapor-permeable films (if the film has one-sided conductivity, do not confuse which side should be nailed - the rough side facing the street). If the openings are closed tightly, there is a high chance of getting mold or white fungus in addition to the blue. Therefore, take care of ventilation.
Blue of dried logs (timber)
After drying and shrinking, it’s time to polish the frame . This is where the need for bleaching may arise again. If there is blueness, bleach, if not, you don’t need to. Then comes the grinding of the frame. In the process, many minor lesions that the bleach did not remove can be removed mechanically: you will still have to remove the darkened layer of wood, so this may also remove fungus-affected wood.
After the first pass with a grinding machine, the condition of the treated logs is assessed. If there are dark spots, they are treated with bleach again. Only this time you need to act carefully: light spots on wood are no less pleasing than dark ones. Therefore, the sequence is as follows: first, generously moisten the darkened area, and then rub it with a brush, “blurring” the boundaries of the treated area. After the bleach has dried, the frame is sanded with a fine-grain abrasive until smooth.
In case of deep damage, simply sanding is not enough: no one will remove two or three centimeters of wood
Then, they are immediately coated with an antiseptic, fire retardant and finishing composition (for example, Senezh wood protection compositions). You can use combined products, or you can use three different ones. You just need to select compatible compounds.
If it works, take all the products from the same brand: there will be no compatibility problems. If this does not work out, before purchasing a large batch, buy the selected products in small packaging. Use them on some unnecessary piece of wood (cover it with a layer of the last compound applied to the walls) and try how they behave in combination. It is necessary that they do not react and do not stain the wood. For example, some antiseptics in combination with chlorine give a pink color. Also check whether the product lays evenly, does not roll down and how well it is absorbed.
Using the same test, determine how much you like the selected topcoat tone, and how many layers you will need to apply to achieve the desired result.
Before buying a large batch of bleach, antiseptic and paint, test them all on an unnecessary (or invisible) piece of wood
Unfortunately, it is impossible to determine the effectiveness of the protection. Unless you can see if the water will be repelled. After the topcoat has dried, spray the board and see what happens. Drops should roll off but not be absorbed.
How to whiten lining at home?
For such a room, a design in country style, Provence or, for example, in a marine style, is well suited if you want to play up the similarity of the lining with ship plating.
How can you use wooden lining in the kitchen interior?
The lining can be used to decorate walls in the kitchen in the dining area, and repeat the same wood colors in kitchen furniture. This type of finish is not suitable for kitchen ceilings, since it will be very difficult to clean such a ceiling from greasy fumes. The use of lining in the food preparation area is also unacceptable; it is better to decorate the “apron” with ceramic tiles, mosaics or special easy-to-clean polymer plastic.
Is it appropriate to decorate the walls with clapboard in an apartment in an apartment building?
Why not? You can cover not only the balcony or loggia of a modern apartment with lining, but also use this type of decoration for walls in the kitchen, hallway, or even in the bedroom. However, it should be remembered that the process of installing wooden lining itself implies the presence of sheathing, that is, a frame. Thus, finishing the apartment with clapboard will take up some of the usable space. Therefore, if your apartment is very small, you need to use lining for wall decoration with caution.
What kind of furniture to furnish a room decorated with clapboard?
Furniture in a room decorated with clapboard should harmonize well with it in style. Therefore, interior items should also be made of wood, because metal, plastic or glass are unlikely to fit well into such an interior. It’s great if the furniture is made of the same type of wood as the lining on the walls, but this is not at all necessary. You can, on the contrary, play on the contrast and choose furniture of a completely different tone. An interesting idea is to use rattan or bamboo furniture in a room decorated with clapboard.
How practical is it to use natural lining in the hallway?
The hallway and corridor are rooms in which it is important to maintain cleanliness, since dust and dirt are brought there from the street. Accordingly, the decoration of the hallway, including the walls, should allow for wet cleaning, or at least wiping with a damp cloth. The lining treated with special compounds is perfect for these purposes, so there is no reason to refuse wooden paneling in the hallway.
How to decorate a room lined with clapboard?
Emphasize the beauty of natural wood with antique decorative items, or souvenirs with a touch of provincial romance: figurines, vases, carved wooden crafts. Paintings depicting still lifes or calm forest landscapes harmonize well with the lining. Pay special attention to carpets and curtains. Bamboo or thread curtains made of wooden beads are perfect for decorating windows. And on the floor you can lay something like a mat or animal skin.
Bath insulation
For comfortable operation of the steam room, good insulation of the building is necessary. This allows you to quickly heat the room, steam with convenience and preserve the structure in winter. In the absence of good insulation or the worn-out condition of the building, various problems arise that prevent you from steaming with comfort. In this case, the causes should be eliminated and the bathhouse repaired.
All surfaces of the bath building need insulation
Insulation is carried out for the walls, ceiling, and roof of the bathhouse. For this, only high-quality materials are used, which must be resistant to high humidity. Safety for human health and environmental friendliness of materials are taken into account when choosing.
We invite you to familiarize yourself with Vapor barrier for bath walls from the inside
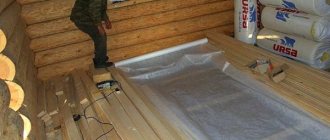
Discomfort and heat loss in a steam room or dressing room often arise due to insufficient floor insulation. Lack of thermal insulation or air cushion, poor waterproofing, incorrectly selected materials can cause cold air to enter the bathhouse. Therefore, when constructing a building, it is necessary to study insulation technology.
Insulating a wooden floor is very easy
If this problem occurs, the following actions are necessary:
- determining the cause of cold penetration through the floor, for example, lack of waterproofing. Depending on the cause, further actions are taken;
- any cracks and gaps between the walls and floor are sealed using polyurethane foam;
- if the quality of the old insulation is poor, the floor structure is dismantled, and new layers of hydro- and thermal insulation are installed inside, taking into account drainage;
- Cracks in the concrete floor must be sealed with cement mortar, and the drain siphon, which may have cracks, must also be checked.
The exact technology for floor repair depends on the type of surface and the cause of the problem. A high-quality floor has no cracks, has a smooth surface with a slight slope towards the drain.
Heat loss through the entrance door area in a bathhouse is a common cause of rapid cooling of the room. In winter, the doors freeze and become covered with a layer of frost. This effect occurs if there is only one door to the bathhouse, as well as when the air temperature inside the room is too high or there is a sharp temperature change. Poor quality door construction often leads to freezing and a decrease in the operational characteristics of the room.
The second entrance door to the bathhouse should be made of wood
If the bathhouse has two entrance doors, then the outer one can be insulated metal, and the inner one can be wooden. This will avoid freezing and lowering the temperature in the room. At the same time, even the highest quality metal door needs to be insulated. For this purpose, mineral wool, polystyrene foam, polyurethane foam and other means are used.
The double door to the bathhouse is practical
To eliminate the freezing problem, you should take the following steps:
- eliminate gaps between the door frame and the wall or floor;
- install the sealing tape on the door frame;
- seal cracks in the wall, ceiling or floor on the side where the door is located and around it;
- the second wooden door should not have any gaps;
- Sealing beads are installed around the perimeter of the door frame to prevent heat loss.
Insulating the door is an important point when arranging a bathhouse. This avoids many problems and structural damage.
Cold air can enter through cracks in a damaged drain siphon. Replacing the old device with a new one is the solution to this problem. The situation is more complicated when the water in the drain is frozen. This occurs as a result of the remaining water in the pipes solidifying. Therefore, you should always carefully drain all water from the boiler, taps and other communications.
The defrosting method depends on the drain design
When designing communications for a bathhouse, it is important to make all pipelines as short as possible. Otherwise, to defrost the outer metal pipes, you should use a gas burner, with which you slightly heat the ice plug. If the drain pipes are located deep underground, then you need to pour salted boiling water and periodically check the system.
Significant heat loss in the bathhouse occurs through the roof. Cold air enters the steam room when the attic insulation is insufficiently correct or ineffective. In this case, you need to inspect the ceiling inside the bathhouse and the structures in the attic. All detected cracks are sealed with polyurethane foam. A layer of insulation that is too thin should be supplemented, and the presence of hydro- and vapor barrier layers should be ensured.
When insulating the roof, high-quality materials are used
The presence of an attic provides additional insulation of the bathhouse, since there is an air gap. In any case, the roof requires timely repair, elimination of cracks and insulation.
Consumer Reviews
Everyone in our family loves to take a steam bath. We used to go to a public sauna weekly, but it’s not very convenient and it’s also expensive. Recently our dream came true and we became the owners of a small but cozy and most importantly our own bathhouse, which we built ourselves on the site of our country house. After construction was completed, we were faced with the problem of ensuring proper protection inside our sauna. After all, there are small children in our family, and the main thing is that they do not suffer from harmful and even dangerous fumes emanating from low-quality impregnations.
There weren’t many suitable products, so we ended up purchasing the antiseptic composition Neomid 200. We bought it for a low price, so after diluting it, we were surprised at the resulting large volume of the finished composition. Antiseptic was applied to all wooden surfaces inside the bathhouse. There was no unpleasant odor during application of the composition; there was also no foreign aroma present in the hot bath. We use our sauna several times a week, despite this the ceilings, shelves, and floors are kept in perfect condition.
Sergey Mikolyan, 30 years old.
The wooden material of the bathhouse is not subject to the easiest operating conditions; it is detrimentally affected by moisture, temperature and hot steam. But you can still extend its life using Neomid and Yaroslavl paints, which are aimed at providing effective, proper and high-quality protection for any wooden material.
How to clean boards from mold
There are two ways to clean boards from mold: call a specialized service that specializes in removing infected areas or get rid of the fungus yourself. If large-scale wood damage is detected, it is better to use the services of specialists. Since such companies determine the type of disputes and select the most effective means of destruction. In addition, processing is carried out with professional equipment.
If you decide to remove the fungus yourself, a person will need to prepare tools for the work and disinfectants that destroy mold spores.