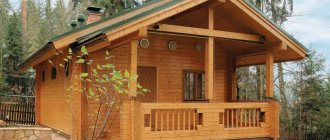
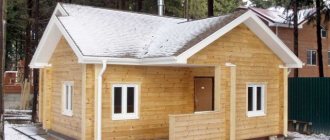
A log or timber bathhouse has an attractive facade that does not require additional decorative finishing. But buildings made of slag blocks, bricks and OSB panels require external protection and aesthetic improvement of the facade.
There are a huge number of finishing materials on the construction market, but choosing the right option is quite difficult for a novice master. How to cover the outside of a bathhouse to get a functional and attractive building?
External finishing materials
The finishing of the external walls of a bathhouse building does not take place without insulating the façade. Steam rooms, as a rule, are built small, so in order to avoid reducing the internal area, insulation work is carried out outside the building. In this case, the right option is a ventilated façade. Moisture does not accumulate on the walls, which increases the service life of the building.
For a ventilated facade, it is advisable to use:
- Siding. It can be vinyl or metal. Lightweight, durable material that is environmentally friendly. Weather conditions, mechanical and temperature influences do not violate the integrity of the coating. Used for cladding frame and brick buildings.
- Linings. It can be plastic or wooden. Installation is simple. Area of use: brick steam rooms.
- Eurolining. One of the types of lining is used. Very durable lumber.
- Block house. The finishing material looks like a milled log with the same thickness along its entire length. Used to imitate wood.
In addition to the main finishing options, you can sheathe a building:
- With a board. When finishing, it is customary to use edged or unedged material.
- Artificial stone. One of the long-lasting materials that can withstand atmospheric and mechanical stress.
- Baths with a solid foundation are finished with decorative plaster - “slab”. Does not require constant care, frost-resistant.
- OSB panels. The material has high strength, elasticity, does not absorb water, and can withstand high temperatures. The building does not have to be insulated.
- Facade tiles with a long service life and resistance to external influences.
Siding
There are many options for finishing baths. One of the most common methods is lining the steam room with siding.
This method is often used for buildings built of brick. It is not recommended to decorate wooden buildings with this material, since it does not provide natural ventilation of the wood. Before starting work, it is necessary to prepare siding panels, fastening parts, boards for creating sheathing, brackets, vapor barrier film, insulation material; isospan can be used as a waterproofing material. Cladding stages:
- A vapor barrier layer is attached to the outer wall, protecting the heat insulator from condensation.
- The sheathing is being assembled. 5/8 slats or boards are nailed to the wall. You need to leave a distance of 30 cm between them.
- A heat-insulating layer is laid between the profiles. There should be a gap of 1–3 cm between it and the siding.
- The insulation material is covered with a waterproofing material - isospan.
- Fifth stage. The starting strip is attached using self-tapping screws. Corner parts are mounted. Self-tapping screws can be replaced with galvanized nails.
- Siding is installed in the corner strip and starting strip.
- The panel is being assembled. The prerequisite is bottom up. All parts must fit tightly together. The assembly pattern is tongue-and-groove.
- The last bar is fixed - the finishing one. It is inserted only from the bottom.
Siding finishing
The ceiling in the bathhouse inside and out
Of course, the best guide is one that talks about the subject “from start to finish.” For those who are going to do everything themselves, we have prepared material just about creating a ceiling with your own hands .
However, the matter is not limited to the ceiling in the bathhouse inside, and an important issue from the point of view of the future fate of the building will be the issue of driving through the ceiling with a chimney pipe. It must be done with knowledge of fire safety rules, understanding which materials are suitable and why. We have collected all the necessary information on this issue in this article.
We also thought it was important to pay more attention to the issue of insulation, and we posted answers to the most frequently asked questions in the article located here.
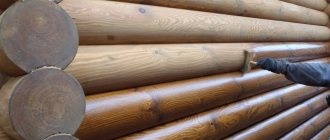
Lining
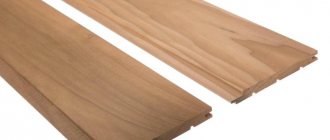
To preserve the appearance of a traditional Russian bathhouse, when decorating the external walls, a common cladding material is used - clapboard. Eurolining is especially in demand. This is a wooden board of small thickness. Lining has all the advantages and disadvantages characteristic of wood. To extend the service life of eurolining, it is treated with antiseptics and coated with varnish or paint.
In order for the cladding of the bath to be done correctly, it is necessary to strictly adhere to the installation technology. Step-by-step execution of all operations will allow you to carry out the cladding yourself:
- Install brackets on the wall. In this case, it is necessary to observe a step that should not exceed 50 cm. The brackets must be positioned horizontally.
- Cover the outer surface of the wall with mineral mats. For fastening, use the prepared adhesive composition. The use of dowels is acceptable.
- Attach a guide to each bracket. To check the correct location of these finishing parts, use a building level or plumb line.
- Cover the insulation with waterproofing material.
- Attach the lining to the fixed guides.
Bathhouses can be lined with clapboards with a humidity level of no more than 15%. Otherwise, after drying, unwanted gaps may appear in it.
What to cover, what to finish, what to hem the ceiling in a bathhouse: advice from professionals
Well, if we’re talking about advice from professionals regarding how to decorate the ceiling in a bathhouse, then you need to give the floor to them themselves. We bring to your attention the videos that caused a completely respectful reaction from us.
Let the first video be from RusPar. Correctly, professionally, within the framework of the stated topic, you will be told how to do everything correctly:
Those who are worried about thermal protection will find this video useful, which tells a lot, in tedious detail, about what materials are suitable for protecting the ceiling and walls in the area of the stove:
Speaking about professionals, we cannot ignore the opinion of Alexey Bely, representing Teplodar. You don't have to agree, but it's still worth listening:
Well, we found a video from ForumHouse - this is a fairly authoritative forum that has been making videos about finished projects or various stages of construction work for a long time. Among them there was a video about lining - it will certainly be of interest to those of our readers who are planning to decorate the insides of their bathhouse with this material. Look, remember, maybe it will come in handy:
Well, for our part, we will consider it possible to recommend you an article about decorating a steam room, which will also contain useful information.
Warm plaster
In brick saunas with a solid foundation, a mortar based on cement and sand is used for cladding. It is used less frequently in wooden structures. In this case, you need to caulk all the cracks so that there are no holes or gaps left.
Before cladding, the building is insulated. You should prepare a beam 3–5 cm in size, which will be used to create the sheathing. In addition, you will need dowels shaped like “umbrellas,” glue for polystyrene foam, polystyrene foam, a reinforcing mesh made of plastic, and a frame for creating “warm plaster.”
Installation must be carried out in strict sequence:
- Make a sheathing.
- Attach the insulation panel with dowels (strictly horizontally). When fastening, it is necessary to monitor the position of the seams. They should not be along the same line.
- Lay the second heat-insulating layer vertically. Secure it with glue capable of securing foamed polystyrene.
- Cover the structure with reinforcing mesh.
- Apply “warm plaster”.
The service life of “warm” cladding is several times longer than other cladding methods.
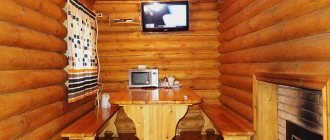
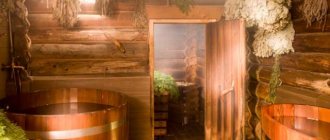
Finishing features of the dressing room
The main problem in a sauna room arises from condensation, which forms due to the difference in temperature between the rooms adjacent to the steam room. In order to prevent such negative aspects, a whole range of actions are carried out:
- Bath ventilation - a well-designed wiring diagram helps to create and maintain a healthy microclimate inside the bath.
- Heating system – to smooth out the temperature difference between adjacent rooms and the steam room, a sauna heating system is provided. It can be linked to a stove in the form of a heater through ventilation ducts or in an adjacent application, when one of its walls or the combustion part will go into the dressing room.
- Insulation – sudden temperature changes have become a popular source of condensation. The high quality of the cladding, in the frame of which a reflector and insulation are installed, helps to improve the microclimate in the dressing room. In this case, a similar scheme is used for the ceiling, walls or floor.
- Sheathing material – it is best to use wood as a finishing material in this regard. It will have excellent thermal capacity properties.
- Doors and windows - they will serve as a natural source of clean air, however, during the operation of the bathhouse, this will prevent the room from warming up if it is large. For this reason, both windows and doors are made small and insulated.
To create and maintain a healthy microclimate in the bathhouse, it is necessary to take into account all the points listed above.
Block house
There are several types of blocks:
- natural - made from deciduous and coniferous trees;
- metal - made from galvanized steel;
- acrylic - based on polymer resin;
- vinyl - made from PVC powder.
Any type of block material is suitable for finishing. You should prepare screws and 6-7 mm clamps for fastening, mineral wool as insulation, log parts for creating sheathing, a membrane with vapor barrier properties, a waterproofing agent, antiseptic impregnation and fire retardant, which are used to pre-treat the wood elements. Cladding stages:
- Secure the vapor barrier film in a horizontal position. Secure it with staples or a construction stapler.
- Install the assembled sheathing in a horizontal position. It is attached to the wooden base with self-tapping screws and nails. It is advisable to fix it to a brick wall with dowels for frames. In the latter case, it is necessary to pre-drill the recesses.
- Lay insulation in the spaces between the beams.
- Use a stapler to secure the waterproofing material.
- Build a similar sheathing on the main frame, placing it in a vertical direction.
- Cover the outer surface with block houses. The direction of installation is from bottom to top horizontally.
- Using clamps, secure the panels.
- After completing the finishing work, hide the screw heads using sawdust paste and PVA glue. You can also use special plugs and leftover block materials.
- Place plinths in the corners. Decorate windows with slopes and doors with cash.
Blockhouse cladding
Video description
How walls are covered with metal siding is shown in the video:
In contrast, a profiled sheet is attached vertically, with the sheets simply overlapping each other along the wave relief and through fixation with self-tapping screws with a rubber washer and a painted head. Therefore, the frame under it is mounted in the form of a horizontal sheathing with a convenient step of 50-60 cm.
Scheme of wall cladding with corrugated sheeting Source iblogger-ok.ru
Wood paneling
Wood is a traditional material for finishing the facades of residential buildings and baths. It remains popular, despite the emergence of cheaper and more practical analogues - vinyl and metal siding that imitates wood paneling.
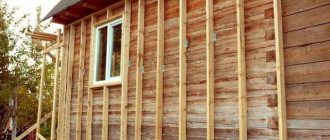
Most often, it is chosen when you need to decide how to sheathe the outside of a frame bathhouse, since it adds another warm layer to the thermal insulation pie and fits perfectly with the wooden elements of the building’s frame.
The lining material used is mainly lining, imitation timber and block house made of coniferous wood.
- Lining.
This is the most affordable type of wooden panels, which can have different profiles. The cost per square meter, depending on the species and type of wood, is from 280 rubles (pine) to 700 rubles (larch).
- Imitation of timber.
The panels are thicker than conventional lining, and their assembled profile imitates a timber frame. Sheathing with this material will cost much more - 400-500 rubles/m² (pine) with a 20 mm thickness.
Finished walls cannot be distinguished from those made of timber Source hozsektor.ru
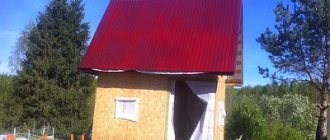
Roof cladding
To finish the roof in a steam room, it is advisable to use corrugated sheets. This material is made from high quality galvanized sheet steel. At the production stage, each sheet is processed in roll forming machines. The corrugated sheet is protected from corrosion by a galvanized layer.
Stages of building a bathhouse roof from corrugated sheets:
- A sling system is installed.
- A sheathing is installed, which is coated with an antiseptic compound that protects the product from rotting under the influence of moist air and high temperature.
- Wooden surfaces are coated with paint that has fire retardant properties.
- Thermal insulation is being installed. This ensures protection of the corrugated sheet from sudden changes in temperature.
- A waterproofing material is placed on top of the thermal insulation, protecting the insulation from the accumulation of moisture as a result of the appearance of condensation on the inner surface of the profiled sheet. When choosing this element, you must carefully examine its structure.
Front area finishing
The cladding of the front part of the steam room is made from the material used for finishing the facade. The material used in the construction of this segment of the bathhouse is also important:
- The wooden pediment can be covered with any material. First you need to install waterproofing, for which a membrane material is used.
- The concrete gable parts are pre-leveled, the sheathing is attached to them, and the sheathing is mounted. The use of molded relief elements is permitted.
Attaching the sheathing material to the pediment is done in several ways:
- Using aluminum stands. They are attached directly to the gable surface of the bathhouse building.
- If the upper front part of the facade is made of wood, the siding is attached directly to the surface.
- Using slats made from wooden materials. The elements are pre-installed on the gable part of the building.
After covering the gable and roof, drains must be installed and a sewerage system for wastewater must be installed. These measures will provide additional protection to the building.