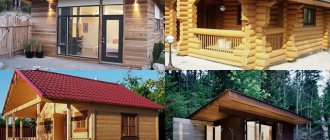
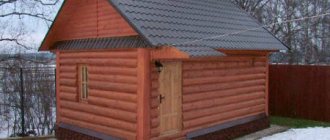
Before building a bathhouse, you should think about what its facade will be like.
Since we are talking about the fact that a bathhouse also has the right to its own design, then it’s time to discuss what to cover the outside of the bathhouse with. Why sheathe? Because even lining a bathhouse with bricks will be called cladding in our construction language. Any structural layer that is not rigidly connected to the base of the structure will be sheathing.
Therefore, cladding or cladding on the outside will be the same process when, together with the builders, designers can also conjure up facades, gables and other planes of the building.
Requirements for structures
Before building a brick bathhouse, you need to study the requirements that apply to such buildings. They are described in government documents.
Requirements according to SNiP 2.08.01-9:
- When choosing a location, you need to take into account that the smoke from the stove should not disturb the neighbors. It should not create smoke in buildings. One option to solve this problem is to install an electric heater.
- For construction you need to choose an elevated place. It is important that it is not flooded with melt water.
- The distance from the bathhouse to the neighboring one should be more than 3 meters (minimum 2.5 meters). To residential buildings - at least 5 meters. To a reservoir, well, borehole - from 20 meters.
Fire safety requirements:
- In the place where the chimney passes through the ceiling, you need to make a hole with a radius of 65–75 cm. Along the edges it needs to be covered with non-combustible material.
- Wooden surfaces must be coated with fire retardant. This will reduce the risk of fire.
- You cannot assemble a chimney from asbestos-cement pipes, since the material quickly collapses with frequent temperature changes.
- It is necessary to make a high-quality ventilation system in the bathhouse and install a fire extinguisher. Doors must be installed so that the leaves open outward.
- Surfaces around the stove should be covered with reflective sheets. It is recommended to place a layer of basalt wool behind them. There should be a metal sheet on the floor in front of the firebox.
All electrical equipment in the bathhouse must have automatic switches and be grounded.
The use of bricks for the construction of a bathhouse
Construction of bath walls
A bathhouse built using bricks has an excellent appearance and good performance. Fireproof, strong, durable walls that are not susceptible to rot, insects and other pests can provide excellent thermal insulation when good thermal insulation materials are used between layers.
When choosing a material for masonry, first of all, pay attention to indicators such as moisture and frost resistance, thermal conductivity index.
Facing
In some cases, to improve aesthetic qualities, facing bricks are used. This type of building materials, according to the components used, is divided into ceramic (clay), hyper-pressed (limestone or shell rock) and clinker (a special type of clay, dyes). Of these, the most expensive is clinker, and the cheapest is hyper-pressed. Facing materials have excellent moisture resistance, and hollow ones also retain heat well.
The best option in terms of price-quality ratio would be hollow ceramic facing bricks.
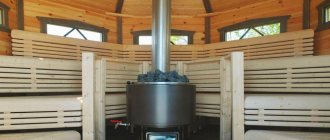
Brick oven
Traditional brick stoves are the best option for a bathhouse. Having good healing properties, clay, when heated, emits infrared waves of a strictly defined range, which have a beneficial effect on the musculoskeletal system. Therefore, a brick kiln is the preferred type.
For proper installation of the furnace, it is necessary to use refractory bricks in the combustion chamber. The remaining parts can be made of ordinary bricks. In relation to bricks for pipes, SNiPs require the use of a grade of at least M-200.
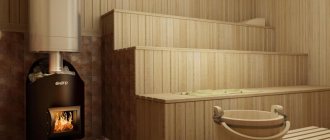
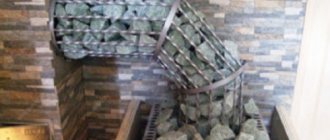
Erection of a screen near a metal furnace
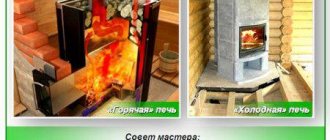
It is not always possible to build a brick oven in a bathhouse. If a metal stove is installed, in order to increase the heat-accumulating properties of the bath, for more uniform heating and “softening” the heat, the stove is often surrounded by brickwork, creating something resembling a traditional stove. It is optimal to leave a gap of 4-6 cm between the oven and the wall to ensure uniform and high-quality heating. It is also possible to additionally equip the screen with a cast-iron door to regulate heat transfer.
In such structures, solid red bricks are most often used.
Registration
Before you start building a brick bathhouse, you need to clarify whether it is possible to erect a building on the territory of a summer cottage. Land plots are divided into certain categories depending on their purpose. Certain government regulations apply to them. Buildings can be built on several types of land:
- Summer cottages. Residential and utility buildings can be erected on their territory. These can be various cooperatives, SNT.
- Land plots for individual housing construction. These lands belong to a specific locality - an urban settlement, a village, a city.
- Private household plot territory. Such lands are allowed to be used for agricultural activities, construction of residential and commercial buildings.
If the land plot does not fall under any of the presented categories, it is prohibited to build a bathhouse on its territory.
When constructing a bathhouse, the owner of the site must:
- Obtain permission to carry out construction work.
- Design the finished building.
After drawing up, signing, and approval of all documents, the building will receive the status of real estate and will begin to be taxed.
It is important to remember that not all buildings need to be registered:
- Any capital buildings are subject to registration. Their main differences are the presence of a massive base, a second floor and living rooms, large dimensions, and the presence of communications - water supply, sewerage, electricity, gas pipeline.
- Buildings that do not need to be registered are sheds, temporary buildings, and utility buildings. Their main differences are the lack of communications, lightweight foundation, and low weight.
The classic bathhouse belongs to the auxiliary buildings.
If you need to register a brick bathhouse, you need to prepare a number of documents:
- Application for permission to carry out construction work.
- Drawing of the territory.
- Document on ownership of a land plot.
- Owner's passport. If it is not possible to obtain it, you can issue a power of attorney to another person.
- Plan for future construction.
It is important to take into account the availability of the required fire safety and sanitary standards. If they are violated, the application for registration of the building will be rejected until the violations are eliminated.
What kind of brick to line an iron stove in a bathhouse
Not every type of brick is suitable for lining a furnace; here you need a material with a high value of thermal inertia, fireproof, solid, which does not deform at high temperatures.
Therefore, when choosing a material for these purposes, you should immediately exclude those brick options that are unsuitable for lining a furnace. These are silicate, slip and raw brick. The first type is not heat-resistant, it conducts heat well (the thermal conductivity coefficient of sand-lime brick masonry is 0.7 W/m*K at a density of 1800 kg/m3) and is destroyed by high temperatures. Slip is also a bad option; it will crumble from regular thermal exposure. As for raw brick, the material is hygroscopic, which absolutely does not meet the requirements of the planned work.
It is best to buy a special stove brick. In fact, it is the same ceramic, only made from high-quality selected raw materials. Its cost is much more expensive than regular ceramic and depends on the brand and manufacturer. Heat-resistant fireclay bricks are also extremely rarely used for lining; its main area of application is the construction of fireplaces and the stoves themselves. It belongs to the high price category of oven materials.
Thus, the choice of brick for a bathhouse and, in particular, for the construction of a screen most often falls on red ceramic piece material. It is obtained from clay (additives that create certain properties are possible) by firing. As a result of the technological process, ceramic bricks acquire excellent strength and frost resistance. Two methods of its manufacture are used: plastic molding and semi-dry pressing. Brick produced using plastic molding technology followed by firing at a temperature of more than 900 degrees is more suitable for lining a furnace. Products produced using the dry pressing method are less resistant to variable thermal loads.
The construction market offers interesting examples of bricks with a textured surface. Using it, you can create an original decorative design for the stove.
Advantages and disadvantages of buildings
Classic Russian baths are often built of wood, but they are in many ways inferior to brick buildings. Advantages of a brick bath:
- Service life more than 50 years.
- High level of fire safety.
- Reliability, durability.
- Environmental friendliness. The brick is made from natural raw materials and does not emit harmful substances during operation.
- Resistance to external factors - temperature changes, ultraviolet radiation, high humidity.
- Easy care.
- Attractive view. If a brick bathhouse was built by a person with practical experience, there is no need to do additional finishing of the walls on the outside. If the seams are located asymmetrically, you can cover them with decorative material.
Flaws:
- High heat capacity. Warming up a brick building takes longer when compared to a wooden bathhouse.
- High cost of building materials.
- Increased hygroscopicity. Without high-quality hydro- and thermal insulation, the premises will constantly have a high level of humidity.
You also need to pay attention to the base. A brick building must be erected on a strip or monolithic foundation. This increases construction costs.
Dyeing process
Paint for a metal stove is quite in demand, so it is not difficult to find it on the modern market. The most popular fireproof paints are:
- Organosilicate products have long been known to a wide range of consumers, as they are used for various works. People who ask the question: “How to paint a stove?” first of all remember these paints. They can withstand temperatures up to 600 degrees.
- Some types of spray paint have increased heat resistance. They can withstand temperatures up to 650 degrees and can be applied in almost any environment, such as sub-zero temperatures or electrostatic fields. Heat-resistant aerosol paints are perfect for painting a boiler in a bathhouse.
- A sauna stove can be painted with electrically conductive paints, but it should be remembered that they have one significant drawback: the ability to reduce heat transfer.
If you want the decorative finish to maintain high aesthetic values for a long time, then painting the sauna stove should be done with products from well-known brands that have been on the market for a long time. Popular manufacturers value their reputation and sell products that have the characteristics stated on the packaging.
Elevated temperatures, high humidity, frequent heating and cooling cycles cause rusting not only of the sauna stove, but also of other metal structures located in the steam room. This primarily concerns the tank intended for hot water. It needs to be painted not only from the outside, but also from the inside, since the water in it will cause corrosion.
Painting the tank is carried out according to the same rules listed above. The only difference is that it needs to be coated with paint and varnish at the manufacturing stage. Once it is installed, such work will not be possible.
In addition to the tank, it would not be superfluous to paint the heat exchange system and the chimney pipe, which rusts quite quickly. It is better to paint boilers and other metal surfaces that the steam room is rich in at the same time. When answering the question of how to paint the tank and other metal surfaces of the bathhouse, the already mentioned paints and varnishes should be mentioned.
In addition to other advantages of painting stoves, tanks and other structures, it is also necessary to highlight the fact that cracks can appear on hot metal (especially cast iron) when it comes into contact with water. Thus, the painted stove can be safely used in a room with high humidity.
Before painting the inside of the bathhouse, you should select the tools used for this purpose. After all, the quality and appearance of the surface also depends on this.
There are two main options:
- Spray. Thanks to it, you can paint the surface as quickly and efficiently as possible. In addition, this method practically does not raise wood fibers, so the walls will not need to be thoroughly sanded after treatment.
- Brush. Despite the seeming archaism of this device, many experienced craftsmen advise using it, especially when applying the base layer.
Paint brush
Painting the inside of a bathhouse begins with purchasing the necessary materials and equipment.
For ease of presentation, the process itself is divided into several stages:
- Prepare the area for work. Considering that you will have to paint not only the walls, but also the ceiling, you should make sure that there are stools, stepladders or scaffolding that allow you to gain access to any point in the room.
- Clean the surface. This phase is very important. You should sand the wood very carefully so that when you run your hand over it, you don’t get a splinter in your palm and feel a smooth surface. A vacuum cleaner or damp cloth will help get rid of dust and sawdust. For best results, you can treat the surface with white spirit.
- Apply a base coat of paint or varnish. Wait until it dries and sand the surface again with fine-grained sandpaper.
- Cover the wall with a second layer, for which it is better to use a sprayer. Before doing this, you need to cover the areas that will not be painted with paper and masking tape.
Before painting, you need to thoroughly clean the surface
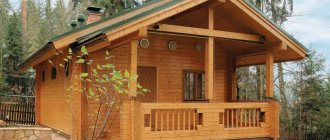
Calculation of building dimensions
Bathhouse project
When calculating the dimensions of a building, you need to take into account:
- Constant number of visitors. The more there are, the larger the bathhouse is needed.
- Number of separate rooms. There must be at least 3 rooms inside - a dressing room, a shower room, and a steam room.
- The thickness of the walls with insulation and finishing materials.
If you need to save space and create an additional recreation area, you can build an attic on the roof or a terrace near the bathhouse.
Design and drawing
The most popular sizes of a brick bath:
- 3x4 meters - for 2–4 visitors. There are three rooms inside - a steam room, a shower room, and a small dressing room or vestibule.
- 4x6 meters - 4–6 people. Inside you can make 3-4 rooms - a steam room, a shower, a relaxation area, a small vestibule.
- 6x8 meters - for 4–10 visitors. Inside you can make a standard set of rooms for a bath and several recreation areas.
Bathhouse drawing
The drawing must indicate:
- Location of door and window openings.
- Door opening direction.
- Connection points for plumbing fixtures and water drainage.
- Places for installing large equipment and furniture.
- General dimensions of the building, wall thickness, room sizes.
Using the drawing it will be easier to calculate the amount of consumables.
Separate elements, decoration, use in design
In the design of baths, brick materials are actively used, including facing, salt, etc. Masonry can either create a separate partition or act as a material that enhances the surface of the walls.
Red worker
When constructing the walls of a building, preference is given to hollow bricks, because the thermal conductivity of such building materials is significantly lower (two or more times). This means that it will be much easier to heat the bath to the desired temperature, and that it will take longer to cool down. Naturally, even when using hollow bricks it is necessary to use heat-insulating materials.
When using this type of brick, it is necessary to use a thick mortar and ensure that the mortar does not fill the voids. Otherwise, the thermal insulation properties of the material will deteriorate.
When constructing other elements of a bathhouse - a screen, a stove, etc., solid brick is more often used. The hollow one will take a very long time to heat up, although it will also take a long time to cool down. So in this case, the choice of which type to use depends on the preferences of the owners.
Porous type
This type of brick is a modification of the hollow type. Having indicators similar to other types, it has an even lower heat transfer coefficient. Allows for maximum heat retention.
Selection by strength
All brands of brick are designated by the letter M with an index (75...250). The index shows the strength of a specific type of product (this number shows how many kilograms per square centimeter of area the material can withstand). Since most bathhouses are one-story, there are no special requirements for strength indicators - M-75 is enough (five-story Khrushchev buildings are made with this brand).
At the same time, if several grades are used in the construction of a bathhouse, higher grades must be laid out in the lower part of the building. This is especially important if the building has more than one floor.
Selection by frost resistance index
Perhaps the most important index when choosing bricks is marked with the letter F. The fact is that the index determines how many freezing-defrosting cycles the product will withstand without destruction. That is, it actually shows how long your bathhouse will last. It is especially important to take into account the frost resistance indicator when laying the outer layer of bricks, which is most exposed to temperature changes. For this layer, products with a frost resistance index of at least 50 are recommended.
At the same time, a layer of plaster on brick walls sharply reduces the effect of frost on the structure, which allows the use of lower grades.
Refractory
This type of product is the only one in the category that is suitable for the interior of the oven. It should be remembered that when constructing the refractory parts of the furnace, only fatty clay and other refractory materials are used as a solution. An ordinary solution rapidly breaks down in such extreme temperature conditions.
Despite this, the firebox is also made of ordinary red working brick. Such fireboxes are unsafe and extremely short-lived.
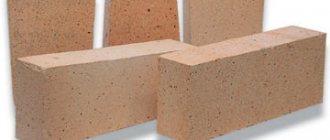
Chamotte
The most popular and widespread of the fireproof types. The base is clay, with significant admixtures of aluminum oxide. Withstands up to 1000 degrees. The brands ShB and ShA are recommended for sauna stoves. Due to its high cost, it is used exclusively in the construction of sauna stoves.
Solyanoy
Despite the high cost (about 200 rubles per piece), this type of product remains highly popular due to its excellent aesthetic and medicinal properties. When used indoors in a bathhouse in sufficient quantities (especially near the stove), it has a positive effect on the pulmonary and cardiovascular systems. The only limitation of such products is that they must have low humidity (below 53 percent).
Preparation of materials and tools
To carry out the work you need to prepare:
- bricks, mortar for masonry;
- fittings;
- boards, bars, rafters, beams;
- roofing material, insulation, waterproofing;
- sand, crushed stone, cement;
- trowel, large spatula;
- construction level, marking tool;
- grinder with discs for metal and stone;
- knitting wire;
- drill with whisk attachment;
- container for mixing the solution.
You will also need wires, sockets, switches, plastic pipes and faucets to carry out communications.
Construction of a building
The process of building a brick bathhouse consists of several stages, which must follow strictly one after another.
Making masonry mortar
Before preparing the mortar for laying bricks, you need to study what the working mass should be. Requirements for the composition for masonry:
- High strength after drying. The masonry should not deform, crumble, or settle.
- High plasticity. Only if this requirement is met, the masonry mixture will be able to fill all the voids between the bricks and securely hold them together.
- There should be enough time before the working composition hardens to lay the bricks on top of each other, align them horizontally and vertically.
The standard mortar for bricklaying is cement-sand. To prepare it, you can use cement m400 or m500. When using the second option, you need to take 1 part cement, 4 parts sand. For the first one - 1 part cement, 3 parts sand. Preparation:
- Pour the ingredients into a bucket.
- Mix them together with a drill and whisk. When stirring, it is necessary to add water.
The result should be a homogeneous thick mass without lumps or large inclusions.
Foundation and floor
Construction of the foundation:
- Prepare the area. To do this, it is necessary to indicate the dimensions of the future building using stakes with a thread stretched between them. Clear the designated area of debris. It is also recommended to cut the soil layer to a depth of 20 cm to get rid of holes and hills.
- Add pegs with string to mark trenches for the strip foundation.
- Dig trenches to a depth of 50 to 80 cm (depending on the freezing point of the soil).
- Make wooden boards from the boards and secure a thick plastic film on them. Install the shields along the edges of the trenches and connect them together with boards. Install spacers for the formwork so that it does not tear due to the pressure of the cement.
- Make a reinforcing frame from reinforcement. It is tied with knitting wire.
- Place a layer of sand 15–20 cm thick at the bottom of the trenches and compact it.
- Install the reinforcement frame inside the formwork. The height of the base above the ground is 50 cm.
Pour cement mortar into the formwork. Cover the base with film to protect it from precipitation. The strip foundation must harden for at least four weeks.
To prevent the cement surface from cracking, it is recommended to periodically water it with a small amount of water.
Walls
Features of building walls in a brick bath:
- Before you start building walls, you need to prepare the foundation. The formwork is dismantled, the voids between the ground and concrete are filled with expanded clay.
- Clean the cement surfaces from uneven surfaces. After this, they need to be covered with a layer of liquid mastic. When the mastic dries, spread 2 layers of roofing felt on top of it.
- The first row of walls begins to be laid out from the corners. It is important to check each brick for level so that further rows are level.
- The masonry should not be continuous. Bricks in adjacent rows should be positioned so that the seams do not coincide.
- Every third row you need to make a binding. To do this, you can use a metal mesh or small diameter reinforcement.
If the walls are laid in summer or late spring, it is recommended to wet the bricks before use. This action will help prevent the solution from drying out.
Windows and doors
You need to decide in advance where the windows and doors will be. To limit them from above, metal corners should be used. They must be laid in the top row that ends the window or doorway so that they overlap it. The next row of bricks is laid on top of the corners.
Ceilings and roof
The process of constructing a roof and ceilings:
- The walls must be strengthened with a reinforcing belt. To do this, a recess is made in the brickwork along the perimeter of the wall on the upper side, into which concrete is poured.
- On top of the production of the tightening belt, a mauerlat is fixed - a strapping crown made of timber.
- Ceiling beams are fixed on top of the Mauerlat in increments of 60 cm. The ends of the beams must protrude beyond the walls by at least 50 cm.
- Next, the rafter sections are assembled. It’s easier to collect them on the ground and then put them on the roof.
- All rafter sections are secured to the ceiling beams using rafter feet.
The rafter sections are fastened into a single structure using sheathing. A vapor barrier film is fixed on top. A counter lath is placed on top.
Communications
It is also necessary to pay attention to the laying of communications. These works must be carried out during the first stages of construction.
Electricity
Features of conducting electricity in the bathhouse:
- You need to draw a wiring diagram in advance, on which you should mark switches, sockets, and lamps.
- It is necessary to choose wires with additional protection from strong heat.
- Switches and sockets must be located in the dressing room.
Since most lamps operate on 12 volts, a transformer must be installed in the recreation area. You can hide it behind a metal shield.
Sewerage
Features of the sewer outlet:
- It is better to assemble sewerage from large-diameter plastic pipes.
- The drain should be located at the lowest point of the shower. To do this, during the construction of the floor it is necessary to make a slope in one direction.
- Water drainage points must be protected by gratings.
The sewage system must be discharged into a septic tank or drainage well. There should be at least three meters from it to the bathhouse.
Water supply
Features of water supply connection:
- The best option for running a pipeline for cold water is from a central water supply system. If this is not possible, a borehole or well will do.
- Pipes that run along the street must have additional insulation.
- If the building will not be used in winter, it is necessary to make points for draining water from the system.
Wall treatment
There is no additional need to treat brick walls. They are not destroyed by fungus, mold, insects, or exposure to moisture.
Thermal and waterproofing
To improve the functional qualities of a bathhouse built of brick, it is necessary to perform heat and waterproofing. Waterproofing methods:
- Pasting. It involves gluing brick surfaces with sheet materials.
- Painting. Liquid compounds are used for waterproofing. They cover brick surfaces.
The process of thermal and waterproofing walls:
- Leveling and covering walls with plaster.
- Installation of a frame made of wooden bars or aluminum profiles.
- Laying thermal insulation. Individual slabs are fixed in empty frame cells.
- Packing of moisture-resistant board material.
- Covering the slabs with foil film.
- Stuffing wooden slats to create a ventilated gap.
Roof diagram
For steam rooms and washing rooms, it is better to choose foam glass as insulation. For dressing rooms, vestibules, and recreation areas - mineral wool.
Sequence of work on furnace lining
The brick structure must have a reliable foundation, so the process of lining the furnace begins with the construction of a solid or columnar foundation. If you have a wooden floor in your bathhouse, you should also take care of fire safety. To do this, a metal sheet is laid in the area where the firebox door is located, covering it with asbestos material on top. Further work is carried out in the following order:
- make a base that is one or two rows of masonry;
- a stove is mounted on the base;
- lay the first row of bricks, along which the entire structure is installed;
- gradually lay out the next rows of the screen, leaving special holes at the bottom and top for air circulation, and install additional elements along the way;
- make a brick chimney or install a metal pipe.
When carrying out work, we must not forget about the following nuances:
- For lining the furnace, use a brick, previously soaked for 30 - 40 minutes in water;
- seams between bricks should not exceed 5 mm.
Otherwise, everything is the same as in ordinary masonry: checking the corners with a plumb line, and the evenness of each row with a level. Strict adherence to technology is the key to the quality of the future design.
A few final words
The labor costs and money spent on lining a sauna stove are more than justified. A brick casing increases the operational safety of a metal stove; heat is distributed evenly, since the artificial stone first accumulates heat and then releases it. And the heat is retained much longer; you can steam in the sauna comfortably for several hours in a row. The benefits are obvious.
stroikadialog.ru
Finishing
After the construction of the building, installation of windows, installation of the subfloor and ceiling, installation of heat and waterproofing, you can begin finishing. Different materials are suitable for finishing brick surfaces.
Internal
Features of interior decoration:
- For finishing it is better to use lining. It is easy to work with and is suitable for finishing steam rooms, showers, and dressing rooms. It is important to prepare the tree in advance. The boards must be coated with special antiseptics and antipyrine.
- You can combine finishing materials. In the steam room, the walls should be lined with clapboard with the lowest thermal conductivity. In the washing room, wood can be combined with plastic panels, natural, decorative stone.
- Floors can be covered with ceramic tiles or porcelain stoneware.
When purchasing tiles for a sink, you need to choose rough products. This will reduce the risk of slipping while visiting the bathhouse.
Which is best
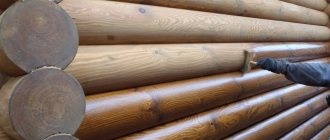
Since ancient times in Russia, wax, as well as hemp or linseed oil, have been used to treat bathhouses. Despite the modern processing compositions proposed by various manufacturers, it is possible to use time-tested products and, at present, they have not lost their relevance.
Of the modern substances, it is best to use acrylic types of varnishes, as well as water- and wax-based varnishes. The advantage of these products applied to boards is that they do not release harmful, toxic substances and pungent odors when heated, which are formed by standard varnishes and paints. This is especially true for treating sauna steam rooms with compounds, where the walls, ceiling and floor are made of wooden paneling and where colorless varnish is best suited.