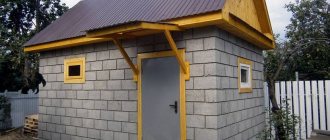
DIY summer bath
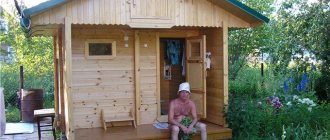
Summer sauna If you plan to use the sauna only in the summer, its construction will not cost much.
Such a building will not require thorough insulation, and solar heat will do a great job of heating water for washing. You will learn about the construction of such a bathhouse from our material. Summer frame bath
Summer baths can be used both for washing and for taking full bath procedures and are built using frame-panel technology.
In the first case, the heat source is solar energy, which allows you to create a greenhouse effect in the bathhouse and heat the water for washing. This structure does not have a stove, so you won’t be able to take a steam bath with a broom here. The walls and roof of such baths are made of materials that accumulate heat, for example, cellular polycarbonate. Thanks to this, the bathhouse premises maintain a comfortable temperature for carrying out hygiene measures even in cloudy weather.
Another option for a summer bath is a light construction with a metal stove, a dressing room, a steam room and a washing compartment. It is not much different from a traditional Russian bath, and therefore has a healing effect.
Any materials that are used for the construction of summer baths using frame-panel technology have their advantages and disadvantages. Unlike log baths, frame buildings do not shrink - this is their important advantage. There is no need to wait 1 year to begin finishing work and put the bathhouse into operation.
Another plus is that a light-weight wooden bathhouse does not require a massive strip foundation. Brick, block or concrete columns can be used as supports here. This will provide significant savings in funds allocated for construction.
If a summer frame bath is thoroughly insulated, it can be used all year round, and its price, including labor costs, will be much less than a similar building made of brick, logs and other massive materials.
Timber and boards used in the frame-panel technology of building construction are useful natural materials, but they have certain disadvantages, such as susceptibility to rotting, infestation by bugs, cracking, deformation, etc.
You can build such a summer bathhouse with your own hands, having one assistant and the necessary tools. We will analyze construction technologies using examples of frame buildings assembled from cellular polycarbonate and from boards.
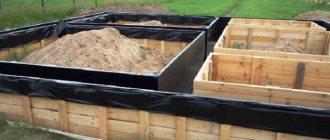
Summer bath for washing made of polycarbonate
The roofing and lining of such a bathhouse allows you to use the energy of the sun to heat water. Since the temperature in the building’s premises depends directly on insolation, its front wall should be oriented towards the south and have no obstacles that shade it. In summer, a roof made of polycarbonate, in addition to storing heat, also provides light.
For construction you will need: edged board 50x100 mm, floorboard 50x150 mm, logs for the frame, OSB board 9 mm, cellular polycarbonate 6 mm, polystyrene foam 4 mm, cement, sand and brick for the foundation, self-tapping screws 3.5x40 mm and washers with gaskets for fastening polycarbonate sheets.
The work is done in this order:
- Using a cord and pegs, the building site is marked. Foundation columns are installed at each corner of the sections.
- Each of them is covered with roofing felt waterproofing. Then the foundation is strapped with antiseptic-impregnated timber.
- 2.5 m long posts made of 50x100 mm boards are installed on the harness with a cut into the timber. Their verticality is checked with a building level.
- The rafters are laid in increments of 600 mm. This will prevent the polycarbonate sheets from deforming under any snow load.
- Polycarbonate sheets are cut to size for the roof and screwed to the rafters with self-tapping screws. When installing, be sure to use washers with soft spacers. The material is laid so that the stiffening ribs are perpendicular to the cornice. The ends of the roof are equipped with plugs that protect from dust and moisture.
- The outside of the frame is sheathed with OSB (oriented strand board).
- The walls of the bathhouse are lined with polycarbonate. The outer side of its sheets is the one that has ultraviolet protection.
- The internal surfaces of the bath section are sheathed with polycarbonate. The second layer will ensure the opacity of the walls and maintain the privacy of the interior space. There is a hole in the floor for drainage, which is equipped with a regular mesh for washing. The dressing room is lined with OSB board, and the partition between it and the “steam room” can be made of polycarbonate.
- The outside walls are treated with a water-repellent compound, doors are hung and ready-made window units are installed.
- To make the frame, boards with a cross section of 50x100 mm or more or dried timber are used.
Hot water must be brought into such a bathhouse or pumped into it, since there is no stove in such a building. But on a hot day, the water is perfectly heated by the sun. Drainage can be arranged in a pit with high-quality drainage.
Summer sauna made of boards
To build baths using frame-panel technology, it is possible to use not only boards, but also plywood, as well as OSB boards. In addition to them, various insulation, vapor and waterproofing materials are included in the multilayer construction of walls, ceilings, floors and roofs.
Let's consider the features of the materials that are used for the construction of a summer bath:
The construction of a bathhouse from boards is carried out in the following order:
- The base piping of the bathhouse is performed, which serves as the basis for its frame. In this case, 150x150 mm timber or 50x100 mm boards are used, laid in 2-3 rows on an edge. Before installation, the material is treated with an antiseptic. When used for tying boards, it is easier to connect them in the corners and make grooves in the structure for attaching vertical frame elements.
When we talk about a Russian bathhouse, we imagine a small, solid log house. Such baths have been built for a long time, and all technologies have been tested for centuries.
But the construction of a log bathhouse requires large material investments; it is also quite expensive to operate, since in cold weather it takes a long time—up to six hours—to warm up, and it takes a lot of firewood to heat it.
But there is also an inexpensive option: a frame bath. In terms of its characteristics, it is in no way inferior to classic wooden ones, and in some respects it even has a number of advantages.
Of course, the ideal option for building a bathhouse is a bathhouse made from wooden logs, but if this option is too expensive or complicated for you, you can take a simpler route and use frame construction technology.
This “democratic” option will make it possible to save on materials, and the construction process itself will last about 10 days and will not require any special knowledge and skills from you. The frame structure has other advantages that make it increasingly popular among private sector homeowners:
- firstly, the frame structure is much lighter than buildings made of brick or logs, and therefore does not require the construction of a reinforced foundation, even on wet soils;
- secondly, the materials used to construct the frame retain heat in the rooms;
- thirdly, the construction of the frame, as well as its cladding and finishing takes a minimum of time;
- fourthly, materials for a frame bath are much cheaper than, for example, for a bath made from a log house.
Material characteristics
When compared with other materials, cellular polycarbonate has a number of important advantages. In addition, the cost of this polymer is more than affordable.
- polycarbonate is ideal for a bathhouse, as it can withstand large temperature changes from -45 to 120 degrees, at such critical moments it loses its properties;
- lightness and strength;
- a wide variety of colors of this material will allow you to choose one suitable for every taste;
- ease of installation and operation;
- the material does not burn and does not support combustion - in the event of a fire, polycarbonate melts without spreading the fire;
- good light transmittance, but at the same time it absorbs UV rays, which can cause burns if they come into contact with the skin;
- Due to the flexibility of the material, it is actively used in creating both designs of classic shapes and the most original ones.
Making a polymer bath
You can make a durable building with your own hands. It must be mounted on a wooden frame. This building is suitable for summer. Prepare edged boards or timber, OSB and polycarbonate sheets. They should not be transparent.
A bathhouse that you will use in the summer will not cost much at all. To build it, you will need high-quality insulation. The water will heat up from the heat of the Sun. These buildings are often placed on summer cottages. In this case, during its seasonal operation, capital structures are not needed. If you need a log house for the summer version of the bathhouse, then you do not need to insulate it, except for the steam room.
After you have been in the steam room, it is always nice to come out and sit in the fresh air. A terrace attached to a bathhouse is suitable for this. It can also be built from polycarbonate. It can have many functions and look beautiful against the backdrop of your home. It can be made using cellular polycarbonate. This type of polymer is different in that it has “pores” that contain air. This increases the thermal insulation characteristics of this material.
A canopy must be installed in front of the bathhouse. Install a grill or barbecue and upholstered furniture under it. You will have a comfortable place to relax after taking bath procedures. The canopy will not only protect from sunlight and precipitation, but will also decorate the area near the house.
The porch will look great if the building is located at a height from the ground. By installing this design, it will give the house additional comfort. The porch can be built from boards and logs. Be sure to make a visor over it. It will protect from precipitation and fit into the design of the building. Make it durable and resistant to wind and snow.
Possible designs
Let's take a closer look at what can be made from this material.
One of the popular areas for its use is a canopy in a private courtyard. It has a significant advantage: it allows you to be in the yard and enjoy fresh air during rain, and protects you from the negative effects of direct sunlight.
Let's look at how to make a polycarbonate canopy with your own hands.
To do this you need:
- draw up a project for the future design, decide what requirements it must meet;
- make a preliminary calculation of the required material;
- buy a profile for the structure frame, polycarbonate sheets, fasteners, necessary parts for draining rainwater;
- install racks, assemble the frame;
- fix the polycarbonate;
- assemble a structure for draining rainwater.
Note. As you can see, everything is quite simple. It requires accuracy and a little effort.
Greenhouse
An excellent solution would be to make a greenhouse from polycarbonate. Thanks to its high transmittance of sunlight (up to 90%), this will enable the full development of plants in winter.
It is recommended to use cellular polycarbonate, which will significantly retain heat and create the desired environment inside the structure. Its flexibility will allow you to make an arc roof. The strength of the material will make the product stable over many years of use.
An excellent option for a summer house or personal garden could be a polycarbonate house. Such a structure can be built in a surprisingly short time. It will have a high light transmission capacity and will protect its owner from rain and wind.
Porch
Thanks to the lightness of this material, you can easily make a polycarbonate porch with your own hands. It is important to take care of assembling a strong frame and attaching it to the wall and floor. Next, the polycarbonate sheets themselves are attached.
This product will make it possible to create an external extension and protect the front door of your home from the negative influence of the environment.
Visor
A good solution would be to make a polycarbonate visor. This will make it possible to protect the front door from the negative effects of sunlight and rain.
DIY polycarbonate summer bath
Diagram of the structure of a frame bath.
If you carefully calculate the costs that await you when building a bathhouse on your site, if you want to do the construction on your own, then a frame bathhouse is the option for you.
It is economical both in construction and in use.
- it takes little time to build such a bathhouse;
- unlike a log house, it does not shrink;
- it can be built at any time of the year;
- you can handle the assembly yourself;
- a variety of materials are suitable for finishing the frame;
- in the future it is easy to add additional premises to it.
The walls of the bathhouse, supplemented with insulation made from energy-saving materials, warm up and retain heat perfectly, and this is a serious saving on time and fuel. It turns out to be a really inexpensive option.
For example, the thermal conductivity coefficient of ordinary wooden walls ranges from 0.13–0.15, while for modern heat-insulating materials this coefficient is an order of magnitude higher - 0.03–0.04.
The variety of options for exterior and interior decoration is another argument in favor of building a frame bathhouse.
The outside can be finished with siding, tiles, plastering, sheathing with boards or a block house (imitation timber), then the bathhouse will not look different from a chopped one.
Having finished building the walls and partitions of the bathhouse, you need to start installing the ceiling, which can be insulated using a layer of sawdust, peat or expanded clay as the cheapest materials.
We suggest you familiarize yourself with: Installation of a shower stall drain
The finished floor is made of floorboards, under which foam plastic or mineral wool is laid. The roof is usually constructed with a pitched roof; this significantly simplifies and reduces the cost of construction.
All other work on the installation of the stove, shelf, drainage of water is carried out in the same way as for a regular wooden bath. Such a frame bath can be built in the shortest possible time and, using inexpensive materials, can save a lot.
As was said earlier, the foundation for a frame bath can be chosen of the simplest design - columnar. Asbestos-cement pipes with a diameter of 100 or 200 mm and a length of 4 m are suitable for its arrangement. The number of such pipes depends on the building area and amounts to several dozen. Pipes, cut in half, are installed in the ground in wells previously made with a gas drill.
The diameter of the wells is 200 mm, and their depth is about 1.5 m. The pipes installed in the wells are filled with sand, and the sand is carefully compacted. Next, the pipes must be filled with concrete. To prepare it, you need to mix 1 bucket of M200 cement, 4 buckets of pre-sifted sand, 7-8 buckets of fine crushed stone and water. The resulting solution is used to fill wells with pipes installed in them.
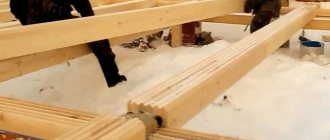
After arranging the foundation, a lower frame of the structure is installed on it, made of timber 150x150 or 150x100 mm, connected to each other with nails. We install logs on the finished harness, which are made of 150x50 mm boards. Since the harness is not located high above the ground, care must be taken to waterproof it.
To do this, a waterproofing layer of roofing felt is placed under the trim and joists. The dimensions of individual sections of roofing felt are about 0.2x0.2 m. To obtain a more rigid and durable structure, the trim boards and joists are attached directly to the foundation pipes. To do this, you need to attach metal plates to the pipes in advance.
The racks of the structure frame and parts of the future rafter system are made from boards with a section of 150x50 mm. They are manufactured according to a pre-developed scheme and installed in designated places.
The wall installation sequence has three stages:
- two racks are installed in the corners, and several intermediate ones between them;
- starting from the corner, installation of sheathing material begins, for example, sheets of oriented strand boards (OSB). Installation involves attaching the sheets to the frame racks using screws. The position of the sheets is constantly controlled by the building level;
- parallel to the installation of the sheets, the subsequent racks are being installed, to which the sheathing is also attached.
Thus, by installing racks and securing OSB sheets to them, the entire frame structure is installed. Do not also forget about window and door openings in the walls of the building.
To arrange the roof of a bathhouse, rafter structures are first assembled on the ground according to the developed template, which are then lifted up and attached to the frame racks. To create more comfortable working conditions for installing the roof structure, a temporary ceiling is attached to the beams. On the last truss obtained in this way, markings are applied for fastening the OSB sheets for the pediment of the building.
To ventilate the roof, a layer of special film must be laid between the rafters and the counterbeam. The roof sheathing must be attached directly to the rafters. As a roofing material, you can choose slate, metal profiles or ondulin. When the rafter system and roofing material are installed, OSB sheets of the desired shape are attached to the gables of the building.
After the construction of the main frame of the bathhouse is completed, windows and doors are installed in the corresponding openings in the walls.
Next, you should begin interior decoration. The ceiling can be made from OSB sheets, which are attached to the beams from below. The ceiling is insulated with a layer of selected insulation, which is cut into sheets measuring 50x600x1000 mm, in three layers. The perimeter walls are also insulated in the same way. In addition to insulation, a layer of “screen” foil is also laid in the walls of the steam room. The top of the insulation is covered with glassine.
For the floor, you can use boards that were previously used for temporary covering during roof installation. They are removed from the beams and nailed to the joists.
The steam room is usually equipped with a stove-stove, and the boiler for heating the water is located in the dressing room near the wall common with the steam room. There must be a brick wall between the steam room and the relaxation room, as required by fire safety standards. The brick used is ordinary construction brick.
In the steam room, the ceiling is additionally insulated and covered with clapboard made of natural wood. This will significantly reduce the height of the ceiling, which according to standards can drop to 2.1 m. When choosing material for lining, it is better to give preference to linden. You can also use it to make shelves in the steam room.
The entire construction process will not take much time. For a team of 3 people, 10 days is enough to build your own bathhouse.
If you break it down by day, you get:
- the first 3 days will be spent on laying out the foundation;
- another 3 days - for installation of strapping and joists;
- 2 days – for installation of the rafter system;
- 2 days – installation of roofing material, windows and doors, finishing work.
- First you need to install a columnar foundation using timber and roofing felt for waterproofing. Lay timber frames on the foundation pillars. Secure it with 50*100 boards. This will be a good supporting element. Make sure that the boards cut into the floor of the beam. The boards need to be secured vertically and diagonally. Mount the rafter system from the same boards.
- Now start attaching polycarbonate sheets to the finished frame. If desired, you can make a combined cladding using LSP. Make it only from the outside, and the inside of the bath is made of polymer material.
Useful tips
Having chosen the optimal materials for constructing a greenhouse, it is best to make its shape arched. Then snow or rain will not accumulate on top and weigh down the structure. In addition, this shape retains heat better inside. Solid arches are stronger than collapsible structures. The distance between them should be small.
Then the structure will be more durable. Make small windows in the end parts of the greenhouse for ventilation so that in extreme heat the plants can breathe normally. The optimal type of polycarbonate is two-layer. Material that is too thin will not protect plants from frost. The joints should be sealed with sealants.
Installation nuances
It is necessary to cut polycarbonate sheets to the same dimensions as the roof. Secure the sheets with self-tapping screws. You will need washers with soft spacers. When you start laying the material, the stiffening thread when laying it should be perpendicular to the cornice. Be sure to make caps at the ends of the roof to protect from moisture and dust.
The interior wall needs to be sheathed with polycarbonate. When installing the second layer, the wall will be opaque, thereby maintaining the privacy of the interior space.
There should be a hole on the floor in the bathhouse through which water will drain. To prevent it from clogging, put a mesh. It is better to cover the dressing room with OSB tiles, and the wall between it and the steam room with polycarbonate. The outer walls must be treated with a water-repellent agent. After this, you can install doors and window blocks.
Hot water will be supplied to the bathhouse by a pump, because a stove will not be installed in such a room. In hot weather, a summer bath will always be supplied with hot water heated by sunlight. For drainage it is necessary to create a special hole and drainage.
Important points
Factors to consider when building an extension:
- The design of the bathhouse itself (including the building materials that were used during construction).
- The presence of a foundation, its depth and type (monolithic, strip, bored).
- Finances that are planned to be spent on the construction of the extension; Carefully calculate the cost of all materials that will be required during construction.
- The time frame within which all types of work must be completed.
Varieties
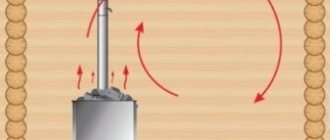
The bathhouse can be built both winter and summer. In winter, the room will warm up well at an outside temperature of minus ten degrees. Even if there is wind, it will not penetrate inside. There is a stove inside with stones on it. They retain heat in the room for a long time. In addition, you can make a portable heater in the bathhouse.
Remember! The heated heater must be placed on a metal tray. Be careful when handling heated stones.
We invite you to familiarize yourself with: Installation of a floor in a bathhouse on screw piles
As you can see, making such a polymer building is not so difficult, but ease of installation is not the only advantage. There is no smell in the room. Lighting in the bathhouse will be provided by daylight; electricity will not be installed in such a building. Polycarbonate is not considered a hazardous material. You can verify this by visiting the Internet or our website.
From the experience of those who have such a building, it is known that in hot weather it is used as a shower stall without a heater in it. The water is heated by the sun's rays.
Decide for yourself which bathhouse to make - for summer or winter. The main thing is that you have the opportunity to have your own bathhouse on your site for any time of year.
How to choose a greenhouse?
Polycarbonate is a fairly hard plastic.
It belongs to the category of thermoplastics, as it does not lose its properties after melting. This material is used for greenhouses because it is transparent, lightweight, durable, resistant to temperature changes and has a long service life. It should be noted that everyone has their own ideas about what an ideal greenhouse should be. However, there are general characteristics that you need to consider and know when choosing a greenhouse. Frame. The frame of the greenhouse must be strong. Otherwise, the structure will not survive strong winds and snowfall. Most often, the frame is built from metal, plastic or wood.
https://www.youtube.com/watch?v=xdOuWsFqXtohttps:
The latter option is undesirable, since the wood may be damaged due to insects, moisture and temperature changes. Plastic, despite its resistance to frost and insects, will not withstand mechanical damage, which cannot be excluded since the structure is located outdoors. The most durable design is made of metal.
Advantages of a frame bath
Start of construction of a frame bathhouse.
The main thing in the design is the frame. It is made from special boards that are treated with an antiseptic. The size of the boards is determined not only by considerations of strength, but also by the need to accurately adjust the insulation to them, which is placed between the frame racks.
Its thickness should not exceed the width of the board. Additional structural strength is provided by the internal and external cladding of the frame. The corner posts, as well as the upper and lower frame frames, must be made of timber or especially strong boards.
The lower trim must be fenced off from the foundation with roofing felt. Intermediate posts are installed at a pitch that is suitable for both laying thermal insulation and sheathing.
Calculation of the pitch of the racks must be especially careful. It is also necessary to take into account what the frame will be sheathed on the outside.
In addition to traditional plywood or lumber, OSB (oriented strand boards) and CSP (cement-bonded particleboard) boards are also used for this purpose. The width of the OSB sheet and the plywood sheet is 1.22 m, and the width of the DSP sheet is 1.25 m.
To ensure that the sheets are joined closely and there is no need to trim them, the intermediate posts are made in increments of 0.6 m. This step is also convenient for installing thermal insulation, because its standard width is approximately the same.
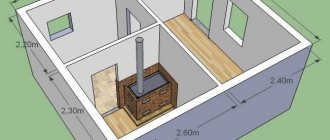
Bathhouse with backfill walls: a – general view; b – plan of the bathhouse; 1 – dressing room; 2 – steam room; 3 – stove-heater; 4 – hot water tank; 5 – support under the floor joist.
Therefore, the material will fit tightly between the posts, without gaps, which means it will support itself. In addition, this step is ideal for laying the roof: maintaining equal distances between elements helps to evenly distribute the load on the frame.
For most of the territory of Russia, the following scheme for installing walls in a frame bathhouse is suitable:
- internal lining made of clapboard or plywood;
- vapor barrier gasket;
- frame made of boards 50×150 every 60 cm;
- again a vapor barrier gasket;
- insulation;
- waterproofing;
- external finishing cladding.
For external cladding, not only lining or plywood is used, but also OSB or DSP sheets - waterproof and non-flammable. Cement particle boards are made of pressed shavings impregnated with cement mortar; their surface is smooth, which is convenient for subsequent cladding or plastering.
But to cut the DSP you need a grinder, and you have to drill holes for fasteners. Therefore, oriented strand boards OSB are even more attractive for these purposes. Working with them is no different from working with wooden ones; moreover, they are sold in sheets and compact packages.
They are made from flat wood chips glued and pressed with resins. Due to their multi-layer nature, such panels do not react to weather conditions, are impact-resistant and perfectly insulate sound.
Construction stages
Preparing the area where the extension will be located: all garden debris is removed, bulges and holes are leveled. Installation of strip foundation. (It is this type of foundation that is mainly used on such structures because it is easy to manufacture, does not require the use of special equipment, has a long service life, and the cost of construction is inexpensive.
Cover the prepared frame with polycarbonate sheets. It is recommended to secure it using screws with rubber washers. You can cut polycarbonate using an electric jigsaw or a saw with fine teeth (either a hand saw or a circular saw will do). Install a roof for the extension, the possible types of which were described above (in the form of an arch or sloping). If windows are needed, ready-made metal-plastic ones are usually used.
The extension is ready for use, but to increase its service life and attractive appearance, it is important to know the basic rules for caring for this material:
- Branches of nearby trees can scratch the material, so if there are trees or shrubs near the building, it is better to trim them or tie them up.
- When soiled, the material should be washed with soapy water using a soft cloth (or rags). It is better to avoid products containing alkali, solvents and acids - the material may become cloudy, which will negatively affect its appearance.
- The material does not require additional painting.
We hope that our detailed recommendations, as well as visual photos, will help you build a reliable and durable extension!
Thermal and waterproofing of walls
Frame wall construction.
Insulation of a frame bath is, perhaps, the main stage of its construction.
As insulation, you can choose expanded polystyrene or much cheaper penoizol, mineral wool or fiberglass. The most important thing here is not even the choice of material, but its correct installation.
Expanded polystyrene practically does not absorb water, so it becomes an insurmountable barrier for water vapor. They attach it with mounting glue to the inside of the frame sheathing, and fill the gaps with mounting foam.
On the room side, the insulation is supplemented with a vapor barrier film with a layer of foil, and it is with foil inside the room. Metal foil reflects heat, so the steam room warms up faster.
Recently, modern, environmentally friendly insulation made from the same class of foam plastics - penoizol - has become increasingly popular.
It compares favorably with expanded polystyrene in its price and at the same time is durable, non-flammable, non-toxic, and has high sound insulation properties. Installation of sheet penoizol is similar to installation of expanded polystyrene, but liquid penoizol can also be poured directly on the construction site into the gap between the inner and facing layers or under the floor.
It is preferable to lay the insulation between the racks in two layers, for example, 50 and 100 mm thick, and at least one layer must be made of slab material, and for the second, both slab and roll material can be used.
After laying foam insulation, the frame is sheathed on the outside with clapboard oriented horizontally for greater strength of the walls.
As a result, a thermos effect is created in the room; there is no air and steam exchange through the walls, so ventilation must be provided. The advantage of this method of insulating a bath is its ease of installation.
Scheme of waterproofing frame walls.
If materials made from glass wool or mineral fiber are used for thermal insulation, which allow not only air but also steam to pass through, the design is completely different. The walls of the bathhouse, insulated with these materials, “breathe” no worse than a wooden frame.
Mineral wool, when saturated with moisture, deteriorates its thermal insulation properties. It can become saturated with moisture from the outside, so in the middle of the frame, between the insulation and the outer skin, a waterproofing layer is laid - a special film (for example, Tektoten) that allows moisture to pass through only in one direction, from the inside to the outside.
The film and outer skin of the frame are fastened so that a gap is formed for ventilation. For internal vapor barrier, in this case, a foil film with micro-perforation is used (for example, Olefol D), and the seams are taped. The inside of the room can be lined with clapboard.
This is a more labor-intensive method and requires careful execution. Fiberglass-based insulation shrinks if installation technology is violated, resulting in poorer heat retention. But the microclimate in such a bathhouse is more comfortable.
Tags: bathhouse, polycarbonate, greenhouse
« Previous entry
Features of the structure
- Open - for relaxing and spending time outdoors.
- Closed - can be used as a dressing room, which was not previously built for one reason or another. When making a dressing room from this material, no additional heating is required - the material retains heat very well.
Materials for construction can be used completely different - wood, brick, foam block, but the best option is an extension to a polycarbonate bathhouse.
In addition to extensions, this polymer is used for the construction of: greenhouses, greenhouses, canopies and gazebos.
Choosing a location for installation
When choosing a place to install a structure in a country house, certain rules should be taken into account, since its effectiveness will depend on this. The main ones are the following:
- the building should be located next to the main house, especially when heating during cold weather;
- do not build a greenhouse in a low-lying area due to frequent freezing of the soil. Slopes or open garden areas where winds often appear are also not suitable;
- choose a sunny place;
- closed ground structures cannot be assembled on bulk soils with close proximity to groundwater.
The best option would be areas with low groundwater. After choosing a suitable location, preparations should be made. The soil should be loose and dry; you can leave a slight slope if it is placed on the south side. On a farm plot with a large volume of moisture, ditches are dug around the perimeter. Single-pitch models are positioned from west to east, with the roof directed to the south. The gable roof should be placed from north to south with a maximum deviation of up to 15 degrees. Teardrop-shaped structures can withstand any conditions, maintaining an optimal microclimate even in winter.
Interior work
The bathhouse consists of two identical compartments - a changing room (Fig. 2, item 1) and a washing compartment (Fig. 2, item 2). I placed a bench in the locker room and attached hangers to the wooden blocks of the walls. In the washing compartment I installed shelves for bath accessories.
The gap between the polycarbonate walls and the soil along the perimeter was blocked with boards.
For the floor, I installed brick supports on the ground, on which I laid the bars. On top I screwed the floorboards from edged boards 25 mm thick with self-tapping screws. There are no curtains in the bathhouse, only doors: the frame is made of timber, and their fabric is made of polycarbonate. I installed the entrance door to the locker room (Fig. 2, item 3) and the second one to the washing department (Fig. 2, item 4).
Additional filling with components
A mobile bathhouse, like a stationary one, should not deprive a person of the joy of rest and relaxation. Given the limited space, the user will still find places to relax, where he can install a sofa, a small table, or his favorite portable exercise machine. An electric stove for heating water and steam - its presence goes without saying. It's easy to fence off a shower area.
For transportation and installation in a fixed position, it is necessary to equip the container with cable hooking devices. You will have to load it onto the trawl platform using a crane.
Those who like to take a steam bath on the road equip their mobile saunas with the following equipment:
- install tiled floors;
- install an electric convection fan in the relaxation room;
- storage water heater;
- shower tray or shower cabin;
- stock of field stones;
- rational furniture.
The above list of additional kits can be considered sufficient for a useful and comfortable outdoor recreation.