One of the most important factors in the installation of polymer self-leveling floors is high-quality preparation of the base.
Failure to comply with the requirements and violation of technological regulations for surface preparation lead to swelling and peeling of the polymer layer. In approximately 90% of cases, the cause of peeling and destruction of polymer coatings is improper preparation of the base. Therefore, it is worthwhile to dwell in more detail on the basic requirements for the base for the installation of self-leveling floors.
Expert answer
A self-leveling floor, in fact, is no different from a regular screed, the only difference being that liquid self-leveling systems are used for this. The thickness of such a coating is small and most often is no more than 5 mm, and it can be a finishing coating or used in the form of a quick-hardening mixture. The latter is intended for arranging the base for floor coverings such as laminate, linoleum or parquet boards. The main advantage of self-leveling systems is that when spreading, they can easily fill existing unevenness and at the same time “bring out” the horizontal to the ideal. Of course, if you follow the technology, you won’t be able to install such a floor at an angle. The mixture will tend to take a horizontal position, or, more simply put, flow to the lowest point.
However, there is information that some home craftsmen were able to install a self-leveling floor at an angle. To repeat their result, you will have to deviate a little from the technology. The mixture is diluted with less water - and its fluidity is greatly reduced. You will have to level the surface manually - using a long spatula or a rule, having previously installed inclined beacons. The best self-leveling floor that can be recommended for arranging an inclined surface is the finishing leveler Vetonit 3000. While the mortar is setting, you will have to adjust the surface several times as a rule, otherwise slipping of the mixture cannot be avoided. I would like to immediately warn you that it will most likely not be possible to obtain a perfectly smooth “mirror” floor - the surface will need to be polished to perfection using abrasives. However, maximum accuracy and diligence will allow you to achieve the desired result - practice confirms that what you have planned is quite feasible.
The main building material at any stage of construction and repair is concrete. This is due to its technical characteristics and properties, as well as its low cost compared to other similar materials. In certain situations, pouring sloped floors may be useful. In the process of performing work, there are certain nuances that must be taken into account without fail. If the concrete screed technology is not followed, then you don’t have to think about strength.
What should a balcony screed be like?
There are many types of poured floors. It is worth choosing the right option based on the climate zone in which you live, operating conditions and your personal taste.
Here are the main queries that a self-leveling floor should answer:
- Ability to tolerate cold, humidity and mold.
- Structural compatibility.
- Compliance with expected loads.
If you choose the wrong grouting mixture in cold or rainy weather, you may find that your floors are leaking or covered in mold and mildew. Therefore, regardless of whether your balcony is open or closed, if it is not heated, you should choose a mixture that is resistant to cold and moisture.
If your balcony is a standard loggia resting on a load-bearing wall, then you can safely buy the most ordinary screed. But if the weight of the floor is limited, you will have to look for a lightweight mixture. Otherwise, there is a risk of collapse.
Such mixtures have their own characteristics:
- they cannot be used on open balconies; there must be at least a canopy;
- there must be a finishing coating;
- cannot withstand strong, dynamic loads.
Application area
The most popular among rooms where concrete screed is laid on a slope is the bathroom. In addition, external territories cannot do without such a device. These include entrances to the garage, personal plots, and premises of economic importance. Screed in a bathhouse or when installing shower cabins, the floor is also actively installed with some slope.
Such a screed device is necessary in places of unorganized outflow of water in order to compensate for the difference between adjacent surfaces. If you have an idea about the process of installing a concrete floor, then no difficulties will arise during the work. There are no special features. But some recommendations are worth considering in order not to deviate from the technology itself.
What should the rough foundation be like before pouring the floor?
The search for the causes of defects can safely begin by examining the quality of foundation preparation. In order for the screed to lie smoothly and not “behave badly”, the base must be:
- Durable, does not peel off, and does not crumble;
- Not be porous, rough or uneven;
- Well dried and thoroughly cleaned of dirt, old paint and small debris.
Anything that interferes with good adhesion leads to defects. Therefore, sufficient attention must be paid to the quality of the preparatory work, as well as cleaning, grinding, and drying the surface.
Installation features
The drainage in the required room can be completed using the following methods of pouring floor screed:
During installation, you should carefully and constantly check the functionality of the drain itself in the room. Otherwise, you will have to waste time on drilling and cleaning in the future. In this case, the level difference should not exceed 20 mm for each meter of the shower or bathtub surface. Normal operation will not be possible at higher slopes. In the future, it will be problematic to lay tiles or any other type of flooring.
Installation of a floor with a slope
The drain is most often located in the central part of the room or with some offset to one of the corners. In the first case, there will be fewer problems due to the uniform distribution and installation of beacons over the area of the room. When the drain is located in a corner, the beacons will have a different order.
Peculiarities
The first thing to note is that a self-leveling floor can be not only a rough coating, but also an independent finishing. For example, people with open terraced balconies often simply make a screed with a subtle slope to drain water. Therefore, making such a floor without subsequent finishing would be a very good solution.
If you choose which fill to make the floor for the rough covering, then the best option would be self-leveling. It has the ability to level itself. It consists of a binder element (that is, gypsum or cement), a mineral filler and polymer additives that give the material elasticity.
Base structure
We must not forget about the quality work done to clean the base from the old screed or any other coating. You can spend less effort and remove only all damaged areas, but in the future the remaining elements may manifest themselves in a negative way. For work, a hammer drill can be used to remove concrete. Particular attention is paid to the junctions of walls and floors.
If during the preparation process floor defects are identified (cracks, crevices, potholes, etc.), then they should be repaired with the prepared solution. All further measures can be carried out only after the solution has dried. Only in this case will it be possible to know how to fill a floor on a slope.
When the surface is ready, you should proceed to the waterproofing layer. The following types of materials are suitable for this:
- Coatings. They have excellent waterproof properties and are able to withstand high humidity and not allow it to pass through. In addition to the floor surface, they are also applied to walls. It will be enough to raise it to a level of 10 cm. The number of layers of the solution will depend on the type of coating being installed. All details will be written on the packaging of the material. You should pay attention to the drying time, since only after this can you begin all subsequent activities aimed at pouring floors with a slope.
- Pasting. Presented in the form of rolls, which are spread on the base with an overlap of each sheet of 100-150 mm. Most often, roofing felt is used, which has become part of the practice of renovating an apartment.
- Emulsion bitumen. But the duration of service is no more than 5 years. It is worth thinking about whether it makes sense to spend money on such materials in order to start the work all over again over the course of several years.
Preface
In garages, floors occupy a special place - they are fundamental to such premises. It is on them that car tires will stand, as well as the rest of your things, for which moisture is bad and you need a dry, clean place so that dust does not emit, the floor must withstand the load, otherwise it will affect the safety of the car. Therefore, the floor in the garage must be chosen taking into account all these features.
Most often, a concrete floor is used in the garage, but more modern options are pouring the floor with a polymer coating or modular rubber or PVC floors, as well as paint for the garage floor.
A self-leveling floor for a garage is made after a properly laid concrete screed. Otherwise, the adhesion (adhesion) of the self-leveling polymer coating to the concrete base in the garage will be poor and peeling will begin over time. And then the polymer floor in the garage will deteriorate and will have to be re-installed by other skilled specialists.
Sloping garage floors are a common problem for garage owners. If it was not done yet during the construction of the garage itself. Water accumulates in certain parts of the garage area and is absorbed if the base is concrete, which leads to the destruction of the floor covering. And you, as the owner of the garage, need to constantly remove water from there.
There are 2 options for solving this issue: creating a general slope towards the exit, creating a drain ladder and creating a slope towards it. But in practice, projects become more complicated due to mistakes during garage construction.
But the specialists of the company SOP - Create an Excellent Floor - cope with these difficulties. Let's look at one of our projects as an example:
Slope in a garage with installation of polymer self-leveling coating
In this garage, a particular problem was the slope created by the builders towards the center, instead of making it towards the exit. Water accumulated and the flooring began to deteriorate.
The cost of installing a floor - self-leveling polyurethane, epoxy, hybrid - cannot be the same for all cases. Since almost every room requires a specific, individual approach to solving the issue of installing a self-leveling floor. Therefore, the price of installing a polyurethane floor in this case was determined based on the list of tasks assigned to the specialists.
Before starting work, all personal belongings are removed and covered from dust. Equipment and connections are also checked.
It is important to isolate personal belongings from work dust, otherwise dust will accumulate on them. Otherwise, all things will need to be wiped thoroughly, which will take additional time.
Next, the concrete base is cleaned from dirt and dust.
Next, after measuring the slope over the entire area of the room, a slope plan was drawn up and decisions were made on further work to create an excellent floor:
1) Sanding
2) Cutting out the drain in the center
3) Creation of special shelves for the drain grid
4) Increasing the slope to the drain in the garage
5) Priming the garage floor
6) Leveling the garage floor from holes
7) Installation of a polymer floor in the garage
 Finishing work
9) Renting a garage with a self-leveling floor.
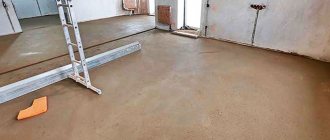
Garage sanding
To polish the garage, the specialists of the SOP company use a two-rotor mosaic grinding machine. It also includes a powerful vacuum cleaner to minimize dust while working, so you don't have to be distracted by cleaning in the future.
Deep grinding is carried out. This technique allows you to thoroughly sand the garage floor for better adhesion (adhesion) of the solution to the concrete base.
Also, using the grinding method, a slope was developed to allow water to flow down to the future drain in the garage.
At the deep ends, grinding was carried out in the opposite direction from the garage, so that water would drain out, and also for better adhesion of the polymer. Sanding was carried out with a special grinder connected to an industrial vacuum cleaner - again to minimize dust.
The photo shows general sanding and deep sanding to create an additional slope to the drain in the middle.
Cutting a drain in the center of the garage
Then, after taking measurements and marking the future drain, cutting began. It was necessary to work with extreme caution in this garage because... The thickness of the concrete base is 120mm, and under the garage there is a living room.
To prevent the danger of destruction of the garage into a living room, the engineer and chief engineer for the construction of the house developed a plan according to which the slope of the drain ladder was 4 cm with a minimum recess into the thickness of the concrete.
Otherwise, the foundation could collapse under the weight of the cars.
After cutting out the drain drain, all dust, stones and other small particles were carefully removed from the garage floor.
Creating shelves for the drain grate
Then the cutting of shelves for the future drain grate began.
The dimensions were tested again, this time with future garage drain grates.
Everything fits perfectly!
Now you can remove the grate and once again remove all dust, stones and other small particles.
Priming the garage floor and increasing the slope to the drain
After more cleaning and vacuuming of small particles, the floor specialists began priming the surface.
Every corner, every pore is carefully primed for stronger adhesion of materials. Coarse-grained sand is also added along the edges of the garage perimeter and fine-grained sand is added closer to the drain.
This is done to increase the level of slope.
The drain ladder is primed separately.
For the drain, a soil mixture was used along with sand to create a level surface for the drain.
The final step is to prime the area around the drain in the garage.
Next is a technical break to allow the soil mixture to dry.
After the soil mixture has dried, specialists carefully check the adhesion of the soil mixture to the base.
This process is necessary to eliminate any possible defects to create a truly excellent floor.
Parts were found where strong adhesion of the solution to the base did not occur. Such places were designed, carved and sanded.
Next, a special polymer solution was applied to them.
Leveling the garage floor from holes
A leveling layer of polymer with sand was applied around the future drain ladder so that the slope would be even with no holes, so that water would not accumulate around the drain ladder in the garage, but would flow smoothly towards it, and along it to the outside.
Before applying the polyurethane coating, the walls and exits were covered with special metallized tape, so as not to stain the walls with the polymer, and also so that the polyurethane mixture would not drain either the drain or onto the street.
Installation of polyurethane flooring in the garage
After preparing the polymer composition for 20 minutes, specialists poured polyurethane and leveled it.
First, the polyurethane mixture is rubbed over the base. This is done with a special metal squeegee and an insert, in our case 2mm in size
At this time, the second specialist already put on wet shoes. In order not to spoil self-leveling polyurethane floors, but also not to lose performance. And carefully release all the air out with a needle roller so that after drying there are no blisters.
At the same time, the 2nd specialist pours flocks for the self-leveling floor to give a more aesthetic appearance. In this case, white and yellow flocks were chosen - a rare fraction.
Within 20 minutes, the installation of a polyurethane floor in the garage was completed. Now a technological break was needed to dry the polyurethane floor.
And the metallized tape still protected the drain and street covering from polyurethane drainage.
Finishing work
After a technological break, the metallized tape was removed and a polyurethane base was installed in the drain.
The step in front of the garage entrance was also painted with polyurethane to isolate the concrete from capillary suction. Otherwise, the polyurethane floor may peel off, because polyurethane flooring, like epoxy flooring, is afraid of water, while the n-Coat hybrid coating copes with this.
After another technological break, the self-leveling polyurethane floor in the garage with a slope and a drain ladder was ready!
All the garage owner's belongings were put back, and the garage was completely cleared of dust and other small particles.
Fixing beacons
This stage and the choice of a specific beacon option will depend on what methods of filling the screed are chosen. If the drain is located in the central part of the bathroom or shower, then the sequence of work is as follows:
- Initially, the beacon is installed in the direction from the existing drain hole to the far corner from the entrance to the room.
- Regarding this lighthouse, marks are made on the walls using a level for subsequent elements. It will be very difficult to apply a long rule in your work, since the area of the room is small. In this case, a wide and narrow spatula will be optimal.
Lighthouse installation diagram: 1 - frieze lighthouse row; 2 — intermediate auxiliary beacons; 3 — reference beacon on the wall; 4 — lighthouse rows; 5 - mooring cord for laying the lighthouse row.
It is more problematic to install beacons when the drain hole is located in the dressing room or bathtub in the corner. Here attention is drawn to the fact that there will be different lengths of beacons. Of course, no difficulties should arise. The main thing is to approach the installation with all seriousness.
Preparing the mixture
To work, it will be necessary to prepare a high-quality solution. You can purchase ready-made options in the store, or mix everything yourself, following the proportions and recommendations. For streets and external areas, you should choose a higher grade of cement - M600. Its strength will be at the highest level. Before pouring the floor in a bathhouse on a slope, you should buy a grade of cement no lower than M400.
Fragility is ensured if the mixture has been lying for a long time and has not been used. It is very important to pay attention to the date of manufacture and service life.
To mix all the ingredients of the future solution, you need to take a concrete mixer. With its help, you will obtain a homogeneous solution with better strength characteristics. The ratio of sand and cement M400 is 1 to 4. In the future, you just need to gradually add water, obtaining a thick slurry. There should not be any sand impurities visible.
The solution should be somewhat thicker than when installing a concrete screed in other rooms. This will contribute to the full formation of the slope. In this case, surface unevenness is allowed, since they will subsequently be eliminated with tile adhesive. If the defects in the screed are obvious and conspicuous, then cutting with diamond wheels must be used.
Reinforcement process
A reinforcing mesh is placed between the exposed beacons, which improves the quality and strength of the poured mortar. An alternative is steel rods. The main thing is to fix them correctly and securely. They should not be located directly on the base, but somewhat raised above it. Concrete pours are suitable for this.
Currently, fiberglass is increasingly being used instead of any metal elements. Fiber allows you to reduce the total weight of the finished solution when installing on a slope, and also increases ductility and strength after drying. Despite its fluidity, the solution with fiber fiber fits perfectly even at an angle. If we take into account the cost, it will be even lower than purchasing a metal mesh.
Reinforcement is simply necessary if concrete is poured indoors not in one stage, but in several. If you bypass the laying of metal mesh, the concrete will begin to crumble and crack.
Stages of work: what do they include?
Construction beacons
Construction beacons, which are installed parallel to the wall, will help to tilt the screed.
To ensure the tilt of the future screed, special devices are installed. When pouring the floor, the beacons are installed parallel to the wall, at a distance of the length of the building code. Leveling begins from the far corner from the front door, and after 1.5-2 hours the slats are removed. The formed depressions are filled with cement-sand mortar. To create a blind area around the building, pins are used, to which threads or fishing line are pulled according to the level of inclination.
Reinforcement
To strengthen the concrete surface, before pouring the solution, a metal frame is made from reinforcement or a special reinforced mesh is used. A metal structure is installed between the installed beacons. The level of the frame is determined by the thickness of the screed. The reinforcement is installed in the middle of the level of the poured solution. Low placement does not bring the desired strengthening of concrete, and high placement leads to reinforcement coming out above the surface of the floor or blind area.
Pouring the solution
This stage is carried out in 2 stages:
- Pouring concrete with crushed stone. It is necessary to strengthen and acquire the required strength of the screed. To ensure better adhesion, the next step is performed after 24 hours.
- Pouring cement-sand mortar. This mixture does not contain crushed stone to ensure a smooth surface. The thickness of this solution is 2-4 cm. It is prepared more liquid than the previous layer.
Proper preparation of the solution ensures a high quality concrete surface. The ingredients are mixed evenly. Preparation of the mixture requires precise adherence to proportions. An excess or shortage of any of the materials leads to a deterioration in the quality of concrete. This causes the surface to deteriorate quite quickly.
Screed installation
When there is no experience in performing such types of work as pouring the floor in a bathhouse on a slope, then you should seek help from specialists. They will tell you that installation is best done in two stages.
To begin with, prepare a solution that is thicker and contains more crushed stone. This will turn out to be a kind of base. The second layer of concrete is thicker and almost without crushed stone. The time delay between two stages should not exceed a day. If you skip more, the bottom layer will begin to dry out and will hardly be able to adhere to the second one.
Uneven self-leveling floor: how to avoid problems
In order not to have to deal with mistakes and irreparable defects later, you need to carefully prepare the rough base before pouring and carefully follow the technology.
Most problems arise when you want to do everything quickly and, above all, save money. It doesn’t matter what you save on – on tools, materials, or hiring professionals. When you have confidence in your abilities and skills, it’s simply wonderful. When all this is missing, then it is better not to take risks, not to spoil the material, not to waste time in vain.
Ultimately, the self-leveling floor will reflect the quality of the work performed. And if everything is done in good faith, then it will please you for many years, will not create any problems, and will not lead to additional unforeseen expenses.
Quality mixture
It is not difficult to learn how to pour a floor on a slope. Everything comes to the same conclusion with experience. But it is very important to take care of a high-quality mixture. The properties can be improved by adding various additives and components that improve the characteristics of the finished solution. The screed begins to compact on its own if plasticizers are added to the composition, and artificial fillers help increase strength after hardening, resist cracking and the appearance of fragility.
The slope angle is considered optimal up to 10-12 degrees. It will be enough for excess water to be removed into the drain in the bathroom or bathhouse. In addition, it is often possible to do without reinforcement. It is worth remembering that anyone can fill the floor on a slope. You just need to adhere to the technology and the result will please everyone.
As a rule, after a concrete floor has been laid, its surface is far from ideal. You cannot lay tiles on a “crooked” floor, as this is a violation of technology. The thickness of the glue joint should be less than 5 mm, and this can only be achieved if the floor is properly prepared for laying tiles. Mixtures for self-leveling floors can help with this.
How to prepare a floor for self-leveling flooring
You cannot neglect technology by not doing or doing poor quality preparatory work before laying floors, otherwise all the work will go down the drain. Preparatory work requires high qualifications and the use of special tools, so such processes must be carried out by professionals in the industry.
A mandatory requirement that the base surface must meet is its horizontal evenness. This indicator is determined using a level, and if the difference between the perimeter points reaches a value greater than 4 mm, leveling the base will be required. Large differences or sealed with a similar solution, bulges are sanded with special grinding machines.
How preparatory work is performed for different types of base surfaces:
- Wooden floor. First of all, the baseboards are removed, the top layer of paintwork is removed with a scraper or a metal brush, or you can use a grinder. Measuring the humidity level (the optimal indicator is no more than 10%). Cracks and crevices need to be sanded with coarse sandpaper, widened and filled with putty for wood material. Dust is removed from the floor with a vacuum cleaner.
- Concrete base for self-leveling floor. Measuring the evenness of the coating. Removing dirt and dust. Expanding cracks and potholes (until the surface crumbles), sealing them with cement mortar. It is imperative to measure the humidity of the base; if it is too high, dry it. If polymer was previously poured onto the concrete, it must be completely dismantled. Blisters and irregularities are sanded, then the horizontalness is measured again. After leveling and degreasing oil stains, the coating must be primed (especially the places where cracks were sealed with mortar).
- Ceramic tile. Checking each element for tearing (whether each tile is firmly held). Items that are loose or crumbling must be removed. The depressions formed after removing old tiles are filled with mortar and leveled with the general surface. When the putty dries, the entire coating is degreased and primed.
Dry mixtures for self-leveling floors
The main thing that needs to be taken into account when choosing a dry mixture for leveling floors is what layer should be poured. If there are potholes in the concrete screed, then it is necessary to measure the depth of the largest potholes using a tape measure. If the depth of the “pits” is 30 mm, then it is necessary to choose a mixture intended for a thick layer. For a thick layer, the dry mixture “Bolars Epreess 1050” (instructions for use) is suitable.
Self-leveling floor mixture "Bolars Epreess 1050". Layer thickness from 5 to 100 mm
When pouring a thin layer (1-10), choose a mixture designed for that thickness.
Classification of self-leveling floors
First of all, self-leveling mixtures differ in their composition, namely, the main binder. Here two groups can be distinguished - on a mineral or synthetic basis, and in addition to this, “hybrid” options are also presented.
Mineral- liquid mixtures include the following:
- Cement-based mixtures. They can be called the most common and universal. The filler is fine quartz sand, less often stone chips. It is necessary to have special additives that ensure high plasticity (fluidity) of the finished solution and its rapid setting.
Self-leveling cement-based flooring - high durability of the coating and versatility in use.
Suitable for any premises, many are also designed for external use. They can be poured either in a thin layer or up to 50÷80 mm, that is, they can act as a full-fledged screed. Shrinkage is low, high adhesion rates, resistance to cracking. Disadvantage - they take longer to gain operational strength than their gypsum counterparts.
- Self-leveling floors on a gypsum (anhydrite) basis. They are perfect for interior work, since gypsum itself is a highly environmentally friendly material. Can be used in a “warm floor” system.
Gypsum compositions are an excellent solution for floors in the living area of an apartment or house.
They can be applied in a layer of 5 to 10 mm (some brands can be thicker). They have a good heat and sound insulation effect. Able to maintain an optimal balance of humidity in the room. Any speed at which the coating is ready is characteristic - sometimes within an hour or two you can move on it without the risk of damaging the surface.
The disadvantages include that the strength is not as high as that of cement ones, that is, finishing of the floor is definitely required. Not suitable for unheated rooms or with high humidity - bathrooms, showers, baths. Fast, “avalanche-like” setting requires good skills and confident actions when pouring. The cost is slightly higher than cement compositions.
- Combined compositions, on a cement-gypsum basis, combine the advantages of both of the above types. True, they are still designed only for indoor use, but without restrictions on the level of humidity in the room.
A universal self-leveling composition on a cement-gypsum basis.
The hardening speed of such compositions is quite high, but still gives a certain “handicap” to the novice master. It is noteworthy that such combined mixtures can be considered almost an ideal option for any “warm floor” systems.
Self-leveling self-leveling floors can also have a synthetic, polymer base . Most often they go on sale in the form of one- or two-component liquid formulations, that is, they do not require mixing with water.
- Polyurethane compounds are distinguished by both high strength, including abrasion loads, and a certain elasticity, that is, they are not afraid of impact. As a rule, they themselves become the finishing floor covering, requiring no further finishing or “rework”.
Polyurethane composition for pouring a self-leveling floor
may well be used in some areas of a house or apartment, especially in areas with the most intense traffic or with a pronounced load on the surface (for example, a home gym). There are no restrictions on humidity, temperature, location of premises.
Disadvantages - rather high price, pungent odor before the composition polymerizes.
- Epoxy-based filling compounds. They create a durable, waterproof coating that is resistant to any chemical reagents. They can be made highly filled while maintaining transparency, and this property is used to create decorative floors with fillers or artistic 3D patterns.
Self-leveling self-leveling composition on an epoxy basis.
Obvious advantages include absolute environmental friendliness after polymerization and the almost complete absence of odor during pouring. The disadvantages, in addition to the considerable cost, are the lack of elasticity. Such floors are not afraid of high loads, but shock impacts are contraindicated for them - chips may appear. Therefore, they are often covered on top with a thin protective layer of polyurethane.
- Combined compositions, epoxy-polyurethane, represent just such a “symbiosis” of the advantages of both types.
- Methyl methacrylate compositions for self-leveling floors are characterized by a high setting speed, and are often used as additional protection, for example, of a concrete base from the destructive effect of external loads. Scope of application - industrial facilities and areas with maximum intensity of people and even special vehicles (for example, warehouse complexes, bases, etc.). Due to the considerable complexity of application and high cost, they are unprofitable in residential construction.
Acrylic-cement and polyurethane-cement floors are of the highest quality and durability. But the price of the material and the complexity of pouring scare off private developers.
Prices for self-leveling floors based on epoxy
epoxy self-leveling floor
- Acrylic-cement and polyurethane-cement compositions, as the names suggest, are combined compositions that provide very strong, wear-resistant, durable waterproof coatings. Pouring requires a highly qualified team, and the cost is high. And therefore, although such floors would be perfect for some rooms of a private house and outbuildings (including a garage), they have not gained much popularity.
So, if we consider the variety of self-leveling floors from the point of view of an individual developer or apartment owner, then mineral-based compositions usually remain in view, and polymer-based ones - epoxy and polyurethane.