The laying of the very first crown of a house made of timber must be done very thoroughly and with a mathematical approach so that the walls of the house stand exactly at 90 degrees. Correctly lay the first crown of timber on the foundation not such a difficult task if you do everything thoroughly and prepare well for this event. And if you want to build a house from timber that will serve you for many years, take this stage of construction very seriously.
Projects of timber houses
Number of projects 1346
- 4 rooms
- 2 bathrooms
Forester's Hut House Project
- To favorites
- 185² Total area
- 15 x 22m Construction area
from 2,038,900 rub.
Construction time individually
- 3 rooms
- 2 bathrooms
Project of the House "Grace"
- To favorites
- 107.9² Total area
- 12 x 10m Construction area
from 3,878,750 rub.
Construction time individually
- 5 rooms
- 2 bathrooms
Charlotte House Project
- To favorites
- 138.1² Total area
- 11 x 9m Construction area
from 3,450,000 rub.
Construction time individually
- 3 rooms
- 2 bathrooms
Project of the House "Zlata"
- To favorites
- 122.4² Total area
- 15 x 8m Construction area
from 4,422,500 rub.
Construction time individually
- 3 rooms
- 1 bathroom
Bulava House Project (one-story)
- To favorites
- 116² Total area
- 12 x 10m Construction area
from 1,566,000 rub.
Construction time 62 days
- 2 rooms
Mushroom House Project
- To favorites
- 61² Total area
- 6 x 6m Construction area
from 437,167 rub.
Construction time individually
- 3 rooms
- 3 bathrooms
Richard House Project
- To favorites
- 312² Total area
- 12 x 16m Construction area
from RUR 3,599,640
Construction time individually
- 3 rooms
- 2 bathrooms
Project House Ray
- To favorites
- 224² Total area
- 16 x 17m Construction area
from RUR 3,492,720
Construction time individually
- 5 rooms
- 1 bathroom
Memphis House Project
- To favorites
- 108.6² Total area
- 9 x 7m Construction area
from 1,519,000 rub.
Construction time individually
- 6 rooms
- 2 bathrooms
Borodino House Project
- To favorites
- 242.76² Total area
- 12 x 14m Construction area
individual calculation
Construction period individually
- 4 rooms
- 1 bathroom
Project House made of timber SR-126
- To favorites
- 103² Total area
- 8 x 10m Construction area
from 1,390,500 rub.
Construction period 90 days
- 3 rooms
- 1 bathroom
House 10 Project
- To favorites
- 103.1² Total area
- 7 x 12m Construction area
from 1,245,000 rub.
Construction time individually
- 6 rooms
- 1 bathroom
Legend House Project
- To favorites
- 112² Total area
- 8 x 9m Construction area
from 990,000 rub.
Construction time individually
- 8 rooms
- 2 bathrooms
Project House Irina 11.7x10.2
- To favorites
- 194² Total area
- 12 x 10m Construction area
from 2,619,000 rub.
Construction period 97 days
- 3 rooms
- 1 bathroom
House project "1172"
- To favorites
- 106.4² Total area
- 12 x 10m Construction area
from 1,551,000 rub.
Construction period 25 days
- 2 rooms
- 3 bathrooms
Pokrovskoe House Project
- To favorites
- 88² Total area
- 6 x 8m Construction area
from 861,000 rub.
Construction time individually
- 5 rooms
- 2 bathrooms
Clover House Project
- To favorites
- 206² Total area
- 11 x 13m Construction area
from 2,781,000 rub.
Construction time 103 days
- 1 room
- 1 bathroom
House project DBo-9
- To favorites
- 36² Total area
- 6 x 6m Construction area
from 486,000 rub.
Construction time individually
- 4 rooms
- 3 bathrooms
Magnolia Luxury House Project
- To favorites
- 206² Total area
- 10 x 10m Construction area
from 4,026,600 rub.
Construction time individually
- 6 rooms
- 2 bathrooms
Lipetsk House Project
- To favorites
- 214.7² Total area
- 10 x 13m Construction area
from 5,193,095 rub.
Construction time individually
View all projects
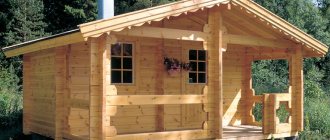
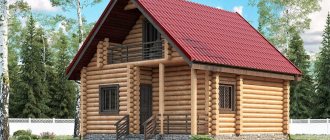
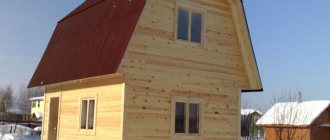
Houses made of timber are in demand. Many people want to live in environmentally friendly buildings, while enjoying all the benefits of civilization. Therefore, a large number of private developers today give their preference to timber as the main material for building their own home. But today we will figure out how to lay timber. And in this case, we will be interested in the process of laying on the foundation.
Timber laying technology Source okarkase.ru
Laying technology
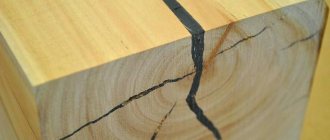
First of all, you need to choose a beam. Everything is simple here. This material should have a minimum number of knots, because it will be subject to heavy loads. And knots are places that do not withstand loads well. Plus, the material should not have a tint of blue.
It is recommended to pay attention to the annual rings of wood. Or rather, the distance between them. The closer the rings are to each other, the stronger the beam.
It is clear that even in one batch of material there are different timber with different degrees of quality. And if you come across elements of lumber with visible defects, do not be upset. The main thing is to place them correctly. So, if there is a visible defect on the beam, then this side should be laid upward. If there are bulges, then this side will be lateral.
Before laying, all lumber must be treated first with an antiseptic and then with a fire retardant. The first will protect the wood from fungi and mold, the second is a protective layer from fire.
Treatment of lumber with antiseptic Source teplicno.ru
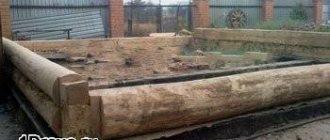
Now a few words about the foundation. A wooden house made of timber requires a structure with the most flat upper plane. Because leveling beams is not easy. But there are options:
- This can be done using a waterproofing layer, which is usually formed from roofing felt and bitumen mastic. The first one is laid in 2-3 layers. On uneven areas, roofing felt can be laid with a large number of layers. Or use a thicker layer of mastic.
- Wooden pads are placed under the timber.
Other options do not apply. Some craftsmen subsequently fill the free spaces between the laid timber and the foundation with polyurethane foam. The option is acceptable, but short-lived. Therefore, advice - before laying the timber on the foundation, decide how to level the latter. It's better not to save money on this. But it is better to do it correctly right away at the stage of forming the foundation structure, taking into account the evenness of all surfaces.
Leaks hidden by bitumen mastic Source https://i.ytimg.com/vi/hr_Y3edfXGM/maxresdefault.jpg
How to attach timber to the foundation
In general, the question of how to properly lay timber mainly concerns the method of attaching it to the foundation structure. There are several options here, which we will now discuss.
The first of them is fastening with studs. The latter is a steel rod on which threads are cut: on one or both sides. In this case, one-sided studs will be required, the threads of which will be directed upward. This fastening element is installed in the foundation at the stage of installation of the reinforcing frame. It is to this that they are welded by electric welding. Here it is important to accurately set the distance between fasteners.
It turns out that the studs will stick up from the foundation structure. And their protruding size should be 5-10 cm greater than the thickness of the timber.
Beam fastened with metal pins Source tskastra.ru/
See also: Catalog of double timber house projects
So, the foundation is ready, the studs are sticking out, we need to lay the timber. To do this, it is necessary to drill through holes with a diameter slightly larger than the diameter of the installed studs. In this case, the distance between fasteners is strictly maintained. After that, the lumber is simply placed on the protruding pins and tightened on top with a nut, under which a wide washer must be placed. First, a wide groove is made on the upper surface of the beam in the places of through holes for a washer and a nut. It is important here that both elements do not protrude above the plane of the lumber.
Fastening with dowels
The second fastening method is based on the same metal pin, only without a thread. It is also welded to the reinforced frame. But the length of its part protruding from the foundation is equal to half the thickness of the timber being laid. Therefore, in the latter they do not make through holes, but blind ones. And their length should be equal to the length of the protruding part of the dowel.
That is, it turns out that before laying the first row of beams on the foundation, it is necessary to prepare it, and then simply place it on the pins protruding from the foundation structure. In this case, no fastening is performed. The dowels will hold the lumber well, preventing it from moving in the horizontal plane.
Attaching timber to the foundation with dowels Source 1.bp.blogspot.com
Fastening with anchors
Not the best option, but some masters use it. There is no need to install fasteners into the foundation structure. First, through holes are made in the beams, the material is laid on the foundation and marks are made on the concrete plane through the holes.
After that, the timber is removed and holes are made according to the marks. Then the lumber is laid back and a metal dowel is inserted into the foundation through the holes, which is tightened with a nut. Long and difficult.
Fastening timber with anchors Source krysha-expert.ru
Fastening timber to screw piles
If a wooden house is built on screw piles, then the first crown is attached to them with bolts. To do this, through holes are also drilled in the timber, which must exactly coincide with the holes on the piles. It is through them that the bolt is inserted: from bottom to top. And on the upper side it is secured with a nut and washer. Typically, four bolts are installed on each pile.
Some craftsmen use long, thick self-tapping screws as fasteners.
Fastening timber to screw piles Source strhouse.ru
Types of foundations
In suburban construction, the following types of support foundations are used:
The types of foundations are not limited to the above list, which shows only the most commonly used forms.
Columnar structures
They are made in the following order:
- Preparing the site - you need to remove the turf layer and all the plants.
- Mark the foundation and use pegs to mark places for installing pillars. In this case, the distance between their axes should not exceed two meters. Pillars must be installed at each intersection or junction of the foundation along the perimeter of the marking and under the internal partitions.
Places for installing poles must be marked with pegs
The reinforcement cage is lowered vertically into the well
A grillage is installed on the horizontally aligned pillar heads
When digging pits, it is advisable to use TISE technology. This means that a widening is created at the bottom of the pit, increasing the area of support of the foundation on the ground.
If you make a widening at the bottom of the pit, the area of support for the foundation will increase
Pile foundations
For a wooden house without a basement or ground floor, the most suitable option for constructing a support base is a pile structure. The marking procedure and rules for placing piles are the same as for a columnar foundation.
A pile foundation is installed on soft soils and if there is a slope on the site. The reason for constructing such a support base is also the nearby groundwater.
The main structural element is metal screw piles. They are wrapped in soil, aligning the upper ends along a stretched cord. A grillage is mounted on top of the pillars. It can be made from the following materials:
- wooden beam;
- metal profiles - beam or channel;
- cast concrete grillage.
The advantage of pile devices is the complete absence of excavation work and the quick installation of the foundation.
The disadvantages include the impossibility of installing a basement or basement. Difficulties also arise when setting up a garage.
The foundation on screw piles is erected with virtually no excavation work
Strip foundations
Such support bases are the most popular in the construction of wooden buildings of any type. For the manufacture of strip foundations, the following technology is used:
- The foundation is marked using pegs and a cord.
The marking is made so that the corner of the tape is at the intersection of the stretched cords
The drainage bedding must be compacted using special equipment or manually
The material for formwork must be selected taking into account the possibility of its further use.
The holding time of the foundation until complete crystallization of concrete is 28 days. In the hot season, it must be covered with film and periodically watered. Premature drying of concrete will lead to cracking of the foundation.
At the end of this period, the supporting foundation is ready for further construction.
After the concrete has dried, waterproofing and the supporting frame of the house are laid on it.
Slab foundations
Such structures must be installed during construction on the most unreliable soils using the following technology:
- Mark the site, remove the soil layer and vegetation.
- Compact the soil in the cleared area using a vibrating plate. In this case, it will settle to a depth of 50 centimeters.
The bottom of the dug pit must be compacted
A drainage bedding is made in the pit and formwork is installed
The mesh size of the reinforcing mesh should not exceed 40 cm
Conditioning and maintenance of the foundation should be carried out as indicated above.
To pour a monolithic foundation, it is better to call a special team
Connecting beams to each other
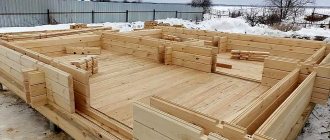
So, let’s move on to the topic of how to correctly lay the first crown of timber on the foundation, and move on to a very important position - fastening the elements together. If this concerns the corners of the house, then four options are most often used:
- Half a tree. This is when half the thickness of each element is cut off to a certain length. Two adjacent beams are joined, forming a reliable connection that does not change the cross-section of the joint relative to the body of the material.
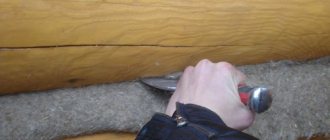
- Butt joint is the simplest option. But it is not recommended for use in residential buildings. Because it is the corner that often becomes the place where heat leaks from the house due to the formation of leaks at the joint. Therefore, the corners of buildings are well insulated, but often this does not save.
Root tenon - ideal joint Source remontik.org
- Root thorn , also known as a warm corner. An ideal option for corners both in terms of reliability and thermal insulation qualities. Structurally, it is a tongue-and-groove connection. That is, a groove is made in one element, a tenon is planed in another, which exactly fits the dimensions of the first. When joining, insulation is placed inside, providing high thermal insulation characteristics of the structure.
- Dovetail . The most difficult to manufacture, but the most durable option in terms of fastening. It also falls into the category of tongue-and-groove joints. Only the shape of the cut elements is not rectangular, but trapezoidal. It is this shape that ensures an increase in the contact area of the joint parts.
Which timber to choose for the lower crown of a log house?
Suitable quality material should be prepared in advance. The first crown for a bathhouse made of timber must be formed with a material distinguished by its high quality characteristics:
- The bars should be selected even.
- The knottyness on them should not be very pronounced.
- It is better not to use material with a bluish tint; it will not be suitable for laying the lower crown.
- You should take bars with the maximum density of rings: this raw material is made from the middle part of the wood.
Briefly about the main thing
The timber that will be laid on the foundation must be of high quality - without knots, blue stains, with tightly lying annual rings. Antiseptic treatment is required.
The smoother the foundation on which the timber will be laid, the higher the quality of the work as a whole.
The timber is attached to the foundation with studs, dowels or anchors. The choice of method depends on the skills of the master.
The beams are attached to each other in different ways - depending on whether it is an angle or a longitudinal connection. Popular methods are root tenon, dovetail, bowl, oblique lock and others.
Ratings 0