Having your own bathhouse is convenient and practical. At any time you can take a steam bath, sit on the veranda, drinking aromatic tea. Of course, you can go to a paid bathhouse, but this pleasure is not cheap. You need to pay for every hour, so you will have to constantly look at the clock, but in your own bathhouse you can relax and fully enjoy your vacation.
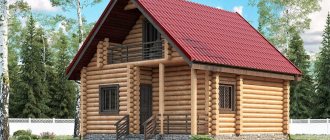
For the construction of baths, different materials are used, the most popular of which is currently timber. Baths made of timber are also divided into several types, depending on what type of this material is used: solid, profiled or glued.
Each of these types has both advantages and disadvantages; the most popular at the moment is laminated veneer lumber.
Bathhouse projects
Number of projects 681
- 1 room
- 1 bathroom
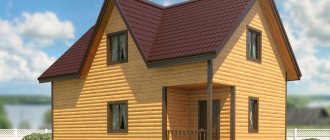
Project of log bathhouse 4x6 m
- To favorites
- 60² Total area
- 6 x 4m Construction area
from 225,000 rub.
Construction time individually
- 1 room
- 2 bathrooms
Project Baths 5B-B
- To favorites
- 18.55² Total area
- 5 x 5m Building area
from RUB 300,159
Construction period 17 days
- 1 room
- 2 bathrooms
Project Baths Mercury
- To favorites
- 37² Total area
- 8 x 7m Construction area
from 499,500 rub.
Construction period 27 days
- 1 room
- 2 bathrooms
Bath Rafaella project
- To favorites
- 84² Total area
- 10 x 7m Construction area
from 1,134,000 rub.
Construction period 40 days
- 2 rooms
- 2 bathrooms
Project AS-2272
- To favorites
- 79² Total area
from 1,066,500 rub.
Construction time individually
Project of Log House Baths 4x5 m
- To favorites
- 20² Total area
- 4 x 5m Building area
from 245,000 rub.
Construction time individually
- 1 room
- 1 bathroom
Bani Anapa-5 project
- To favorites
- 30² Total area
- 6 x 6m Construction area
from 405,000 rub.
Construction time individually
- 1 room
- 1 bathroom
Antalya Baths Project
- To favorites
- 74.5² Total area
- 11 x 11m Construction area
from 1,005,750 rub.
Construction period 40 days
- 1 bathroom
Sanduny Baths-2 project
- To favorites
- 48² Total area
- 6 x 9m Construction area
from 587,012 rub.
Construction time individually
- 5 rooms
- 3 bathrooms
Bani Opus Project
- To favorites
- 159² Total area
- 13 x 10m Construction area
from 2,146,500 rub.
Construction time 82 days
Quad bathhouse project "Mega-2"
- To favorites
- 2 x 5m Building area
from 244,900 rub.
Construction time 1 day
- 1 room
- 1 bathroom
Bathhouse project No. 25-11
- To favorites
- 19.26² Total area
- 4 x 5m Building area
from 260,010 rub.
Construction time individually
- 1 room
- 2 bathrooms
Bathhouse project "Anthea"
- To favorites
- 43.2² Total area
- 8 x 7m Construction area
from 1,030,000 rub.
Construction time individually
- 1 room
- 1 bathroom
Bathhouse Ivanovo project
- To favorites
- 93² Total area
- 9 x 9m Construction area
from 1,255,500 rub.
Construction period 52 days
- 1 bathroom
Barrel sauna project 6m
- To favorites
- 13.2² Total area
- 6 x 2m Building area
from 259,000 rub.
Construction time individually
- 3 rooms
- 2 bathrooms
Bathhouse Parkhochevo project
- To favorites
- 146² Total area
- 9 x 12m Construction area
from 3,500,000 rub.
Construction time individually
- 1 room
- 1 bathroom
Project of a garden house-bath "Sanduny"
- To favorites
- 24.2² Total area
- 6 x 5m Construction area
from 326,700 rub.
Construction time individually
Project Hozblok made of timber “Light”
- To favorites
- 18² Total area
- 6 x 3m Building area
from RUB 143,550
Construction time 1 day
- 2 bathrooms
Bani South project
- To favorites
- 62² Total area
- 9 x 8m Construction area
from 994,000 rub.
Construction time individually
- 1 room
- 2 bathrooms
Bani Cricket 2 project
- To favorites
- 62.68² Total area
- 6 x 9m Construction area
from 846,180 rub.
Construction period 38 days
View all projects
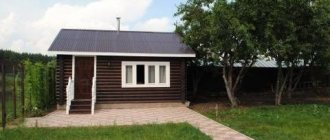
To provide yourself with a durable, inexpensive and spacious structure for relaxation and wellness treatments, you need to build a bathhouse from timber. If you approach the design correctly, there will be the required number of rooms inside the bathhouse. It could be a Spartan set of a steam room, a shower and a relaxation room - in this case, the prices for a turnkey laminated timber bathhouse will be quite affordable. For those who are more demanding, they offer an extended option with a separate bathroom, vestibule, dressing room and a host of additional rooms.
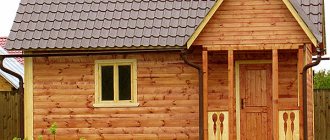
Turnkey laminated timber bathhouse Source hi-news.ru
If you have the proper experience, materials and a team of skilled workers, you can manage the construction yourself, but it is more profitable to order a turnkey bathhouse. This will save you from unnecessary waste of nerves, greatly reduce construction time, and eliminate the possibility of errors during calculations and installation, because professionals in their field will take care of the work. This approach allows you to obtain high quality at minimal cost. One of the materials that will make an excellent bathhouse is laminated veneer lumber; any project can be made from it on a turnkey basis.
Requirements for structures
To increase the service life and safety of the building, the state has developed standards. Primary requirements:
- The distance to the nearest fence from the building must be at least three meters. The distance to tall trees is from 4 meters. To a well or well - from 12 meters. To residential buildings - from 8 meters. To the neighboring plot - from 8 meters.
- It is forbidden to build buildings on areas that can be flooded by melt water.
- When choosing a place for construction, you need to take into account the features of the Wind Rose. This way you can avoid smoke in residential buildings when heating the stove in the bathhouse.
- The optimal distance of the drain well from the building is 3 meters.
- All wood surfaces should be pre-treated with a fire retardant to reduce the risk of fire.
- The part of the chimney that passes through the ceiling must be protected with a special sleeve or casing made of non-combustible material.
- All surfaces that are located near the furnace equipment must be covered with basalt slabs. A sheet of metal needs to be secured to the floor in front of the stove.
- Inside the bathhouse you need to install a fire extinguisher and equip an effective ventilation system.
- Electrical appliances that will be used inside the bathhouse must be grounded.
General requirements for the placement, construction, and arrangement of a bathhouse are described in government documents - SNiP 30-02-97, SP 11-106-97. Features of the production process of laminated veneer lumber and the requirements for this material can be found in GOST 24454-80, GOST 20850-84.
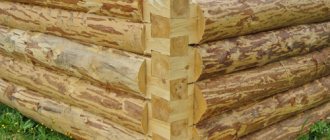
Glued laminated timber is the best choice for a bathhouse
For a bathhouse, laminated veneer lumber is the optimal building material. It allows you to get a lot of benefits without the disadvantages that are inherent in wood:
- Light weight. Saving on the foundation and eliminating shrinkage from calculations.
- High strength characteristics. Often, when creating laminated veneer lumber, different types of wood are used, which allows you to evenly distribute the load on the part and increases protection from mechanical damage.
Bathhouse made of laminated timber with a large open terrace Source spb-cr.ru
- Resistant to fire, fungus and insects. The use of special impregnations in the process of manufacturing laminated veneer lumber significantly reduces the risk of wood destruction by insects and fungi, and ensures fire safety.
- Durability. When connecting lamellas (individual layers of timber), sorted, clean, dried wood is used, which significantly increases the service life of the material.
- Easy to assemble. Even ordinary timber is produced in a certain, geometrically correct shape, this allows you to avoid the formation of gaps when connecting individual elements. The use of profiled laminated veneer lumber will further strengthen the connection and increase the speed of assembly of the structure, thanks to the presence of special grooves or locks.
Construction of a bathhouse from laminated veneer lumber Source anticafe-sandbox.ru
- Low thermal conductivity of certain types of wood. The characteristic is responsible for the speed of heating the bath and maintaining the temperature by reducing heat leakage.
An additional advantage is the low cost of the material and attractive appearance. You can easily verify this by looking at the timber baths, photos of which are presented in the article.
Table. Connection types
| Name | Illustration | Description of the lock connection | Description of the insulation method |
| 1. Finnish profile with round bowls | The beam profile itself has connecting tenons at the top and a groove for them at the bottom. Between the spikes there is a stepped recess, which is shallower at the edges and deeper in the middle. Bowls are cut into semicircular shapes | For insulation, use a wide insulation tape in the center, for example, PP-TERMO, and two narrow strips of sealant on the sides | |
| 2. Finnish profile with flat bowls | The profile of the timber does not differ from the previous one, but the bowl is cut flat to simplify the process and save time | A profile with flat bowls is insulated with tape only along the central groove or with a seal (polyethylene foam) only along the outer grooves above the tenons | |
| 3. German profile with flat bowls (one-sided, two-sided or four-sided) | For corner connections, bowls are cut parallel to the cross-section of the beam | The corner joints are sealed with sealant or tape insulation, which is rolled out without tension only in the locks. The insulation is fixed with a stapler with short staples. You can use PSUL or flax jute. The crowns themselves are not insulated along their length, because... the connection of the tenons and grooves is quite tight and windproof | |
| 4. Profile with a reduced number of spikes | This is a domestically produced profile, similar to the German one, but has a maximum of two grooves for two tenons | Insulation is carried out along one or both grooves | |
| 5. Austrian or German profile with a “labyrinth” corner connection | Joining cuts are made only on enterprise machines. Provides a very tight, windproof connection | The seal is not used | |
| 6. German profile, “Tyrolean castle” | The cross section of the lock is trapezoidal, the upper and lower planes form a “dovetail”, i.e. are on a slope | You can use PSUL by inserting it into a rectangular groove on the side surfaces of the paws | |
| 7. Connection of the German profile without residue or “in the paw” | The lock can be cut at a right angle or with a bevel, like half a dovetail. | The lock joint is sealed with jute | |
| 8. T-shaped splices of all types of profiles | Notches and grooves are made in the beams of load-bearing walls, and a tenon is cut through the beams of interior partitions | Jute seal is used | |
| 9. Bay window connections at an angle other than straight | The coupling of parts is carried out due to vertical grooves and tenons | Wind protection is low, but insulation is usually not used |
Video - Connecting corners and beams
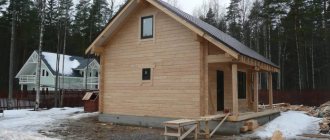
Features of the construction of a bathhouse made of laminated veneer lumber
You don’t need to delve into all the intricacies of the question of how to build a bathhouse from timber - just figure out what parameters you need to focus on when ordering from professionals in order to get a high-quality building that will last for decades. A turnkey bathhouse made of laminated veneer lumber, made by a good team, will be much better than a “homemade” one.
Laminated timber bathhouse with a small open terrace Source vsedlyastroiki.ru
Dimensions of a bathhouse made of laminated veneer lumber
Everyone decides for themselves what size a bathhouse made of laminated veneer lumber will be. There are no uniform parameters, but there are important characteristics that will make the selection task easier:
- Number of visitors. For a large group or family, you will need enough space so that everyone can fit comfortably. If the bathhouse will be visited by one or two people, a small building will suffice.
- Seasons of use. If you wash in the bathhouse only in the warm season, then you can neglect thermal insulation and a separate heating system. For a building that operates all year round, the organization of heating and thermal insulation is necessary, which automatically increases the dimensions of the bathhouse.
- Additional areas. Equipping a terrace where it’s so nice to sit after a steam room, building a second floor with a lounge or bedroom, or a room with a swimming pool increase the required size of the building.
Based on the specified parameters and your own taste, it is easy to choose the best option for the dimensions of your laminated timber bathhouse.
Laminated timber bathhouse with attic and balcony Source domostroy96.ru
Foundation
If the main material of the bathhouse is laminated veneer lumber, the structure will be light in weight, so you can avoid laying a capital foundation, but choose one of the three most common types:
- Tape. Allows you to obtain a strong single structure that can easily support a building of several floors at low cost.
- Columnar. At each corner and at the junction of the walls, a pole is mounted, which is buried in the ground. This allows the load from the building to be evenly distributed.
- Pile. Used on moving soils. Deep digging or screwing the pile into the ground allows you to reach stable layers of soil and securely secure the bathhouse.
Depending on the amount of average annual precipitation, floodability of the land, quality and density of the soil, and the overall construction budget, you should focus on one of these options for constructing a foundation.
Construction of a strip foundation Source rockstroy.ru
Waterproofing
A bathhouse means high humidity, which poses a danger to laminated timber, even despite the appropriate impregnation of the material. Protecting individual parts of a building will improve its performance.
- To insulate the foundation, molten bitumen is used, which, after hardening, is covered with a layer of roofing material.
- Waterproofing the walls, ceiling and floor covering in the bathhouse will protect them from water getting inside and prevent rotting.
- Materials for protecting the interior space are selected depending on the type of room. For a steam room, the waterproofing must have additional resistance to high temperatures.
High-quality waterproofing will improve protection from water and increase the durability of a bathhouse made of laminated veneer lumber.
Foil waterproofing material Source iv-proect.ru
See also: Contacts of construction companies that offer the service of building a bathhouse from laminated veneer lumber.
Insulation
When using a bathhouse made of laminated timber all year round, it is necessary to take care of the insulation of the walls and ceilings. This will reduce heating costs, prevent the formation of condensation inside the walls and prevent mold from appearing. Insulation will also protect the bathhouse from freezing in cold weather. Low temperatures can negatively affect the strength characteristics and cause the formation of microcracks in the wood.
Felt insulation for bath walls Source srubdacha.ru
Materials for interior and exterior finishing
A good bathhouse made of laminated veneer lumber involves the use of certain building materials for interior decoration, which are suitable for installation in all rooms except the steam room.
- Plastic deforms when heated.
- Natural stone and brick can burn.
- Cork moisture-resistant material is highly thick, which reduces the usable volume of the room.
Therefore, the steam room must be lined with clapboard made of natural wood, which is sufficiently resistant to high temperature and moisture. You cannot use coniferous wood for this; when heated, they release resin.
Steam room lined with natural clapboard Source poselok.com.ru
For the outer cladding of a bathhouse made of laminated veneer lumber, you can use any materials.
- Decorative brick allows you to give the building a solid look.
- Wood panels create a natural decor.
- The block house imitates rounded logs.
- Thermal panels perform a double function - they give a nice look to the bathhouse and reduce thermal conductivity.
The choice of material for the exterior finishing of a bathhouse made of laminated veneer lumber can be discussed with the designers when ordering a turnkey construction.
Bathhouse made of laminated veneer lumber, trimmed with decorative wood panels Source oooarsenal.ru
Calculation of building dimensions
When calculating the dimensions of a building, you need to pay attention to factors that affect the cost of free space:
- wall thickness, selected finishing material;
- door opening side;
- type of furnace equipment;
- amount of furniture;
- availability of electrical appliances.
The main factors that influence the calculation of the dimensions of the building are the availability of funds, free space on the site, and the average number of visitors to the bathhouse. To save space you can:
- build a second floor;
- convert the attic into an attic;
- arrange a veranda as a recreation area.
If there are 2–4 visitors in the bathhouse, you can make a simple extension to the house or convert a trailer or barrel into a steam room.
Video description
For a detailed review of a bathhouse made of laminated veneer lumber, watch the video:
A one-story bathhouse made of laminated veneer lumber imposes certain requirements on the layout and number of rooms. The minimum project includes a relaxation room, washing room and steam room. An increase in the number of rooms requires a corresponding increase in the total area of the building or a decrease in the size of each room.
The advantage of a one-story bathhouse will be its low cost and reduced maintenance costs. The disadvantages include some limited free space and the difficulty or impossibility of combining with living space.
Project of a one-story bathhouse Source banya-ili-sauna.ru
A two-story bath house made of laminated veneer lumber allows you to significantly increase the usable area and delimit zones of space use. The first floor is made functional, there is a steam room, a swimming pool, a shower room, a bathroom, a dressing room with kindling and other rooms with similar characteristics.
Design
Be sure to think through and draw up a plan for your bathhouse. Designate the necessary rooms: steam room, shower, bathroom, rest room, wardrobe, etc. Calculate the area of the entire bathhouse and each room separately, compare the values with the length of the timber that you plan to purchase in order to reduce the number of trims. Be sure to think about the type of corner connection and the method of joining the timber along the length in advance. If you want to save money, plan frame rather than timber internal partitions.
Note! You will definitely have to make a scattering plan, which you will submit to the manufacturer. According to the drawn up plan, the cutouts will be precisely made in production. Of course, in order to save money, you can do the cutting yourself, but it will be very difficult to achieve high accuracy and joint density, and if mistakes are made, the timber will be rejected.
Scattering with markings
Example of scattering project
Include in the estimate not only wall beams, but also joists, as well as floor boards, floor beams, rafters, door and window frames with frames, and roofing material.
Below are three interesting projects that you can build without changes or make adjustments and create your own version.
Project 1 – façade
Project 1 – side view
Project 1 – side view
Project 1 - rear view
Project 1 – visualization
Project 1 – visualization from the other side
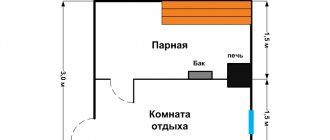
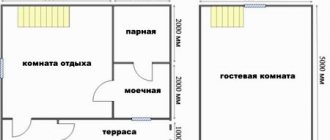
Project 1 – bathhouse plan
Project 2 – left view
Project 2 – left view and partial facade
Project 2 – façade
Project 2 – façade after finishing
Project 2 – bathhouse plan
Project 3 – façade
Project 3 – bathhouse plan
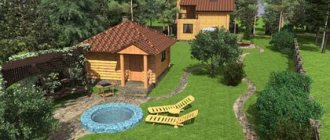
Photo examples of bathhouses made of laminated veneer lumber
Project of a one-story bathhouse with a large terrace Source ytong.by
Project of a bathhouse with a glazed terrace Source avoka.do
Laminated timber bathhouse with porch Source www.rwhouse.ru
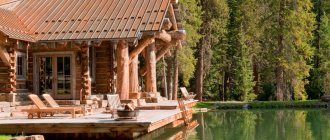
Project of a two-story bathhouse with an outdoor pool Source stroy-good.ru
One-story bathhouse Source lineyka.net
Project of a bathhouse made of laminated timber near an artificial reservoir Source sk-brusnika.ru
Bathhouse made of laminated timber on a strip foundation Source market.sakh.com
Two-story bathhouse with an attic Source remontik.org
Bathhouse with a residential attic and terrace Source profipluspz.ru
Small sauna for 1-2 people Source rinnipool.ru
DIY assembly is easy
Timber is a modern and convenient material. For those who have used it in construction, it is quite obvious that:
- Assembly is quick. It can be produced in 1 month, even without special skills.
- Using a ready-made house kit greatly simplifies the work.
Connecting laminated veneer lumber into a finished house is easy if you follow all the steps exactly, but it will lead to disastrous results if you are lax about it.
Scheme for marking corner joints of timber and joints of parts of longitudinal walls, for a house with overall dimensions of 6x9 meters. A and C - longitudinal walls; D and B - transverse walls; E - internal wall made of timber - partition; 1 - joints of beams.
For the house shown in the diagram, each crown consists of 7 sections of beams from 3 to 6 m long.
The crown of the longitudinal wall consists of two parts: the main beam of a standard length of 6 meters and an extension of 3 meters. On one crown, long beams are laid on the left, and extensions on the right. On the next crown, installation begins in a similar order, but on the right.
The parts of the crown of the transverse wall and the partition are made from one beam of a standard length of 6 meters.
To eliminate cold bridges in external walls, the joints of the beams of the longitudinal wall, item 1, are made by making vertical cuts “into the floor of the tree” with an overlap of 15 - 20 cm. The beams in the corners of the crowns are connected in a dressing with a root tenon (for more details, see below ).
How to correctly and quickly mark tenons, grooves and other profiles and ensure identical dimensions of lumber blanks?
The easiest way to do this is using templates. The template is placed on the beam and the outline of the template profiles is transferred to the surface of the beam with a marker.
It is more convenient, faster to mark and there will be fewer errors if the template completely follows the contour of the part and has the same length as the part being marked. I placed the template on the timber and immediately transferred all the dimensions and profiles to the workpiece.
For our example, we will need to make seven templates, corresponding to the number of parts in the crown. One template is used to mark two mirrored wall parts.
If you think about it, the number of templates can be reduced. Let's look at how to make universal templates for marking parts of the longitudinal walls of a house (see above for the wall assembly diagram).
Two templates (highlighted in bright yellow) for marking the beams of the longitudinal walls. 4 - groove for the main tenon; 5 - groove for the tenon of the inner wall; 6 - template; 7 - extension beam.
The figure above shows a template for marking the main beam in the crown, in which the extension is located on the right. On the wall marking diagram, these are crowns A1, A3, A5 and C1, C3, C5.
The lower template is used for marking the main beam in the crowns with the extension on the left - A2, A4, A6 and C2, C4, C6.
The templates are the same at first glance, but differ in that the grooves, item 5, for connecting to the partition, are located in different places in the templates.
The same templates are used to mark the parts of the extensions. To do this, through holes are drilled on the templates at points b and c, and cuts are made at points a and d.
To mark the extension, the template is placed on the beam and points are made on the surface of the workpiece through holes and cuts.
Remember this technique when making holes in the template. This will help you create universal templates in many other cases.
The templates are made from planed inch boards.
As a result, we manage to reduce the number of templates from seven to three (2 for longitudinal walls and 1 for transverse walls). Two longitudinal templates (right and left) provide the ability to obtain blanks for longitudinal walls, and one transverse template allows you to prepare parts for transverse walls and partitions.
Now let's look at how templates are used. To mark the first beam of the crown (for example, starting from the left), the left template is laid on the beam and the end of the template on the left is outlined with a marker, then two grooves and, finally, a recess for the connection “in the floor of the tree”. The marked timber is transferred to the cutting site, where unnecessary fragments (it is better to shade them when marking) are cut out with a chain saw.
How to mark parts with spikes? Obviously, the tenon and groove are elements of the same unit, which means they must match each other in size and location. In a part with a tenon, a tenon is marked in place of the groove.
If the dimensions of the groove are 5x5 cm, then the tenon should have dimensions of 4.5x4.5 cm. The gap is filled with inter-crown insulation.
The template profile is transferred to the upper edge of the beam. The markings are transferred to the vertical edge of the beam using a square. Accurate cuts are made using these markings.
The technical conditions (TS) for the manufacture of timber allow deviations in the size of the timber in one direction or another from the standard value specified in the documents.
If the purchase documents indicate the standard dimensions of the timber, for example, a section of 150x150 mm. and length is 6 meters, then the actual dimensions will differ from the standard.
Each beam in a batch of timber brought to the construction site will differ from the dimensions indicated in the documents by several millimeters. The cross-sectional dimensions and length of the bars will be different.
The variation in sizes must be taken into account when developing templates, marking timber and assembling walls.
We suggest you familiarize yourself with: Stone in a bathhouse on the wall
How to assemble smooth walls if the beams are different in width and length?
b - minimum beam width; delta b is the difference between the narrow and wide beams.
Obviously, using timber of different widths, you can make only one surface of the wall flat - either from the outside or from the inside of the building.
If they want to make the outside wall of a house flat, then all the beams in the wall are aligned along the outer edge. Then, inside the house, the wide beams will protrude from the wall by the amount of “delta b” (the difference between the narrow and wide beams). Alignment along the outer edge leads to an increase in gaps in the corner joint of the beams (see figure).
If the beams in the wall are aligned along the inner edge, then the “steps” from the protruding beams will already be on the outer surface of the wall. The outside of the wall is usually sheathed. And if you chamfer the outer edges of the timber, then the steps on the wall will be invisible even without cladding. The corner connections of the beams are more dense and “warm”.
Each crown of the log house is connected to the lower crown with metal or wooden dowels. The dowels are placed at a distance of approximately 250-300 mm from the end of the beam and then every 1-1.5 meters of the length of the beam.
Each detail of the crown is secured with at least two dowels. The length of the dowel must be at least 1.5 times greater than the height of the beam.
The upper ends of dowels made of any material must be buried 2-4 cm into the timber, pos.
1. Round steel dowels with a diameter of 6-8 mm. - pins with a pointed end or nails (6x200-250 mm), simply hammer into the crown beams, option a in the figure.
The upper ends of the dowels made of any material must be buried 2-4 cm into the timber. If this is not done, then when the timber dries and the log house shrinks, the dowels will be higher than the timber and will raise the upper crown. A large gap forms between the crowns.
For the same reason, hammer-in dowels cannot be made from reinforcing steel. The corrugated surface of such dowels will keep the crown beams from moving when the log house shrinks, even if the dowel is buried into the timber. The crowns will simply hang on such dowels.
Small-diameter steel hammer-in dowels cannot always provide the necessary wall rigidity, especially with long wall spans. Their use can be recommended for small buildings - for example, baths. To increase the rigidity of the walls of large buildings, it is necessary to install dowels of increased diameter.
Steel dowels with a diameter of 10 millimeters or more, as well as wooden dowels, are inserted into pre-drilled holes in the timber. The diameter of the holes is made slightly smaller than the diameter of the dowel.
When the dowel fits tightly into the hole, the rigidity of the wall increases, but the risk that the dowels will interfere with the shrinkage of the frame increases.
It is recommended to make the diameter of the hole such that the dowel fits into the hole when hit by a regular hammer weighing 400 grams. Do not drive the dowel into the hole with a sledgehammer!
It is convenient to cut wooden dowels with a diameter of 25-30 mm from round cuttings for tools. Such cuttings are made from hardwood. It is recommended to chamfer the lower end of the dowel - it will be easier to drive the dowel into the hole.
You can cut dowels with a square section of 25x25 mm from a regular “inch” board. One end of the workpiece is chamfered. Such pins are driven into a hole made with a drill with a diameter of 24 mm.
The ribs of such a dowel, made of relatively “soft” coniferous wood, become crushed when hammered in, the wood becomes compacted, ensuring a fairly tight fit of the dowel in the hole.
The depth of the holes in the wall for installing dowels must exceed the length of the dowel by at least 4 cm. Moreover, the hole must be free of chips.
To drill holes in timber that are deep enough and have a large diameter, a low-speed electric drill (drill) is usually used. The passport of a power tool usually indicates what diameter of drilling in a particular material the drill is designed for. Considering the large drilling depth, it is better to choose a drill with a power reserve.
To drill holes in timber, it is convenient to equip the drill with a stop, as shown in the figure.
The stop block is attached to the drill with steel clamps.
The stop, in the form of a wooden block, is attached to the drill, for example, with clamps. The stop stops drilling at the required depth, but the rotation of the drill does not stop after that. Continuing to rotate in one place, the drill clears the hole from chips, grinds in and then easily comes out of the deep hole.
It is convenient to drill holes for connecting the crowns in a beam that is already installed on the wall in the design position on the inter-crown insulation. But here a problem usually arises - the crown gasket cannot be drilled. The fibers of the spacer material simply wrap around the drill bit and clamp it.
You have to install the beam on the wall in two steps. First, the timber is mounted without a gasket and temporarily secured from displacement, for example, with nails. Drill holes for dowels. Then the timber is moved from the wall and inter-crown insulation is laid.
At the drilling points, the gasket is cut out with a sharp knife. Then, the removed beam is put back in place, this time on the gasket, and secured with dowels.
Which profile is better to choose – German or Finnish?
Before you start building a house, you should decide on the type of profile. There are two main modifications:
- Finnish;
- German profile.
The Finnish (Scandinavian) profile is a flat surface with a wide tenon at the bottom and a groove at the top. When using it, be sure to use an insulating gasket. The Finnish profile is easier to install. The German profile (comb) is distinguished by the presence of many spikes. It can be installed without additional thermal insulation, but violation of storage rules at the construction site or poor drying can greatly complicate the installation process. The main thing you must remember is that if the material is of high quality, then there is not much difference when choosing.