The floor in the bathhouse can be wooden or concrete. A wooden floor, of course, requires attention and proper care, but walking on it is pleasant and safe, and it is better to lay ceramic or natural tiles on a concrete floor. Both from an aesthetic and practical point of view, this option is preferable. The walls are also often tiled. Especially in the washroom.
It is better to lay ceramic tiles on a cement floor in a bathhouse.
Some prefer to tile the walls of the steam room to a certain not very high height: it is the cladding that is not high from the floor that begins to deteriorate and after a while requires replacement, and tiles save us from such a nuisance. It is necessary to take into account that there are many types of ceramic tiles and not all of them are suitable for a bath or sauna. We'll talk about how to choose tiles for a bath below.
[toc]
What should the tiles for a bath be like?
In a bathhouse, as a rule, there are several rooms, and different types of tiles can be used in each of them - you just need to take into account the characteristics of the coatings. For example, in the locker room and rest room the humidity is the lowest, and there are no strong temperature changes. Here you can use “standard” tiles for both the floor and walls.
It is important to consider that in winter the bathhouse is usually used less often, so the tiles must be frost-resistant. Otherwise, due to too low temperatures, the material will most likely crack and will have to be replaced.
They also pay attention to such a criterion as wear resistance. You need to choose the material based on the approximate number of people who will regularly visit the bathhouse and the frequency of the procedures.
When choosing tiles for a bath, you need to pay attention to different criteria: frost resistance, resistance to high temperatures, wear, etc.
The shape and color of the tiles are chosen by each owner independently - everything here depends only on personal preferences.
As for the washing room, tiles are usually used for finishing both walls and floors. The humidity here during procedures is very high, so the coating should have low water absorption. In addition, it is worth paying attention to whether the tile has an anti-slip surface - if not, it is better not to purchase it, since the risk of injury is high. Matte options with a rough surface are more suitable.
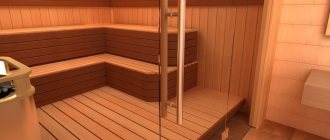
For a steam room, tiles are chosen less often - usually wood is used for its finishing. The thing is that the tiles usually get very hot at high temperatures, and it is very easy to get burned. But you can purchase it for cladding the stove, as well as for finishing the lower part of the walls (50-100 cm).
Features and benefits of RBM
In appearance, the Maslova bathhouse resembles a hammam, but in fact it has significant differences. In this bath, all surfaces are heated, including the ceiling; the temperature regime is set separately for each part of the room. Thanks to a special steam generator and heat cables, the steam room is heated evenly and quickly. Even at low temperatures (40-45°C), you can fully warm up and sweat in just 20 minutes. At the same time, you can breathe easily in the bathhouse, your head doesn’t hurt, and there’s no strain on your heart. The Maslova bathhouse is suitable for everyone - from lovers of hot Russian steam baths to children and pregnant women, people with poor health.
Temperature
Another feature of the RBM is the ventilation system. It has several operating modes, and for each of them it creates its own microclimate. The air in the steam room is regularly renewed, so even after a long stay there is no feeling of heaviness or discomfort, as happens when visiting a regular bath. The steam room warms up in only 1-1.5 hours, unlike the Turkish and Russian baths.
Comparison of electricity costs and bathhouse diagram
Advantages
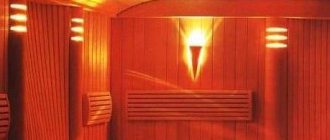
Health effect. Deep and uniform heating of the body, which is performed through infrared radiation, soft and bioresonant, helps get rid of many diseases, ranging from common colds to chronic diseases of the musculoskeletal system. Regular visits to such a bath strengthen a weakened body, promote skin rejuvenation, and increase vitality.
Russian bathhouse Maslova
Hygiene. The internal lining of the bathhouse consists entirely of ceramics, natural stone or glass mosaic, so cleaning can be carried out using any disinfectants. This finish does not absorb moisture, does not change color, does not rot, and compares favorably with wood, which is used in a traditional bathhouse.
Bath decoration
Fire safety. During the construction of the bathhouse, exclusively fireproof materials are used, heating panels are installed under the cladding layer, the temperature is strictly controlled using sensors. Thanks to this, the need for fire extinguishing systems is completely eliminated.
The bathhouse is fireproof
Clean air. Regardless of the temperature and humidity conditions, the air in the steam room always remains fresh and clean. When heating a bath, ordinary metal stoves emit tiny particles of rust, dust, as well as a certain amount of carbon monoxide from burning oxygen. The heat generator created by Maslov is devoid of such shortcomings and ensures that the steam room is filled with light and clean superheated steam.
There is always light steam in Maslov's bathhouse
Ease of use. Warming up the room is very fast, and control is carried out using sensors. To warm up the bath, you need to turn on the touch panel and select a mode. If desired, the RBM is equipped with a remote control and connects to a tablet or phone.
Complete temperature control not only in space (different zones in the steam room), but also in time
The first thing that amazes is the controllability of the modes, as well as the remote tablet itself
Various temperature conditions.
Using the control panel, one of the presented thermal modes is selected.
| Mode | Description |
| Beach (children) | all surfaces are heated to 30-35 degrees, the ventilation mode is set to “low ventilation” |
| IR bath | heating of the room is more intense, while in the lower part of the steam room the temperature is about 43 degrees, and under the ceiling up to 65°C. The air is moderately ventilated |
| "Aroma bath" | The average temperature in the steam room is 50 degrees, the main heating is on the ceiling. The heating of the steam generator is set at 400°C, the steam is aromatized with the help of medicinal plants placed in a special container. The ventilation damper is closed, the light air mixing mode is operating |
| dry hammam | The steam room is heated to 50°C, the ceiling heating is turned off. Ventilation mode – low ventilation |
| wet hammam | When heating the steam room to 50 degrees, the heat generator is additionally turned on and set to 300°C, the humidity is 60-90%. Ventilation mode – low ventilation |
| Russian bath (soft mode) | the seats are heated to 42 degrees, the top of the walls 55, the ceiling 60 degrees. The steam generator heats up to 500°C, the ventilation damper is closed |
| Russian bath (hot mode) | intensive heating up to 65-80°C in the upper part of the steam room and up to 45°C on the surface of the seats. Steam generator heating 700°C, damper closed |
By switching modes, it’s easy to choose the optimal temperature for each family member, including kids.
Wide range of installation options. In the RBM, the steam room is also a washing room, as it is equipped with a drain and shower mixers. This layout significantly saves space, and therefore you can install a bathhouse even in an ordinary apartment, in the attic or basement of a private house, in a spa or fitness center.
Maslova's bathhouse does not require a large room
Types of tiles
Ceramic
Most often, ceramic tiles are chosen - they are inexpensive, and the range is quite wide. There are several varieties of it, which differ in shape, thickness, clay used for production, firing method, molding method, etc.
It can be produced in two ways: either extrusion or pressing. The almost finished product can be fired single, double or even triple, and the more of them, the more porous the tile will be. You can determine this by the markings on the package - look for the flame icon and the number next to it (1, 2 or 3). We recommend using single-fired tiles for steam rooms and washrooms - they have sufficient strength, but double-fired products, although more beautiful, are “weak”, so they are only suitable for a relaxation room.
Ceramic tiles for baths - the most popular option
As for sizes, you can choose from square, trapezoidal, octagonal, and rectangular tiles. Product sizes are indicated on the packages.
Prices for ceramic tiles
ceramic tiles
Ceramic mosaic
Mosaics can often be found in swimming pools, baths and saunas. Usually it is used to decorate the sides of the font or completely finish the washing area. It is also great for decorating the interiors of bathhouses - panels are assembled from mosaics.
As with large ceramic tiles, mosaic tiles are easy to care for, they are not afraid of moisture and temperature changes, and if installed correctly they will last a very long time. True, it is quite difficult to install it, so you will have to be patient.
You can also use ceramic mosaic - it looks very beautiful
Clinker
Clinker tiles are made from several types of clay. The products are fired at high temperatures, so that they have sufficiently high strength, resistance to various influences and heat resistance. It is also not afraid of water - it can be placed on the floor in the washroom. The thickness of such products varies from 8 to 12 mm.
Note! Clinker tiles are used for cladding the stove itself, the walls, and the floor.
Clinker tiles look good in a bathhouse
Terracotta
Terracotta tiles are notable for the fact that they are not glazed, so they look natural, like stone or brick. It is usually brown in color, quite porous, so it is not afraid of high temperatures and temperature changes, does not crack or deform in any way.
Ideal for cladding stoves and walls. It is rarely used as a floor covering.
Terracotta tiles are perfect for a bath
From the coil
Coil is a popular decorative material with a rich green color. Tiles made from it have a fairly high price, but this is justified by its unique beauty: each product has a unique pattern. In addition, it is believed that this stone has healing properties that manifest themselves when heated - that is why it is used to decorate the stove and walls in the steam room.
Note! Unfortunately, coil tiles have a disadvantage - they cannot always withstand temperature changes. It is also better if a small amount of water gets on it - because of it, the products may collapse.
You can also choose tiles from a coil
From porcelain stoneware
Porcelain stoneware has a large number of advantages: it is very durable, completely resistant to moisture, durable, and has an aesthetic appearance. It is also not afraid of severe frosts, so this is an excellent option for a bathhouse.
The texture of porcelain tiles can be different: wood, marble, terracotta and other materials, often more expensive.
Porcelain tiles are used for different purposes: for lining a stove, mounting on walls or as flooring.
Porcelain tiles are particularly durable
Soapstone
Soapstone tiles are also very often used in baths, since they heat up very quickly, retain heat for a long time and successfully withstand even high temperatures, as well as their changes. Such products are very durable, but they are easy to work with and, if necessary, give the desired shape.
There is a big disadvantage - soapstone tiles are expensive, so they can only be used, for example, for finishing a stove. Thanks to this, the room will be heated many times faster.
Soapstone tiles retain heat for a long time, which is why they are ideal for baths
Prices for soapstone tiles
soapstone tiles
Tile sizes and calibration
Tiles are available in different sizes and shapes, which allows you to create coatings that are different from each other. The most popular models are square and rectangular in shape, but there are also triangular, trapezoidal, tiles with five, six and eight sides, as well as curly products with smooth lines.
Table of sizes and shapes of ceramic tiles
Manufacturers indicate the dimensions (that is, the width and length of the tiles) on the packaging, but these values very often differ from the actual dimensions by several millimeters. For example, when purchasing a 300x300 mm tile, the buyer, after unpacking the goods, discovers a 297x297 or 295x295 mm tile. What explains this difference?
Choosing tiles for a bath
Floor tile
Patterned floor tiles
Classic tiles, imitates parquet
The fact is that the raw materials for the production of tiles differ slightly in properties from batch to batch. It is impossible to select an identical composition for a new portion of raw materials, because the clay even in one area can be different, let alone over large areas. That is why it is impossible to calculate the exact percentage of compression during firing, as well as shrinkage and deformation during subsequent cooling. And although the manufacturing process is constantly being improved, dimensional uniformity is still a small problem for the manufacturer.
For convenience, tile calibration was introduced: the finished material passes through a special module in which the width and length of the products are measured with a laser, and then sorted by caliber. As a rule, the difference between calibers is 1 mm.
Tile calibration
Caliber table for tiles 300x300 mm
| Actual tile dimensions, mm | Caliber |
| 295x295 | 0,5 |
| 296x296 | 0,6 |
| 297x297 | 0,7 |
| 298x298 | 0,8 |
| 299x299 | 0,9 |
| 300x300 | 0 |
| 301x301 | 1 |
| 302x302 | 2 |
When choosing tiles for a bath, be sure to make sure that all packages indicate the same caliber, otherwise during installation the difference between the elements will be noticeable, and more time will be required for tiling. To find out the caliber, just look at the marking: it is indicated in numbers next to the dimensions declared by the manufacturer.
Choosing glue and grout for laying tiles in a bathhouse
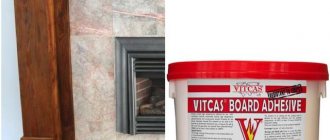
Usually, along with the tiles, glue is also purchased immediately. You cannot take the first one you come across - the composition must be waterproof, not afraid of temperature changes, and capable of firmly fixing the tiles. At the same time, the glue should not harden very quickly, otherwise the tile will not have time to stick, and there is a high risk that it will simply fall off under mechanical loads and high temperatures.
Remember that if you are laying a new layer of tiles on top of an old one, you need to purchase an adhesive that has high bonding properties.
Glue for laying tiles in a bathhouse must have certain properties
Let's look at the most popular glue options suitable for use in a bathhouse.
| Products | Description |
Fixator | Fixator is an adhesive that is suitable for installing any tiles in any conditions. Therefore, it can be successfully used for laying such material in a bathhouse. Fixator adhesive is resistant to excessively high and low temperatures, is not afraid of moisture, and is suitable for any surface. The main thing is to prepare the foundation in advance. |
Ceresit CM 17 | Ceresit CM 17 is also suitable for all types of tiles - it belongs to the “super elastic” category of adhesives. Moreover, it is reinforced with microfibers, so its adhesion is quite high. Excellent for laying on floors, walls in bathhouses, as well as lining stoves. |
| BOTAMENT M 22 HP | Premium glue. Despite the high cost, the consumption of this composition is very economical. Can be used for both interior and exterior work, is not afraid of high temperatures and moisture, and is suitable for almost all types of tiles. |
If we talk about choosing a grout, then you need to focus on the purchased glue. It’s great if both compositions are from the same manufacturer. As in the previous case, you need to look at the moisture resistance of the grout and its resistance to temperature changes. It is also important to pay attention to the width of the seams - this criterion is indicated on the packaging. Sometimes these gaps are 0.4 mm wide, and in some cases - 2 cm.
Note! It is better if the color of the grout is darker than the tile itself - after several months of use, the material usually becomes lighter.
It is better to choose a grout that is darker than the tile itself
Prices for tile grout
tile grout
If you are looking for tiles, there is a large selection of similar products here
Indications and contraindications for the use of RBM
Banya Maslova can cure many diseases with the right approach. Indications for using such a bath are:
- chronic heart disease;
- hypertension in the initial stage;
- bronchitis and pneumonia;
- epilepsy, various neuroses and depression;
- problems in the endocrine system;
- allergies of various types;
- stomach ulcer.
In addition, regular visits to the RBM are recommended for immunocompromised children and pregnant women. Bath procedures with uniform heating of the whole body help get rid of toxicosis, fetal hypoxia, and help reduce blood loss during childbirth.
Child in Banya Maslova
Of course, in order to be completely cured, it takes time and patience; under no circumstances should you abuse the bathhouse or stay in it longer than prescribed. Particular attention should be paid to contraindications, otherwise, instead of improving your health, you will get a completely opposite result.
Spa treatments at Maslova Bathhouse
Contraindications:
- all types of acute infectious diseases;
- sharp exacerbations of inflammatory processes;
- problems with cerebral circulation;
- heart attack and related conditions;
- renal failure;
- third stage hypertension.
Proper use of the Maslova bath will help restore tone, gain energy and simply enjoy life.
Bathhouse decoration with mosaics
Markings to pay attention to
When choosing tiles for a bath, you need to pay special attention to the markings on product packaging. What exactly do you need to know?
- The “T” marking indicates that the tiles are resistant to high temperatures.
- The designation “R” indicates whether the tile in front of you is glossy or matte. Next to the letter there will be a certain number, and the higher it is, the less slippery the tile is. For example, glazed tiles will be designated R9, R10, but matte tiles will be designated R11, R12, etc. Also, if the product is slip-resistant, you can see on the packaging an image of a foot stepping on the tile.
- Frost resistance and resistance to temperature changes are also important. The first criterion is indicated by a snowflake (sometimes two), and the second by a sun icon. It is also possible to indicate additional information, which is indicated by the letters “A” and “B”: the mark A I and B I indicates the possibility of using the tile even for the exterior cladding of a building, that is, it has high frost resistance. The A II and B II marks indicate average frost resistance, but tiles with the A III and B III marks can only be laid indoors.
- It is also worth paying attention to the abrasion resistance of the tiles - this criterion is indicated by the letters PEI and the image of a saw blade. If there is a number next to such a mark, it will be easier to determine whether the tile is suitable for you: 1 indicates the possibility of use in a bathroom, toilet (not suitable for a bathhouse), 2 – for use in corridors, a dressing room, 3 is suitable for any room in a bathhouse, and 4 and 5 can be found less frequently, since these are industrial options.
Markings that can be seen on tile packages
Features of floor preparation for tiles
The design of the bath floor has its own specifics in preparation for laying ceramic tiles. However, there are also general principles that must be followed when arranging the rough foundation:
1. Making a drain hole. The sauna tiled floor is a non-leakage structure, which means that water drains along the surface of the floor. To ensure drainage in the floor, it is necessary to equip drain holes, which should preferably be equipped with special drains. The location of the drain can be different: in the center of the room or against the wall. One of the common options is a longitudinal ladder along the entire wall (on one or both sides).
2. Formation of the floor slope. An important condition for removing water from a room is to ensure its gravity flow in the direction of the drain hole. For this purpose, the floor has a slope of at least 10 degrees, for which it is necessary to ensure a level difference of at least 2 cm for every 1 m of floor.
To remove water from the bath room, make a floor slope of at least 10 degrees
3. Drainage system. The simplest option is to drain the water into a drainage hole located directly under the bathhouse. Such waste liquid discharge can be carried out in sufficiently loose soil, deep groundwater and in the absence of special environmental requirements. An important condition: the presence of a filter layer of sand and crushed stone. The discharged water should not accumulate under the bathhouse and create problems for the foundation. A more complex system involves the installation of trays and drainage pipes to collect wastewater and drain it outside the structure into special collectors (wells).
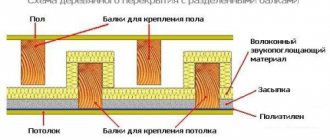
4. Waterproofing the floor in the bathhouse under the tiles. A layer of waterproofing material is an essential element of a bath floor covering. Moreover, it should be taken into account that moisture comes not only from above, but also from the soil, especially when the groundwater level is close and during floods. Most often, roofing material is used for these purposes. In addition, a vapor barrier must be included in the floor structure in the steam room.
Installation of tiles in the bath
First of all, you need to prepare the coating. Note that laying tiles in a bathhouse is not too different from installing it in an apartment. You just have to remember that there is a need for a slope for drainage on the floor, but it is usually installed at the stage of laying the subfloor.
Remember that the surface should be as clean and level as possible. Clean, remove all debris and dust.
The surface must be properly prepared before laying tiles.
To install tiles you will need the following tools:
- building level;
- plastic crosses;
- tile cutter (you can also use a regular glass cutter, but it will be more difficult to work with);
- spatula for applying glue (a serrated one is more suitable);
- container for adhesive solution;
- construction mixer.
| Sequencing | Description |
Step 1 | If the tiles are laid on the floor, it must be waterproofed and treated with a primer. This is usually done in advance. It’s quite easy to prime the walls, but sometimes they are waterproofed, about half a meter from the floor. |
Step 2 | Installing tiles on the floor should start from the corner - this way all the products will most likely be laid evenly. If you are laying it in a washing room or steam room, you can start from the drain. You can check how correctly the tiles are placed using a building level. If the tiles are laid on the wall, a support is pre-installed - it can be a wooden board, a metal profile, a piece of lining, etc. The main thing is to attach this stop correctly, at a right angle relative to the perpendicular wall. It is necessary so that the tiles do not slip and are laid evenly. |
Step 3 | Experienced builders recommend using a little glue - the thicker the layer, the longer it will take to dry and the greater the chance that the tile will “move off”. Usually the glue packaging indicates how much is needed for each product. Apply the adhesive with a notched trowel either to the tile itself or to both the tile and the wall. The product is applied to the surface, trying to do it as evenly as possible, and then tapped with a rubber mallet to increase the adhesion of the tile to the base and get rid of excess glue. Usually, all solid tiles are laid first, and then, if necessary, they are cut and the cut pieces are additionally installed. In this case, plastic crosses are inserted between the tiles - this is necessary so that the seams between all products are the same width. Work continues until the entire prepared surface is covered with tiles. |
Step 4 | After laying the tiles, you need to leave them to dry. This ideally takes several days, but after a day you can start grouting the joints. |
Step 5 | The grout is applied over the seams, and then filled with a special trowel, moving it diagonally. There is no need to press hard - the composition will already fill the space. There will definitely be excess grout on the tiles, which you need to try to remove as quickly as possible - after a few hours this will be much more difficult to do. To do this, just wipe the tiles with a damp sponge without touching the seams. One such cleaning may not be enough, so you will have to do this procedure several times until the stains and marks disappear completely. |
Note! It is better to leave the tiles for another day, and then you can use the room for its intended purpose.
DIY BSR construction
Building a Maslov bathhouse on your own is not at all easy, because this will require certain skills not only in construction, but also in working with electrical equipment. If you have such skills and you are eager to create this miracle bathhouse at home, first you will have to purchase ready-made factory panels for walls, floors and ceilings, as well as a steam generator and other components.
You should only purchase electrical equipment for RBM from a company that owns the rights to manufacture and install it. These rights are possessed only by Bani Maslova LLC (www.bani-maslova.ru). The company has all the necessary permits and patents for the production and sale of Maslov baths, which guarantees the complete safety of the devices, their efficiency and minimal energy consumption. In addition, all baths ordered from this company are tested by the inventor, Viktor Valentinovich Maslov. Purchasing analogue equipment from other manufacturers does not provide such a guarantee and can lead to negative consequences, for example, power overload and fire.
The RBM can be located separately from other buildings, or it can be located directly in the house. The first option will cost more, since it will require the construction of a metal frame with high-quality insulation and waterproofing. Additionally, you will need to install pipes for water supply and drainage, and install electrical wiring. The second option is much more convenient and cheaper, because the bathhouse is located indoors, where wiring and sewage already exist.
Aquapanels
Modular cabins with duralumin aqua panels for individual bath assembly have standard sizes of 2.2x2.2 m and 1.5x2 m, so they do not take up much space. Most often, a home RBM is installed in the bathroom or pantry. In addition to the cabin itself, a small area of the area will be needed for the technical room where the automation will be located. If the ceiling height is high, you can make a technical area directly above the steam room.
Prices for aqua panels
aquapanel
Step 1. Determine the most optimal option for placing the bathhouse and draw up a drawing. To the dimensions of the cabin, it is necessary to add at least 10 cm on each side for heat and waterproofing of the room. An area of 1.7 x 1 m is sufficient for a dressing room, and even less for a technical room. Immediately think about where the shower with mixer and drain will be located in order to minimize the cost of laying additional pipes. That is why the location of the cabin in the bathroom is considered an ideal option: there is water supply and drainage, ventilation too, there is enough space. You can perform any hygiene and SPA procedures in the RBM, so it completely replaces the bathroom.
Making a plan
Layout option
Another important element is the sun lounger. Depending on the modification of the bathhouse, the cabin is equipped with one or two sunbeds, which are a metal frame with a heated top panel. If desired, you can lay out the base of the lounger from hollow brick, so the structure will receive additional strength and a more solid appearance after cladding.
Making a sun lounger from metal profiles and OSB
Faucets should be located on the side of the sun loungers, and the heat generator should be located between them, on the wall opposite the door. If there is only one lounger, the heat generator is hung on the opposite wall at a height of 1.5 m.
Step 2. According to the drawing, the exit points for pipes, electrical cables and ventilation are marked in the room, and holes are drilled in the walls. For water supply, ½ inch pipes are used, for drainage with a diameter of 50 mm, so the holes must be appropriate.
Step 3. Mark the location of the shelves and lay them out of brick. The shape of the shelves is rectangular, dimensions are 2.3x0.8x0.7 m and 2.3x0.5x0.7 m. The masonry can be solid or in the form of a bench, when brick blocks are laid out on the sides and connected with metal channels or corners. There is another row of brick on top of the metal, and then the entire structure is plastered with cement mortar.
Step 4. Next, the room needs to be completely insulated. The walls and ceiling are covered with slabs of basalt insulation or other non-combustible material. The whole thing should be covered with foil on top and secured at the seams with aluminum tape. To insulate the floor, use foil plates, since it will also be heated. When insulating, do not forget to make cutouts in the thermal insulation for holes for pipes, cables and ventilation ducts.
Insulation
Vapor barrier and fastening of aquapanels
Markings on the wall for the heat generator and the unit itself
Prices for basalt insulation
basalt insulation
Step 5. Unpack the panels and install the cabin according to the manufacturer's instructions, which must be included with the heating elements. You can pre-assemble the structure in a spacious room, attaching fasteners in order to more accurately understand its structure. This will help avoid mistakes and save time. Cables and pipes are taken out into the technical room, a ventilation duct is inserted, and the drain ladder is connected to the sewer pipe.
Communications
Step 6. Now you can start tiling the surfaces with ceramic tiles. Be sure to use heat-resistant glue, because the tiles will heat up to 50-60 degrees. When tiling, ensure that the seams are even, because in a small room any defect will be very noticeable. Do not allow glue to get on the front of the tile, and if this happens, wipe it off immediately with a clean rag.
Fastening panels
Step 7. On the wall between the sun loungers at a height of 1.5 m from the floor, a heat generator is mounted on brackets, which is also lined with ceramics on the outside. After this, a door leaf made of heat-resistant glass is hung, and another ventilation duct with a condensate drain and a throttle valve is installed in the dressing room.
Fixed heat generator
Step 8. In the technical area, connect the cable to the automation to control the bathhouse, and lead it to the power supply panel. The control display is mounted on the wall of the dressing room at eye level. The electrical cable must be connected strictly according to the diagrams that are necessarily included with the equipment. It is best if an experienced electrician does this, because the slightest inaccuracy can damage the system or cause a short circuit in the network.
Connecting equipment
Grouting joints
The final stage will be grouting the joints. Choose a composition in a contrasting color or to match the general background of the surface - your taste and desire will tell you. Main quality. If, as an example, we consider the range of grouts from the Ceresit company, then there are silicone grouts, elastic water-repellent grouts, and two-component grouts. Antifungal impregnation is offered to protect the grout.
Therefore, your experience, information that you can find in sufficient quantities on our website or consultation with a specialist will help you make the right choice. After the tiles have completely dried, we begin grouting. Mix the solution with a mixer, and use a rubber spatula or small grater to fill the seams. We hold the tool at an angle of approximately 45 degrees - this is how the grout most effectively fills the seam. You need to prepare as much mixture as you can produce in 20-30 minutes. After this time, it will begin to dry out and lose elasticity.
After letting the grout dry a little, use a dry, clean rag to carefully remove excess gypsum from the surface of the tile. After this, wipe clean with a damp cloth and leave until completely dry. As you can see, there is nothing complicated or supernatural about laying tiles on a wooden floor in a bathroom. Please note an important point: the floor level in the washroom should be lower than the floor level of the remaining rooms of the bathhouse, so that in case of problems with the drainage, the water does not flood the neighboring rooms.
Horizontal drain
It is better to place a horizontal drain close to the wall, since the trim does not look aesthetically pleasing.
- This option for laying tiles is as easy as shelling pears to do with your own hands, even if the screed was initially poured without a slope. First, we calculate the distance from the drain to the opposite wall. The level of floor slope in centimeters towards the drain will be equal to the number of meters. For example, if there is 3 m from the ladder to the wall, then the slope level should be 3 cm.
- Now we measure 3 cm up from the floor on the wall opposite the gutter and attach the beacons. We pull the cords from them towards the drain and fix them in this way. As a result, we have a template according to which we will lay the tiles.
Important: mark the wall in the washing bath, from which we will begin laying the lining towards the drain, in half. The first tile should be placed to the right of the applied markings. Now you should put the required amount of material to the right and left of it. This will be the first row of masonry.
The process for laying each tile is as follows:
- Apply the required amount of glue to the back side of the tile using a notched trowel and lay the tile. We adjust the height of the masonry with a rubber mallet if the screed was poured without a slope.
- Between each tile we install plastic or wooden crosses that regulate the width and uniformity of the seams.
- First, lay all the whole tiles towards the drain and only then lay the outer cut ones. While working, use a damp cloth to remove excess adhesive on the tiles. Otherwise, once it dries, it will be difficult to remove.
- Leave the laid floor for 12-24 hours until the glue dries completely.
- Once the glue has completely dried, you can rub the seams. The grout is applied with a special rubber spatula. Remove excess with a cloth. We treat the joints of the facing material with the wall with silicone.
Pros of using tiles
Ceramic tiles, currently available in a variety of modifications and design solutions, are distinguished by almost ideal technical characteristics in terms of finishing wet rooms with elevated temperatures:
- Resistance to the development of mold and fungi;
- Possibility of combination with modern underfloor heating systems;
- Moisture resistance;
- No release of toxins when heated;
- Durability;
- Resistance to temperature changes;
- Ease of care;
- Easy to install yourself;
- Affordable cost;
- The ability to implement even the most creative design solutions that give unique individuality to interiors.
The only drawback of the material is its fragility, which requires maximum care when working with it.