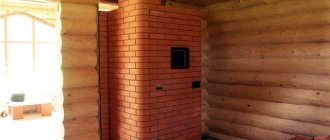
Modern heating systems provide us with warmth and comfort, but they can hardly be called a symbol of the hearth. This title rightfully belongs to the good old stove and fireplace.
Heat-resistant adhesive for gluing tiles
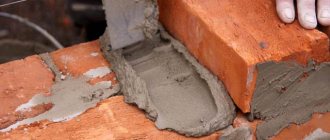
They become the center of attraction in the house, warm the body and soul with natural warmth, and add originality and piquancy to the interior. Various fire-resistant finishing materials are used for cladding structures - stone, ceramic tiles, tiles. To prevent the cladding elements from falling off during operation, they are attached to a special heat-resistant tile adhesive.
Tool
To lay the tiles we will need:
- Building level;
- Notched spatula (tooth height 8-9 mm);
- Drill with a nozzle for mixing glue;
- Plastic crosses;
- Device for cutting tiles (tile cutter).
In principle, ceramic tiles can be cut with a glass cutter, but it is still better to purchase a tile cutter. Tile cutters are either electric or manual. If you plan to limit yourself to laying tiles only in the bathhouse, then a manual tile cutter will be sufficient.
To learn how to choose a manual tile cutter, watch the video.
White or gray tile adhesive – which is better?
As a standard, both white and gray tile adhesive are made from medium and high grades of cement. In terms of strength, hygroscopicity and other characteristics, adhesive masses can be the same. The question then arises: what is the difference between white and gray tile adhesive? The thing is that materials such as slate decorative stone, artificial or natural marble and some types of glass, when facing, can take on the dark color of gray glue and, accordingly, the material loses its attractive qualities. In addition to the above-mentioned facing materials, wall mosaics are also laid on white tile adhesive.
Mosaics are laid only with white tile adhesive.
What glue to use to glue tiles in a bathhouse
Any hardware store will offer you various adhesive compositions. First of all, dry mixtures (sold in bags) and ready-made mixtures (in buckets) are separated. Ready-made mixtures are significantly more expensive, but when diluting dry mixtures there is a possibility of making mistakes with dosages.
If you are planning to make a heated floor in a bathhouse, then it is better to buy the glue recommended for laying heated floors:
- Has antiseptic properties;
- Environmentally friendly;
- Thermal and moisture resistant.
Ready-made NEOMID tile adhesive - 10 kg is enough for gluing up to 20 square meters of tiles.
Suitable for laying heated floors When choosing an adhesive, first of all you need to pay attention to the characteristics:
- Moisture resistance;
- Good tolerance to temperature changes and aggressive environments;
- Frost resistance - relevant in cases where the temperature in the bathhouse drops below zero.
Typically, dry two-component mixtures based on polyurethane or epoxy resin meet these requirements.
Advice! Two-component compositions remain elastic for about an hour after dilution, so prepare the glue in small portions.
You can use waterproof adhesive “Diola D-307”, which is intended for gluing heavy ceramic tiles to floors and walls indoors and outdoors.
Dry mixtures can also be used when laying floor tiles in a bathhouse with your own hands. Waterproof glue “Diola D-307” is suitable for these purposes.
It is necessary that the tile adhesive have a high degree of elasticity: in the bathhouse, the operating conditions are very difficult: either heating and expansion of materials, then their cooling, and at times freezing. The higher the elasticity of the composition, the greater the loads and changes the floor can withstand. Also, high elasticity of the adhesive is required if the tiles are laid on a heated floor, which is not uncommon in bathhouses today.
After preparing the two-component glue, it remains elastic for an hour
If you are laying porcelain stoneware tiles on the floor, you must choose an adhesive composition with high adhesion - at least 28 kg/cm2. This is due to the fact that porcelain stoneware practically does not absorb moisture, and also has a decent weight.
Ceresit CM 17 adhesive (instructions for use) is suitable for attaching ceramic and porcelain tiles.
Ceresit CM 17 adhesive is suitable for attaching ceramic and porcelain tiles
Ceresit CM 11 adhesive is also popular, but without the addition of the elasticizer CC 83, the adhesion (“stick”) of the adhesive to concrete is less than that of Ceresit CM 17.
Some builders do not like Ceresit glue and sometimes use homemade tile adhesive: a mixture of cement and sand (1/3) + PVA glue (polyvinyl acetate emulsion in water).
There is an assertion that Russian-made adhesives are much inferior in quality to such tile adhesives as Botament M22, Sopro N1, PCI Flexkleber.
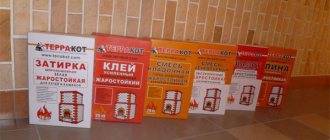
Popular brands
When choosing a heat-resistant adhesive, it is important to consider its quality. Before purchasing a suitable adhesive mixture, it is recommended that you familiarize yourself with popular manufacturers of such materials, as well as their products and customer reviews.
Stove maker
Pechnik glue is available in dry powder form. It is intended for finishing stoves and fireplaces. This composition is suitable for materials such as:
- ceramic tile;
- porcelain stoneware;
- tiles made of natural and artificial stone;
- tiles.
The Pechnik adhesive mixture can withstand temperatures up to two hundred and fifty degrees Celsius. The time for complete drying of the solution is seven days. Buyers highlight the following advantages of this composition:
- good heat resistance;
- high plasticity rates;
- slow drying, so the speed of laying tiles may not be too high;
- durability.
Terracotta
Heat-resistant Terracotta adhesive is used for finishing stoves and fireplaces, as well as heated floors. Work can be done with materials such as ceramic tiles, natural stone and facing bricks.
Terracotta glue has a high level of moisture resistance and heat resistance. The mixture can withstand temperatures up to four hundred degrees Celsius. Other advantages of the solution include good plasticity and high adhesion rates.
PalaTERMO-601
PalaTERMO-601 adhesive mixture is suitable for interior and exterior finishing work. The glue can be exposed to temperatures ranging from minus fifty to two hundred and fifty degrees.
Using PalaTERMO-601, you can seal cracks on the surface of furnace structures. Buyers highlight the following positive qualities of this composition:
- good ductility;
- reliability (the adhesive layer does not crack or crumble);
- preventing deformation of the tile covering;
- high strength;
- economical consumption.
Width of joint between tiles and grout
When choosing grout, you need to choose a composition that is compatible with the adhesive. This is very important for normal and long-term operation. The grout must meet the same requirements as the glue: moisture resistance, ductility, wide operating temperature range. This material also has a specific parameter: the permissible width of tile joints - it is indicated on the packaging. Typically, 2-4 mm are left between the tiles (maximum gap 20 mm), which are maintained using crosses of the appropriate size.
For a bath, you can use Ceresit CE 33 Super grout, provided that the width of the joints does not exceed 5 mm. For joint widths from 4 to 15 mm, Ceresit CE 35 Super grout is suitable. You can also recommend grout with an antifungal effect Ceresit CE 40 Aquastatic (instructions) for joints up to 10 mm wide. Dry mix CE 40 Aquastatic is supplied in 2 kg polymer buckets.
Elastic water-repellent grout Ceresit CE 40 for joints up to 10 mm wide
As for the color scheme, it is more practical to take a grout that is darker than the tiles - over time, the grout becomes lighter due to fading/washing out of the coloring pigment, and on light-colored joints the plaque that is sure to form during the operation of the bath is clearly visible.
It’s better to use dark grout – it’s more practical.
If you initially use light-colored grout, it almost immediately acquires a yellowish-cloudy coating, which no household chemical can handle. It turns out completely unaesthetic.
Ceresit grout color system by number (click to enlarge)
It is recommended to fill corner seams (these will appear if you glue a row of tiles to the wall under the lining) with silicone grout, for example Ceresit CS 25.
Silicone grout-sealant for joints Ceresit CS 25
Ceresit CS 25 is suitable for use in baths, as it can be used at temperatures from –40 to +120°C (instructions for using Ceresit CS 25 silicone sealant).
When working with sealant, you will need a blower gun (“caulk gun”).
The sealant is squeezed out of the tube using a pump gun
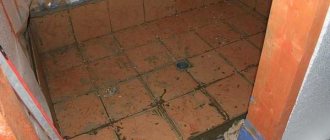
How to lay tiles in a bath
The process itself is no different from laying tiles in other rooms. The main thing is the right glue. Before starting work, it is necessary to level, clean and dry the base. If the room has the correct shape, installation begins from the most visible corner. If the geometry is incorrect, they find the middle and start laying from there in both directions. If we are talking about a steam room or a washing room, you can start from the drain gutter - it’s easier to maintain the slope.
Usually the horizontality of the tiles is checked using a building level, but for a bathhouse the slope towards the drain is important. Therefore, either deliberately tamp down the desired edge, or stretch the fishing line, which will serve as a guide for you. Sometimes a block is made that has the required slope. It is placed on the tile, and on top is a building level.
Advice!
If you make a plinth from tiles, it should go beyond the line of the lining (the lining seems to lie on top). In this case, water from the walls will not flow under the baseboard, but will roll down it onto the tiles.
Prepared base for laying tiles on a wooden floor
If the floor in the bathhouse is wooden, before laying the tiles, a layer of waterproofing (roofing felt, roofing felt, etc.) is laid on it, the joints are sealed (firstly, the material is laid with an overlap of 10-15 cm, secondly, they are glued with tape), and the waterproofing is secured with staples. A reinforcing mesh is laid on top, on which a layer of plaster at least 1.5 cm thick is laid. Once dry, the wood floor is ready for tiling. The technology is no different from that described above.
The process of laying tiles in the dressing room is simpler than in the steam room and washing room, so there is no need to control the slope towards the water seal. In this case, it is enough to maintain a horizontal line and align the tiles relative to each other by pressing them with a level from above. This is exactly how the woman in the video below lays tiles; her manicure doesn’t even bother her.
Main characteristics
Heat-resistant mixtures include cement, synthetic additives, sand, minerals, and fireclay fibers. Glue with an optimal ratio of components has the following characteristics:
Hardens quickly at high temperatures
- has good plasticity (the solution is easy to work with, lays on the surface in a thin layer, and does not increase their thickness when leveling walls);
- retains adhesive properties at temperatures above 120°C, does not crack under the influence of high temperatures;
- has sufficient thermal conductivity;
- excellent adhesion to any type of surface;
- does not flow down from vertical planes;
- does not allow moisture and steam to pass through;
- hardens quickly;
- serves as reliable protection for tiles from deformation during sudden temperature fluctuations;
- not flammable.
For cladding fireplaces and stoves, universal mixtures that meet all of the above requirements are most often used.
Professional tile laying
If you want to follow all the technologies and lay tiles at the highest level, we recommend using the products of the Finnish company KIILTO, which produces the entire range of products that may be needed when laying tiles:
- Tile adhesives;
- Waterproofing materials;
- Grout for tile joints;
- Sealants;
- Primers.
How to lay tiles with a slope towards the drain - technology and procedure - in the video.