If not everyone can build a bathhouse with their own hands, then anyone can cope with making the decor. Do you want to make your bathhouse original and cozy? We suggest paying attention to such a simple but necessary item as a bath hanger.
Style
Let's start with style. This time we would like to limit theorizing on this topic as much as possible. Therefore, we will limit ourselves to introducing two poles - simplicity and ornateness, and between them let there be many intermediate options, including various attempts to imitate different eras or countries.
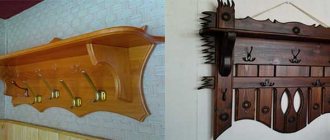
So, the more traditional , the wider the possibilities - hangers of any degree of ornateness will suit you, and of the simplest ones, only those that combine exaggerated rigor of geometry with metal or glass elements are not suitable.
Original homemade hangers in the bathhouse shown in the previous photo
The more modern your bathhouse is, the better it is to opt for relatively simple interior elements. Of course, we are not talking about high-tech now, but simply about a comfortable bathhouse in which modern materials are used, everything is functional and there are not many references to tradition .
What do we mean by comparative simplicity? The presence of some decorative elements , but subordinate to functionality and not very attractive.
Let us explain: the more original your hanger is, the more demanding it will become to its surroundings . You need to understand the principles of stylistic unity - if you put Khokhloma on the table, then several other interior items should play with similar patterns, and the entire interior as a whole should be designed in the Russian ethno-style. A single out-of-the-ordinary object will irritate rather than please the eye.
Features of making decorative hooks
Ready-made hooks for bath hangers are commercially available, but if desired, you can make them yourself from available materials.
The simplest option is birch cuttings.
Hooks from cuttings are made as follows:
- The cutting is sawn into the required number of elements, each 5 cm long. In the future, the hooks will be installed on the holder in increments of 10–12 cm, so you should calculate the required number in advance.
- Semicircular grooves are made in each element using a milling cutter or miter saw.
- The end parts and corners of the hooks are carefully polished.
- The ends have holes for fastening with a diameter of up to 3.5 mm. This is necessary in order to prevent deformation or damage to the hook when screwing in the fasteners.
- The hooks are fixed to the holder with self-tapping screws, the ends are additionally treated with an adhesive composition.
Place
Usually we need a clothes hanger in the bathhouse and a hanger for hats and towels. Where something like a kitchen unit is provided, small hangers can also be useful, but they are no different from what we use in the kitchen.
Hallway: for clothes
the most thorough , because in winter it should hold a decent weight of outerwear for several people.
It is located in the hallway , dressing room or similar area of the rest room , if it is not separated by a partition.
In principle, when choosing, you can focus on the simplest models that we use in the hallway. Since you plan to make a hanger for the bathhouse with your own hands, it is worth deciding how many people it should be designed for, whether it will be enough to make it wall-mounted or whether it is better to make a floor structure.
At the same time, it is worth resolving the issue of a shelf for hats and the like - you don’t have to do it if you don’t want to. On the other hand, they are unlikely to linger on this shelf; after all, a bathhouse is not a home.
Steam room: for hats and towels
But in the steam room you need a very simple and light hanger that does not have to hold a lot of weight. A few felt hats, a few towels - that's all.
It can be quite small in size. You can make it with a shelf or without a shelf.
BY THE WAY !
And nothing prevents you from using one of the corners of the steam room to place such a structure - this is both space saving and convenience.
From perforated sheet by yourself
A hanger made of perforated sheet will, in every sense, reflect the phrase “I can also cross-stitch.” It will reveal talent and creativity and will become an original decoration for your home.
Materials for production:
- metal or plastic panel with perforation;
- hooks (4 pieces);
- multi-colored floss threads (you can use yarn for knitting);
- scissors.
Perforated sheets can be purchased at any construction or furniture store.
Material of the required size is purchased and cross stitch is performed using embroidery threads. A simple drawing or a word you like will do. The main thing is to calculate everything correctly so that the spaces between the letters are the same, and also not to go beyond the contours of the sheet. After completing the embroidery, you need to secure the hooks in the finished holes of the panel. All that remains is to hang the hanger, again using the already prepared holes in the panel.
Material
Since we initially decided that our bath hangers were wooden, the chapter on material will concern exclusively the selection of wood. (Of course, if you have a choice, because often leftovers from other works are used for shelves and hangers, which, of course, limits the possibilities.)
Suitable wood species
Despite the fact that there will be increased humidity , its scale is not so great as to greatly affect the wood in the hallway. But in a steam room, the effect of moisture is much more significant.
The temperature is also distributed unevenly - the highest will be in the steam room, the lowest in the dressing room.
Since we are talking about hangers for the hallway and for the steam room, the advice will be fundamentally different.
ADVICE! When choosing wood for a steam room, avoid conifers if you prefer (even sometimes) sauna mode - conifers emit resin that will stain.
Resin leaks on coniferous wood
In a bathhouse with Russian conditions, this is less significant; you can choose the material at your own discretion - the same deciduous or coniferous.
From deciduous trees , what you have is good. Of course, the same linden or aspen, which are most often used in a bathhouse, do not have high strength characteristics , but in this case this is not significant. Simply coat the hanger with the same oil or wax you used (if used) for the shelves. This way it will last longer.
In the waiting room, the choice is not associated with any restrictions at all. Here, if you really prefer something, it would probably be ease of processing, since you are going to make a hanger for the bathhouse out of wood with your own hands.
Unconventional ideas
As an extraordinary way, you can use a wall hanger, on which there are many hooks of the same or different styles. To do this, you only need a free wall, as well as a lot of hooks.
Many people in the modern world use a fork or a rake to make it into a hanger. Of course, it will be necessary to process and improve the tool, as well as cover the sharp ends so that no one gets hurt, but the result will exceed all expectations, since no one is ready to see this when they come to visit. See photos of original hangers in our article.
Form
By design, all hangers can be divided first into the following categories:
- wall-mounted (have no other support other than walls);
- floor-mounted (may not be attached to walls).
In turn, wall and floor ones can be located along one of the walls, or located in the corner.
Wall mounted
The most minimalistic version of a hanger is a board, on one side of which hooks are attached (these can be wooden sticks, forks of branches, door handles, and knockers, but most likely some kind of purchased type of holders), and on the other side there is a fastening on the wall - ears, hidden loops, other varieties.
A hanger with a shelf is not too different from it in terms of labor intensity . Everything is the same - board, holders, ears, only a shelf is added at an angle of 90 degrees, and a pair of approximately triangular-shaped sidewalls will support it in this position. You can do it without the sidewalls - glue them and place them on the screws.
The structure, which we conventionally call a “ fence ,” is a little more complicated. These are several boards attached to cross slats with gaps between the boards. The upper edge is usually made smooth (because a shelf is most often attached to it), and the lower edge is either smooth, or a triangle, or rounded, or the author came up with something else.
Floor-standing
Floor designs can also be different.
For example, it could be a classic hanger in the form of a pole with a three- or four-legged support and a crown of hooks for circular placement of clothes.
Idea! A variation of such a pillar can be a felled young tree, the branches of which form “hooks”. However, first it will need to be dried thoroughly (at least a year).
In another version, it can be a frame made of round wooden elements, which rests on two “legs”:
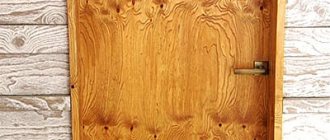
an old door leaf into a floor hanger by attaching a shelf and hooks to it.
Corner
Corner can be either a wall or floor design. Roughly speaking, its feasibility depends on whether it is imaginable that you mentally cut the design you like so that it folds at an angle. In some cases this will not be difficult.
However, for a steam room there is no need for a floor structure, and a light wall -mounted one consists of two boards at an angle of 90 degrees and a shelf-lid in the form of a triangle or a sector of a circle.
It is quite suitable for hats and towels, and if you wish, you can further decorate it.
Instructions for making and assembling a wall hanger
A wall hanger is the simplest design option for DIY. This is an ordinary wooden sheathing made of boards laid vertically and horizontally.
A wooden hanger can be used in all functional rooms: in the dressing room - for underwear and towels, in the locker room - for clothes, in the washing area - for bath accessories.
To assemble such a structure, you will need drawings. We have selected examples of some of them.
To work you need to prepare:
- boards for horizontal fixation measuring 10 × 110 cm, thickness 2 cm – 3 pcs.;
- boards for vertical fixation measuring 10 × 120 cm, thickness 2 cm – 6 pcs.;
- board for hooks measuring 20 × 100 cm – 1 pc.;
- board for a shelf measuring 30 × 100 cm – 1 pc.;
- wood screws 3.5 cm long;
- decorative plugs for self-tapping screws;
- tools.
The hanger assembly instructions include the following steps:
- Cleaning boards with sandpaper, rounding corners and edges. Checking the quality of grinding: the surface must be smooth and even.
- 2 side boards and 3 for horizontal fixation are placed on the table. The angle of intersection of the elements with each other should be 90 degrees.
- The boards are connected with self-tapping screws, which are screwed into the lumber from the reverse side, and the heads of the screws must be completely recessed. After assembly is completed, the screws are closed with decorative plugs to match the wood.
- The remaining elements are connected in a similar way in increments of 8 cm.
- A holder for hooks is fixed to the sheathing with self-tapping screws, which are screwed into vertical boards.
- A bar or shelf is installed in the upper part of the holder.
- Holes are made in the horizontal boards to attach the hanger to the wall surface.
- The finished product is treated with a protective wood varnish and installed in the selected location.
Wooden hangers: technology (video)
Carpentry products of this kind, such as hangers, are considered one of the simplest (unless, of course, you apply maximum imagination).
Below we invite you to get acquainted with several video instructions, which clearly demonstrate the process of making both simple and quite complex versions of wooden hangers, and it is clear that what is suitable for a hallway in an apartment will look quite normal in a bathhouse.
the fence hanger already mentioned above
And in this video, the master even talks with some awkwardness about how to turn a simple board into a convenient bath hanger:
As a source of inspiration, you can use this instruction from the same master, where he shows the stages of making a piece of furniture in the Japanese style:
It's quite challenging for beginners, but can be enjoyed by professionals.
And here is another fence hanger , but with a triangular bottom:
For the steam room, you can make a hanger from the following roller, just do not use metal hooks - it is better if they are simple wooden pins:
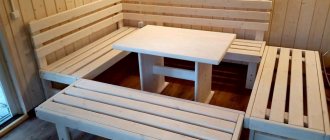
Do-it-yourself bathhouse bench
Drawing
Considering that this hanger design was developed and made by me with my own hands a long time ago, I suggest you the following assembly procedure.
Assembling the sheathing
- We first place the two outer vertical boards on the table, and then place three transverse boards on them.
- After checking the right angles and dimensions according to the hanger drawing, we screw in the screws on the back side of the transverse boards, connecting all the parts together. We cut in the screws, recessing the heads flush with the surface of the crossbars. We do not allow the sharp ends of the screws to come out through the vertical boards.
- We lay and secure the remaining vertical boards with uniform clearance between each other (80 mm).
- We check and, if necessary, adjust the right angles. Then we place a holder for hooks under the sheathing and insert two self-tapping screws into each vertical board. As before, we screw the screws into the back of the crossbars. This way we will give the sheathing sufficient rigidity.
To Contents