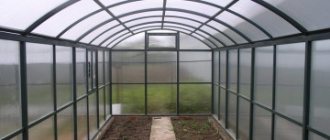
For almost all regions of Russia, heating the soil in a greenhouse is the only opportunity for early planting of garden crops. Most often, the task is to maintain the required temperature to protect seedlings from changeable weather in the spring, since a year-round heating system is too expensive for most farms and does not pay for itself with the harvest.
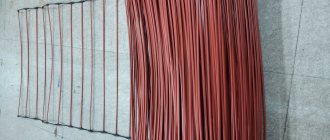
Heating cable for greenhouses is successfully used to organize additional or main heating of soil and air, protecting plants from hypothermia and maintaining the optimal temperature to obtain the desired harvest.
When organizing heating, it should be taken into account that no matter what heat sources are used for heating, the energy consumption, all other things being equal (system operating time, insulation, area) will be the same - 80-100 W/m2. This means that in order to heat the greenhouse, you will have to obtain this amount of energy in any way, regardless of its source. The difference in heating methods, therefore, is in efficiency (efficiency), complexity of organization, operation and availability of the energy source.
Greenhouse heating cable from the manufacturer
Gulfstream ROOF 1370/80.8m cable kit
- Total system power: 1370 W
- Linear power: 17 W/m.p.
- Purpose: roofing / heating of greenhouses / platform
- Country of origin: South Korea
- Screen: aluminum foil
- Insulation type: XPE
Warm floor Oasis (0.5 m²-0.9 m², 100 W)
- Total system power: 100 W
- Linear power: 14 W/m.p.
- Purpose: greenhouse heating / floor heating
- Country of origin: South Korea
- Heating type: comfortable / basic
- Screen: aluminum foil + copper wire drain core
Gulfstream ROOF 400/23.5m cable kit
- Total system power: 400 W
- Linear power: 17 W/m.p.
- Purpose: roofing / heating of greenhouses / platform
- Country of origin: South Korea
- Screen: aluminum foil
- Insulation type: XPE
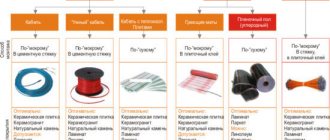
How to heat a greenhouse?
There are many methods of greenhouse heating, from the most basic, such as installing a heater or stove heating, to organizing complex “smart” systems (solar heating, autonomous heating station).
Convection (natural or artificial) is a heating method in which the greenhouse is heated by the influx of a mass of heated air (stoves, solar panels, open burners, electric convectors, fireplaces). The simplest way to organize heating, as it does not require additional structures inside the greenhouse space. The disadvantage is uneven heating and difficulty of control.
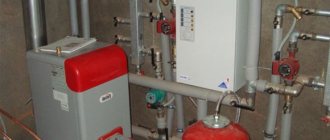
Collectors are a system of pipes distributed over the area of the heated greenhouse, in which the coolant (water, air, steam) circulates. This method allows you to evenly distribute the coolant over the area of the greenhouse. Boilers (solid fuel, gas, electric) and furnaces can act as energy generators.
Infrared heating – the use of infrared radiation sources (convectors, heating film). An infrared heat source does not heat the air, but the surfaces of objects (similar to the sun), thus using electricity most efficiently. The system is quite easy to install and regulate using temperature sensors and thermostats.
Biological heating - biofuel (usually manure with straw, peat) is located directly in the ground.
Cable heating – distribution of the heating element directly into the soil of the greenhouse.
All methods of organization have their advantages and disadvantages, which we will not dwell on, describing in detail the methods of heating greenhouses and conservatories using an electric heating cable.
Heating cable. Advantages
Laying a heating cable under a ridge is a safe, uncomplicated, economical and effective way to constantly warm the soil. The most common problem lies precisely in cold soil, which is much more difficult to warm up from above.
The advantages of this method of heating a greenhouse:
- Rapid warming of the soil to optimal temperatures. Warming up in natural conditions, as well as with the help of air heating, occurs very slowly. Only the top layer of soil thaws, while ice remains below for a long time.
- Installation of a heating system without affecting the structure of the greenhouse itself.
- Small system volume.
- Seedlings can be planted much earlier; seeds germinate quickly.
- In warm soil, plants develop better and grow faster.
- Fungal and other infectious diseases of seedlings are excluded.
- The method is also suitable for year-round greenhouses, but with additional air heating and lighting for plants.
- Ideal conditions in any weather outside.
- More heat-loving crops can also be grown.
- Installation of the system is simple.
- Safety - the cable does not overheat and cannot lead to burns of roots or ignition of plant residues in the soil.
- Does not require additional control. The self-regulating cable reads the ground temperature and distributes heat based on this data.
- A properly laid heating system prevents damage to the cable.
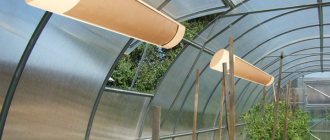
This is what the cable installation process looks like.
This is what the cable installation process looks like.
Cable heating of soil in a greenhouse
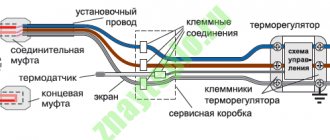
The cable electric heating system of the greenhouse consists of a direct heating cable placed in the ground and a control system represented by thermostats and temperature sensors.
Advantages of cable heating of a greenhouse
| Easy installation | One of the main advantages of cable heating is the easy installation of the system, without the installation of additional structures (such as air ducts, collectors, fastening systems, boiler rooms, furnaces). The cable can be laid in a greenhouse of any configuration (rectangular, square, round or more complex shape) without loss of efficiency or any additional labor costs. |
| Versatility of use | Cable heating is suitable for any type and design of greenhouses, regardless of the materials or location of the heated area. |
| Don't take up space | Neither inside the greenhouse, nor in the garden. |
| High efficiency | Since the cable is essentially both a source of heat and a coolant (laying in the ground, close to the roots of plants, and the soil itself and the sand layer are an accumulating layer), there are no energy losses during transportation and heating of the coolant. |
| Even heat distribution | The cable is laid only under the beds, evenly distributed over the entire area. The heating cable has the same heat output along its entire length, so you don’t have to worry about overheating or hypothermia of the plants. In addition, the cable can be laid with different pitches (distance between turns) - and in different areas of the greenhouse you can create your own microclimate, necessary for a certain type of plant. This effect is difficult to create and maintain using, for example, water or air heating. |
| Economical | Achieved by more precise control by setting the thermostat to a certain air temperature at any time of the day or night. As the temperature in the greenhouse rises, the system automatically reduces energy consumption. |
| No need for constant monitoring and participation in maintaining the system operation | Cable heating can operate stably and safely without human intervention; by programming the thermostats, you can leave the system unattended for several weeks. Modern devices allow you to connect the control system with a mobile device, and you will always know about the operating status at any time. |
| Doesn't burn oxygen | The heating cable placed in the ground does not affect the plants and does not disturb the microclimate of the room. |
| Safety | The operation of the system is controlled by a thermostat through temperature sensors; the cable is laid to a depth of approximately 30-40 cm, using waterproofing and a layer of reinforcing mesh to protect against mechanical damage. The maximum cable heating temperature is 65°C, which is safe for plants and structures. |
Installation of a self-regulating cable for heating soil in a greenhouse
Installation of a cable ground heating system is carried out in several stages.
- Before laying the self-regulating cable, it is necessary to remove a layer of top soil to a depth of about 30-50 cm.
- Level the surface of the earth.
- We apply a layer of sand, about 5 cm, and moisten it with water, then it should be compacted and leveled.
- Now it is necessary to provide heat and waterproofing, since it is important that the heat from the heating cable goes up and not down, otherwise the lower layer of soil, which does not play any noticeable role in growing plants, will also warm up. Sheets of polystyrene foam or expanded polystyrene are well suited for thermal insulation, and any polyethylene film can be used as waterproofing.
- Thermal insulation is laid on the sand, then waterproofing, and on top there is a mounting grid on which the heating cable will be attached with a snake in increments of 10-15 cm (depending on the power that needs to be brought per square meter of bed).
- The cable is fixed using plastic cable ties to prevent the cable from shifting after installation.
- If necessary, install a temperature sensor in the installation tube between the turns of the cable.
- Sprinkle again with sand (5 cm), water and compact to eliminate air cavities in the layer.
- Fine-mesh galvanized reinforcing mesh is laid on the sand in order to protect the cable from being hit by any agricultural tool.
- We pour a layer of fertile soil 25-40 cm and at this point the installation work can be considered completed.
You can simplify the installation and lay the cable without heat and waterproofing; in this case, heat loss will be greater, but this will allow the roots to feel freer, and nothing will limit their growth. Another advantage of a cable heating system is that for each bed you can select exactly the temperature that a given plant needs. This allows you to grow several types of plants from different climatic zones in a greenhouse.
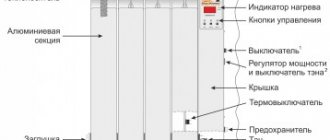
Heating cable for greenhouses
To heat the soil and air in greenhouses, a two-core resistive heating cable is used in sections with a linear power of 14-17 W/m. This power is enough to provide the required temperature of 15-25°C, depending on the type of cultivated plants. A resistive heating cable has a constant linear power (unlike a self-regulating one); it is also used for heating roofs and floors (including concrete).
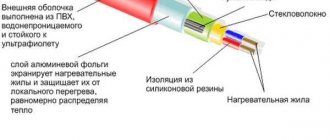
The cable consists of two current-carrying cores (main and return) - a two-core cable, so there is no need to return an additional section of power cable to the power source, placing the end of the section where it is convenient.
Internal insulation (the higher the melting point of the insulation, the more reliable the cable protection from overheating and destruction). Therefore, modern cables use Teflon insulation with a melting point of 185°C. The drainage core, together with the aluminum screen, performs the grounding function; the screen also serves as mechanical protection.
The outer sheath of the cable ensures the tightness of the structure, protecting it from external influences.
A self-regulating cable in ground heating systems is not effective, since the ability to self-regulate (the dependence of the cable power on the external temperature) leads to a rapid decrease in output power when working in the soil layer. Roughly speaking, the cable will heat itself.
Resistive cable is sold in ready-made kits of various lengths!!! It is impossible to change the length of the finished section, since the power of the resistive cable depends on the cross-section of the conductor. For each section length, a cable of a certain cross-section is used. By changing the length of the heating part, you will change the power characteristics of the section, which can lead to insufficient operating efficiency, or to overheating or even a short circuit.
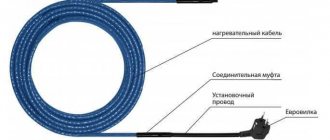
The factory section is equipped with a power cable for connecting to the power supply; the cold part of the wire is connected to the heating part by coupling with heat-shrinkable tubes. Modern cable heating systems also use couplingless connection technology, when the junction of the supply and heating parts is located under the outer sheath of the cable. Such a connection is more reliable and safer, since the integrity of the shell is not compromised and there is no adhesive base, which corrodes over time, thereby compromising the tightness of the connection.
The maximum heating temperature of the cable for greenhouses is 65°C; this is a low-temperature heating cable. The maximum operating temperature is a characteristic that determines the heating limit of the cable.
There is also a “maximum exposure temperature” parameter, which indicates the limit of the external environmental temperature at which the cable retains its properties. For a low-temperature cable it is usually 70-85°C. For use in a greenhouse, this parameter is not so important, since the cable is located underground and is not significantly affected by the external environment. But this value is still indicated in the characteristics of the resistive cable, since it can also be used when heating the roof, where exposure, for example, to sunlight can lead to overheating of the sheath.
Finished section of resistive cable with heat-shrinkable sleeve.
Finished section of resistive cable with a couplingless connection.
Disadvantages of heating cable
There are far fewer disadvantages than advantages, and they are quite relative:
- It does not produce high temperatures, therefore it is suitable for well-insulated greenhouses with a floor, foundation, etc.;
- Electrical connection required;
- The air will not warm up, so during frosts you will have to additionally cover the plants with spunbond or lutrasil or install heaters;
- Large greenhouses require significant energy consumption, and therefore financial costs.
Calculation of the length of the heating cable for heating a greenhouse
When calculating the total power of the heating system, the useful area of the greenhouse is taken into account (the area occupied by beds and their location) as well as the degree of insulation. It is also necessary to determine whether only the soil will be heated - then the power of the system can be 75-80 W/m2, or also the air of the greenhouse. In this case, the power ranges from 80 to 100 W/m2.
The total power of the heating system is calculated by the formula:
Area * 100 W/m2 = for heating the greenhouse air.
Area * 80 W/m2 = for heating the ground.
Cellular polycarbonate 4-6 mm has the lowest thermal conductivity; greenhouses made from this material are the warmest, most durable and reliable. Glass and, of course, polyethylene film are also used in the construction of greenhouses.
Thus, the heating power is directly related to the thermal conductivity of the material from which it is made. Since the task of heating is precisely to compensate for the temperature difference inside the greenhouse and the environment. The calculations in this article are given for heating a greenhouse made of 6mm cellular polycarbonate, the thermal conductivity coefficient of which is 3.6.
Power = T1 - T2 * S * K.
Where T1 - T2 is the temperature difference,
S – greenhouse area,
K – thermal conductivity coefficient.
Thermal conductivity of materials:
| Polycarbonate 4 mm | 3.9 |
| Polycarbonate 6 mm | 3.6 |
| Polycarbonate 8 mm | 3.3 |
| Polycarbonate 10 mm | 3.0 |
| Polycarbonate 16 mm | 2.3 |
| Glass 3 mm | 6.0 |
| Single-chamber double-glazed window 4 mm | 1.9 |
| Polyethylene film 180-200 mkm | 7.5 |
| Double-layer inflated polyethylene film 180-200 mkm | 3.5 |
Thus, the heating power for a greenhouse made of other materials is calculated taking into account their thermal conductivity:
Heating a glass greenhouse – Heating power (6 mm polycarbonate) * 1.7
Heating a polyethylene greenhouse – Heating power (6 mm polycarbonate) * 2.1
Next, you need to select a ready-made kit based on power or cable length in the section. As we said above, resistive cables are sold only in ready-made kits, so you need to select sections of the required length and calculate their number before starting installation, since the length of the sections cannot be changed.
Depending on the linear power of the cable (W/m), the total power of one set (a piece of cable in a section) is calculated.
For example:
A greenhouse with a useful area of 17 m2 requires a heating system with a total power of 17 m2 * 100 W/m2 = 1700 W.
If the heating cable you choose has a linear power of 14 W/m, you will need a section 121 m long.
If the total heated area exceeds the maximum length of one cable section in a set (usually the maximum length of one cable set does not exceed 200 m), two or more separate sections are used, connected to the network through a thermostat.
Do-it-yourself installation of a heating cable in a greenhouse
Greenhouses can be of various configurations and designs: with vertical/sloping walls, arched, single-slope, gable, with a mansard roof, round, rectangular, dome. Cable heating can be implemented in a greenhouse of any shape and area.
Before starting installation, you must draw a cable layout plan to scale and mark the location of the thermostat.
Soil removal: the top layer of soil is removed to a depth of 40-50 cm. This is the most labor-intensive part of the installation process. The recess is necessary, since laying the heating requires the formation of several layers of sand reinforced with a mesh.
Installation of the frame: optimal at this stage for a greenhouse made of lightweight structures. Recessing the frame into the base of the greenhouse will provide additional stability and wind resistance.
A layer of sand 10 cm: then sides are installed from a heat-insulating, moisture-resistant material, and sand is poured, which in turn will be a heat-accumulating layer and will allow heat to be evenly distributed in the base.
Compaction: the layer must be spilled and compacted to prevent displacement of the sand layers when laying the cable and subsequent installation of the upper layers of the cake.
It is not recommended to install thermal insulation of the soil in a greenhouse, since when deepened by 40-50 cm, the soil cools from the outside, while the insulation usually consists of waterproof materials, which can lead to moisture accumulation in the area where the heating cable runs. Also, obstruction of water drainage does not exclude rotting of plant roots. You can install insulated edges to prevent heat loss beyond the perimeter of the greenhouse.
For the same reason, we do not recommend installing waterproofing, since moisture does not harm the heating cable located in the sand bed, and waterproofing interferes with the natural moisture exchange of the system.
Laying the mesh: a reinforcing plastic mesh is necessary to fix the heating cable. The mesh is laid directly in the places where the cable will be laid. The mesh also prevents the sand pad layers from shifting.
Cable laying: the heating cable is laid in a “snake” pattern according to the diagram drawn up in advance. For fastening, you can use plastic clamps or perforated mounting tape such as TP.
Laying step calculation:
After selecting the appropriate kit, it is necessary to calculate the pitch of the heat cable with which the section will be mounted on the area. We apply the following formula:
Laying area / section length * 100 = laying pitch in cm.
The laying pitch is the distance between turns that must be observed to ensure uniform distribution of the coolant (cable) in the sand layer. The area, accordingly, is taken as useful (heated).
Why is it necessary to shed sand?
When wet, the sand is compacted and deaerated, preventing the formation of air bubbles around the heating tape, which increases the thermal conductivity and storage properties of the layer. In fact, spilled sand is close in its properties to cement screed.
Laying reinforced mesh: fine mesh (25x25mm) serves to protect the cable from mechanical damage when cultivating the soil and keeps the soil from moving.
Adding soil: a layer of soil is poured over the mesh into which plants can be planted.