Hello. A heating cable was installed on a cold water pipe (connected to the house, laid in a trench and backfilled). A little not taken into account is to heat the pipe in the well itself. How can I lengthen a self-regulating cable?
One comment
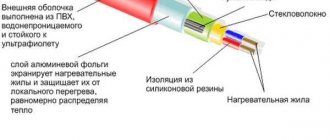
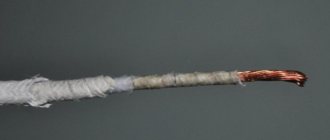
The self-regulating heating cable has the following design - a PVC sheath, a grounding outer braid, an additional layer of insulation, two current-carrying copper cores and a special heating layer between them. To lengthen the heating cable, you need to carefully strip the wires; it is better to make connections using sleeves and crimping them. You can insulate them using electrical tape, carefully insulating the sleeves. Heat-shrinkable insulation is placed on top of the wire and the insulation area. This must be approached responsibly, paying attention to quality and preventing moisture from entering the insulation area. The free end of the cable must also be insulated using heat shrink, shortening one of the ends of the supporting core to avoid a short circuit. This is how you can build up a self-regulating floor heating cable.
Subscribe to the newsletter
Heating cable is one of the most technological innovations. It is widely used in everyday life, agricultural and industrial applications. The popularity of this cable is due to the fact that it is the best alternative to gas and water heating systems. The heating cable is more economical and safer. It can be turned on in a specific room only at the moment when heating is required. But is it possible to connect heating cables together? Yes! We'll look at how to do this below.
How to connect 2 pieces of self-regulating heating cable?
Two heating cables can be connected to each other.
The main thing is to make this connection correctly. Only in this case will the system you are setting up work for a long time and without interruptions. To connect 2 pieces of self-regulating heating cable, you need to perform the following steps:
1. Cut the outer and then the inner insulation of the cable and remove it. 2. Heat the semiconductor core with a hairdryer and remove it to expose the conductive wires. 3. With another heating cable, perform the same actions as described in points 1 and 2. 4. Connect the wires by soldering or crimping. 5. Use heat shrink tubing to insulate the twist.
How to connect 2 pieces of resistive heating cable?
To connect 2 pieces of resistance heating cable, do the following:
1. Remove the protective sheath from a small section of the cable. 2. Fold the braid back over the sheath. 3. Remove the insulation a short distance. 4. With the other cable, do all the actions described in the 1st, 2nd and 3rd paragraphs. 5. Connect the heating wires by soldering or crimping. 6. Use heat shrink tubing to insulate the twist.
How to connect the heating cable and the “cold” end?
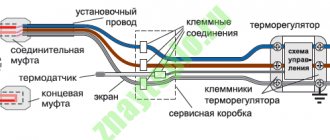
To connect the heating cable to the “cold” end, you will need reliable couplings. Proceed in the following order:
1. Cut the outer insulation of the heating cable and remove it. It is important not to damage the braid. 2. Straighten the cable braid and twist it into a “tail” (it will be needed to ground the heating cable). 3. Cut the inner insulation of the heating cable and remove it. The black semiconductor core must be completely exposed. 4. Heat the core with a hairdryer and remove it with pliers to expose the conductive wires. 5. Place connecting sleeves on the ends of the cores and crimp them with a special crimper. 6. Place heat shrink tubing onto the cores. 7. Set the tubes with a hairdryer and wait until they cool down. 8. Place the connector on either the cold end or the heating cable. 9. Make the grounding end of the power cable longer (in the future it can be cut off). 10. Place appropriate heat shrinks on the insulated cores of the power cable. 11. Connect the conductive cores of the heating cable and the insulated cores of the “cold” end - crimp the sleeves with crimpers. 12. Move the heat shrinks and heat them to casing. 13. Cut the ground wire to the length you need and crimp the connecting sleeve onto it. 14. Cut the braid to the middle of the sleeve and apply heat shrink to the ground wire. 15. Connect the braided “tail” of the heating cable to the grounding wire. 16. Move the heat shrink tubing and heat it with a hair dryer. 17. Slide the coupling onto the connection and fit it with a hair dryer. The coupling must fit both the cold end and the heating cable.
Now you know how to connect the heating cable, so you should not have any difficulties in this matter. If for some reason they suddenly appear, seek help from a competent specialist.
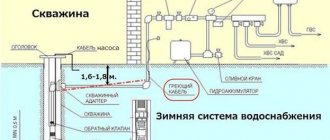
During severe winters, homeowners often face the problem of freezing of various pipes - sewer and water pipes. Since it is not always possible to lay pipes below the freezing depth of the soil, more and more often experts advise, and people end up using a heating cable for water supply.
Connecting a heating cable: step-by-step instructions!
Heating cable
- one of the most technological innovations.
It is widely used in everyday life, agricultural and industrial applications. The popularity of this cable is due to the fact that it is the best alternative to gas and water heating systems. The heating cable
is more economical and safer. It can be turned on in a specific room only at the moment when heating is required. But is it possible to connect heating cables together? Yes! We'll look at how to do this below.
How to connect 2 pieces of self-regulating heating cable?
Connecting a heating cable: step-by-step instructions!
Two heating cables can be connected to each other. The main thing is to make this connection correctly. Only in this case will the system you are setting up work for a long time and without interruptions.
To connect 2 pieces of self-regulating heating cable, you need to perform the following steps:
1. Cut the outer and then the inner insulation of the cable and remove it.2. Heat the semiconductor core with a hairdryer and remove it to expose the conductive wires.3. With another heating cable, perform the same actions as described in points 1 and 2.4. Connect the wires by soldering or crimping.
5. Use heat shrink tubing to insulate the twist.
How to connect 2 pieces of resistive heating cable?
Connecting a heating cable: step-by-step instructions!
To connect 2 pieces of resistance heating cable, do the following:
1. Clear a small section of the cable from the protective sheath.2. Fold the braid back over the sheath.3. Remove the insulation a short distance.4. With the other cable, do all the actions described in the 1st, 2nd and 3rd paragraphs.5. Connect the heating wires by soldering or crimping.
6. Use heat shrink tubing to insulate the twist.
How to connect the heating cable and the “cold” end?
Connecting a heating cable: step-by-step instructions!
To connect the heating cable to the “cold” end, you will need reliable couplings. Proceed in the following order:
1. Cut the outer insulation of the heating cable and remove it. It is important not to damage the braid.2. Straighten the cable braid and twist it into a “tail” (it will be needed to ground the heating cable).3. Cut the inner insulation of the heating cable and remove it. The black semiconductor core must be completely exposed.4. Heat the core with a hairdryer and remove it with pliers to expose the conductive wires.5.
Place connecting sleeves on the ends of the cores and crimp them with a special crimper.6. Place heat shrink tubing onto the cores.7. Apply a hairdryer to the tubes and wait until they cool down.8. Place the coupling on either the cold end or the heating cable.9. We make the grounding end of the power cable longer (later it can be cut off).10. Place appropriate heat shrinks on the insulated cores of the power cable.11.
Connect the conductive conductors of the heating cable and the insulated conductors of the “cold” end - crimp the sleeves with crimpers.12. Move the heat shrinks and heat them to casing.13. Cut the ground wire to the length you need and crimp the connecting sleeve onto it.14. Trim the braid to the middle of the sleeve and apply heat shrink to the ground wire.15. Connect the braided “tail” of the heating cable to the grounding wire.16. Move the heat shrink tubing and heat it with a hair dryer.
17.
Slide the coupling onto the connection and fit it with a hairdryer. The coupling must fit both the cold end and the heating cable.
Now you know how to connect the heating cable, so you should not have any difficulties in this matter. If for some reason they suddenly appear, seek help from a competent specialist.
The original article is posted on our website cable.ru
.
If this material was useful to you, please share
them on social networks!
We also recommend a series of articles dedicated to underfloor heating:
Which cable heated floor is better?!
Do-it-yourself warm floor? Easily! Preparatory work Do-it-yourself heated floor?
Easily! Installation instructions And in order not to miss the release of new articles, click “like”
and
subscribe
to our channel:
Kabel.RF: all about electrics
.
Source: https://zen.yandex.ru/media/cable_ru/soedinenie-greiuscego-kabelia-poshagovaia-instrukciia-5d43ea716f5f6f00adaa1cda
Why do you need a heating cable?
For various reasons, pipes are insulated - both water supply and sewerage.
In private houses, the need for insulation especially often arises when the house is on stilts:
That is why pipes require mandatory insulation, since they either pass above the ground, or lie on it, or are buried, but as a rule, shallow - this is not always convenient to do if the gap between the house and the ground surface is not large enough for excavation work. The air temperature under such a house in winter is low, and this is fraught with freezing and defrosting of pipelines.
There is a way out for all these cases - one of the most effective and simplest ways - the so-called heating cable. It is mounted both outside and inside the pipe.
A heated water pipe made from a flexible heating cable relieves the owner of the house or cottage of many unnecessary problems.
Design and methods of application
The technical characteristics of heating cables, their types, differ significantly from each other, and are used for heating:
- Water supply.
- Sewers.
- Drains, tanks.
- Pipelines for various purposes.
With all the variety of tasks assigned to these heating elements, their main purpose was and remains to prevent liquids from freezing by increasing the temperature.
These heating systems are applicable for communications located outdoors - both in the ground and in the open air.
An important advantage in the operation of these systems is the function that is commonly called zonal application. In other words, you can always assemble a mini-system from a set of elements in order to heat a small area without connecting it to the general network. Benefit:
- Saving materials.
- Energy is saved.
Components of such systems:
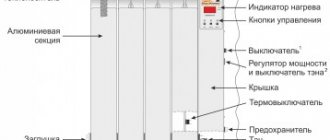
- Inner vein. There may be one or several. It is made of alloys with high electrical resistance, and the higher it is, the greater the specific heat release.
- Insulation. It is made of polymers. As a rule, a screen made of aluminum or copper is used together with it.
- Outer shell. Very durable, made of PVC - it covers the internal elements.
This is roughly what the heating cable looks like, as they say, in cross-section. This can be seen more clearly in the instructions for this element or on the World Wide Web.
Some nuances are possible - different alloys or insulation methods. It all depends on one manufacturer or another.
In addition, the cables are flat in shape. This is why they are called tape.
To improve the characteristics, the copper braid (screen) is covered with a layer of nickel, and as for the outer layer, it is increased.
Requirements for PVC material: moisture resistance and ultraviolet resistance.
There are also so-called food cables - they are used for internal installation and comply with sanitary standards. Drinking water must be safe for health.
Low voltage analogue
In hazardous (explosive, fire hazardous) industries, there is a need for a low-voltage element - this is required by both the technological process and safety precautions.
Thus, 12-14 volt cables are widely used.
How does a water heating cable work?
Any cable system designed to heat something converts electrical energy into heat. This occurs due to the thermal effect of current in special heating elements - they are special cables.
This fully applies to heating water pipes.
Types of heating cable
Any heating system consists of two categories:
- Resistive. It is preferable to heat short sections of small-section pipes (up to forty mm).
- Self-regulating. Used on long sections of water pipelines. Such cables are also called self-regulating, “samreg”, self-heating, self-heating, smart, etc.
Both of these types have their own scope and are widely used, so it is worth considering both options separately in more detail.
Resistive
The principle of operation of a resistive cable is extremely simple: one or two cores are insulated, and the electric current passing through them heats it up.
A high heat dissipation coefficient is promoted by high resistance and current strength.
There are pieces of this cable on the market of varying lengths, and they have a constant resistance. During operation, any of these cable sections produce the same amount of heat over the entire length.
When installing the system, do not forget that the single-core cable is connected at both ends.
Such contours are most often used to heat roof drains, as well as to install the so-called “warm floor”.
However, this option is also applicable to plumbing.
The difference between a two-core cable is that one of the cores is responsible for energy transfer, and the other for heating. Such resistive cables are used for water supply no less than samregi. They are mounted inside the pipe using tees and seals.
The main advantage of such cables:
- Acceptable price.
- Long service life - about 10 or even 15 years.
- Easy to install.
There are also disadvantages:
- The likelihood of overheating due to the intersection or too close “neighborhood” of another cable - you will get a kind of “boiler” of a very long length.
- Fixed length. It cannot be increased, nor can it be decreased - such an attempt will end with the element overheating and not lasting very long.
- A burnt-out section cannot be replaced. In this case, a complete replacement will be necessary.
- The power cannot be adjusted due to its uniformity along the entire length.
In order not to spend money on constant cable operation (expensive), many install thermostats (with a sensor). If the temperature drops below 3°C, the heating is turned on, and if it is more than 7°C, the current is turned off.
Self-regulating
The second type of cable is self-regulating and universal. They can heat:
- Roofing elements.
- Sewer lines.
- Water supply systems.
- Containers with liquid.
How to choose a self-regulating heating cable for water supply
Please note that continuous use of the heating wire is not recommended. The reason is its limited resource. If you turn on the cable for a long time in a relatively warm climate, it will fail ahead of time.
A wire with a higher power is used to heat the pipeline when the ambient temperature drops significantly below 0°C. However, even when installing a cable with a maximum load on the power source, energy costs will be moderate.
How to determine how much cable power is needed
Determination of the power of the heating self-regulating cable:
- For installation inside communications, it is recommended to use the 5 W/m option, and the pipes must pass under a layer of soil. Only under these conditions can one count on a sufficient temperature increase with such a wire.
- If you plan to install communications under a layer of soil, but the heat source will be located on the outer walls, you need to use a wire with a power of 10 to 15 W/m. You can determine it more accurately if you find out the exact depth of the pipes.
- To heat communications that pass above the ground, you need to use a cable with a power of 20 W or higher, since in this case the pipe and its contents are more exposed to low temperatures. In addition, increased air humidity and precipitation increase the negative impact on communications; the likelihood of their icing in this case increases.
The power of a wire is determined by the number of conducting paths in it. The higher the value of this parameter, the colder the pipe can be heated using such a cable. To maintain the temperature of a warm pipe, it is enough to use a wire with an average number of conducting paths. For communications with hot coolant, wire with a low heat emission rate should be used. It is distinguished by a minimal number of conducting paths.
Low-temperature cable is characterized by high elasticity and minimal thickness. This allows you to wrap it more tightly around communications. When choosing, you also need to focus on physical parameters, for example, length.
It cannot be less than 20 cm and more than 100 m, only this ensures sufficient efficiency of the heating wire. If a coil installation method is chosen, the ability of the cable to bend should also be taken into account.
Top 5 best manufacturers
To install a reliable communications heating system, you need to use high-quality materials. The wire is constantly in contact with moisture, which increases the risk of breakdown. For this reason, preference is given to a cable of high-quality assembly, which means choosing materials from common manufacturers:
- Ensto (Finland);
- Nelson (America);
- Lavita (South Korea);
- DEVI (Denmark);
- FreezStop (Russia).
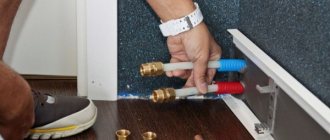
How to connect a heating cable: installation methods
There are, as already mentioned, two ways to install a heating cable on a water supply system:
- Interior. The element is inserted inside.
- Outer. The cable is fastened by winding along the pipe.
The thermal cable connection should be made strictly following the attached instructions (diagram).
Inside the pipe
This method is not suitable for every pipe. Its cross-section must be at least 40 mm. If you deviate from this rule, then in small-diameter pipes the heating element will partially block the flow of water.
It will be difficult to arrange heating for a long pipe in this way, but for short sections this option is the most rational way.
In vertical areas, it is most convenient to lay this element from top to bottom. The process takes place using a sealing sleeve and a tee - the first prevents the cord from slipping.
Such installation is often more expedient than external installation, due to repair or replacement of elements. Everything is simpler here - take out the old one and start the new one. In this case, during pipe laying, measures must be taken to quickly replace the cable - many craftsmen first install it without corners and couplings - the pipe is simply bent smoothly. This way the cable can be easily removed and a new one can be easily inserted if necessary.
There is another method when two cables are laid in the pipe, one of which is connected, and the other is kept in reserve, not energized. So, if the first cable fails, another, working one is used, and no excavation work or other “excavation” is required. The disadvantage of this method is that it is quite expensive, and not every homeowner agrees to it.
Outdoor installation
Winding an element outside the pipe is characterized by the fact that this method is not very reliable and convenient in the sense that if the element fails, it will have to be dug up, and this is very labor-intensive and difficult (depending also on where and how it is buried). The time of year plays a big role when, due to freezing of the soil, this will be almost impossible to do.
As for the actual external installation, it is easy to do it along the pipe. Step by step:
- The heating element is fixed at one edge using self-adhesive fiberglass or plastic clamps that can withstand high temperatures.
- The fastening step of the holders is 30 cm. Metal fastenings are not used!
- The length of the heating element is equal to the length of the pipe that will be heated.
This is how the so-called linear installation is carried out, which exists in addition to spiral installation, in which the cable is wound along its entire length. It is especially relevant if the pipes are buried in the ground.
Wind the cable onto pipes of medium or large diameter, in measured steps. The advantages of the winding method are that the contact is maximum and so is the heating. The disadvantage is the increased consumption of material, in contrast to the linear method.
Is it possible to use a self-regulating cable for heated floors?
The main function of a self-regulating heating cable is to reduce the supply of electricity when the required heating degree is reached, without affecting the quality and uniformity of surface heating. This feature allows the model to be successfully used in the construction of heated floors in any room, from living rooms to bathrooms and toilets.
In addition, if you have heated floors with a self-regulating cable, you can rearrange the furniture in the apartment, since it has the ability to regulate the heating level, unlike resistive cables. That is, it is permissible to reduce heating under heavy furniture. It is impossible to change the heat supply of a resistive wire; overheating of the surface may occur, which will lead to failure of the system.
It is worth noting the simplicity of constructing a self-regulating floor, since this electrical cord can be cut anywhere and the end sealed with your own hands. At the same time, all connections, if installed correctly, can last for more than one year.
Naturally, like any self-regulating electric floor, it must be connected to power while observing all standard protection methods. That is, the system must have a circuit breaker and an RCD, the current leakage of which is no more than 30 mA. The Samreg cable must have a screen and a power of 30 - 40 W. At the same time, the laying step of the heating element is 15 - 20 cm.
Previously, the use of this function was not possible due to the small size of the film. Today, infrared film with 30% self-regulating ability is produced in Korea.
How and with what to insulate
The absence of a basement floor especially forces you to take care of insulation.
Pipes, of course, can be partially buried in the ground, but some part of them will inevitably come out, and it requires thermal insulation. In the first case, the depth to which the pipe was buried plays an important role - it is not always possible or even the desire to dig a hole or trench to the depth of soil freezing - after all, in Siberia and the North this value is several meters.
If the house is located on a slope, then the space under it is quite large; wind and frost “walk” there, even if this gap is covered with some kind of shield material. The mentioned gap can reach one meter or even more, and here we need effective measures to protect the pipes from the cold.
Insulation can be different, and the most common is packing pipes with mineral wool. But this coat is not always effective, and such measures are not always sufficient.
For insulation of wells, for example, extruded polystyrene foam is sometimes used. The method is very labor-intensive, since it requires a whole set (package) of pieces of this material and you also need to make holes in each of them for the pipe. This entire “structure” is buried in the ground (if possible). This material, by the way, is not cheap at all.
Useful tips
It is very difficult to navigate the sea of heating cables offered on the modern market - there are too many offers from different manufacturers. What you need to know and consider:
- Before going to the store, you need to know exactly the diameter of the heated pipe and the length of the area protected from the cold.
- At the same time, you still need to focus on the lowest temperatures to which the soil or air can cool.
- It is necessary to clarify the presence of a protective braid, which increases the reliability of the heating element and provides grounding.
- The following is also important: type of external insulation, power, temperature class, as well as the manufacturing company.
External insulation type
If a polyolefin-insulated cable is suitable for sewer pipes, then fluoroplastic protection is better suited for internal installation (directly into the pipe). Fluoropolymer is also quite suitable for outdoor installation - it protects from both moisture and ultraviolet radiation.
Temperature and power
The medium temperature system is suitable for larger diameter pipelines. The maximum system temperature is 120°C. The power reaches up to 33 W per meter.
The most powerful are with a temperature of 190°C, their power is already 95 W per meter. Such systems are not used in everyday life; their scope of application is industry.
You can select and correctly calculate the optimal power based on the diameter of the pipe. Examples:
- For water supply systems with pipes up to 25 mm in diameter, cables with a power of 10 W per meter are used.
- From 25 to 40 mm – 16 W per meter.
- From 40 to 60 mm - 24 W per meter, etc.
Recommended Manufacturers
There are brands of heating elements that have proven themselves to be long-term, stable and reliable. Imported products:
The most popular Russian manufacturer is considered to be the company Teplolux (SST), which specializes in high-quality household products.
Homemade heating cable
Nothing is impossible, and you can also make a heating cable with your own hands. There is enough information on this topic on the Internet in the form of:
Having some skills in basic electronics, as well as the desire to produce one, using an on-board computer, a power supply, and some materials, many craftsmen make effective, reliable and safe systems for such heating.
The most common reason for making homemade products is the desire to save money, and such “craftsmen” often use “mongrel” wires instead of cables. So, when creating something like this, you need to think a hundred times before doing something that could ultimately lead to a short circuit, even a fire. In addition, everything related to drinking water requires a special, thoughtful attitude.
They say that the greedy pays twice - but that’s not so bad, it’s worse when such a makeshift device harms your own health and the health of your household. Not to mention the safety of the home itself and the breakdown of the water supply due to defrosting.
Reviews
There are plenty of reviews on the Internet about heating cables. Users use them to heat the following communications and surfaces:
- Drainage.
- Drainage devices.
- Water pipes.
- Sections of pipes in an artesian well.
- Sewage systems, etc.
Opinions are divided. Some claim that this method of electric heating is simply irreplaceable, while others claim that a deep trench for pipes will work “cheaply and forever.”
Users of devices such as heating cables assure that with a thermostat, heating is more profitable and saves electricity.
In addition, many are inclined to believe that the combined option is still more profitable: the pipe is buried in the ground and heated by a heating element.
It is strongly recommended not to wrap pipes located in the ground with mineral wool - they absorb moisture. This is how the insulation becomes useless, and the risk of freezing is present.
Everything, apparently, depends more on the specific situation and financial situation of the homeowner.
TOP 5 best manufacturers of warm cable
Leading manufacturers of heating cables are:
- The Swedish company Thermo Industri AB produces cables for heating domestic and main pipelines. Automatic equipment is used to manufacture systems, which improves product quality and reduces product costs. The manufacturer offers thermal regulators and additional devices that ensure reliable operation of pipe heaters.
- Eltrace products are produced by a company with French roots. The company specializes in the production of heating elements with automatic temperature control. The Tubes-heat product series is offered for domestic use. The Traceco range is suitable for installation on industrial pipelines. But the products can also be used in the private sector.
- Thermon products are manufactured by an American company. The equipment is characterized by ease of installation and reduced energy consumption. The company offers products with self-temperature regulation.
- The Danish company Devi offers resistance-type heaters, as well as self-regulating equipment. The company has been specializing in the production of heating elements for over 50 years. The products are of high quality and ease of installation.
- The Russian manufacturer Teplolux (SST) produces heating elements for pipes and floors. The products are distinguished by a reduced price and high quality manufacturing.
If non-standard pipe routing is used on the site. Then the owner will need to create a heating circuit himself or contact a company. When arranging an electric heating circuit, you should remember safety and provide for the installation of protective elements that eliminate the risk of electric shock.
Heating cable review and test, don't miss the video:
How to connect a heating cable to the network:
Helpful2Not Helpful