How to choose a new faucet
When choosing a new faucet, it is important to consider the material: experts recommend choosing models made of brass or bronze.
When purchasing a bathroom faucet in a store, you need to pay attention to several factors:
- Design. It is not at all necessary to buy exactly the same mixer that you already have. The general design of most models is approximately the same, so if you choose another option, nothing will change significantly. It is only important to pay attention to the fact that the appearance of the device is in harmony with the overall interior design.
- If it was decided to choose a fundamentally different model, then it is very important that the connection points with the water pipes coincide. Before purchasing, you need to measure all the distances, or even better, take a photo or video of the old mixer and its position.
- If the bathtub is small, then the length of the gander matters.
- When purchasing, you need to pay attention to the presence of all parts (gaskets, eccentrics, nuts) in the kit.
- As for the general technical and functional quality of the device, only a specialist can objectively understand this. If it is not possible to consult with him, then you need to pay attention to the country of origin and the cost of the product. An old and familiar rule applies here: the better the quality of the product, the more expensive it is.
Installing a mixer: step-by-step instructions
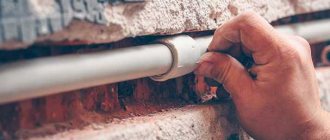
Now it’s worth taking a closer look at how to change the faucet in the bathroom, since the old one has already been removed. The choice of a new mixer and its preparation are very important here. It is better to give preference to higher quality plumbing, in this case the faucet will last longer. Usually the center distance on the pipes and mixer is 150 mm, but it also happens that the device does not fit these dimensions. In this case, special pipes are used that will help you adjust the size to the desired size.
Execution instructions:
- Prepared nuts are put on the pipes;
- to correct possible errors, tighten the nuts with minimal force, and then insert the pipes into the pipes;
- you should bring the mixer up and imagine how the finished structure will look, whether it has any distortions, and whether the distance is correct;
- now flax thread is used, it can be replaced with fum tape, it helps to complete the screwing of the pipes, giving them the desired position (this will help make the connection as tight as possible);
- the next stage begins if the pipes are ready, then a mixer is installed on them;
- To ensure the installation is correct, rubber gaskets are used between the mixer and the pipes;
- After this, the nuts are tightened by hand; they must not be tightened too tightly, otherwise the rubber bands will be damaged.
This way, the independent installation of the mixer will be completed; you can use a tow wrench to turn the nut for the last time. The finished work must be checked for reliability; to do this, just open the tap a little; if there is no leak, then the pressure should be gradually increased. The last step is to connect the shower hose and the water outlet pipe to the mixer.
We recommend reading: 50 tips on how to choose stylish and reliable plumbing fixtures for your bathroom (video)
Wall mounting
We have already looked at how you can change the faucet in the bathroom, now it’s worth taking a closer look at how to install the faucet on the wall. First, you will have to partially remove the tiles from the wall to carry out dismantling. You should also prepare all the required tools to carry out this work. The installation in this case is practically no different from the previously described option, but here you will have to take into account the installation of fittings on the wall:
- a central distance of 150 mm should be maintained between the fittings, and it is important to ensure that they are parallel to each other;
- when the installation is completed, the extreme points of the fittings must be flush with the wall surface;
- the fittings are located on the wall surface so that the mixer is comfortable to use; it is best to use the side of the bathtub as a guide;
- when the installation of water pipes is completed, the threads on the fitting are used for unsoldering.
If the walls in the bathroom are made of ordinary plasterboard, then the fittings should be soldered in such a way that they extend beyond the outer edge by about 25 mm. The output is then fixed using mounting brackets and profiles.
Installation in the bath body
You can consider the option of changing the faucet in the bathroom yourself by installing it directly on the bathroom body. This option is usually used if there is no desire to spoil the renovation, or if the sink and bathtub are located next to each other. These faucets are not only easy to use, they also look very attractive.
To install a faucet in the bathroom, you first need to make a hole, but it is better to purchase a product with a ready-made faucet connector. Installation does not take much time:
- A rubber gasket is placed on the mixer body, and tubes from the device are threaded into it;
- the tap is inserted into the hole in the bathtub;
- An additional gasket should be installed at the bottom and the mixer should be secured with a nut.
Recommended reading: How to clear a clog in your bathroom
This is a very simple option on how to replace the plumbing fixtures in the bathroom with your own hands; if you strictly follow the instructions, there will be no problems with installation. Once the faucet is installed, you can check the operation by first opening the faucet at minimum power. If no leakage occurs, the pressure is increased gradually to the limit.
Faucets on a separate stand
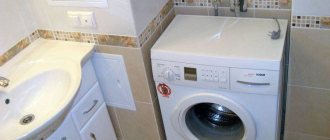
If you need to choose a stylish option for replacing a bathroom faucet, you can use a faucet on a separate stand. Installing the equipment is complicated because it is necessary to bring the pipes to the floor, and if the repair has already been completed, then all that remains is to move the pipes to a corner and disguise them. The rest of the process is no different from installing the faucet on the wall.
It is worth noting the fact that such faucets have a high cost, but it is justified by the original design of the faucet, which can emphasize the style of the bathroom.
The installation process is not complicated; even those who have never installed a faucet can handle it. But here it is important to be careful and attentive. After installation, you should check the reliability of the structure; to do this, open the valves of the pipes with cold and hot water; if there are no leaks, then the tap can be used. The reliability and durability of the crane will depend on the quality of the design.
Required Tools
It is important to prepare in advance all the necessary tools for replacing the faucet, so as not to waste time in the process, being distracted by searching for a key or screwdriver.
You will need:
- adjustable (gas) wrenches;
- open-end wrenches;
- screwdriver;
- FUM tape.
Instead of the latter, you can use tow (linen) with oil paint or silicone. But in this case, the mixer cannot be used for at least a day after installation.
If the old faucet has not been changed for many years and is clearly rusty, then VD-40 liquid (“liquid key”) may be needed for dismantling. Pliers and a small hammer will also come in handy.
How to remove a bathroom faucet
When replacing the mixer, it is important to pay attention between the centers of the eccentrics: it should be 150 mm.
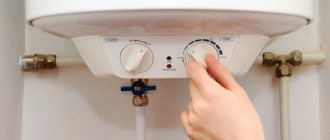
Before starting work, you need to turn off the water. In ordinary city apartments, the corresponding valve is located under the sink or bathtub. In private houses there may be a separate box located in a corner or in another room altogether.
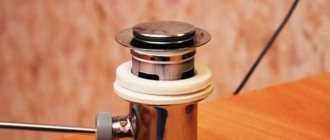
The drain hole in the bathroom must be closed with a stopper to prevent small parts from falling into the drain. You should put a large thick rag on the bottom in case you accidentally drop the tool from your hands.
To unscrew the nuts, use an adjustable wrench or a regular open-end wrench of the appropriate size. If they hold tight, then you will have to make an effort. You may need to spray the structure with liquid key.
It is not recommended to try to unscrew the nuts with sharp jerks. Movements should be strong, but smooth and accurate. If your hands are not strong enough, you can try tapping the key with a hammer.
If the eccentrics have not yet worn out, and the holes of the old and new mixers match, then they can be left.
After dismantling, you need to unscrew the decorative cups (“reflectors”).
How to properly install a bathroom faucet
When installing a new faucet, you must use the tools carefully so as not to scratch them.
Step-by-step installation instructions:
- Eccentrics are used to level the position of the mixer in the horizontal plane. Therefore, before the main installation, you must first place the tap on the eccentrics without tightening the nuts and check its position. If it turns out to be slightly tilted to one side, then you should tighten the eccentrics to level the position. To twist, you can use an adjustable wrench or pliers.
- Screw on new decorative cups.
- Wind FUM tape onto the threads of the eccentrics.
- Insert spacers inside the nuts.
- Place the mixer and tighten the nuts by hand, lightly.
- Check the position of the tap. If it is crooked, then you need to unscrew the nuts and decorative cups and align the eccentrics.
- Place the mixer and tighten the nuts, first with your hands, then with a wrench.
- Connect the watering can (shower) to the hose by inserting the gasket.
- Insert a gasket into the other end of the hose and screw it to the mixer.
- Screw on the gooseneck, not forgetting the gasket.
- Remove the rag from the bathtub, turn on the water and check the operation of the mixer.
After installation, the first time you need to monitor whether water is flowing. If there is a small stream, you can tighten the nuts a little.
How to disassemble faucets of different designs
There are different types of faucets in apartments. Previously, only two-valve ones were installed, but they are now being replaced by single-lever ones. To disassemble the product, you should know how it works.
Some owners prefer old designs that continue to be produced. The design of the control equipment of these 2 types differs. There are also differences among single-lever types of various modifications.
Prepare the necessary tools:
- pliers;
- screwdrivers;
- hexagons;
- spanners.
It is impossible to say the exact dimensions of the tools - each manufacturer has its own screws and nuts.
Single lever device
The main part of devices of this type - the cartridge - is located in the housing and is secured with a nut. It distributes hot and cold water and regulates the flow strength. They are changed by turning and lifting the handle.
This unit can be ceramic or ball. The first has washers that align to varying degrees with the holes in the body, which affects the temperature and pressure of the water. The design of a mixer with a ball assembly is slightly different, but the operating principle is the same.
Before disassembling, turn off the water and drain the residue.
To remove the cartridge, disassemble the upper part of the mixer.
The order is as follows:
- Carefully, so as not to break it, pry off the plug on the lever with a knife. It is colored red and blue, which indicate where to turn the handle to open hot or cold water. Another purpose is to hide the screw that secures the handle to the stem.
- A thin screwdriver or hexagon is inserted into the opened hole - manufacturers have different screw heads. They unscrew the screw - just a few turns, it is not long.
- Remove the lever. Here you may encounter the problem that it cannot be removed. Do not pull, much less press with a screwdriver - the decorative trim will bend. The handle is stuck with the resulting coating, you need to drop a little oil or pour boiling water over it.
- Unscrew the fixing nut. It almost always yields to the efforts of the hand; if it doesn’t work, use a key. Do not press hard - the part is fragile.
- Remove the cartridge. If you plan to replace it yourself, take pictures or sketch the situation. This will help beginners install the new part correctly.
There is no further need to disassemble anything; the unit is not repaired, but only replaced.
Another problem with mixers is low pressure even with the lever fully raised. To solve it, unscrew the nut from the nose of the gander. Next, remove the filter mesh from the tap spout, rinse it and install it in place.
Two-valve device
The design of devices of this type has been developed a long time ago. The body is made of stainless steel or brass, the streams are mixed directly in it. The shower mixer has a slide valve through which water is supplied to the shower head.
To disassemble and reassemble the mixer, it is important to understand the design.
By rotating the valves, the crane axleboxes are moved, opening access to the holes drilled in the body. A tight fit to the seats is ensured by rubber gaskets or ceramic discs that block the water.
Breakdowns of two-valve taps occur due to wear of the seals; water flows in the closed position. Leaks can also appear from under the union nuts.
Disassemble in the following order:
- Remove the plastic covers on the valves. Unscrew the screw and remove the lever.
- Using a wrench, unscrew the valve axle boxes. The soft brass from which they are made can be easily damaged, so do not use unnecessary force, but treat the threads with WD-40.
- Inspect the crane axle boxes. If the gaskets are rubber, install new ones. Replace the ceramic fittings completely - they cannot be repaired.
The faucet with the shower switch is a little more difficult to disassemble. It is removed by unscrewing the clamping nuts and changing the gaskets. Some designs of three-way mixers are non-separable.
Mixer with shower
The single-lever faucet has a built-in switch that changes the water supply: to the gander in the bathtub or shower head.
When the spool gaskets are worn out, water flows out of 2 devices at the same time. If the rod spring in the switch is worn out, it will not return to its original position. In both cases, disassembly of the plumbing is required.
To disassemble the switch, proceed in the following sequence:
- lower the mixer lever, turning off the water;
- disconnect the shower hose;
- remove the cover;
- unscrew the screw;
- remove the switch;
- remove the spool from the housing.
Replace worn gaskets. If there is a problem with the spring, remove it and install a new one.
Disassembling the ball valve
Faucets of this type last a long time.
Faults that can be eliminated are low pressure and leaks.
In the first case, unscrew the nut on the spout and clean the filter. The second defect is associated with worn sealing gaskets.
The ball valve design has a long service life.
To replace them, disassemble the mixer:
- Remove the plug and unscrew the handle fixing screw.
- Carefully remove the lever so as not to damage it and other parts that are extremely fragile.
- Remove the dome and unscrew the plastic nut. In its lower part there is an o-ring that can be cleaned or replaced.
- The ball element is removed. It cannot be repaired: if damaged or deformed, it must be replaced.
- Using a thin screwdriver, remove the lower seals with springs. They change as a set.
When installing new gaskets, apply silicone grease to them.
Disassembling a Grohe faucet
Grohe appliances rarely have to be disassembled - they are reliable. If the pressure is low, the reason is that the filter on the spout is dirty. If a metal mesh is installed there, perform manipulations similar to those with all mixers in this case: unscrew the nut and wash the mesh.
New models have silicone pads on the filter. If the filter is clogged, rub it with your finger and the pressure is restored.
If water flows from the shower and faucet at the same time, the spool gasket is worn out.
Disassembly order:
- shut off the water;
- dismantle the shower hose;
- remove the adapter with the drain;
- unscrew the screw securing the lever;
- remove the eccentric;
- remove the spool;
- Using a thin screwdriver, remove the gaskets.
GROHE faucets are characterized by a long service life of their components, and repairs are rarely required.
After replacing the rings, assembly is carried out in the reverse order.
The peculiarity of Grohe models is that it is not possible to dismantle flexible supply hoses in the same way as in other faucets. The connection is not threaded - internal fixation is used.
It is necessary to disassemble the tap:
- Remove the handle. The hexagon is predominantly used.
- Remove the cap. It can be threaded or tightly inserted into the housing.
- Unscrew the screws and remove the cartridge.
- The seals are removed from the liners.
- Remove the clamp holding the hoses in the housing.
The video demonstrates the subtleties of the process of disassembling a Grohe mixer.