A washing machine is an indispensable assistant in the home. It is known that its functionality and ease of use will depend on the features of the installation. The slightest error in connection or incorrect location can lead to breakdown of the unit and other unpleasant consequences.
How to connect a washing machine to the water supply in the bathroom, how complicated is the process and where should it be placed in the house? It's worth looking into it in more detail.
Where to put the washing machine
You should think about this in advance, even before purchasing:
- imagine how much space the machine will need;
- decide on the model and its dimensions;
- calculate the optimal dimensions of the unit;
- draw (imagine them) the location of all the main items in the kitchen or bathroom (depending on where the installation will be made);
- see what washing machines are available for sale;
- purchase a suitable one and install it, connecting all communications.
Installing a washing machine in the bathroom/kitchen is a serious matter that requires knowledge. The main thing here is not the choice of space for it, but the correct connection of all the necessary systems - water supply, electricity.
The rooms where the machine is most often placed are the bathroom or kitchen. Moreover, a washing machine is placed in the kitchen if the bathroom is very small. Wealthy people who have large houses or apartments can set aside a separate room for washing and drying clothes. Most people are forced to install a washing machine in the bathroom or kitchen.
Accommodation options:
- Under the sink - suitable if the door is located opposite it, and the bathroom itself is on the right/left. The sink may need to be replaced. Pros - saving space, minus - the need to look for a small machine that can fit there, the difficulty of installing communications.
- Opposite the sink - suitable if the door “looks” at the bathtub and the sink is on the side. But the space remaining free under the sink can be occupied by a cabinet where all the necessary detergents and a laundry basket will be stored.
- In the corner - hide the washing machine in the bathroom where the shower is located, especially if it is corner.
- In a niche - it remains when people combine the bath with part of the corridor. Then, instead of a rectangular one, you can choose a rounded bathtub or replace it with a shower stall. This will free up space where it is convenient to place a machine and a small sink.
- Above the toilet - arrange a special niche above it for the unit. This design seems inconvenient, however, if you think through the design, it can turn out to be an interesting option, both from the point of view of design and space saving.
- Under the cabinet - select a small corner, put a washing machine there, and order a special cabinet on top. At the same time, the problem of placing sanitary supplies will be solved.
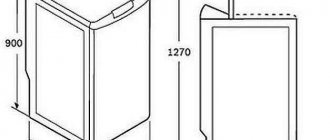
When choosing a machine, you should measure the width of the opening near the bathroom in advance. The width of the machine must be smaller, otherwise it will not fit.
Installation and connection of a washing machine in the bathroom
Unpacking equipment
We'll start from the very beginning - with unpacking the equipment that was delivered home. This must be done carefully so as not to tear the box in which the car arrived home. If you damage the packaging, it may not be accepted even for warranty repairs. Therefore, carefully open the box, remove the protective foam layer from the machine - a special plate, and take the washing machine out of the box.
Now you will need to remove the transport bolts, of which, depending on the model of the washing machine, there may be 3-6 pieces. They are located on the back panel of the washing machine and can be easily unscrewed with a key of a suitable diameter. The bolts are taken out together with rubber bushings, and special decorative inserts are installed in the holes. After this, the washing machine mechanism is completely ready for use.
Installing a washing machine by level
The next process, and one of the most basic, is the level installation of the washing machine on the floor surface. Remember that the washer should not swing, otherwise it will not function properly, and this will easily lead to rapid wear of some parts.
The uniform installation of the washing machine occurs thanks to the legs on its base, which simply screw in and out, changing the distance of the machine from the floor. With their help, it is very easy to adjust the installation height and the level of the machine relative to the horizontal.
Correct installation can be checked with a level, or you can use a simple method - press it onto the top of the car in the corners, sequentially. If the machine does not wobble, then it is installed correctly.
Be sure to use special anti-vibration mats for washing machines, which will help not only stop the washing machine from “dancing” on the bathroom floor, but also prevent excessive wear on the equipment’s mechanisms.
Connecting the washing machine to the sewer
Now that the machine is leveled, it must be properly connected to the drain so that during washing the equipment does not have problems discharging waste water. This can be done in two ways - by organizing a simple water drain into the nearest bathtub or sink, or by doing everything correctly by connecting the washing machine hose to the sewer.
Draining water into a sink or bathtub can be organized very simply, and this is very convenient if the laundry has accumulated and the system connection has not yet occurred. To install such a drain, use a special hook from the washing machine kit, which snaps onto the water discharge hose and is thrown over the side of the sink or bathtub. The main thing is to maintain the correct height of the hose, which according to standards (for draining water from a washing machine) should be between 40 and 90 cm.
But, it would be more correct to immediately discharge water from the washing machine into the sewer. To do this, all you need is nothing - installing a special adapter for the sewer and connecting the washing machine drain hose to it. If the sewer pipe is far away and the machine hose does not reach it, you can always extend the hose a little, using, for example, metal-plastic or polypropylene pipes and several adapters.
Connecting the water supply to the washing machine
Following the specifications, connecting water to a washing machine is as follows. The equipment kit includes a special hose that is screwed to the back panel of the washing machine, onto the water inlet hole. The hose is screwed on very simply - pressed against the hole and tightened with a plastic nut. The other end of the water supply hose is connected to the water supply, but if it is not enough, we extend the hose in the same way as the sewer one.
When connecting the water supply to the washing machine, be sure to make sure that there is a shut-off valve in front of the washing machine to turn the water supply on/off.
Connecting the washing machine to the network
All we need is a safe outlet of 220 volts and 16 amps, where the power cord of the washing machine will be connected. After connection, the washing machine is completely ready for use.
Before starting a full wash, it is advisable to check the connection by running the machine without laundry, so to speak, for an idle wash. While filling with water, you must ensure that there are no leaks at the inlet of the machine. Next, you drain the water from the washing machine and pay attention to the sewer drain connections, where, if connected correctly and with high quality, there should also be no leaks.
Preparation for installation
The procedure for installing a washing machine in the bathroom begins with preparing the unit itself. In the store, several locking transport bolts are installed on the machine - these secure parts of the mechanism, increasing the safety of transportation. In particular, the bolts hold the drum, preventing it from dangling and damaging other parts (bearings, for example).
Recommended reading: How to create the perfect guest bathroom
The bolts must be removed after delivery. This is not difficult, you will need a 10ka key. They need to unscrew the bolts and pull them out, not forgetting the plastic bushings.
Examine the place prepared for the machine. Wipe the surfaces, level the floor (place something under the legs of the unit if necessary).
Study how to connect the machine, inspect the walls - if there is mold on the seams, then treat them with an antifungal agent. It is advisable that there is a free outlet nearby.
Leaving the bolts will lead to rapid failure of the unit.
After studying the instructions supplied with the machine and removing the bolts, you can begin installation.
Choosing a location for installation
The washing machine can be installed in any room of a country house or apartment where sewerage and water supply pipes pass nearby. It all depends on the wishes of the owner of the house and its size. Many people place this device in the bathroom because it meets many requirements:
- you can easily connect to the water supply;
- there is a sewer pipe nearby;
- availability of power supply network;
- If you accidentally spill water on the floor, you can quickly clean it up without worrying about the moisture getting to your neighbors.
A bathroom with a washing machine fully meets the above requirements.
Before installing the device, it is necessary to ensure the availability of the necessary systems for normal operation.
For normal and safe operation of the washing device, it is necessary to follow the following instructions:
- Its location should leave room for free passage.
- The steel parts of the washing unit should not come into contact with metal elements - bathtub, radiators, water supply and heating pipes, because this can lead to a short circuit.
- The design of a bathroom with a washing machine should be harmonious and consistent with the style decision.
The most important requirement for safety measures when operating a washing machine is the presence of reliable grounding.
In houses where modern electrical wiring is installed there is a grounding contact. If it is not there, then this connection must be made separately, because the washing machine is connected to a network with a voltage of 220 volts. This can be dangerous for the health of everyone in the house, and especially children.
Methods for connecting to the water supply system
The washing machine requires constant access to water and electricity. The user himself chooses how he will connect the unit. It all depends rather on skill and experience, as well as the location of the pipes in the bathroom.
Connection to a metal pipe
Insertion into the wall of a water pipe. A special mortise clamp is installed on the pipe (you can use a crimp coupling instead). The device has a small hole on top where the machine hose is then attached. Through it, water will flow into the washing unit.
Connection process:
- first you need to close the faucets, turning off the valve so that water does not run out;
- thoroughly clean the section of pipe selected for laying, removing any remaining paint, and sand it;
- The tip of the bushing is carefully inserted into the clamp and securely fixed in the area of the gasket cutout;
- attach the assembled clamp to the desired section of the pipe, secure it with 4 bolts and tighten them, turning with a wrench, until the gasket is finally attached tightly to the pipe itself;
- Through the hole inside the clamp, carefully drill a part of the pipe wall with a drill (a drill of 6-8 mm in diameter will fit there).
When finished, place a small container or rag under the clamp, now smoothly turn the valve at the shut-off mixer. Water will immediately flow out of the hole. When it has all drained, clean the hole and then fix a new tap there, at the same time checking for leaks.
When the pipes are metal-plastic, it is better to replace the usual clamp with a tee fitting. The installation mechanism is simple - just turn off the water, attach the fitting, mark the places for cuts, and cut out the desired piece of pipe. The resulting opening is closed with a fitting, supplemented with seals. Then connect a simple ball valve.
Connection to mixer
The faucet is equipped with a separate hose extension for hot water. The connection method is now quite popular due to its accessibility and speed of application. If the mixer is European, then the connection will be quick - you need to disconnect the hose (cold water), screw the tee tap onto the eccentric on top. Hole 1 – mixer hose, hole 2 – machine hose.
Recommended reading: How to choose the right garage door
If the mixer is domestic, then, having disconnected it, you need to unscrew the eccentrics and insert a pass-through valve with its extension.
Connection to taps to a tank or mixer
It is considered the most practical and affordable installation method. The taps are mounted, turning into “pipe-hose” type connections; they are needed to supply used water either to the tank, or to the water heater, or to the mixer. It is more convenient to install the faucet in the space between the water supply pipe and the faucet from the tank. If the connection point is the water heater area, then it is better to install the pass-through valve in the space between the pipe and the main valve.
Connection procedure:
- turn off the water;
- turn off the tap (cold water);
- take a tee tap, FUM - tape, wrap it around the external thread, screw the tee in place of the previously removed tap;
- Occupy 1 hole of the tee with a mixer hose, the second with a machine hose.
The machine can be connected to an existing outlet from the riser.
Unpacking and checking contents
First of all, you need to familiarize yourself with the technical documentation. Modern household automatic washing machines are complex electronically controlled equipment. It is necessary to comply with all manufacturer's requirements in order not to lose the right to warranty service in case of repair.
The work order is as follows:
- Remove the machine from its original packaging.
- Unscrew the transport bolts that secure the drum during transportation from the seller to the buyer. They are located on the back wall, turn to the left, and the holes are closed with plastic or rubber plugs.
- Check the presence of the water supply hose. Its standard length is about 1.5 meters. If the length is not enough, buy hoses of the required size.
- Reinstall the washing machine. First, it must be checked for horizontal installation. You can use a water level for this. If there is none, take a plate and pour water into it. Turn the adjusting screws until the water is equidistant from the edges of the plate.
- Secure the screws with locknuts so that they do not change their position due to vibration during spinning.
The washing machine is ready for connection and operation.
Methods for connecting to the drain pipe
Connecting a new machine to the sewer system is not difficult, the main thing here is to follow the instructions. The user selects one of the three options presented.
Plumbing drain
It may be inconvenient, but it is the most practical of the options. A horseshoe-shaped plastic holder will be included with the purchased machine. After installing the machine itself, the element is attached to the side and the end of the hose is threaded there. Through it, dirty water is directed into the bathtub/toilet, depending on where the holder is attached.
Pros - there is no need to waste time installing a drain.
Minuses:
- when the hose is weakly fixed, the water pressure can drop it;
- the toilet will be busy until the machine drains all the dirty water;
- the choice of location for installing the unit is limited by the actual length of the hose plus the distance to the drainage point;
- plumbing gets dirty faster.
Draining through a siphon
After installing the washing machine under the bathroom sink, you can at the same time connect its drain to the siphon located there. You need to purchase a special siphon with a pipe on the side and replace the old one with it. Then connect the end of the hose to that pipe. The input is prudently located higher, at a special angle.
We recommend reading: An important step in the lives of many is buying an apartment
Minuses:
- Sometimes the “aroma” of sewerage leaks through the hose; it is advisable to use a water seal system;
- The siphon may not be able to withstand strong pressure, then the water, on the contrary, will pour up into the sink.
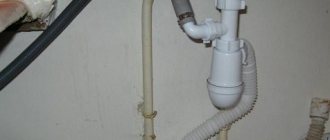
Drain into the sewer
It is considered the most reliable, but difficult option. You will need a tee with a special oblique outlet, as well as a check valve (in other words, an anti-siphon). One side of such a valve is attached tightly to the end of the drain hose, and the second is attached to the tee and further to the main sewer pipe.
It is better to place the inlet at the drain hose at an angle, directing from top to bottom.
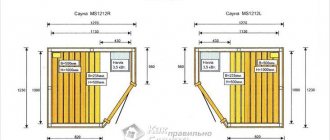
Where to put a washing machine in a small bathroom?
Spacious rooms leave room for imagination, but how can owners of “Khrushchevka” apartments, modest in size, install equipment? New items in the furniture industry, miracles of technology, plumbing, finds, and inventions of folk craftsmen will help you find an original solution.
Traditionally, the main massive element is placed along the room. There is still a narrow area at your disposal where you need to “squeeze” a washbasin, a cabinet with household chemicals, cosmetics, and a laundry basket. Where can you install even the most compact washing machine? Here are some options for a small bathroom.
Under the bathroom sink
The “washing machine plus sink” combination will help free up space. A special water lily sink is installed above the device. The drain pipes of the “tricky” washbasin are not in the center, but in the back wall. This leaves room for maneuvers during installation and operation of the machine, making it safe.
- the area of the sink should be larger than the body of the washing machine;
- the drainage system is located behind the equipment;
- the gap between the washbasin and the device is 2-3 cm;
- connection to the water supply is made by a special siphon with two pipes.
How to hide a washing machine under the sink?
If the washing machine does not harmonize with the interior of the bathroom, it can be hidden under the washbasin using the doors of a special cabinet, or covered with a curtain.
Common table top
By building the machine under the countertop, you can increase the capacity of the washbasin and free up access.
Unusual placement of the washbasin
Are you the owner of a bathroom with a narrow drain? You can hang the sink above it. This will not affect ease of use, but will free up space. Such “non-classical” plumbing fixtures of an original form will help to rationally “beat” any interior.
Shower stall
Do you prefer showering to other procedures? Install a shower stall instead of a bathtub. Such a replacement will help rationally plan the space and give the room a modern look.
Combination of bathrooms
From two small “closets” you can make one spacious bathroom, in which there will definitely be a place for washing equipment. Such redevelopment requires permission from utility services. If the wall between the restrooms is load-bearing, be prepared to receive a refusal.
Between the bathroom and the toilet
A combined toilet allows you to place a washing machine between the plumbing. It is convenient, compact, practical.
How to close a washing machine?
Does the appearance of the equipment contradict the design solutions in the interior? How to hide the facade of the case and protect it from moisture? A cabinet (box, tall cabinet) or niche will help you.
Cabinet for washing machine
This solution kills two birds with one stone:
- the machine is hidden, protected by doors;
- additional shelves and compartments for storing detergents, household items, and dirty linen make housekeeping easier.
Niche for a washing machine
A new trend in modern renovation is a separate niche for a washing machine. It is easy to make it yourself from any material (foam block, tiles, drywall, chipboard). The main thing is to take into account the size of the unit when planning and performing work. Leave side gaps of at least 3 cm, take into account the distance and location of the holes for the output of communications. The upper free space can be equipped with shelves.