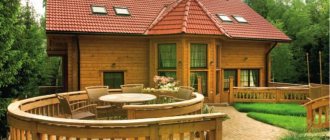
When the question of building a bathhouse arises, the first association that the minds of most people draw is a solid wooden frame with smoke pouring out of the chimney on the roof. Therefore, wood remains a traditional material for the construction of such objects, especially considering the achievements of modern technologies for its processing, and thanks to its high performance characteristics, it has practically no competitors.
Moreover, it is both economically and technically beneficial if you build a bathhouse from rounded logs with your own hands, a material that has undergone a drying process and special treatment with compounds that prevent the development of mold and other microorganisms, as well as increasing its fire resistance.
There is a similar article on this topic - Log house: technology and the secret of popularity.
Types of bath structures
We will analyze various types of bathhouse design, both as a separate building and in combination with others.
Freestanding
The construction of a full-fledged bathhouse in the country is a costly construction.
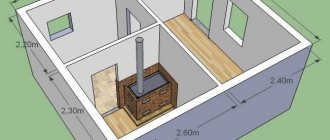
Such a bathhouse is a separately equipped building with three main rooms:
- steam room;
- washing (shower);
- dressing room (dressing room).
If the area allows, then a recreation area, living room, bedroom, and dining room are additionally equipped. There are projects of two-story baths and with an attic.
A bathhouse made from fresh logs or timber looks great. Cheaper than wooden structures made of foam concrete and cinder block.
For a small building, a lightweight columnar or pile foundation is sufficient. Recommended roof type - gable .
For year-round use, you will have to think about heating. To do this, you can install a compact stove using wood, gas, or electricity (your choice).
The disadvantages of a separate bathhouse are the high consumption of building materials and the fact that it takes up a lot of space on the site.
The advantages are that this is a separate room for relaxation and bathing procedures do not interfere with other residents.
On the first floor of the house
The construction of a bathhouse under the same roof as a residential building can significantly save free space in the yard.
The rooms inside the house are effectively used. The living room will also serve as a relaxation room. The bathroom serves as a washroom.
Inside the house, a room is simply allocated for a steam room. Other rooms are already included in the building layout.
A decision about arranging a steam room in a private home needs to be made at the drawing development stage.
The advantages of this layout:
- Saving space inside the yard. This is especially true for areas with small areas.
- You don't need to go outside to move between rooms.
- There is no need to make a separate heating system.
- Minimum construction costs.
Minuses:
- High fire hazard. Provided that all fire safety rules are followed, there is always a risk of an unexpected fire.
- A high-quality vapor barrier is required.
- Installing a complex ventilation system will be expensive.
Since there is high humidity in the steam room, this entails a special approach to waterproofing the room and choosing materials for finishing.
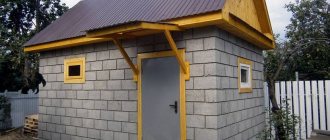
Extension to the house
Builders recommend attaching a bathhouse to a house when it is made of brick or foam block. It is unsafe to make an extension to a building from timber or boards. You can use the summer terrace area for the sauna or pour a separate foundation.
It is recommended to complete the construction of the bathhouse at least two years after the shrinkage of the residential building.
It will be convenient to lay the necessary communications into the room and connect the heating system.
Protection against high humidity is carefully thought out. If the floors are wooden, then the wood will need to be treated with fire retardants (protection from fire) and antiseptics (from rotting). When using a wood-burning stove, debris and fumes from the firebox may enter the house, so cleaning will have to be done more often.
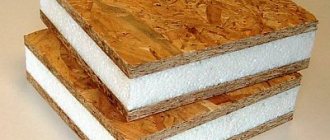
Photo: extension to a house made of OSB. Can serve as both a veranda and a bathhouse.
Before laying the flooring, it is important to consider the location of the drain so that moisture is promptly removed from the room.
Combined type
Photo: bathhouse with gazebo
To expand the functions of the building, the bathhouse is often combined with other buildings:
- terrace;
- gazebo;
- summer kitchen;
- garage;
- utility unit;
- barbecue area.
A simplified version is a bathhouse with a porch and vestibule.
Photo: project of a brick house with a bathhouse and a garage
One of the most popular projects among summer residents is a combination with an open or closed terrace or veranda. The room is equipped with a barbecue, a stove, and a table with chairs is installed in the center of the room.
There are two-story complexes with a balcony or attic, with an indoor pool. For convenience, a garage is attached to one side.
In villages it is common practice to combine a bathhouse with a summer kitchen. The room is divided into a cooking and eating area. The structure is most often assembled from budget materials (boards, slabs, blocks) and used according to the season.
On wheels
A modern mobile type of steam room. Many owners have turned it into their own small business, providing on-site bathing services.
Inside there is a steam room, a mini-bathroom and a changing room; in economy class buildings there is only a steam room.
It is customary to build a structure from lightweight lumber for easy transportation.
Caravan
A simple mobile bathhouse. Building it yourself will be inexpensive.
It is allowed to install the trailer directly on top of the soil or shallow foundation.
In standard layouts, the area is small, so if you plan to vacation with a group of more than four people, it is better to choose other layouts.
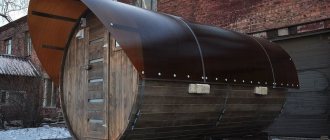
Barrel
The non-standard shape and arrangement of the bathhouse is gaining popularity among owners of suburban areas. The barrel takes up little space and is suitable for constant use.
A potbelly stove is used for heating. When installing on the ground, arranging a foundation is not necessary. To strengthen the frame, metal rings are attached around the perimeter.
A round bathhouse decorated with wooden clapboard looks beautiful.
Temporary
A homemade temporary shed is cheap, requires a minimum of building materials, and is assembled quickly.
Used only in warm weather. The wooden frame is often simply sheathed with plastic film.
Another option is a tent. It is used temporarily for one-time use, and then collected. Suitable for country or outdoor recreation.
The undeniable advantages of rounded logs
So, by choosing a rounded log for building a bathhouse, you can get the following bonuses:
- structure made of environmentally friendly natural material;
- tight fit of logs;
- controlled shrinkage process;
- a wider thermal lock, unlike round timber, which contributes to more efficient heat retention;
- reduction of construction time due to a shorter shrinkage period (from 3 months to six months).
In addition, the unique properties of wood are completely preserved, such as:
- low thermal conductivity of the material;
- ensuring natural air circulation;
- vapor permeability;
- durability, for example, a bathhouse built from high-quality material will quietly stand for at least half a century, without requiring any repair work;
- relatively low construction cost, depending both on the price of the material and on the work associated with the assembly of the log house. In addition, it is quite possible to do this work yourself, which will allow you to significantly reduce costs.
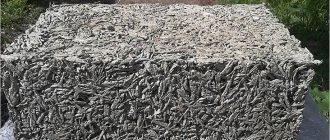
Thickness of rounded log
The industry produces calibrated wood products from 18 to 32 cm, and upon special order even larger diameters.
But the most popular logs are those with a diameter of 22, 24 and 26 cm, which are optimal both from the point of view of thermal conductivity of the walls being built and from the economic point of view, because additional “cubes” mean additional construction costs.
Sometimes, owners of country real estate, considering the bathhouse an auxiliary building on the site and trying to save money, choose a 20 or even 18 mm log, but this is completely wrong , given the functional purpose of the object, as well as the requirements for its ability to retain heat. Many reviews of owners who “managed” to reduce costs in this way speak eloquently about this.
In such cases, the question may even arise about insulating the bathhouse , including the external one, but this is undesirable both for wood, for which the conditions for natural air exchange are deteriorating, and for the architecture of the object, since all the presentability and beauty of the natural material will be hidden, most often , behind artificial PVC panels, various “sandwiches”, bricks, etc.
In addition, the financial component should be taken into account:
- heating and maintaining the temperature in a bathhouse made of thin logs will require more energy and coolants ;
- if insulation is performed as necessary, the costs will be significantly higher than what would have to be spent on purchasing a rounded log of a larger diameter.
Nuances of frame construction of a bathhouse
Many owners do not want to spend a lot of time constructing the structure, but rather quickly assemble it and relax their souls and enjoy bath procedures. In this case, there is nothing to decide - the frame assembly technology is exactly what is needed.
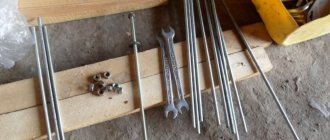
You will have to start by assembling the frame. The walls are made like a lattice. Materials you will need:
- timber of different sections;
- thermal insulation material;
- material for external and internal cladding.
In the latter case, the following will do:
- siding;
- block house;
- OSB;
- edged board;
- lining.
For the frame, it is recommended to take boards from larch and aspen. They are more resistant to moisture and have low thermal conductivity.
Basic construction steps:
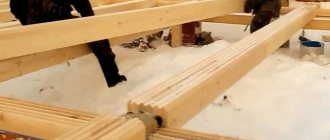
- The lower frame of the beam is assembled. Dimensions - 100*100 mm. Holes are drilled at the ends of the material. The elements are fastened together with self-tapping screws. When using timber of smaller dimensions – 50*100 mm, the elements are mounted end-to-end on metal corners.
- After this, a strapping board is installed at the end. Floor joists go right next to it (a 50*100 mm beam is suitable).
- On the other side, the logs need to be cut so that another end board stands up for strapping.
- The logs are placed so that it is convenient to attach the heat insulator between them.
- A timber measuring 50*100 mm is suitable for the wall frame.
- For vapor barrier it is better to use film, for thermal insulation - mineral wool.
Photo: frame bath project
Thermal insulation and wall finishing are carried out after the roof is attached.
If you don’t have time to build a bathhouse yourself, you can choose a project and order its installation. Small baths are delivered assembled.
Features of the finished product:
- Assembled on a wooden frame.
- The cladding is done with lining, profiled timber (optional).
- It consists of three rooms - a steam room, a shower room, and a dressing room.
- An electric heater is used for heating.
- The water tank is mounted on the roof. A drain pan is installed under the floor. The drains exit through the pipe.
Useful tips
In order for the bathhouse to be in working order for a long time, you need to know the subtleties when building a structure:
- Logs for the log house are harvested in winter. This is necessary because during winter harvesting the log undergoes less rotting and is resistant to various precipitation. To check whether the logs were harvested in winter, iodine is dripped onto them. A bluish spot should form.
- To ensure that the building lasts as long as possible, all wooden structural elements are treated with an antiseptic.
- To increase the thermal capacity of the structure and give it a beautiful appearance, it is necessary to fill all joints and gaps with tow. It should not protrude further than the logs, otherwise it will get wet and rot.
- If you choose the “foot-to-foot” method of fastening logs, it is necessary to protect the corner joints. To do this, they are sheathed with boards.
- It should be remembered that during shrinkage, the height of the building will decrease by 5 or 10 percent.
- Cutting the material to the center will help prevent cracks from appearing in the log.
- Caulk work is carried out in dry weather.
- They increase the stability of the structure and prevent the displacement of logs by securing them with dowels, installed in holes in the center of the logs.
Thus, making a log house with your own hands, although a complex process, is doable. In the video presented for this article you can find complete information on this topic.
Which place to choose for a bath
The norms for the distance of buildings are clearly stated in SNiP 30-02-97. This document regulates the construction of various types of structures in the country, in the village, in the city.
Among the main requirements for the location of the bath are the following:
- The distance to the neighboring fence should be more than 1 m.
- To any neighboring wooden building - from 15 m.
- The distance to a residential building on its site is over 8 m.
- Distance from the street, road - from 5 m.
- The distance to any structures made of non-combustible materials is from 6 to 11 m, to wooden structures with non-combustible cladding - 8-12 m, completely wooden - 11-15 m.
- The distance to the forest is 15 m, the nearest body of water is 5 m.
- The distance from tall trees is 4 m, from bushes - 1 m.
- A distance of at least 12 m will have to be made from a well or well with drinking water.
The best place to locate a bathhouse is considered to be the backyard. The ideal option is when it is the southern part of the estate - the building will be protected from the wind. The windows are facing west.
In addition, good ventilation and drainage should be considered.
Why do people love log houses?
- First of all, these are aesthetic and moral components. At first glance, a good-quality wooden frame inspires confidence in the quality of the construction. And a timely explanation that everything was done with one’s own hands disproportionately increases the authority of the owner.
- The ecological cleanliness of such a structure is beyond doubt. Moreover, such a steam room does not require any air fresheners or other similar things. The natural massif itself exudes the unique aroma of the forest.
- Existing projects of a bathhouse made of rounded logs with a barbecue, a swimming pool, access to a natural reservoir and other modern options can satisfy the most picky customer. Now there is everything, from a modest bathhouse on six dacha acres to serious complexes on two levels.
Log house with a swimming pool.
- Although a rounded log is a natural tree trunk, it has already been pre-processed. As a result, we obtain building material with clear dimensions. With the right approach, the instructions for assembling such a structure will not seem too complicated even for an amateur.
- Designs of bathhouses made of rounded logs that have developed over centuries, improved by new technologies, make it possible to build not only beautiful, but also very warm and durable log houses.
- Often, a bathhouse made of rounded logs with a veranda and attic can completely replace a country house or serve as a temporary shelter during the construction of a permanent cottage.
Project of a small bathhouse on two levels.
Opponents point to the susceptibility of the array to shrinkage, shrinkage and cracking. But this relates more to the quality of the pre-processing of the material rather than to inevitable defects.
It is difficult to argue when they talk about the high fire hazard of wood, although good impregnations and fire retardants are now being produced, after treatment with which the wood can withstand up to 20 minutes of direct exposure to an open flame.
Characteristics of wood.
Selection of materials for insulation and vapor barrier
When the bathhouse is combined with a residential building and is under the same roof, external thermal insulation is used to use the building all year round.
If the Russian bathhouse is a separate building, then internal insulation is enough.
In addition to insulation, it is important to provide high-quality vapor barrier protection for walls and other elements of the structure from moisture. The absence of a layer will lead to damage to the insulation and rotting of the wooden frame elements.
For vapor barrier use:
- Film. Thick film comes with or without a reinforcing coating. It costs little.
- Membrane. The non-woven fabric fits perfectly on top of the insulation and protects well from condensation.
- Foil coated sheets. Metal lavsan will help not only cope with moisture, but also retain heat indoors.
In frame structures, insulation is one of the stages of wall construction. The best material option is mineral wool.
Key requirements for thermal insulation in a bathhouse:
- hygroscopicity;
- environmental friendliness (the material should not release toxins when heated);
- low thermal conductivity;
- fire safety;
- ease of fastening;
- holding shape.
It is permissible to use the following insulation materials:
- Polymer. Suitable penoizol, polyurethane foam. Penoizol with a layer of foil is well suited for a steam room; it retains infrared heat radiation indoors.
Expanded polystyrene and its derivative polystyrene foam are prohibited for insulating steam rooms. They are flammable and release toxins when heated. They can be used to insulate the dressing room and rest room.
- Mineral. This category includes glass wool, mineral or basalt wool. They do not burn and do not emit toxins. This is the optimal solution for a bath. Minus - they can become saturated with moisture, so a vapor barrier will be required.
In frame buildings, organic heat insulators can be used - mixtures of gypsum, sawdust, expanded clay, and lime.
Determining the quality of wood for logs
But the quality characteristics of logs from different woods are not the same. That's why they differ in price.
Thus, most baths are built from coniferous logs - spruce or pine. They are inexpensive and have many advantages. That is why the best wood for a bathhouse is from northern coniferous species, which has a dense structure and does not change its properties due to high humidity or high temperature. Ideal in this regard are pine from the Baltic Sea and Canadian spruce. In second place are high-quality alder, aspen and linden wood. And a self-built bathhouse made from aspen or larch logs will last for 100 years, but it will also cost more - because the logs of this species are very strong, and this strength only grows over time.
By the way, all production of wooden building materials in Russia is concentrated in the northwestern regions, where there is an excellent raw material base. And today, quite a lot of different companies and intermediaries of manufacturers are engaged in the sale of these products - you can even order everything you need via the Internet. It is only important to draw up an agreement with the contractor, which will indicate in black and white the type of wood, its moisture content, length, type of groove and method of drying. And, if you have the opportunity to look at the proposed wood in advance, you should pay attention to the following characteristics that indicate quality:
- Low heat capacity
- Light or dark yellow tint of the log surface
- Pleasant soft smell
- Good sound absorption
- No blue spots on the cut
- Low thermal conductivity
- There are a small number of knots that sit inside without gaps - if there are any, it means the core is rotten.
- Resistance to splitting
- The cut of the log has a hard surface
The core of the log itself should be exactly three-quarters of the cut and at the same time have an even dark shade.
But what if the arriving logs look damp?
The reason for their dampness may be insufficient drying. In this case, it is better not to treat them at all - except with a transport septic tank. If this has not been done in advance, what should be specified in the contract. After that, you need to create a maximum ventilation mode. After all, if this is not done, the entire structure may shrink in the future - and longitudinal cracks will appear.
Step-by-step instructions for building a bathhouse with your own hands
Let's look at the main points of self-construction.
Site preparation
Consists in determining the type of soil. The choice of foundation depends on this.
Debris and vegetation are removed from the future site, the top 15 cm layer of soil is removed. Pegs are driven in around the perimeter and a rope is pulled.
After this, you can start digging holes for pillars, foundation pits, trenches (depending on the type of foundation).
Pouring the foundation
For a frame bathhouse, small, made of blocks, a columnar foundation will be enough. If it is made of brick, stone, logs, a monolithic concrete strip with a low level of penetration is more reliable.
Walling
In a structure made of blocks, it is necessary to start by leveling the base. The easiest way to do this is with a cement-sand mixture. After drying, the roofing material folded in half is laid (it will perform the function of waterproofing).
Laying should be started from the corners. The first bricks are placed and compliance with the plane is immediately checked. If they match, a rope is pulled along the upper edge, which will serve as a level for the entire row.
It is important to take into account that bricks are placed on a mixture of cement and sand, foam concrete blocks are placed on special adhesive mixtures.
Jumpers are installed at the location where the future door and windows will be installed. The formwork is attached to the top. An armored belt is created in which the foundation bolts are fixed in order to then secure the Mauerlat. As soon as the solution gains strength, it is allowed to proceed to assembling the roof.
Floor installation
In frame structures, the principle of flooring is simpler - insulation is carried out, a finishing board is laid.
In other types of structures, the installation order is as follows:
- Lag fastening.
- Creating a subfloor.
- Vapor barrier flooring.
- Fixing the insulation.
- Laying a waterproofing layer.
- Laying the finished floor - laying prepared boards.
The bathhouse has a concrete and wooden floor.
Craftsmen recommend making an insulated solid wood floor in the dressing room. In the shower and steam room, it’s better not to skimp - make a concrete shower and simply lay grates of boards on top, which are taken outside for drying.
It is not recommended to try to lay a flood floor yourself without experience. It should be done on a slope so that all moisture and condensation collect in one place. At this point there should be a sewer opening for water drainage.
To make the concrete floor look more beautiful, ceramic tiles are used. The tile will be very slippery. Wooden gratings can be placed on top if desired.
Roof installation
The choice of roof type depends on the complexity of the structure and terrain features:
- Gable. Suitable for densely populated areas, dacha cooperatives, where there are no strong gusts of wind. Reduces the load on the walls.
- Single-pitch. It is chosen when the bathhouse is an extension to a residential building.
In the steppes, in regions with strong winds, the roof is made at a slight angle.
The general procedure for installing a gable roof is as follows:
- Installation of the Mauerlat. The roof truss system is fixed on it.
- Flooring layer of waterproofing.
- Fastening the sheathing strips in increments of 1 – 15 cm. The exact figure depends on the choice of roofing material.
- Laying roofing materials (slate, corrugated sheets, roofing felt, bitumen shingles).
Don't forget to thermally and waterproof the ceiling. Otherwise, condensation will begin to gradually destroy the roof beams.
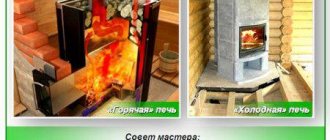
Bricklaying or installing a metal stove
Installing a full-fledged brick oven involves pouring a separate foundation for it. The weight of the furnace sometimes reaches 1.5 tons.
The brick oven is characterized by high fire safety and significant dimensions. It is capable of heating large areas and retaining heat for a long time.
For masonry, a mixture of refractory clay is used that can withstand high temperatures.
The downside of a brick oven is that it takes a long time to warm up and consumes a lot of wood. We recommend reading: “What mortar to plaster a stove so that it doesn’t crack.”
For small baths, a metal stove like a potbelly stove is suitable. Sold with or without built-in water tank. If there is no tank, then a horizontal oven is used.
A metal stove is compact, heats up quickly, and consumes much less wood than a brick stove.
The downside is that it is a fire hazard.
A protective screen is made of bricks around it. The nearest 1.5 m from the stove are laid on the floor with sheets of metal or other non-combustible material.
According to the principle of action they are divided into:
- Closed. The vertical one has 3 main parts: at the bottom there is a firebox, in the middle there is a heater, and on top there is a water tank. It takes a long time to heat up, but it also retains heat many times longer.
- Open. The stones are laid outside the furnace, in the public domain. To increase steam, they are watered with water.
Interior finishing and insulation
When the walls are built, it is necessary to begin thermal insulation of the walls. To do this, wooden blocks are mounted to the walls in increments of 50 cm. If the walls are made of blocks, then the bars are attached to dowels. Their width is selected according to the dimensions of the insulation. It is best to use mineral wool.
Insulation is placed in the spaces between the bars. A vapor barrier film or membrane is laid on top of it. It is better to fix it with a construction stapler.
The lathing is again made on top, already under the finishing material. Slats 2 cm thick are suitable.
The best finishing material for a bathhouse is considered to be lining made of linden, alder or aspen.
It is contraindicated to use softwood lumber in the steam room, as they release resin when heated. It is unacceptable to cover it with OSB and fiberboard sheets - they are deformed under the influence of moisture and emit harmful substances when heated.
What else is important to know: “How to properly install wiring in a bathhouse.”
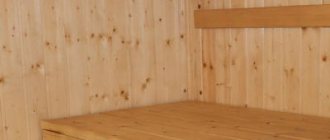
Installation of shelves
The shelves in the steam room are made of deciduous trees. The size calculation is carried out strictly according to the size of the room. A frame is assembled from timber, onto which a polished edged board and lath are mounted.
Exterior decoration
For exterior decoration the following are used:
- siding;
- block house;
- painting;
- decorative plaster;
- lining;
- facade tiles;
- facing brick;
- Wall panels.
The structure made of foam block and brick is finished with decorative plaster and clinker.
For plastering, make a mixture of cement and sand in a ratio of 1:4. The walls are covered with mesh. Apply one layer of mortar, then a second, rub it, give relief or level it. Give it time to dry. Paint it in the color you like. The siding will also look beautiful. Frame structures are covered with clapboard.
Walling
All logs for the walls will be placed on the framed crown. However, before laying the crown, it is necessary to ensure waterproofing. It can be two layers of roofing material coated with bitumen mastic. If the insulation consists of several pieces, they are laid with an overlap of 20 cm, sealing the joints. On top of the roofing felt, for additional protection of the lower crown, it is advisable to lay a board 1.5 cm thick, placing it with gaps of 2-3 cm. These indentations can later be foamed.
After this, the material prepared in advance with the selected connecting mechanisms must be laid on the frame. Laying is carried out according to the “butt to top” principle, that is, alternating the arrangement of the ends of logs with larger and smaller diameters from the lower element to the upper one. This is necessary in order to maintain the same height of the walls on different sides.
However, only connecting at the side joints is not enough. The entire structure must be fastened vertically using spikes. In diameter, they are made at the rate of 1/10 of the trunk width plus 2 mm. The depth of the tenon holes is equal to the thickness of two logs. The tenons are mounted 10-20 cm from each edge, and along the wall the distance between them is 80-100 cm. This fastening strengthens the structure of the log house so that window and door openings can be installed without complications. In addition, the spikes prevent the logs from mixing in the horizontal plane during the shrinkage of the log house.
You need to place insulation in the longitudinal grooves - batting, tow, moss or any other. It is desirable that the outside appearance of the walls be neat, and the excess can be removed from the inside.
The position of the logs must be strictly vertical. You can monitor this using a plumb line or level. In this case, the winter side should always be placed outward.
Note that during the shrinkage process, the height of the log house may change, so during the construction process it is made 15 cm higher than the planned value.