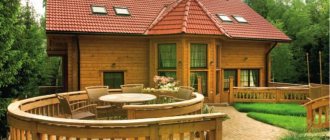
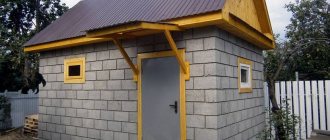
The humidity and temperature of the air, comfort and benefits for the body depend on the stove in the bathhouse. A sauna stove must be equipped with a tank for heating water, a chimney and a heater pocket for stones. If you have a great desire to build a sauna stove with your own hands, and not to hire specialists, be sure to read this article several times, you can even print it out on a piece of paper and use it directly as a cheat sheet. At the same time, you will save significantly and gain invaluable experience, which will allow you to build similar structures for money in the future. External decoration plays an important role, because a bathhouse is a place of relaxation, both physical and moral, and the appearance of the stove plays an important role in this! After external finishing, the stove in your bath should become its “highlight”, an exclusive decoration that is simply pleasant to look at, like a painting.
The sauna stove is placed either with a combustion door into the adjacent room, or directly into the steam room, where firewood is stored. Naturally, it is better for the firewood to be supplied from the next room; if the size allows you, do just that.
Water tanks are mounted either behind the stove body on supports (floor or wall mounting), or they are mounted directly above the stove firebox. At the same time, a stationary floor mounting of the tank is safer than a wall mounting.
Video instructions: how to weld a metal sauna stove with your own hands
Calculation of tank volume for a sauna stove
The volume of a water tank is calculated by taking from seven to ten liters of water with a temperature of at least fifty degrees per person. So, if you plan to visit a steam room with 3-4 people at the same time, you should choose a tank with a volume of at least 40 liters.
How to calculate the volume of the steam room and firebox of the stove?
It is not enough to measure the dimensions of the room. You also need to take into account the material of the surfaces. If the room has windows, a glass door, surfaces made of tiles, bricks, concrete, their area should be measured. For each square meter of area of such surfaces, add one and a half cubic meters to the volume of the room, which will be taken into account when choosing the size of the stove. The minimum power of a sauna stove is 8-10 kW.
Oven requirements
A sauna stove must be safe (both in terms of fires and for human health - not cause burns if accidentally touched and prevent smoke from entering the room), the temperature must be regulated, and the dimensions must correspond to the volume of the room.
Practical advice for choosing
When choosing a specific model, consider the type of fuel you will use. For example, a design of 350 or 30x205 mm is suitable for coal, and for firewood and briquettes - from 140x120 mm to 330x252 mm. The grate must be taken in such a way that the rods can withstand the maximum possible weight of one portion of fuel. You can check with the seller how much a particular model can withstand. If in doubt, consult a specialist.
In order for the grate to be well cleaned of ash, the gaps must occupy at least 40% of the area of the entire structure. If there are fewer of them, the firebox will work less efficiently, because the amount of incoming air is not enough for intense combustion. If there is insufficient ventilation, gases may accumulate. If the area of the gaps is larger, then unburnt fuel will be poured into the gaps along with the ash.
Round grates
Metal heater stove, is it suitable for a bath?
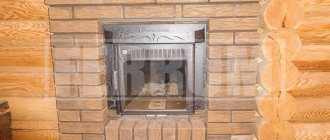
This furnace design is the simplest. For work you will need sheets of steel with a thickness of at least 5 mm, a welding machine and a grinder (or a gas cutter), pipes for water supply and drainage, refractory bricks, stove clay solution, stones, pipes for the chimney, tap, stove doors with latches and hinges, metal profile for mounting the stove support.
The structure itself consists of a water tank with pipes and a tap connected to it. The tank is heated from the back wall of the stove, the internal space of which, in turn, is zoned into a firebox and an open heater. Flue gases are disposed of through a chimney exiting the firebox through the heater and the walls of the bathhouse.
First of all, it is necessary to cut out the bottom and side walls of the future stove from steel sheets and connect them by welding. We weld corners inside the stove - they will support the sheet of metal on which we will lay the stones.
On the front wall we cut out a rectangular hole for the door, and from the cut out rectangle we make a door. You can weld it around the perimeter with strips of steel for a tighter fit. We drill several holes in the lower part of the door or front wall of the firebox to allow air to enter the stove. We weld the door hinges and the hinge for the bolt.
To make a chimney, we will prepare a pipe and make a hole in the sheet of metal on which the heater will be located. We weld the pipe to the steel sheet.
Let's start installing the water tank. It consists of three walls and a bottom, hermetically welded together and the back wall of the furnace. We weld the inlet and outlet pipes for water to one of the side walls of the tank. Then we weld the tap at the bottom of the tank. We install the entire structure on a frame made of steel profiles or on a brick base 20-30 cm high. We cover the metal parts of the stove with fireproof paint. We lay stones on top (soapstone, porphyrite, basalts, etc.) ranging in size from 5 to 12 cm. We install the chimney and chimney, pour water into the tank, cover it with a lid and ignite the finished stove, checking the structure for the presence of draft and the absence of smoke in room.
To modernize a potbelly stove for a bath, you can equip it with an ash pit with a grate and a box for collecting ash. This will greatly simplify cleaning the stove, and the ash door will help to better regulate the draft, and, accordingly, the temperature and rate of fuel combustion. For the same purpose (regulating the heating temperature of the stove), as well as to reduce heat loss through the chimney, it is equipped with a valve. It can be a gate type or any other.
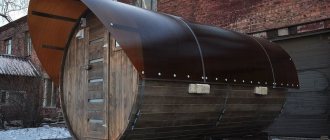
Sauna stove made from a pipe or an old cylinder
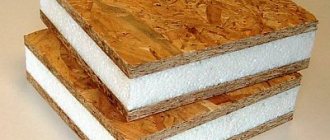
The difference between this design and the previous one is that the water tank is located directly above the firebox. For work you will need: a pipe for the stove and tank (wall thickness 1 cm, diameter 50 cm, height 150 cm); pipe for the heater (the wall thickness is the same, and the diameter is 35cm); mortise valve; metal fittings; hinges for doors; steel sheets with a thickness similar to pipes; tools for welding, metal cutting.
- We divide a pipe of larger diameter in two using a grinder. From one part (length 60 cm) we will mount a water tank, from the second (90 cm) we will construct a heating device for a bathhouse.
- We make markings on a sheet of steel to cut out a circle equal in diameter to the pipe - the furnace body. To do this, it is convenient to use a can of paint or a marker. This circle will serve as the bottom of the structure. We weld it hermetically to the pipe.
- We immediately make the legs of the structure. To do this, we strengthen the bottom of the sauna stove with a metal frame made of profiles. Frame height 10-15 cm.
- After the stove stands firmly on its legs, draw a 25x7 cm rectangle on the body. This piece of metal will be the blower door. We cut it out with a grinder, equip it with hinges, a handle and a latch.
- We make a grate. Its task is to pass air from the ashpit into the combustion zone, hold fuel and not prevent ash and ash from entering the lower chamber of the furnace. Such a grid can be made from pieces of reinforcement or a sheet of metal with holes cut in it. The grate must be secured by welding in the inner part of the pipe at a height of 12-15 cm from the bottom.
- The firebox will be located above the grate. We cut out a door for it measuring 25x30 cm, departing from the level of the grate about 20 cm. We install the door in the same way as the ash door.
- We will construct the heater from rebar. By bending it in different directions, we give the reinforcement rods the shape of a basket, and fasten them together with plastic wire. This is where we will place the stones for the stove. We install the “basket” on the top of the pipe. Here we cut a door of any shape and again equip it with hinges and a latch.
- Next we'll take care of the water tank. The tank body is a pipe, 60 cm long. For this pipe we cut out the bottom, in which we in turn cut a hole and pass the chimney pipe through this hole. We secure the parts by welding. We cut in a tap closer to the bottom of the tank.
- Now we assemble the two parts of the stove together so that the tank is located strictly above the firebox. We make a weld.
- It is convenient to make the lid for the tank double-leaf. We cut out a circle, divide it into two equal parts, one of which is tightly welded to the tank, the other is attached to the first half with loops. To make it more convenient to open the tank, we equip the lid with a bracket handle made of reinforcement.
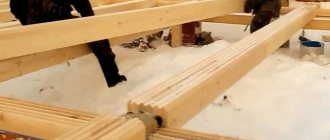
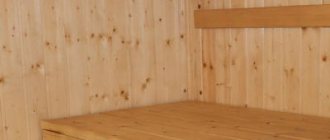
Do-it-yourself row masonry of a sauna stove - photo report
Everything is very simple, just look at the photos and do exactly the same, of course you need to use suitable materials and mixtures!
Zero row of the furnace base: Second row of the furnace base: Second row and blower chamber Fourth row - block the ash pit Put a grate Second row of fireclay bricks Leave a gap between the fireclay brick and facing bricks Third and fourth row of fireclay bricks Cover the fireclay brick with ordinary Put the fifth row of fireclay bricks Make fireclay grate We make a release channel We install the combustion door We draw out the register We attach the upper part of the door The finished combustion door The appearance of the stove at this stage We make a grate on which the stones will lie The second row of a pocket for stones We display the upper level of the register What the stove should look like if you do everything correctly Necessary places for laying fireclay bricks The outermost row of fireclay bricks Making holes in the fireclay bricks Preparing the valve for installation (fitting in) Laying the valve Covering the valve Closing the opening above the core Narrowing the chimney Laying the chimney Installing the second valve Fitting the top of the chimney to the ceiling If you did everything correctly, your stove for a bath it should look something like this
Congratulations, it turns out that you completely coped with the task on your own!
It is quite possible to make a grate with your own hands in a home workshop. What is a stove grate, how best to make and install it - we will try to talk about all this in the article below.
The grate for the stove is part of the support platform in the form of a grate for laying solid fuel in the combustion chamber of the stove. The lattice can be either solid or in the form of bars laid in a row with spaces between them. The size of the grate depends on the size of the stove firebox. The material from which grates for furnaces are made in the factory is cast iron and steel. Homemade structures are assembled from steel elements.
What is a grate for?
This important element of the furnace combustion chamber allows you to get the maximum effect from fuel combustion. The structure of modern stoves is constantly being modified and improved, and only the main structural element of the firebox remains unchanged. The combustion equipment retains its grate configuration.
The platform supports any type of solid fuel (firewood, coal and briquettes). Through the through openings, air is sucked in from below, which creates effective draft inside the combustion chamber. Combustion products (ash) fall into the ash pan (ash pan), freeing up space for the top layer of fuel. The grate promotes uniform combustion of fuel, thereby achieving maximum thermal energy transfer from the fuel placed in the combustion chamber.
Dimensions of grate for the furnace
The dimensions of cast iron grates for a furnace depend on the type of fuel. Their possible sizes are presented in the table.
| Firewood | Coal |
| 330*252 mm | 350*205 mm |
| 300*252 mm | 300*205 mm |
| 250*252 mm | |
| 250*180 mm | |
| 140*180 mm | |
| 120*140 mm |
If it is necessary to install beam gratings, you need to remember that the length is 250, 330 and 470 mm.
Types of grate
The grate is made from elements of different shapes, but only from cast iron and steel. Other materials do not withstand frequent calcination or are too expensive. Depending on the design, grate bars are divided into several types:
- tile grating;
- beam grate
- basket;
- mobile grid.
Tile grate
One of the most common types of grate is the tiled grate. The main feature of this design is the observance of strictly fixed dimensions. This grille is designed for an installation site of a certain size. A mandatory condition must be met - the presence of a gap between the outer perimeter of the grate and the walls of the firebox of at least 5 mm. If this size is not maintained, the cast iron grate may expand greatly when heated and damage the firebox.
Beam grate
The grate consists of a set of individual grate elements. On opposite sides of the installation site, grooves are made into which cast iron bars are placed. Such a system is not entirely convenient for cleaning grates, and today these designs are practically not found. However, it should be noted that when using an antique stove, this is an acceptable option for installing a grate.
Basket
The basket is the same lattice, only with high sides. This type of grate was used in open fireboxes, but now such equipment is practically not used
Mobile grid
The movable system allows you to avoid manual control of the grate. Automated long-burning furnaces are equipped with designs of this type.
Grate - grate
How to install grates for a stove with your own hands
Metals expand when heated, so grates must be installed with a minimum gap of 5 mm on all sides. In the firebox you need to cut off a ledge on which the grate is laid with its edges. In a brick oven, the location is usually chosen one brick below the firebox door. This is necessary to prevent burning coals from falling onto the floor.
During installation, it is not advisable to tightly bury the grates. Different materials expand to different degrees when heated, so too strong a fixed fixation of a metal element can result in deformation of the metal or cracks in the masonry. Having laid the grate, the grooves are tightly filled with sand without cement.
Note! If the cross-section of the grille bars is triangular, then you need to lay it with the triangles down.
This is what a properly installed grate looks like
How to make grate bars with your own hands
The grates that are permanently installed in the furnace eventually burn out and become unusable. If the opening for the grate was made individually, then you can only install a grate of a certain size. A simple way to make a grate with your own hands is to weld a grate frame from a steel angle. To do this you need to prepare tools and materials.
Tool
List of required tools:
- welding machine;
- angle machine;
- sander;
- drill;
- vice;
- hammer;
- tape measure and ruler;
- square;
- pencil.
Materials
- corner 40×40×2840 mm;
- steel strip 100×40 mm.
Step-by-step instructions for making a grate
Before you make grate bars with your own hands, you need to clarify the initial data. The firebox opening subframe is made from a 50×50 mm corner with an internal perimeter of 265×335 mm. Therefore, the grate frame should be made with dimensions of 260x330 mm along the outer perimeter. Having prepared tools and materials, the following work is carried out:
- Using a corner machine, a corner 1180 mm long is cut.
- The side of the corner 40x40 mm is successively marked with a pencil into segments: 260, 330, 260 and 330 mm.
- Perpendicular lines are drawn in marking areas. From the top point, lay 20 mm in both directions. The sides of the equilateral triangle will be the cut lines.
- Using a corner machine, triangular fragments of the corner are cut out.
- Alternately clamping the steel workpiece in a vice, bend it into a frame with a hammer.
- The sides of the folds are connected by welding. The right angles of the frame are checked with a square.
- The remaining section of the corner is divided by a corner machine into 5 sections, each 322 mm long.
- The corners are welded into the frame with the feathers facing outward with 10 mm gaps between them.
- A grinder is used to remove all burrs and metal deposits after welding.
- A piece of strip is welded to one of the sides of the frame, having previously made a hole ø 6 mm in it with a drill. This is done so that when cleaning the grate it can be easily removed from the subframe.
- The finished grate is lowered into the subframe.
Making a grate at home
You can make a grate with your own hands only from steel, since it is almost impossible to make a structure from cast iron at home.
For work, it is better to choose fire-resistant steel, but this is not a prerequisite. It is necessary to take into account what type of fuel the grate will be made for; its size depends on this.
For coal, a design of 300x300 mm or 350x300 mm is suitable, and for burning wood, the size of the grate will be from 140x120 mm to 300x225 mm.
Using simple iron, it is necessary to plan the stages of work so that in the end the grate is thick enough. You can use steel strips and reinforcement. Before you start making a grate with your own hands, you need to take the dimensions in advance. The next stage is the production of the frame.
The frame is considered the basis when installing the grate; later, parallel elements are welded to it. It is important to choose the correct distance between elements in the frame. Here it is necessary to take into account that ash does not leak through the holes, and air can circulate freely to maintain combustion.
Holes in the grill should not occupy more than 40% of its area. Do not forget that compliance with safety regulations has not been canceled. It is worth taking care of clothes and shoes in advance, especially at the welding stage.
Grate for the furnace: design options and replacement rules
Modern stoves in their functionality and design can be very far from their classic versions. However, here too there are design details that have remained virtually unchanged since ancient times. We are talking about grate bars.
What is a grate?
The cast iron grate for the stove ensures the most complete combustion of fuel. The element is placed between the ash compartment and the firebox and looks like a grate. During combustion, air enters through the grate from below. The movement of the air flow - from bottom to top, allows the fuel to burn completely. And after combustion, the ash does not accumulate in the firebox, but spills through the same grate into the ash pan. At the same time, it also serves as a kind of protective layer for the grate itself, since it does not allow it to become hot. The photo shows grates.
The products perform several important functions at once:
- separate the firebox from the ash pan - the temperature in these two compartments is different;
- ensures the passage of air flows from bottom to top - draft;
- the same rising air flow dries firewood and coal;
- the entire system of the ash pan, grate and stove door allows you to regulate the fire.
Ready-made devices - Harvia, Bavaria, products from Castor, of course, are equipped with this element. And, even when it comes to a do-it-yourself design - for a bathhouse, for example, it is recommended to purchase this part. All well-known manufacturers of furnace units - Termofor, Castor - offer grates of any size for sale. It’s also quite possible to make a grate yourself, but getting the material for it – cast iron – is much more difficult to work with.
Classification of grate
Cast iron grates for stoves were and are still the best option. Steel is less resistant to this mode of operation and is not able to accumulate heat, as cast iron does. Therefore, despite the heaviness of the material, it is cast iron wood-burning stoves - Harvia, for example, and cast iron grates that are considered the best. Moreover, this applies to models both for baths and for heating living quarters.
However, this classification exists:
- steel gratings are lighter. If you know how to handle a welding machine, they can be made with your own hands - for a bath structure, for example. However, the material burns out faster because it is less resistant to chemically aggressive substances.
- Cast iron grates for sauna stoves or other structures are much more stable and, therefore, have a long service life.
Another classification of devices is related to the type of device.
- Fixed - usually a lattice with different sizes for different types of construction. This element does not change its parameters and does not move. There are several types of grating:
- tiled flat - lattice flat rectangle. This is the most popular option and is used for any wood-burning sauna stoves, solid fuel heating boilers, fireplaces, and so on. The photo shows the Harvia model.
- basket - designed for open fireboxes and originally developed for cooking. This device is no longer used, and there are almost no open fires, so the popularity of this model is not great;
- beam - in appearance they resemble a construction beam. The lattice of them is assembled with your own hands, choosing the appropriate size and quantity. This is the best method for fireboxes of non-standard sizes.
- Movable grates are extremely rare in everyday life, as they are designed for long-term heating devices. Such an element consists of several gratings and a shaft. When changing the angle, the size of the clearance also changes, which allows you to effectively regulate the heating. Based on the angle of rotation, devices are divided into swinging and full-rotating.
- The grate bars of the stoves are laid with your own hands on a stone ledge formed from brick during laying, or welded to the walls of the body of the iron sauna model.
- The gap between brick and cast iron must be at least 5 mm. There is no need for this in a steel structure for a bathhouse, since the thermal conductivity of metals is much closer.
- As a rule, the cast iron grate is placed 1-2 rows below the fire door to prevent coals from falling out.
- After laying, the gap is filled with sand - it will compensate for the expansion of the metal when heated.
The chain grate belongs to the same category: its elements are connected by chains. However, in practice it is extremely rare, since it does not ensure complete combustion.
How to install a grate
To select the appropriate device, the most important are the dimensions of the grate for the stove, and not its purpose - for a bathhouse or living room. Moreover, both the dimensions of the furnace structure itself and the type of fuel are important here.
So, for coal, the grate should be more massive, since the weight of stone fuel is higher, while for wood, you can choose a lighter model.
It is worth paying attention to the total number of gaps - at least 40%, otherwise the air will flow poorly, and the accumulating ash will not be poured into the ash pan.
The installation process itself is extremely simple.
The view shows the installation process of the grate.
- Galanka oven: how to build it yourself
- Cast iron grates for furnaces
The design features of a modern stove are constantly being modified and improved, new elements are replacing old ones. But a number of functional details remain unchanged attributes and it’s simply impossible to do without them. These include grates for ovens. This combustion element of a potbelly stove or fireplace, supporting firewood, coal and fuel briquettes, provides good traction. Through the holes, ash falls down, which makes room for a new fuel load. Cast iron grates of modern furnaces can have different designs and are made of various materials, including from a metal corner .Correct selection and installation of grates
This element of the stove fittings ensures high-quality combustion and maintenance of the flame when the stove is fired . When the first layer burns out, the remains fall into the ash pan, and the next layer falls directly onto the grate . where better airflow is provided, which enters through the blower and the flame burns more intensely.
Installation of grate
The grate is usually installed during the construction of the furnace. However, sometimes it is necessary to replace it in an already operating heating device or structure. In this case, it is necessary to understand for what reasons this unit was damaged or fell out of its seat.
An example of installing a grate in the combustion chamber of a brick kiln being built
When building a brick oven, the seat must exceed the dimensions of the grate by 5 mm on each side of its perimeter - this thermal gap will be an excellent protection against damage to the masonry and from deformation of the metal part itself when heated to high temperatures. As you know, all materials expand when heated, but the linear expansion coefficients of brick and metal differ quite significantly, and this requires a mandatory compensation gap.
As a rule, the bricks framing the nest for the grate are cut slightly at an angle, approximately as shown in the illustration above. This makes it easier to install and, if necessary, dismantle and replace the grille, and simplifies the process of cleaning it.
These gaps between the brick and the lattice are filled with dry sand or a mixture of sand and clay. But under no circumstances should cement-containing mortar be used. Sometimes an asbestos cord is laid along these cracks.
As a rule, the plane of the grate should be one row of masonry below the fire door - this prevents burning coals from falling out when the stove is opened. Naturally, this rule must also be observed in fireplaces with an open firebox - the lower edge of the hearth should be higher than the grate.
The grate also needs to be correctly placed in place, without mixing up the sides. Very often, the grate lintels have a triangular (trapezoidal) shape in cross-section. In this case, the pointed side should face towards the ash pan.
In conclusion, it is necessary to briefly summarize the information presented above:
- The dimensions of the grates are most often subject to standards. When drawing up furnace designs, they usually start from these established dimensions. But if necessary, you can assemble a grate of a more complex or non-standard configuration using separate beam grates or small modules.
- The manufacturing material is selected depending on the selected fuel. But by far the best material for metal stove fittings, proven over many years of use, is cast iron. But even among cast iron grates there are divisions into wood-burning or coal stoves.
- When installing the grate, it is important to properly prepare the seat in advance.
- It is easiest to install monolithic grate bars. But the stacked and beam options expand the possibilities, usually last longer, and their maintainability is much better. It is easier to replace one, for example, cracked grate, than the entire grate.
However, some stove owners try to make grates for their appliances themselves. This is often motivated by the fact that really high-quality cast iron is too expensive. And what is now on sale, in their opinion, often does not stand up to criticism.
Yes, a steel grate will not last very long. But for a craftsman it is easier and cheaper to make a new one than to purchase a ready-made model.
Well, this point of view has its right to exist. For example, here is a video on this topic:
Dimensions and types of grates for furnaces, tips for choosing
The designs of modern stoves are strikingly different from their predecessors. The use of new materials and fundamentally new elements has significantly increased the efficiency of heating devices. But there is one element that has remained virtually unchanged - the furnace grate.
This part of the structure is a separator between the combustion chamber and the ash pans. The main purpose of the grate is:
- Maintaining the combustion process of solid fuel by moving air masses using natural convection, entering through the ash pan.
- Removing ash elements from the firebox that may block air penetration. They enter the ash pit through special holes, which can be of various shapes.
It is the design that determines the effectiveness of using the grate in certain heating boilers.
Design features
Externally, the grate is a grate with separate elements that serve as fuel support in the firebox. Depending on the type of structure, it can be of the following types:
Tiled flat
The most common type of grate. It is used in stoves, fireplaces and boilers. Its peculiarity is certain overall dimensions. Therefore, when laying a stove yourself, it is necessary to take this factor into account.
For installation in the heating device, an installation platform must be provided. The grate must be freely removable, and the minimum gap between its edges and the brickwork must be at least 50 mm, since in most cases the grate is made of cast iron, when it expands it can partially damage the firebox and ash pan.
Beam
This grate design is of the stacked type. Their number directly depends on the size of the firebox. This is the best option for arranging a non-standard homemade stove. But you need to take into account the standard lengths of the grate.
Basket
Grate structures of this group can be used in open fireboxes. Currently, their installation is not practiced, since heating equipment of this type is irrelevant.
Grill installation
Metal tends to expand at high temperatures, so the grate must be installed with a small gap of no more than 5 millimeters in each direction.
The ledge in the combustion hole needs to be cut off; the grate itself will be located on it in the future. In a brick stove, the location for the grate is generally chosen below the opening of the firebox door by one brick. This must be taken into account to ensure that burning wood and coals do not fall on the floor.
At the installation stage, you should not install the grates tightly, since when heated the material is capable of deformation. This can lead to product failure and cracks in the oven itself.
It is also necessary to take into account that if triangular rods are installed in the grate, then it must be laid with triangles down.