Sauna stove based on “Stove in a Cube” by Igor Vasiliev
10 Apr
Greetings, dear fellow steam bath lovers!
After much thought, study, comprehension and analysis of all the information available on the Internet on the sauna stove developed by the respected Igor Vasiliev, which received (and not unreasonably) from the light hand of its author the name “Stoves in Cube”, I made an attempt to create a similar sauna stove.
I hope that I did not miss any of the “tricks” of the original “Oven in a Cube”, and all of them in one form or another found their embodiment in the new oven.
And now I would like to briefly go over the main points inherent in the newly created sauna stove.
Description of the construction of a heater stove
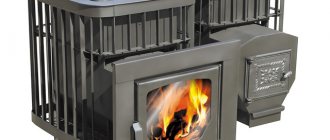
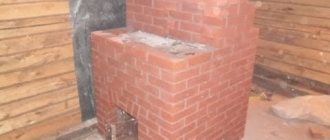
The basis of any furnace is the foundation. In accordance with the previously prepared drawing, using a cord we outline the location of the future foundation. Then we dig a ditch about fifty centimeters deep and fill it with concrete or cement mortar. We give it a couple of days to dry and shrink. Before laying the sauna stove, we lay roofing felt on the foundation. We do this for waterproofing. We lay the first row of bricks on top of the roofing felt and, using wire, attach the first door for air flow or a vent. Then we lay four more rows of bricks and install the grate bars. At the next stage, we install the water tank and the combustion door. The tank in places of contact with brick must be lined with asbestos. After laying the ninth row of bricks, it is necessary to install the slab. Know that stone stoves do not withstand sudden changes in temperature, so it is better to make a frame from a corner at the ends. After the laying of the sauna stove is completed, you need to decide on the chimney.
| Brief characteristics: Steam room volume - 10 - 18 m3. Type of heater - open and closed. Cladding - oven for brick cladding. Water tank is missing. The choice of fuel is firewood, briquettes. The weight of loaded stones is 120 kg. |
Chimneys. There are three types:
Single-turn chimney. It is easy to install, but is only suitable for small ovens.
Multi-turn chimney. Such a chimney helps the stove warm up more.
Chimney without ducts. It is undesirable to use, since this method of removing smoke causes overheating of the upper third of the stove.
When firing for the first time, the stove must be heated for at least an hour.
Required tool:
We will need the following tools and accessories:
measuring level and plumb line;
professional measuring tape;
hammer;
solution trough;
Bulgarian.
Bathhouse “Stove in a Cube” by Igor Vasiliev. Digest
09 Mar
Hi all!
At one time, 2 years ago, I published on the pages of this blog a series of articles dedicated to the sauna stove of Igor Vasilyevich Vasiliev, our compatriot, currently living in the USA, Pennsylvania.
This sauna stove, thanks to the light hand of its author Igor Vasiliev, received the name “Stoves in the Cube”.
Based on publicly available materials, I made an attempt to understand the features of the device and the capabilities of this furnace.
The cycle (the beginning of which is HERE) turned out to be very information-intensive and requires significant mental and time expenditure to become familiar with its content.
Also, I did not summarize the results of the study.
With this post, I set myself the goal of briefly (in the form of a digest) showing the main “features” of this stove, which make it so extraordinary among other brick sauna stoves that have found their home among a wide range of admirers of the Russian steam bath.
I have already listed the main features of the “Oven in a Cube” in one of the posts in the series.
And yet, I considered it appropriate to once again touch upon this issue and highlight in more detail and focus on some of the features of this Furnace. In addition, when writing the series, a question related to the climatic conditions that can be created in a steam room with such a stove fell out of my sight
The next post will be devoted to this issue.
In addition, when writing the series, a question related to the climatic conditions that can be created in a steam room with such a stove fell out of my field of vision. The next post will be devoted to this issue.
So, let's go...
Design options
The most common are units with a built-in metal water tank. Depending on personal preferences, it can be located either below or above. Let's look at the drawings with the orders of the two main layout options.
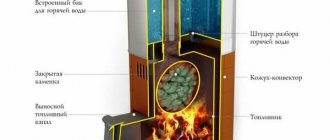
Oven with a bottom-mounted water tank
In the design of such a system, the flame in the combustion chamber, on one side, heats the shield on which the stones are located, and on the other, a container with water.
A container mounted on the side of the stove serves as a wall for the combustion chamber. This model provides fast heating of both the heater and the water inside the tank. At the same time, the consumption of firewood increases, since the heat is distributed to two heating sources simultaneously. Such a stove is laid out in 21 rows using a steel shield to separate the heater.
Following in the footsteps of Igor Kuznetsov’s sauna stoves BIK. “Motivated. Double-2"
06 Jul
It’s been 8 years since Igor Vasilyev spoke at the “Russian Bathhouse” forum. We build ourselves”, 2 models of brick sauna stoves were proposed (popularly called “Motivated” and “Motivated Mini Heater”), made on the basis of Igor Viktorovich Kuznetsov’s stove models BIK P1 and BIK P3.
Since then, many lovers of steam baths have attempted to independently build the brick sauna stoves proposed by Igor Vasiliev in their bathhouse.
The pioneers in this matter were Pyotr Semenov (Petr S), Oleg Argunov, Tral, Galina, Alexey Eliseev, Pioner, lubava, Colleague. Perhaps there were others. But their names (nicknames) did not stick in my memory. Therefore, please forgive me if I offended anyone by not mentioning them in this list.
As a result of each of them laying one of the 2 above-mentioned modifications of the “Motivated” stove in their bathhouse, a specific result was obtained and certain experience was gained. Each one got their own stove, different to one degree or another from the prototype stoves proposed as experimental models by Igor Vasiliev. This information in one form or another is reflected on the forum pages.
Having summarized these data and taking into account the fact that this topic continues to interest numerous apologists of the Russian bath, as well as having certain knowledge and experience in this matter, I took it upon myself to propose my own version of remaking the BIK P1 stove, calling it “Motivated. Take-2." The name is conditional and does not pretend to be “carved in granite.”
In Trakai.
2. In Trakai on an excursion near the Karaite quarter. Behind us is the famous castle.
3. The brass band in Trakai plays like the good old days.
| Bathhouse Pyramidas , built by Ramunas. Very original design. |
There is a swan in the lake. From the steam room along the grass to the lake is a pleasure (water 20C). The water in the font is cold - about 11C. When I measured the temperature and humidity in this steam room, my device failed. At first it showed 100%, then an error.
“The influence of Pyramidas,” Ramunas noted phlegmatically.
| Subsequently, it turned out that it was necessary to occasionally check and tighten the contacts. |
I nevertheless carried out measurements and they showed that the microclimate at the level of a person lying on a shelf is similar to that in Yaroslav’s bathhouse: 42-44C and 95-100% humidity.
We (3-4 people) steamed after the St. Petersburgers (3-4 people - about 6 visits), in the afternoon. Those. oven m.b. “asked” to be flooded.
I even WASHED before going on the road, which happens very rarely during such meetings of bathhouse lovers. Usually there is neither time nor opportunity for this.
And the remaining procedures were completed: Warming up, Sweating, Massage and Cold (lake and plunge pool). I didn’t want to leave the steam room.
| Comment: Long-term tests of various baths and surveys of bathhouse lovers lead to a recommendation from the “Union of Bathhouse and Stove Specialists” - 60°C and 60% (or about that). |
I personally like any mode, as long as the bathhouse warms you to sweat (from 45C) and doesn’t burn (up to 70C) - it doesn’t dry out your nasopharynx and eyes.
Further, I would say this.
Overheating of a person, which steamers strive for (and this is what happens in the steam room), is stress for a person, as physiologists say. Moderate and short-term stress stimulates the body, severe stress causes shock, long-term stress tires, and both of the latter lead to death.
| Therefore, it would be necessary to be able to create a mode with stimulating heating. |
It would be nice to have the body’s heating not weak, not strong, not long, but deliciously moderate.
7. Guests from St. Petersburg, Moscow and Karelia with the host, Ramunas. Ramunas “keeps its shape” - for a long time only raw food.
8. Swan in the lake. Inna with Ramunas. Ramunas with a dog.
| 9. Interesting design of the Ramunas furnace with a main pipe (left) and a top pipe. The heater is closed with a horizontal lid. Comment: The stones are heated in the fire, but they are not located as is often done - above the firebox, but on the side of the firebox. As a result, the stones are heated only by the passing combustion products, and the radiant heat from the coals does not reach them (IMHO). In addition, stagnation zones appear in the corners of the heater, which are not heated by combustion products. |
| The photo shows that the soot on the stones and the lid did not burn off. Guild stovemakers try to remove soot using a gas burner. Sometimes stones are placed in the chimney to heat it. Here, in essence, the stones are placed in a hog. |
10. View of the folded stove. Stones in the heater. Here is a sensible message about the couple from 5_6: https://www.forumhouse.ru/threads/155679/page-7#post-3898534
| Ramunas (left), at a time when he was not a raw foodist. |
11. Movement of gases in a furnace with a main pipe (not shown). Read more on the Builders forum
Many thanks to the owner of such a soulful bathhouse! Good luck to you, Ramunas! And see you later!
12. Panorama from Ramunas’s house. On the left is Pyramidas. On the right is the greenhouse.
From Peter Semyonov : I would like to especially say that I personally have absolutely nothing against the log house. A log structure is sound, reliable, and thorough. Some houses and bathhouses are simply amazing! But it's expensive! Now imagine how many bathhouse lovers there are in the territory of the former USSR? Millions. And everyone, I’m just sure that everyone, openly or secretly dreamed or dreams of their own cozy bathhouse. And how many such lovers bury their dreams for material reasons! Or it becomes a curiosity. A few years ago, one of the dacha neighbors proudly boasted that they were already building a bathhouse for him for only 1.5 thousand dollars. Now I can’t look at this chicken coop from the stockroom without tears. And every season he walks around it and caulks, caulks, caulks... At one time, thanks to the Internet, I came to the decision to build a frame bathhouse. My turnkey construction costs were about $5 thousand. Moreover, most of this amount went to pay employees. And although these were my friends and comrades, I paid them for their work at the prevailing rates, because they had families and children. In general, as Lenya Golubkov said, I’m not a freeloader... Several years of operating my bathhouse, the experience of other forum members (Igor Vasiliev, Andrey Zakharovich, etc.), soaring in bathhouses on wheels, also of a frame type, all this confirms my conviction: - log house is not a necessary and obligatory condition for a proper bath. Mandatory conditions include the correct stove and solid wood paneling in the steam room. Ramunas's bathhouse is a clear confirmation of this. According to him, construction costs amounted to about 2 thousand euros. And I saw that this is an absolutely real figure. Because everything in this bathhouse is made with your own hands. Its very form is extremely economical. The roof and walls are one whole. There are no abashas and cedars, LODE bricks and Finnish fittings. But this bathhouse has the main thing - the correct conditions in the steam room. And you can argue and disagree with the author’s solutions for the screed, for the plinth; perhaps these options are not ideal. But we must take into account that the bathhouse was built in an area with certain climatic conditions, on specific soil with a certain level of groundwater. Materials were selected based on their availability on the farm or purchase at reasonable prices. But these decisions are not dogma and are easily adjusted to any other specific conditions.
The sauna stove deserves special mention . There is very detailed information about it on various forums, for example on the stove makers forum https://www.stroiteli. read.php?t=3002. Since the construction of the first copy, the stove has undergone a number of changes and improvements. With the hands of Ramunas, a whole series of stoves was built in different baths. There are orders, there is a photo of the masonry of each row of one of the stoves, there is a video of the processes of kindling, combustion, and the work of the secondary. One of the forum members from the builders forum took part in the construction of the furnace from scratch to the first firing as a helper. That is, the author generously shares his work and this cannot but arouse great respect for him. The oven is very economical. This is achieved by the design of the firebox. combined with a cap in combination with a lowering channel. It is possible to supply secondary air through the holes in the double combustion door, passing between two cast iron plates, the air is additionally heated. Tertiary air can be supplied to the lower part of the lowering channel and the gases are burned under the stone backfill. A clean, almost invisible release of gases from the pipe indicates complete combustion of the fuel. And this is a consequence of the fact that the stove was designed with a deep understanding of combustion processes; very precise proportions of the dimensions of the grate, the volume of the firebox, the cross-section and length of the channels were found. The furnace components are arranged sequentially horizontally: a firebox, a heater, and another hood for additional heat removal from exhaust gases. This arrangement ensures the highest maintainability of the furnace. Any of the nodes can be iterated without affecting other nodes. And this is very important for a sauna stove. And at the same time, the design is very simple and easy to replicate by amateurs. There is no need for higher education. A middle consideration is needed. I must admit that in all the mentioned parameters, Ramunas’s stove is superior to the “Motivated stoves”, which many forum users, including the author of this writing, built in various modifications. I guess I'll finish here. But I want to appeal to all members of the forum, and first of all to Ramunas. Friends! We have gathered here because we are like-minded people, we all love the bathhouse. Let's treat each other with respect, be tolerant and respectful of the opinions of our opponents. Rudeness, insults, and labeling will not lead to anything good. But if the topic “Ramunas Sauna Stove” appeared on the forum, it would be interesting and useful to a huge number of sauna lovers.
Following in the footsteps of Igor Kuznetsov’s sauna stoves BIK. “Motivated. Take-2." Continuation
07 Jul
So, let's continue the topic started HERE.
In this post, we will begin to consider the design features of the “Motivated. Take-2."
Further in the text, for brevity, we will simply call this sauna stove a stove.
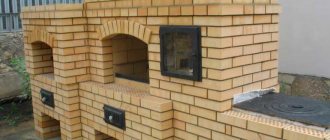
The oven has dimensions of 3.5 by 4 bricks in plan and contains 30 rows of brickwork (Fig. 1). The geometric dimensions of the furnace are shown in Fig. 2.
| Fig.1 | Fig.2 |
The oven is a double-circuit oven, consisting of external and internal circuits.
The external contour is the outer shell of the furnace, consisting of the furnace itself and a small ventilation chamber located on top of the furnace (Fig. 1). The external contour is laid out from solid clay ceramic bricks of a grade not lower than M150.
Advantages of a brick heater stove
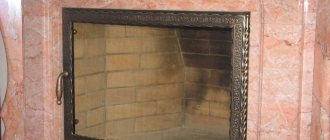
Real and correct heater stoves, for a good steam room, are built from selected stove bricks. There are periodic and permanent projects. The sauna stove can be welded from metal and lined with ceramic bricks of the M150-M500 brand. The advantages of this stove include the ability to retain heat for a long time and relative safety. The disadvantages include high cost. In addition, laying a sauna stove is very labor-intensive.
Preparatory stage
First, it is necessary to perform a graphic drawing and technical calculation of the masonry. The stove must provide the proper temperature in the room, remove smoke, and not require a large consumption of firewood. Also be sure to take into account fire safety requirements and standards. It is important to maintain the distance from the stove to the walls, so in front the distance should be at least 1.25 meters, and at the back and sides at least half a meter. The distance from the ceiling to the stove door should be at least 1.25 meters, and to the top edge of the stove - 1.2 meters.