Hello, dear readers, connoisseurs of ancient traditions and progressive technologies. So sometimes you want to make your home as similar as possible to a medieval mansion and at the same time not deprive it of modern comfort.
Why not? There are plenty of materials on sale today; the technology for assembling wooden houses is at least known to everyone. If you wish, you can make one yourself.
The main thing is not to screw up the corners. After all, the connection of different types of timber in the corners is perhaps the most crucial moment of the entire construction. So let's take a closer look at them.
Beam connection - types and features
Houses, bridges, ramps are built from timber material, and decking for warehouses and piers is laid. The material is in demand among landscape designers and interior decorators. In construction, an important role is played by the methods of joining different types and types of materials, the types of their connection in wooden structures. There are different ways to connect timber in building structures:
- Splicing, production of molded structures;
- Construction of walls and partitions;
- Laying flooring;
- Cross stitch;
- Butt joints;
- Connection at any angle.
Length extension
The length of industrially produced timber is determined by GOST 24454-80; of the many sizes of timber, 3- and 6-meter blanks are most in demand. When splicing, the ends of the joined beams are secured in various ways:
- Half-tree connection;
- On the root thorn;
- Straight patch lock;
- Oblique patch lock;
- Oblique cut.
The choice of fastening for the connected beams depends on the tasks at hand. For decking, a straight lock is used; for vertical supports, a half-tree or tenon lock is used; for the construction of 3D structures, oblique locks are used. Locks are reinforced with building brackets, dowels and dowels; bolted fastenings are used for load-bearing supports. In order to maintain the uniformity of the surface texture of the laminated veneer lumber, the length is increased using the toothed connection method or butt joints with a key, and the joints are reinforced with waterproof glue.
The longitudinal installation of timber roof rafters has its own characteristics - it is necessary to take into account the impact of multidirectional loads. For the connection, an oblique cut is used, reinforced with bolted fastening with a diameter of 10-12 mm.
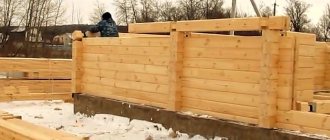
Altitude bonding
When constructing wooden walls and partitions, masonry made from solid timber of natural moisture is reinforced with dowels, staples or “coupling” fastening. The corrugated timber has increased adhesion; reliable adhesion of the crowns is ensured by the tongue-and-groove connection.
The most common construction operation for height bonding is the construction of walls. Dowels with a diameter of 25-30 mm are used as connecting elements; one dowel holds together several crowns. To fix masonry made of corrugated timber, dowels are required 2-3 times less. The dowel connection is reliable and retains its properties throughout the entire period of operation of the structure.
With the help of fastening “on the coupling” they prevent deformation and the formation of cracks when the lumber dries, the screw tie creates an adjustable vertical tension.
Corner connection requirement
Before taking on any work, it is always useful to know who exactly you want to get out of it. This rule also applies to corner joints.
But there are actually only two requirements here:
- Reliability
- And not ventilated
The first one is easy. If the beams do not hold together in the corners, the house has every chance of falling apart, because the walls are necessarily subject to not only vertical, but also horizontal, tearing forces.
There is also a logic to the second requirement. No owner will like a house where the wind blows through the corners.
As you can see, all the requirements are not without logic, but they tried to implement them in more than one way.
How to fasten beams together across widths
The lumber material is used to make bridge decks, lay floors in freight cars and industrial buildings, and make panels for laying on foundations and soil. Unlike floor laths, timber structures are joined together without the use of a tongue-and-groove lateral connection; this method of installation is called “smooth reveal”. The structures are fastened with construction staples, fixed with 30-40 mm edged boards laid around the perimeter and 100 mm nails, and a screw metal tie is used. This connection allows
disassemble and assemble structures, make temporary flooring.
Reinforced floors are used in warehouses, sports and entertainment complexes. To hold lumber together indoors, synthetic glue is used; when finishing the interior, the timber is fastened with a longitudinal dovetail key.
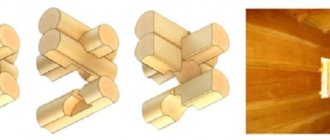
Cross Lap Knit
Lap knitting is a universal connection of lumber, used when laying walls made of logs and timber. The workpieces are placed at right angles into cut-out grooves; the size of this groove depends on the size of the material used. Such a lock is used in the construction of log houses and ceilings, the construction of bridges, and the construction of canopies. The main methods of cross fastening:
- Half-tree connection;
- Quarter and third wood joint;
- Notch in one row.
The most widespread cross-shaped connection in half a tree is when cutting corners into a bowl; it is used in the construction of utility structures, residential buildings and baths. The structure is reinforced with building brackets, dowels and dowels.
Connecting logs in corners with remainder
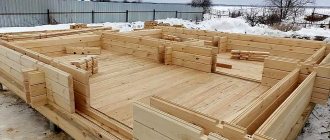
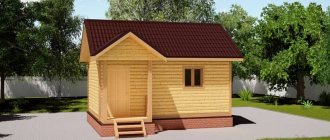
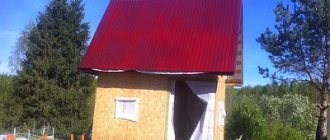
First, let's talk about log houses. Recently, they have become popular again, especially in suburban construction: they look attractive and are also natural. Moreover, even despite a significant overconsumption of material, the corners are made with a remainder. These methods of joining logs are traditional. They came to us from our great-grandfathers, this is how they built their houses.
Log house in a bowl
As has already been said, a longitudinal recess is made in each log - a groove. In the corners they are trimmed more, according to the shape of the log lying across. This notch is round in shape, which is why it is called a bowl, and the method of cutting a corner is called a bowl. The second name is “in the oblo”.
Marking the upper and lower bowl
Depending on the location of the bowl, there are upper and lower bowls. The upper bowl is so called because the log rests on top of the crown, clasping the lower one. This connection is also called “clap”. Remember: the bowl is upper, despite the fact that it is formed at the bottom of the log.
The work is carried out in several stages. The log is first placed in the log house and leveled. Then they outline the contours of the groove and the bowl, place it on a flat surface and process it there - cutting the bowls. When the excavation is ready, the log is raised again and placed in place, trying it on. If necessary, they are adjusted (removed again, trimmed where necessary) and only then laid on a compactor (tow, jute, moss). All these movements are compensated by the fact that with this method of cutting, sediment simply flows down the side surfaces of the wall, and they, as a rule, are well protected by several layers of impregnations and paints.
Types of bowls for joining logs in corners
The lower bowl can be molded directly in the log house: all manipulations can be done on the laid crown. When the walls are already raised high, it is very inconvenient to do this if you lack dexterity, so you still have to drag the logs up/down. Perhaps this is why this method is less popular.
It is easier to make a frame into a bowl: it allows you to correct almost all mistakes. In addition, despite all the apparent complexity, it is this type of joining of logs that is easier for beginners to do. All others require more carpentry skill.
How to make a joint from a log frame into the lower bowl is shown in the video below. The explanation is detailed, showing techniques for working with an ax and the full procedure. First you just need to talk about the tool that is used to draw the log. This is a carpenter's trait or scriber.
The device is very similar to a school compass. There is also a sharp stop on one side and a pencil on the other. Just like in a compass, the required distance is fixed with a screw. Having placed the ends at the required distance, the sharp part is guided along the log for which the bowl needs to be cut. Using a pencil, respectively, according to the one in which the groove and bowl will be cut. This produces markings, which are then drawn with a marker. It will become clearer when you see the process of marking the bowl in the video.
Actually, now a video about how to connect logs into the lower bowl. The first part deals with molding the longitudinal groove, the second directly deals with cutting the bowl.
Connection in okhryap
This type of connection consists of two semicircular bowls. In order for a corner folded using this method to be warm, considerable experience is required: even minor errors in the width of the groove or the thickness of the lintel will cause drafts.
Log in okhryap
Knitting log corners
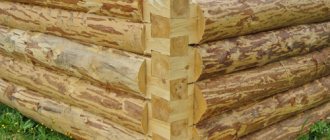
A variation of the cross-shaped connection is the method of fastening the beams together without any residue; in this case, the two sides of the cross-shaped connection have no continuation. This connection is used when laying corners and is called “no residue in the paw.” Cutting a castle without leaving any residue does not require the use of special tools; the construction of a log house using this method is popular among individual developers.
A more complex method of corner mounting is dovetail installation; a dovetail lock is a reliable but complex fastening. Marking and complex cutting of such a connection requires professional skills; the technology is widely used in the construction of low-rise economy class housing.
Cutting logs with corners without residue
As we said earlier, the corners are colder without any residue, but they allow you to significantly save on building materials.
Angle "to the paw"
Among the joints of logs in the corners, the “paw” method is popular. It is easy to implement, and at the same time provides high strength and reliability of the connection. Also, the presence of inclined cuts makes it possible to achieve high tightness. The method has been tested for a long time, even GOST standards have been developed: size tables for each log diameter (see photo).
Table of foot joint sizes for different log diameters
All dimensions are plotted relative to the found middle of the log and a vertical line drawn from it (it is drawn using a plumb line).
Connecting logs without leaving any residue. Angle to paw
The order of work is as follows:
- Find the length of the cut part (called the block). It must be no less than the diameter of the largest log available (in the figure it is marked L). We set this value aside from the edge of the log (let it be 250 mm), draw vertical lines in these places. They will be the boundaries of the idiot.
- Let the diameter of the processed log be 200 mm. From the middle line, ½ of the value of A is set aside. D for a 200 mm log is 141 mm. We divide this value in half and put it on both sides of the center. We draw vertical lines.
- We trim (cut with a chain saw). As a result, you should get the same picture as in figure a).
- We take the appropriate dimensions from the table and mark them on the block.
- We trim off the excess (cut it off). The result should be a figure like in Figure b).
This is what the angle from the logs into the paw looks like (dovetail due to the fact that the connection is in the form of a trapezoid)
All logs are processed in this way one by one. As you can see, the dimensions depend on the diameters of the logs. In order not to have to worry about drawing every time, they make templates from thin plywood according to the diameters of the logs that are available (they label them). Then, having found the middle and made a block, they apply and trace a suitable template. With this order of work, there is less chance of making mistakes, and chopping bowls takes less time.
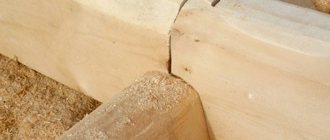
Butt joint of timber
Butt fastenings are the simplest type of connection; the workpieces are fastened at right angles using construction staples or standardized fasteners; the building material is not processed. The technology is used in the construction of temporary buildings, field storage facilities and sheds, and arrangement of work sites. The structures are easy to disassemble, and the lumber can be reused many times.
With the advent of new generation woodworking equipment and laminated lumber, the technology has received innovative development. To strengthen the fastening, a hidden tongue-and-groove lock and a trapezoidal key are used. The castle was called the root thorn; the shape and dimensions of the castle were standardized. The groove and tenon are made on modern milling machines, the reliability of fastening is ensured by high precision processing of workpieces. In such a lock, the tenon is securely fixed inside the workpiece.
Special requirements are imposed on the quality of the material; this method of installing timber is used when working with kiln-dried laminated wood. The corners of cottages and luxury housing are fastened to a secret tenon; the technology is used in the design of facades, interiors, furniture manufacturing, the main advantages of fastening:
- The structures are easy to assemble and disassemble; you can purchase an industrial house disassembled and assemble it yourself;
- The corners of buildings are durable and airtight; this method of assembling corners is called a “warm corner”;
- The front side is not processed, the uniformity of the wood texture and the absence of cuts make the façade of the building attractive;
- The fastening can be strengthened with construction adhesive.
The use of butt fastening on trapezoidal dowels ensures reliable fastening of structures while saving building material.
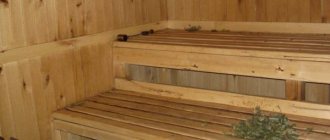
Advantages of a warm corner
The advantages of connecting profiled timber into a warm corner:
- No cracks or freezing.
- High speed of installation, even a non-professional can handle the job. “Wet” work, including with concrete, is not required.
- Attractiveness from the outside and inside of the house.
- No cladding or insulation is required.
- It will help maintain a comfortable microclimate: the room will be warm in winter, cool in summer.
- Fastening stability.
- No nails or other fasteners are required to connect corner elements.
- Even after shrinkage, the gap between the tenon and groove will not exceed 1-3 mm. In some cases, the gaps are deliberately made large, up to 5 mm - this significantly simplifies the caulking of the log house.
However, connecting a wooden beam into a warm corner has nuances:
- Only masters can accurately adjust the tenon and groove one to the other.
- A warm corner is more expensive than a butt joint, but as a result it helps to save on the use of heating devices and caulking.
Mounting at any angle
The developer is faced with the need to assemble at an arbitrary angle when constructing roof frames and arched structures. This type of fastening is used when assembling timber logs onto a ridge assembly and connecting them to the mauerlat - a supporting beam laid on the upper crown of the log house. Mounting at an angle also provides for the technology of installing support posts.
When assembling on a ridge run, the ends of the timber logs are placed in the corner as follows:
- Overlapping, the lock is reinforced with a through bolt;
- In half a tree or on a tenon, the fastening is reinforced with metal or wooden overlays. The covers are secured with nails and self-tapping screws.
To insert rafters into the mauerlat, a single notch is made at the desired angle, the fastening unit of each beam is reinforced with bolts and plates.
Vertical supports are cut into half-tree logs or mounted on special metal hinges. The hinged structure is attached to the joists using metal clamps and secured to the supports with self-tapping screws.