For owners of private homes and dachas, there may come a time when the roof begins to leak and there is an urgent need to replace the roofing. You can hire professionals, but having certain knowledge and adhering to the correct work technology, you can carry out this procedure yourself, which will significantly save your budget.
The modern building materials market offers a huge selection of different roofing coatings, and what choice to make is a personal decision for each owner. The main thing is to take into account all the nuances that affect the long-term and effective service of the coating - the quality of materials, manufacturer’s warranties, and also what it is intended for (for a flat roof or a truss roof).
Choosing tiles: which roofing material to choose
How do you know which roofing material to choose for your home? To do this, you need to study the main characteristics of each of them and decide what is important to you.
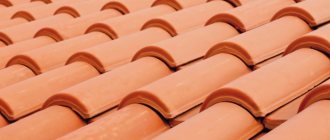
Ceramic tiles are one of the most durable, beautiful and time-tested roofing materials. Its main disadvantage is the high price. Then - weight. In addition, the material is very fragile and often has problems during delivery. Installation of such a roof will also cost a pretty penny, since it is labor-intensive and requires a complex rafter system.
Metal tiles are a profiled sheet of metal 0.4-0.5 mm thick, coated with a layer of zinc and a protective polymer coating. Today we present several types of profiles and a wide color palette. With proper installation of metal tiles, the warranty reaches 50 years. Disadvantages can only appear due to poor installation and storage conditions.
Seam tiles are flat, narrow sheets of galvanized metal coated with a protective polymer layer, which are connected to each other using a special curved lock - a seam. This lock completely eliminates the possibility of leaks.
Soft bitumen shingles are a flexible roofing material that can be laid even on round roof elements. The base is fiberglass, which is impregnated with bitumen and covered with inorganic chips. Installation of tiles requires continuous sheathing, which increases the cost of roofing.
Composite tiles - this version of the roofing material imitates ceramic tiles. The base is a steel sheet, the outer side of which is covered with natural stone granules.
Roofing corrugated sheeting – the main advantage of this product is its low price. Today there is a wide range of coatings and colors on the market. It is easy to install and durable.
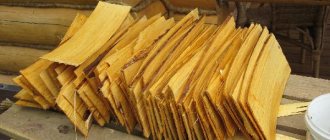
Slate – today you can find asbestos, metal and soft slate (ondulin). Among the advantages are good sound insulation, maintainability, and durability. The disadvantages include the heavy weight and fragility of the materials.
Installation of insulated and non-insulated roofs
Metal tiles can be used to cover a private home and any outbuilding. The roof of residential buildings is always insulated. The roofing pie of an insulated residential attic has the largest number of layers:
- metal tiles - performs the protective function of the structure;
- noise insulation - dampens vibration and noise due to external influences on metal sheets;
- sheathing - the place where the roof is attached;
- counter-lattice - provides a ventilation gap and prevents condensation from forming;
- waterproofing - protects the insulation from moisture;
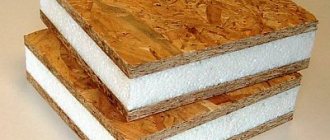
- thermal insulation - retains heat inside the living space;
- rafter system;
- vapor barrier - prevents the penetration of moisture from inside the room;
- internal lining.
When arranging a roofing pie for metal tiles, it is better not to save money so that the roof turns out to be of high quality and lasts a long time.
On an outbuilding or an unheated summer garden house, the design of a roofing pie for metal tiles is much simpler:
- metal tiles;
- sheathing;
- counter-lattice;
- waterproofing;
- rafter system.
Metal tiles are good for roofing outbuildings, sunshades, garages and bathhouses.
Carrying out calculations - how not to make a mistake when ordering a roof
It is better to entrust roof calculations to a professional. Here you need to count not only the number of metal tile sheets (for this you just need to know the length and width of the slope and the width of the metal tile sheet), but also take into account many nuances, such as additional elements, correct lathing, hydro- and vapor barrier, seals, screws and much more .
The roofing calculator presented on our website will help you calculate the required amount of materials. Just enter the type of roof, dimensions, materials used - and you will receive complete information.
Cutting sheets of metal tiles
When laying sheet material, cutting procedures cannot be avoided. Equipment for cutting metal is suitable for this work: metal shears, a hand-held circular saw, electric shears, etc. It is not recommended to use a grinder, as it creates a torn edge on which the polymer coating is depleted and the zinc layer burns. In the future, these places become vulnerable to corrosion, and using this cutting method may void the warranty.
Cutting holes for ventilation in sheets of metal tiles.
It is easier to make corner cuts along a guide, which can be used as a flat board. After cutting, all debris and steel shavings are removed from the surface of the sheet using a brush. The cut area is covered with enamel paint. This paint is also suitable for repairing minor scuffs or scratches that may have appeared on the coating of the material after transportation.
Tools and additional materials used
To install metal tiles you will need:
- Screwdriver + screwdriver attachment 8x45;
- Scissors for cutting metal;
- Roulette;
- Electric nibblers;
- Corrugated pliers;
- Drill attachment for cutting metal;
- Stapler with staples;
- Jigsaw for wood;
- Screws made of hardened steel made of EPDM rubber, average consumption of 7 screws per 1 sq.m;
What kind of roof can be covered with metal tiles?
What type of roof can be covered with metal tiles?
Let us immediately make a reservation that this material is not suitable for all types of roofing. The fact is that the roof must meet certain requirements, namely:
- to be pitched;
- have a slope of more than 14°;
- have simple geometry.
If the roof has a complex structure, even if it is rectilinear, then during installation it will be necessary to make more than a dozen trimmings, which will increase the consumption of material (after all, most of it will simply go to waste). Consequently, this will greatly increase the cost of building materials and installation itself.
Preparing the surface for installation of metal roofing
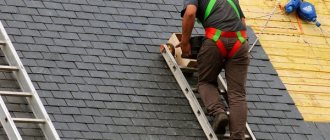
When starting to work at height, you should first take care of safety. When working on a roof with a large slope, it is necessary to use a safety rope and a special belt, as well as shoes with rubber soles and gloves.
In order to correctly install a metal roof, it is necessary to correctly assemble the “roofing pie”.
A quality roofing pie includes:
- Rafter system
- Frontal board
- Lathing
- Layers of vapor and waterproofing
- Cornice strip
- Counter-batten
- Gutter hooks
- Kapelnik
- Metal tiles
Insulation boards should be cut with an allowance relative to the rafter distance. Approximately 10-15 mm wider. The insulation should lie flat.
Then we lay vapor barrier and waterproofing films. They roll out horizontally, along the rafter system, in the direction from bottom to top. The overlap between insulation strips must be at least 150 mm. To ensure a tight seal, the application areas are taped with a special tape.
To drain water from the films, you need to install a drip line on the front board under the films.
The wood for the sheathing must be dried and treated with antiseptic agents before installation.
It is worth remembering some nuances about laying the sheathing:
- The distance between the first and second battens of the sheathing should be equal to the wave height of the metal tile - 250 mm. The remaining slats are laid in increments of 350 mm.
- In places of complex connections, bypasses and fastenings of additional elements, it is necessary to make a continuous sheathing.
After installing the sheathing, long drainage hooks are installed (if short hooks are used, they are installed together with the drainage system).
A counter-batten is mounted on the main lathing.
Then the cornice strip is installed. It protects the space under the roof from moisture and debris.
We install additional elements (lower valley and bypass around the chimney).
It is also necessary to ensure free air flow when filing the cornice. To ensure under-roof ventilation, you will need KTV valves, and use vinyl soffits to cover the eaves.
Now you can begin installing the metal roofing.
Attention to detail
Covering a roof with metal tiles is rarely complete without decorating the chimney and cornices. To protect the pipe, it is necessary to insert a valley, which will break the flow of water, causing it to flow over the surface.
Step-by-step instructions for decorating a cornice include:
- Attaching the cornice strip. Its width is 10-15 cm. It is attached vertically to the rafters under the protruding part of the metal.
- Installation of sheathing. From the wall of the house to the eaves strip.
- Fastening metal sheets of appropriate width. A corrugated sheet is used to decorate the cornice.
- The joint between the vertical and horizontal parts of the cornice is closed with a metal corner.
The final stage of the work is closing the protruding part of the sheathing under the slopes . For this purpose, a profiled sheet is used. When laying it, the direction of the wave is aligned.
Technical aspects of laying tiles
Sheets of metal tiles should be laid in rows: from left to right, from bottom to top. The first row of sheets should protrude 50 mm beyond the cornice. The sheets are attached to the deflection of the wave under the step, in the places adjacent to the sheathing.
Pipe bypass installation
To form a pipe bypass, we install a “metal apron” from junction strips. The lower part will go under the tiles by 200 mm, and the upper part by 150-200 mm will rise along the pipe.
- The junction strip is mounted on top in a groove or overlay.
- A sealant should be installed in the upper part of the “apron”.
- The joints of the strip and the gaps between it and the pipe should be carefully sealed.
Gutter installation
- Long hooks are installed before installing the roofing material. The eaves board must be at least 200 mm wide to securely attach the hooks.
- If the drainage system is installed after the roof has been installed, we recommend using short hooks and mounting them directly on the roofing board.
- The cornice strip is mounted on the cornice board on top of the hooks with an overlap of at least 20 mm on each other
- To prevent damage to the gutter when snow falls off the roof, we recommend installing the first hook on the front board so that the outer edge of the hook is 20 mm below the imaginary continuation line of the eaves board (Diagram 2)
More information about installing a drainage system: Installation instructions for a drainage system
The rules for installing walk-through elements, roof windows, and roof safety elements are described in detail in the instructions attached to the orders.
Nuances of fasteners
To properly install metal tiles with your own hands, it is worth remembering a few nuances:
- For convenience, the sheathing boards on which the sheets of metal tiles are placed should be installed at a distance between them.
- Self-tapping screws are purchased in the color of the tiles and must have a rubber gasket (standard size 4.8 by 28 mm). They are screwed onto the crate until the gasket is slightly compressed, in special places between the wave crests at a distance of 1–1.5 cm.
- The joint of the sheets goes along the waves in rows (this will protect the roof from side winds). Each wave is joined to the sheathing and secured with self-tapping screws.
- Attaching to the cornice can occur in two ways. In the first case, rainwater from the roof flows directly into the drain - for this, a 5 cm protrusion is made from a sheet of metal tile behind the cornice (the cornice board should be 1–1.5 cm thicker than the sheathing). If your roof has a stepped eaves, then water from the roof first gets onto the eaves and then into the gutters.
- The topmost board of the sheathing acts as a support for the ridge board (it should be 1–1.5 cm thicker to obtain a ventilation gap). The ridge board is attached to the metal tiles with self-tapping screws with a distance of 0.8 meters between them.
- The pitch of the screws when attaching the end strips to the front board is also 0.8 meters.
- If the protective coating of the metal tile is damaged during work, this area must be treated with dye.
- The overlapping areas of the tiles must be located directly on the sheathing or other wooden structural elements, but in no case in the voids.
The process of installing metal tiles with your own hands, of course, is not very simple, but with a certain skill you will definitely succeed. Metal tiles are an excellent modern material that will serve you for a long time (manufacturers guarantee a service life of up to 50 years). The main thing to remember is that metal tiles cannot be laid on a flat roof - the minimum slope at which this material is used must be at least eleven degrees.
Triangular and trapezoidal slopes
- When installing metal tiles on these types of slopes, additional counter-battens are installed along the ridges of the slopes.
- Further steps are similar to the installation of standard roofs. Then the cornice board, cornice strip, drain hooks and drip line are installed.
- The sheet of metal tile is cut along an oblique line so that the distance to the sheet of the next slope is 60-80 mm.
- Installation of ridge strips is also carried out from the bottom up.
It is important to ensure that the axis of the ridge strip runs clearly along the axis of the ridge. The junction of the two ridges and the ridge can be formed with a plastic Y-shaped tee.
Sheet fastening process
Do-it-yourself installation of metal tiles should be carried out in a strict sequence: determine where to attach the first sheet, and then begin laying the rest to the right or left of it, as desired. There are no special features in the requirement to choose a side, do what is more convenient for you. The main thing is that installation should begin from the lighter side - where there are no bevels, and smoothly flow to the valley or cuts.
All subsequent sheets of metal tiles after the installed one are placed on its outer wave, slipping them from below. Installation in this way is quite simple, since the sheets secure each other and completely eliminate any possible shifts of the roof, but there is a possibility of damage to the protective coating.
All sheets of metal tiles must be installed strictly parallel to the eaves line. The installation of the ridge must be done last, since the material is laid from top to bottom.
Maintenance of metal tiles and quality assurance
To ensure that your roof lasts as long as possible, we recommend:
- Monthly roof inspection from the ground;
- Annual inspection of each roof slope with a rise to the eaves level;
- If necessary, carrying out roof maintenance work;
- The valleys should be cleared of debris; this requires removing the decorative part;
- If leaks, high humidity, condensation, or uneven temperature of the walls in the attic appear, it is necessary to apply for a comprehensive roof repair.
Scratches must be touched up with a corrector for repair;
Installation of metal strips
The strips that cover the eaves, gables and junctions are important elements of the roof. They protect the rafter system from getting wet and ensure a hermetically sealed joint between the sheets.
- Valley strips are an element that covers the valleys from moisture. A continuous sheathing is installed on the valleys, the lower valley strip is laid on top of it, after laying the sheets of metal tiles, a layer of the upper valley strip is laid on top.
Roof valley plank.
- Installation of junction strips is the most important work, since these places often leak. Connections are made in those places where the roof comes into contact with vertical planes (with a wall of another floor, a chimney or ventilation pipe, a decorative turret, etc.). Junction strips, like valley strips, also consist of upper and lower elements. The installation of the lower strips is carried out before the installation of metal tile sheets. A special flat element for draining water (tie) is placed under the bottom one. It is directed to the valley or to the cornice. At the edges of the junction strips there are special protrusions that are inserted into the groove on a vertical plane, then this element is covered with sealant. After installing the metal tiles, the top strips are laid.
Making connections to the chimney pipe.
The junction strips around the pipe are installed in the following order: bottom, side, and then back.
Installation of the eaves strip - before this operation, it is necessary to mark and install the hook holders for the gutter. The holders are applied to the overhang and the approximate location of the future bend is marked. To prevent water from stagnating in the drainage channel, the gutter must have a slope (3 mm per 1 m). In this case, the step of the holders is made from 0.6 m to 0.9 m. The bend is made using a strip bender. The hooks are attached to the sheathing board using self-tapping screws. The gutter is mounted with an overlap on the holders. A special connecting element with a waterproofing gasket is installed under the seam between the two gutters. The bottom edge of the eaves strip should go into the gutter so that all the water flows down it into the drain. The second edge of the plank is secured to the battens using self-tapping screws. The edge of the roof waterproofing film is removed from under the sheathing and secured to the plank using double-sided tape.
Placement of eaves trim and gutter.
- Installation of the ridge strip is carried out after laying the sheets. The ridge can be flat, rectangular or semicircular. A plug is additionally installed on the semicircular one to prevent birds, debris and water from entering the roof. The ridge is attached using self-tapping screws through one wave. A seal is placed under the bar. The overlap of the ridge strips must be at least 100 mm.
- The front strip is fixed to the end board. Fastening is carried out using 4.8x76 mm self-tapping screws. The front planks are also overlapped.
Errors in installing metal tiles
- Errors in roof calculations - it is better to entrust this matter to professionals, otherwise it may affect the cost and add additional costs.
- A sheet of metal tile the entire length of the slope - it is better to divide a long sheet of metal tile into 2 shorter ones. This will make the delivery and unloading of the material easier, there will be less risk of deforming the metal, and it will also make it easier to lift the sheet onto the roof and lay the roof.
- It is necessary to strictly follow the instructions for installing metal tiles and the “layout” that is offered to you when calculating the roof. Otherwise, the desire to save money can lead to additional seams on the roof, and this will affect the tightness and exterior.
- Refusal of counter-latching - laying tiles directly on waterproofing without counter-latching is undesirable. This can significantly reduce the life of the roof.
- Unleveled sheathing - as a result, the seams will be clearly visible and the waterproofness of the roof will be reduced.
- Saving on insulation - insulation is important, it prevents the under-roof space from cooling down in winter and from overheating in summer, it reduces the level of “noise” of metal tiles and minimizes condensation from entering the under-roof space, so it is important to achieve the right balance of insulation thickness and ventilated gaps to ensure air circulation.
- Using a grinder is a sure way to damage the polymer coating. Metal tiles can only be cut with metal cutting shears.
Preparatory work
Before directly laying the roofing material, it is necessary to carry out a number of preparatory work. First of all, you need to secure a layer of vapor barrier film to the rafter system. The film is secured to the rafter legs using staples, which are installed with a construction stapler or nails. On the inside of the roof, the film is fixed with bars that are nailed across the rafters. When installing a vapor barrier, you do not need to tighten the coating too much; the sagging should be 12-21 mm. Double-sided tape is used to connect two sheets. The overlap on the film must be at least 155 mm.
After installing the vapor barrier, the insulation is laid, the top is covered with waterproofing, on which the sheathing is already placed. The sheets are already being marked along the sheathing. It is convenient if the metal tile fits entirely into the roof without cutting.