This is not to say that flat ceilings are often found in bathhouses today. Modern construction technologies make it possible to make ceilings of better quality and faster. Such ceilings were typical for old bathhouse buildings with small dimensions.
Floor ceiling in the bathhouse
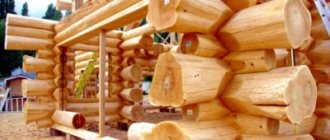
You can also find bathhouses in which the floor ceilings are made of hewn round timber; such a ceiling no longer required additional insulation. True, it should be noted that no one in those distant times could have imagined that the cheapest building material available to all classes (natural wood) in our time would turn into a very expensive pleasure, that natural lining would cost several times more than plastic.
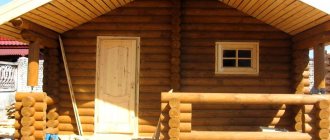
Steam room with flat ceiling
What are flat ceilings? From an architectural point of view, these are all types of ceilings, during the construction of which the boards are laid on top (laid) on the supporting structures, rather than hemmed to them from below.
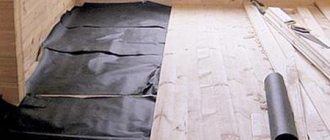
Photo of the floor ceiling
The threads can be laid directly on the walls of the log house (for small-sized rooms), on the ceiling beams (the size of the rooms can increase) or on the load-bearing slats around the perimeter of the room (for small baths). Each type of floor ceiling has individual construction features, which we will discuss below.
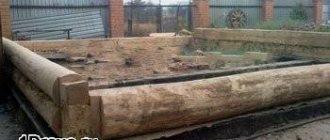
Photo of the installed load-bearing beams on which the ceiling boards will be laid
These ceilings have both their advantages and disadvantages. You can talk about them in detail after you become familiar with the methods of construction. Let's start by degree of complexity - with a flat ceiling along the crowns, then we will tell you how to build flat ceilings along the floor beams and finish with the simplest ones - along the slats.
Features of floors in such houses
Interfloor structures in a wooden house are a complex of several components, each of which is needed to perform certain tasks. The load-bearing beams will be the basis, the decorative coating gives the surface a beautiful appearance, the insulating layer works to preserve heat in the house, and the intermediate layers of steam and waterproofing are responsible for preserving the insulation and insulating the entire structure from moisture penetration.
Based on this scheme, most of the decorative coverings are attached directly to the load-bearing parts of the floor, and only tension structures are attached to the walls. This partly makes the task easier when renovating, but there is another factor that needs to be taken into account - the shrinkage of the house. It is this that will in many cases become the determining factor when choosing what the ceiling in a wooden frame will be like.
Bathhouse floor ceilings on floor beams
This type of flow no longer has strict restrictions on the size of the premises, universal use, and makes it possible, if necessary, to quickly convert an ordinary attic space into a usable one. Some builders use this method of installing ceilings as a decorative element - the appearance of the room improves, the bathhouse resembles an ancient building.
Decorative deck ceiling on floor beams
Step 1. Prepare the ceiling beams.
The choice of beams for flooring directly depends on the subsequent load magnitude
The photo shows an example of beams for the ceiling
It should be taken into account that these structures will be open; external visible surfaces should be carefully treated.
It must be borne in mind that the temperature and humidity in the bathhouse are high, and the use of existing paint and varnish coatings is not recommended. We recommend two ways to solve the problem.
- The first is to only sand the surface of the beams and not touch them again. Let them change their shade a little over time in a natural way, now it’s in fashion.
Sanding timber
- The second is to soak the beams several times with drying oil or ordinary vegetable oil.
Natural linseed oil
Wood after applying drying oilThis method will allow the tree to retain its original appearance for a long period of time. There are, of course, other methods for decorating beams; make decisions yourself or after consultation with designers. For example, in exclusive baths, individual interior elements are impregnated with natural beeswax - the smell in the rooms is amazing. Just don't confuse paraffin with wax.
Impregnations
Step 2. If the beams are round, you need to make a flat area for the ceiling boards.
Log ceiling beams
There are two options for leveling the site: on a sawmill or manually with an ax. Both methods have a right to life; you need to choose the one that creates the least inconvenience. Experienced builders can carefully saw off a segment of round timber using an ordinary circular saw. To do this, a cutting line is cut, and the material is supplied only manually. Another unpleasant moment is that you have to remove the protective safety cover; it significantly limits the visibility of the cut line. And working without it is highly not recommended. For your information, all woodworking tools operate at high speeds; according to statistics, carpenter injuries are one of the first in terms of the severity of the consequences of injuries among other working specialties. Always remember this, don't feel like an ace after a few hours of work. We are not saying that tools should be feared, we are calling for respect.
An example of a log sawn lengthwise
Chainsaw
Step 3. Install the ceiling beams into place in the log house. Carefully check the height of each on the upper planes. Not along the lower planes, as is done when installing beams for cladding the ceiling from below, but precisely along the upper ones. The distance between the beams is at least one meter, otherwise they will visually significantly reduce the height of already low baths.
Step 4: Lay the ceiling boards on the beams one at a time. For a steam room, it is advisable to use tongue-and-groove materials; they have better tightness characteristics. Even after significant changes in size, the tongue/groove connection does not allow through gaps to appear in the ceiling.
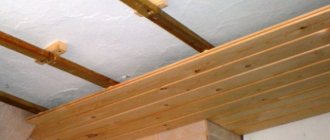
Finished ceiling
Various boards can be used, the thickness is selected taking into account the distances between the beams.
Prices for timber
timber
Video - Floor ceiling on beams
Video - Installation (installation) of wooden floor beams
Design options
Taking into account the different features of such buildings and the operating conditions of the coatings, the following design methods and materials are most often used:
- Drywall. Despite the fact that the compositions assembled from it cannot be rigidly connected to the walls, there is a frame option that allows you to finish the floors even in a newly built log house - this is the so-called “floating” structure, not connected to the walls.
- Tension covering. Perhaps the most successful choice for such buildings. The elastic fabric is not susceptible to deformation and withstands various operating conditions. It is important to choose the right type of fabric used to make the coating.
- Various panels. These can be metal parts, MDF panels, and the most inexpensive plastic strips. The latter will become one of the most economical ways to decorate country houses, which is not used all year round.
- Tree. Also a very good choice for a wooden structure. There is no more environmentally friendly material and it best matches the style of the building itself. In addition, finishing can be very inexpensive if you choose affordable lining or create a composition from treated boards.
Other finishing methods can also be used, but for various reasons they will be inferior to those mentioned above, either in cost or in their characteristics.
Suspended structures made of plasterboard and similar materials
The positive aspects of this design include the creation of a smooth and even ceiling surface, which is suitable for a wide variety of finishing. However, to get the result you will have to spend a lot of effort and time, since the work is quite labor-intensive. This is explained by the need to create a supporting frame.
An additional advantage of the design is the ability to create multi-level ceilings, which allow you to create various sophisticated interior options. They can be very stylish and expensive-looking, especially when combined with several types of lighting.
Drywall
If you decide to make a ceiling from this material in a log house made of logs or beams, you should first study the diagram of a decorative design suitable for them. It differs from the standard one in the absence of a rigid connection between the frame and the walls. The frame parts are attached to the floors using standard or vibration suspensions, but nothing needs to be attached to the walls. There remains a small gap of one to two centimeters between the edge of the covering and the plane of the walls, allowing the covering to move slightly if the house changes its geometry due to shrinkage.
Floor ceilings along the crowns of the bath
Let’s say right away that such ceilings will require a lot of physical labor, the ability to work with an ax and a chainsaw.
The ability to work with an ax will be useful when arranging the ceiling
Used for small rooms, the ceiling length cannot exceed 2.5 meters.
Natural boards are used to cover the ceiling; the thickness depends on the length of the room. We do not recommend using thick edged boards of 50 mm; it is much more profitable to use edged tongue and groove boards with a thickness of within 25 mm.
tongue and groove boards
Due to the tongue/groove connection, the loads are distributed over an increased number of boards, and the load-bearing characteristics of the ceilings are increased. And by reducing the thickness of the boards, you can save almost twice as much expensive material without reducing the load-bearing capacity of the ceilings.
Floor ceiling along the crowns of a log house made of tongue-and-groove boards
Floor ceiling along the crowns of a log frame made of thick edged boards
There are original design solutions for decked ceilings - they are laid with unedged sanded boards in two layers, the gaps between the uneven edges of the boards of the first level of the ceiling are covered with boards of the second level. The designs look quite beautiful, but as for their performance characteristics, it is difficult to find positive qualities in this regard.
Floor ceiling made of unedged boards
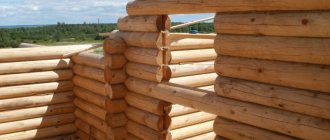
Floor ceiling along the crowns of a log house - photo
Let's consider step by step the option of constructing floor ceilings along the crowns of a log house.
The width of the area on which the boards will lie should not be less than five centimeters. Otherwise, during their fixation, the ends may crack, and this significantly reduces their load-bearing capabilities. This rule, by the way, applies to most board fastening points. We take into account that the height of the ceilings in the bathhouse varies within two meters. No one forbids making them higher or lower, but changing the height causes various consequences, both positive (it is more convenient to take the procedures) and negative (heating the bath will take more time and energy costs).
| Step, No. | Description of work | Illustrations |
| Step 1. | When the log house reaches the planned height, you need to start marking the location of the ceiling. Using a hydraulic level, make marks on two opposite ends of the room at a height of approximately 2 meters from the floor level. Beat off the lines with a rope with blue. This will be the horizontal level where the ceiling boards are located. | Log walls |
| Step 2. | Remove two opposite marked logs and move them to a level area. At the top of the log, beat off a line with a blue rope to the width of the platform. You will need to select L-shaped recesses from the log. | Scheme of cutting a groove for laying ceiling boards |
| Step 3. | Now the most difficult work begins - the manufacture of horizontal platforms. You can only work with an axe, which is very difficult and time-consuming, or use a chainsaw, which is somewhat faster and easier, but very dangerous. A gasoline saw must be constantly suspended; you will only need to cut with the end of the blade. All safety rules for working with chainsaws strictly prohibit working with the saw in this position without the teeth resting on the log being cut. | Choosing a groove in a log |
If you don’t have a lot of practice, we strongly advise against cutting with a saw in this way. You will not only ruin the log, but also risk your health. The cut needs to be controlled both along the marked line and at the cutting depth “by eye”. It is very difficult.
Grooving cuts
If the cuts are made, insert a chisel or ax into them and begin to chop out the sawn sections of the log. The work will not go as quickly as you want, a lot depends on how accurately you made the two perpendicular cuts.
Groove selection
It is desirable that they are connected along the same line throughout the body of the log. But it’s hard, you need a lot of practice and experience working with a gasoline saw. Unevenness in the horizontal platform must be leveled with an axe. There is no need to achieve perfect cleanliness; small irregularities can be perfectly caulked with inter-crown insulation.
If you are afraid to use a chainsaw, chop the area with an axe. And this work requires a lot of experience, skill and physical strength. The ax must be sharp and sharpened at the right angle. In logs of large diameter it is difficult to select the cut part; you need to make several additional cuts in each sector.
Some articles on the Internet on the topic of floor ceilings claim that the work is “very easy to do and accessible to everyone,” but you should not take these words literally and trust them unconditionally.
The work of preparing seats for ceiling boards in sawn beams is much simplified. You can use an electric portable saw for sawing.
Making a groove with a chainsaw
Adjust the depth of cut and guide the saw blade exactly along the marked line. Be especially careful when starting to cut; do not dig into the wood too quickly.
It's also very important to know. According to the technical data sheet, all electric tools have maximum power; this power is achieved at the highest loads. Never work with such loads for a long time; they cause severe overheating of the stator and rotor windings.
If you are lucky and a short circuit does not occur, then such loads will not pass unnoticed for the tool. Overheating of the windings reduces the insulation resistance, and the operating life of the electric motor is significantly reduced. It is better to make several passes with the saw over the same place with a shallow cutting depth.
Important. You cannot attach rafter legs to sawn beams; you will have to put an additional one or two rows of frame. Be careful when drilling holes for the dowels, they may split the ceiling boards and you will have to replace them.
| Step 4. | Place the two removed logs in place, prepare two opposite ones, and make notches for the inter-crown joint. Make joining marks for the cut out support areas on the new logs. Check their position again with a hydraulic level and, if necessary, adjust the platforms a little. Use a rope with blue to beat off the lines. | Making notches for the inter-crown connection |
| Step 5. | Remove the marked logs from the log house and place them on the prepared site. Strike a vertical line under the notch. Repeat all operations to cut down the site. Place the prepared logs in place. Check the flatness and horizontal position of the area under the ceiling boards. | Checking the correct installation of the log |
| Step 6. | Lay inter-crown insulation around the perimeter of the site. It can be tow, jute fiber, etc. | The photo shows the insulation - moss - laid between the crowns. |
| Step 7 | Take the width dimensions of the room; if the area is made with high precision, then all the ceiling boards can be cut to the same size at once. If there are significant deviations, then the size of each board must be measured separately. We advise you not to rush and mark each board separately. Still, the work on preparing the support platform was done manually, and the manual method cannot guarantee absolute dimensional accuracy. | Preparing the ceiling boards |
| Step 8 | Nail each board separately; to improve sealing of the cracks, increase the thickness of the tow or use jute fiber in two layers. | The photo shows the laid ceiling boards |
| Practical advice. | There are standard rules for choosing the length of nails depending on the thickness of the boards. Nails must be 2÷2.5 times longer than the thickness of the board being nailed; the diameter of the nails is regulated by state regulations and depends on the length. | Nail sizes |
| One more tip. | If the nails are driven in close to the end, there is a risk of the boards cracking. In these places, the nails should be driven in at an angle, this allows them to pass through an increased amount of wood fiber. And this doesn't help? We recommend drilling holes in the boards with an electric drill before hammering them in; the diameter of the holes should be approximately one millimeter smaller than the diameter of the nails. This procedure may seem like it takes a lot of extra time. In practice, this is not the case; calm, rhythmic work significantly speeds up the process. In addition, the risk of boards being rejected due to cracking of the ends will completely disappear. And this is not only time, but also money. | Drilling a hole |
| Step 9 | While nailing the ceiling, press the boards together. The last board will have to be adjusted separately in width. Carefully take measurements at the ends of the hole in the ceiling and cut the workpiece to the width. Sometimes it happens that the walls of a log house are not parallel, this is not a big deal. Cut the board at an angle and fix it in the remaining space. | Board saw |
Insulation of all floor ceilings is carried out using the same algorithm. Let's first consider the stages of construction of other types of floor ceilings, and then we'll talk about insulation methods.
Prices for unedged boards
unedged board
Prices for tongue and groove boards
tongue and groove board
Video - Floor ceiling along the crowns
Stretch ceiling
This option is best suited for use in wooden houses, since the canvas is elastic and is not afraid of any deformation of the building itself. However, here you need to pay a little attention to the choice of canvas. Film ceilings cannot be installed in a log house that does not have a constant temperature regime. In other words, if the house is not heated in winter, then only textile fabric that can withstand negative temperatures can be stretched in it.
Calculations
The first thing builders do is calculate the cross-section of the timber. Too large sizes will cause unplanned expenses, small ones will lead to sagging of the ceiling and even destruction of the structure. To carry out calculations, there are a number of formulas that take into account several parameters, including the moisture content of the wood, its load-bearing properties, in addition, the shape of the cross-section of the logs, the distance between them and the width of the span should be taken into account. To facilitate calculations and reduce the likelihood of errors, there are special calculators - programs into which you can enter all the key indicators and get the result. The load value usually does not exceed 300 kg/m, it includes the weight of people and furniture located on the second floor, as well as the mass of the beams themselves.
In practice, reinforcement or the use of composite beams is used - for this, two boards or beams are folded together and fixed using special fasteners or brackets.
Panels
Best suited for summer cottages. There is no need for luxurious finishing and often the price of the material comes first. That is why plastic panels are great as one of the most inexpensive design options. If you choose another material - MDF or metal, the finish will be more beautiful and, accordingly, will cost more, but this design can also be used in ordinary residential buildings - it looks very decent.
How beams are attached to the frame of a log house
According to physics, it is clear that the maximum load of the floor will be at the junction of the beam and the walls of the log house. You cannot nail the beam in this place or screw it with mounting angles. Here, only one connection is possible and technologically justified. A groove is cut in the crown to the height of the beam, and the beam fits into this groove.
It is worth noting that the attachment of beams to partitions inside the house can be done without cutting, on supporting (cranial) bars.
Tree
The easiest to install and very beautiful material, completely consistent with the rest of the interior, made of wood. Such a ceiling would be an ideal solution in a log house. The cost of finishing can vary from not too high to very high values if expensive wood species are used. However, this is a universal solution - for dachas you can use inexpensive lining, and in a reputable cottage the finishing made of oak or other valuable types of wood will look great.
Do-it-yourself ceiling in a log house: choosing the material
The ceiling in the bathhouse receives a lot of attention. After all, it has to withstand considerable temperature loads. Building materials should be chosen very responsibly. One of the most reliable options is wood.
Suitable for ceiling cladding:
- Linden. It has a pleasant aroma and a beautiful golden color that does not change with prolonged contact with steam.
- Larch. This tree also tolerates temperature changes well and practically does not rot.
- Aspen. The only disadvantage of this option is that the wood darkens over time from interaction with steam.
- Alder.
Coniferous wood material is not recommended for internal cladding; it is only good for external cladding, since these species emit resin that can harm the skin upon contact.
The lower the resin content in a plank structure, the better sound insulation and resistance to high temperatures it has.
Wooden structures must be treated with an antiseptic and fire retardant. This is necessary in order to protect the bathhouse from the appearance of fungus, mold and rot.