Why do you need foil film?
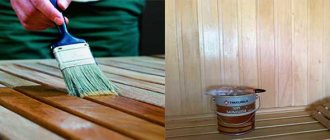
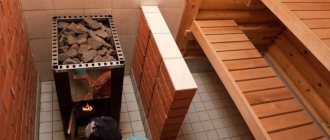
Foil film is used as a vapor barrier in rooms with elevated temperatures - in baths and saunas. This film does not melt and does not release hazardous substances even at a temperature of 120°C. Also, the reflective properties of the film are very important when installing modern steam rooms, because it is necessary to warm up the sauna in a short time and with a minimum of energy consumption.
But foil vapor barrier is justified not only in the sauna. If, when building a frame house, you replace the usual vapor barrier with foil, with the same heating power you can increase the temperature in the rooms by 2°C.
But reflective vapor barriers must be used wisely. Thus, it is not recommended for internal insulation of buildings made of heat-intensive materials (brick and concrete). Frozen walls will only worsen the microclimate. But in a wooden house made of logs or beams, foil film will be very useful for internal insulation.
Reflective vapor barrier is also suitable for an unheated loggia - a film laid under the floor covering will make it warmer. When glazing open balconies, when the entire perimeter is sheathed with sandwich panels that do not conduct heat, foil film will reduce heating costs.
Characteristics, pros and cons of foil insulation
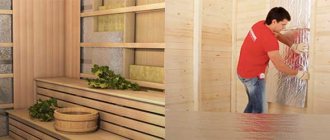
Foil insulation is a combined material of 2 layers: a base, which can be polystyrene foam, extruded polystyrene, glass wool (basalt wool) and a reflective layer - aluminum foil. This insulation works on the principle of a mirror: it returns infrared (heat) rays back into the room, and the base insulation retains that part of the heat that has broken through the foil.
Therefore, foil insulation is always laid with a metallized layer towards the heat, i.e. premises.
The most important performance characteristics of insulation with foil
The foil applied to the insulation significantly changes the quality indicators of the base:
- Sudden changes in temperature and humidity are better tolerated;
- the vapor permeability threshold decreases, almost to zero value - 0.001 mg/m*K;
- the thermal insulation capabilities of the insulation increase - up to 97% of the heat is reflected back into the room;
- sound insulation abilities increase even for materials with conditional noise protection properties - up to 68%;
- the operational life of the foundation increases almost 2 times.
Pros and cons of foil insulation
Insulating walls with foil insulation has its advantages and disadvantages. Among the advantages we should highlight:
- increase in service life by 25-75% of the type of insulation on which the foil is applied;
- improving the level of thermal insulation;
- appearance (expanded polystyrene) or improvement (basalt wool) of noise protection properties;
- reducing the thickness of the insulation, which leads to a reduction in mechanical loads on the building structure, and also preserves usable space in the house;
- more efficient heat conservation, which, firstly, saves the family budget, and secondly, reduces the load on heating systems installed in private homes. And this, in turn, extends their resource;
- absence of drafts in rooms insulated with heat insulators and foil;
- simple installation - you can insulate the walls yourself;
- moisture resistance - there are no restrictions on use in rooms with high humidity, for example, a bathhouse.
Important: in almost all materials in which foil insulation is considered, one of the main advantages is considered to be low price, which is an incorrect approach to analyzing the strengths and weaknesses of this thermal insulator. After all, there is such a range of prices on sale that it is better not to touch the price factor. It can be both a plus and a minus.
Among the disadvantages, first of all, you need to pay attention to the following points:
- no screed is poured onto foil insulation - the point of using foil for insulation is lost: it simply does not work;
- thin insulation with foil does not provide complete protection against heat loss. It is necessary to pair other thermal insulators with such material;
- to glue the butt seams, you need to buy a special, metalized adhesive tape, which increases the estimated cost of repairs (construction);
- It is undesirable to fasten insulation with foil with nails and dowels - the integrity of the foil layer is compromised, as a result of which the thermal insulation properties of the material decrease.
Properties and types of foil films
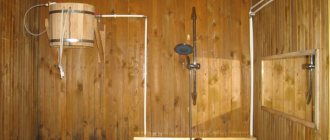
The foil film not only protects the insulation from moisture penetrating from the premises. When using a foil vapor barrier in a sauna, you can protect the inner lining from mold and rot, which inevitably appear due to constant condensation after the steam room is turned off. Thanks to the reflection of heat, condensation simply does not settle.
The characteristics of foil film depend on the materials from which it is made:
- based on kraft paper - such films are inexpensive and easy to handle, but are hygroscopic and tear easily;
- polymer-based - they are strong and durable, but more expensive;
- with aluminum coating - the thickness of the aluminum layer of these films starts from 0.3 microns, but the smaller the coating, the worse the heat-reflecting properties;
- with aluminum foil - films with a foil thickness of 10 microns or more provide the maximum level of heat reflection (up to 97%), but are susceptible to corrosion.
Thus, it is most rational to insulate a bathhouse using polymer-based films coated with aluminum - they are not subject to corrosion, can withstand high temperatures and are quite durable, which simplifies installation.
Films based on kraft paper can only be used in dry rooms - they are not suitable for the kitchen or bathroom. And for heated floors, films with aluminum foil are better suited, which evenly distributes heat, smoothing out possible cold bridges if the pipes are not laid tightly enough.
Films Ondutis R Termo
Used to protect insulation, wooden and metal structures.
When insulating an attic floor or installing a roof in a residential attic, R Termo foil film allows you to retain heat, reducing heating costs.
Vapor barrier has a water resistance of 1000 mm water column and minimal vapor permeability - less than 10 g/m2 per day. At the same time, it calmly tolerates temperature changes from −40 to +120°C. Strength is indicated by a breaking load of 150 N along and 130 N across - the Ondutis R Termo film can withstand an adult and fairly well-fed person.
Installation of foil films
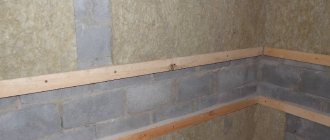
The installation process of foil vapor barrier is practically no different from the usual one:
- The film is rolled out horizontally and begins to be attached from bottom to top with an overlap (10 cm). It is important not to confuse the inside and outside sides - foil vapor barrier is installed only with the shiny side inside the room.
- It is nailed to wooden structures with a mounting stapler, and to concrete or brick walls - with a special mounting tape.
- If a vapor barrier is being installed for the entire room, first it is laid on the floor with an extension of 10 cm onto the walls, then the walls are sewn up and lastly - the roof insulation.
- To ensure a vapor barrier, all joints are first fixed with mounting tape and then taped with metallized tape. All passage elements are also glued with mounting tape - chimneys, pipes, electrical cable exit points.
- A beam with a thickness of 3 cm is nailed on top of the film - it provides a ventilation gap, which is mandatory for foil films.
In order for the vapor barrier to last a long time, it is better to glue the film together with butyl rubber tape, and use it to seal the places where the film is pierced with nails or a stapler. It is also advisable to additionally fix the overlap with a rough filing board - the adhesive tape may come loose over time.
6 votes, please rate the article:
Instructions for installing isospan
Steam, moisture and wind protection of a building is a complex undertaking. Using glassine or plastic film is ineffective. Izospan was developed specifically for this purpose and its high qualities have been tested in practice.
For installation, in addition to the isospan itself, you need a supply of tools and fasteners:
- special scissors;
- self-tapping screws;
- construction stapler;
- connecting tape;
- metal profile or wooden slats.
It should be remembered that on the walls the membrane is attached both from the inside of the room and from the outside, and on the roof - only from the inside. The features of a specific type of isospan are reflected in the instructions for use of the material.
Installation of group A membrane
The best use of this thermal insulation, waterproofing, windproof membrane is to protect the frame wall of low-rise buildings from moisture and wind. It is mounted on the outside of the insulation layer under the exterior finishing of the building.
The outer side of isospan A prevents moisture and wind from affecting the condition of the insulation. Internal - prevents the formation of condensation, because has the property of removing steam
Isospan A is laid in accordance with its technical characteristics on top of the insulation using a special frame.
The technology is simple and does not require special qualifications:
- The roll is unrolled and cut into panels of the required size.
- Alternately, place the membrane pieces on the frame horizontally overlapping with the even side out, starting from the bottom, and moving up.
- Fasten the protection to the frame with an overlap, using a construction stapler or another method. The minimum amount of overlap both horizontally and vertically is 100 mm.
- The material is further strengthened. To do this, the stretched panels are pinned to the rafters with a construction stapler.
- To seal the overlap, the joints of the panels are fastened with 2-sided isospan KL tape.
- Self-adhesive tape is laid in the fastening area.
- Wooden counter-battens are attached on top of the isospan layer vertically in relation to the frame. They are pre-treated with an antiseptic. The size of the slats is 40 x 50 mm. They act as a supporting structure for external cladding - in the form of lining, siding, etc.
A prerequisite is a ventilation gap equal to the thickness of the counter-batten between the isospan layer and the outer skin. The edge of the membrane at the bottom is located so as to divert the flowing moisture into the drain of the building's base.
Laying Am and As films in an insulated pitched roof
For this type of roof, experts recommend choosing isospan Am or As.
The material protects the supporting structure and insulation from condensation that collects under the roof, as well as from snow, wind, and moisture that enter through loose coverings.
The membrane is laid without a ventilation gap, so there is no need to install additional sheathing between the insulation layer and the isospan. Secure it taut.
The sequence of operations is as follows:
- The roll is rolled out and cut directly on top of the insulation.
- Lay out the panels horizontally, turning the white side towards the insulation. The beginning of installation is the lower part of the roof. The segments overlap horizontally and vertically by at least 15 cm.
- Strengthen the membrane along the rafters with a stapler.
- The joints are fastened with continuous 2-sided isospan KL tape.
- The traces of fastening with nails or self-tapping screws are covered - glued with a self-adhesive strip along the rafters and other elements. This is especially true for roofs with a slight slope - up to 22⁰.
- Antiseptic wooden slats 4 x 5 cm are attached vertically over the tape along the rafters.
- Install the sheathing along the counter-battens. Depending on the type of roof, it can be a continuous deck.
To eliminate under-roof condensation, a condensation gap is created between the front side of the film and the roof covering using slats about 50 mm thick.
For free movement of air in the space under the roof, the bottom of the roof and the ridge area are supplemented with ventilation holes. Moisture from the surface of the membrane flows into the drain along the lower edge of the membrane
When installing isospan over the sheathing, slight sagging is allowed. A membrane without insulation is practically useless.
Application of insulating material B
This type of membrane perfectly performs the functions of a vapor barrier, protecting the insulating layer from water vapor rushing upward from the side of the room, and also protects the space of the rooms from insulation particles getting into them.
It is mounted on the insulation side facing the inside of the room. Installation is carried out using a construction stapler on rafters or rough sheathing. Sometimes galvanized nails are used for this purpose. It is correct when the flat side is closely adjacent to the insulation.
Work starts from the bottom. The vertical and horizontal overlap is the same as when installing other types of isospan - from 150 to 200 mm.
As in the case of isospan Am, the joints are glued with Izospan KL, SL tape. Contact points of the material with structures made of any material are sealed by using a one-sided adhesive strip of isospan ML proff.
If the room is finished with clapboard, the vapor barrier is fixed using wooden slats 4 x 5 cm impregnated with a septic tank. For sheathing with plasterboard sheets - galvanized profiles
The interior trim is attached to the wooden base with a ventilation gap of about 40 mm. If isospan is used as a vapor barrier for a frame wall, it is fixed on the inside of the insulation to the loaded parts of the frame or to the rough sheathing.
A stapler is used as a tool, although it is also possible to use galvanized nails. It is laid on the insulation with the flat side facing it. When finishing walls with plasterboard, galvanized profiles are used, and for clapboard walls, wooden counter-battens are used.
Izospan as a vapor barrier for the attic floor is placed in between the finishing material of the ceiling - the rough ceiling. The smooth surface is turned towards the latter. In this case, a ventilation gap is also required.
A vapor-permeable membrane of grade B is also a good hydro-vapor barrier for interfloor ceilings. Mounted between the ceiling trim and the rough system. The rough side is turned down. They are secured to the beams with an overlap.
A ventilation gap is created between the insulation layer and the final layer of vapor barrier, between the finished floor and the vapor barrier layer, between the finished ceiling material and the bottom layer of isospan B.
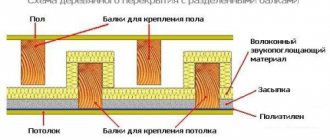
Scheme of waterproofing the basement floor. Here 1 - floor, 2 - isospan B (vapor barrier layer), 3 - membrane D (as a hydro-vapor barrier), 4 - insulation layer, 5 - counter-batten, 6 - beam, 7 - ceiling
The bottom of the basement floor must be protected with a layer of vapor barrier. This must be done so that moisture does not penetrate from the ground to the insulation and other structural elements. The recommended type of isospan for this purpose is D.
The best option for using brand D
The type of isospan D for cold pitched roofs is an excellent hydro-vapor barrier. By using it, they protect the elements and structures of the attic room, made of wood, from under-roof condensation, snow, wind, and atmospheric moisture.
When starting the installation of a protective barrier for a cold pitched roof, isospan D is spread out and cut out. All this is done directly on the roof rafters. The advantage of the material is that it does not matter which side this isospan is attached to, which is very convenient.
Horizontal sections are installed overlapping, traditionally starting from the bottom of the roof structure.