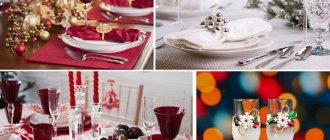
In a modern home, a candlestick plays not so much a functional role as a decorative element in the design of a room. Thanks to candlesticks, you can create the right mood and give the atmosphere a romantic and festive feeling.
Candles in original candlesticks are appropriate not only for a holiday or a romantic evening, they will perfectly complement any dinner and add a touch of enthusiasm. Unusual and at the same time very beautiful candlesticks from different glasses can be made quite easily with your own hands. Such candlesticks will only emphasize the shape of the candle and create an exciting and mysterious atmosphere at any time.
Option 1
We will need:
- stemmed glass;
- brush;
- PVA glue;
- salt;
- decor (buttons, rhinestones, stones).
Sequencing:
- Wash the glasses thoroughly and wipe dry.
- Dip a brush into glue and draw simple patterns (curls, inscriptions, funny figures).
- Pour salt into a deep container. Cover the glass with it, removing excess.
- We are waiting for it to dry completely.
- If desired, the inside of the glass can be decorated with rhinestones or beads, placed on glue.
- Drizzle a little wax onto the bottom of the glass. We attach a candle to them.
The candlestick is ready. All that remains is to decorate the festive table with it, creating a fabulous mood for yourself and your guests.
Interesting: DIY New Year's gift bags 2021: master class with photos
Decor ideas
You can decorate finished candlesticks in different ways:
- tying the stem of a glass with twine or ribbons;
- finishing the stem or surface of the glass with rhinestones and beads;
- painting;
- decoupage
When decorating a craft, it is important to remember the balance of styles, and also be able to stop in time. A product overloaded with details is difficult to perceive; it will stand out from the interior. The decor should correspond to the general atmosphere and theme of the holiday when serving.
Option 2
After watching this master class, you can easily make a candlestick from a glass with your own hands for the New Year.
We will need:
- thuja twigs;
- paper or newspaper sheet;
- tall glass (preferably large);
- glue (preferably in the form of a spray);
- scissors.
Sequencing:
- We lay out the branches cut to the desired size on paper.
- Spray glue on them. If you don’t have a spray on hand, apply it with a regular brush.
- We cover the inside of the glass with thuja all around. We try to do this quickly, without letting the glue dry out ahead of time.
- Leave the workpiece for 15 minutes, after which we cut off all protruding pieces.
- We select a candle and place it in a glass.
The original candlestick is ready to fulfill its main function - to become an interior decoration.
Interesting! The first wax candles appeared in the Middle Ages and were incredibly expensive.
Not every person could afford them.
Master class No. 1: Confetti style glasses
Wine glasses decorated with small peas look very festive and can be either elegant, as in the photo below, or cheerful, multi-colored. The circles are associated with champagne bubbles or bright confetti.
Difficulty level: very easy.
What you will need: acrylic or contour paints for glass and ceramics; regular nail polish will also work (but acrylic paints are much more durable) or a special marker for painting dishes. To degrease the wine glasses, prepare nail polish remover, degreaser or alcohol; for drawing - cotton swabs, a pencil with an eraser at the end or a small hard synthetic brush, and to correct the drawing - cotton pads and swabs.
Painting technique:
- Wash and degrease the glass thoroughly with alcohol or another product using cotton pads or a napkin.
- Now you can start drawing circles. Squeeze a little paint into a small container or just onto foil (paper, file).
Turn the glass over and start placing dots from top to bottom, maintaining the same interval between them. You can draw points as in this master class, that is, starting from large to small, gradually increasing the distance between them. Otherwise, the dots can be the same size, different in color, and they can also form a pattern or pattern (point to point or pique technique), and also slightly overlap each other.
Advice:
- It is convenient to place large dots with a pencil eraser, and small ones with a brush or a cotton swab with a pointed end, as in the photo below (scroll through).
- It is better to maintain a distance of about 2 cm from the edge of the glass to the drawing, especially if the paint is toxic.
- If you draw with contours, then first you need to practice placing small, medium and large dots on paper at the same distance from each other and with the same degree of pressure on the tube.
- Now you need to let the paint dry. Drying methods largely depend on the paint; usually the manufacturer specifies drying time and firing instructions.
- As a rule, painting with acrylic paints or contours requires firing if you want to use the glasses frequently and wash them in the dishwasher. To do this, you need to put the glasses in the oven at a temperature of 150-170 degrees for 30 minutes, and then turn off the oven and, without removing the glasses from it, let them cool naturally;
- The markers dry for 24 hours and do not need to be fired;
- Nail polish dries quickly, but the design will not last long, so this option is not suitable for decorating gift or wedding glasses that you want to keep as a keepsake. But you can’t find better paint for themed parties.
Here are other ideas for painting glasses with multi-colored polka dots that will decorate any fun party (scroll the photo to the right).
Gold, silver, and white polka dots are more suitable for decorating wedding glasses.
By the way, circles can be not only drawn, but also glued. You can buy vinyl self-adhesive paper of the desired color and cut out circles from it using a hole punch or special scissors, and then carefully glue them onto the glass. The photo below shows glasses decorated in this way.
Option 3
This method is perhaps the simplest. Making a candle stand is quite possible in a matter of minutes.
We will need:
- stemmed glass;
- short candle;
- white lace;
- a sprig of fresh flowers, berries or a cinnamon stick.
Sequencing:
- We put any decorative elements at our discretion into the glass.
- Glue a disk or a piece of cardboard cut to size to secure the contents inside. Then the candlestick can be moved without fear - the decorative elements will not fall out.
- Turn the glass upside down.
- Place a small decorative candle at the base of the leg. If there is no such thing, cut off the required piece from the usual one.
- We decorate the candlestick by gluing a lace border to it.
The result was a simple composition.
Note! Since natural light overshadows the warm glow of a candle, they are not placed on the holiday table during the day. The meaning of enchanting properties disappears.
Note: Decoupage of a champagne bottle for New Year 2021: step-by-step master class with photos
floating candle
The “tablet” floating in a glass looks very nice. When performing this option, any shaped vessel is suitable - for champagne, wine or martini. The following is placed in the hollow part of the glass as decoration:
- beads;
- New Year's balls;
- rose hips and twigs;
- pine needles;
- fern leaves.
If you pour liquid glycerin into a glass half full of water, you can add sparkles - they will settle beautifully and slowly. Thanks to it, the candle-tablet will become more confident in adhering to the surface of the liquid.
Option 4
Decoupage will give a glass candlestick a sophisticated look. The manufacturing technology is a little more complicated than the previous ones, but the process is quite exciting.
We will need:
- wineglass;
- acrylic paints;
- varnish;
- glue;
- circuit;
- candle.
Sequencing:
- Degrease the surface of the glass.
- We prime it with one layer of acrylic paint. To ensure that the base lies evenly, it is better to use a sponge rather than a brush as a tool.
- In order not to waste time while the paint dries, let's do decoupage.
- We cut out simple patterns from a napkin (you can take an idea from the Internet).
- Glue the design onto the bowl, smooth it out with a brush, removing all the folds.
- We highlight some details with paints and emphasize them with outlines.
- We coat the vessel with varnish.
- We insert a candle inside.
Advice! Candles in candlesticks or candelabra are installed so that the flame is above eye level, this will prevent irritation.
Master class No. 2: Artistic painting of glasses
In this master class we will turn glasses into flowers, because its stem is so similar to a stem, and its bowl is like a bud.
Difficulty: medium.
What you will need: any degreaser, cotton pads and cotton swabs for degreasing and pattern correction. And for painting, prepare synthetic art brushes of different sizes, a plastic plate or palette for mixing paints, as well as acrylic paints for glass and ceramics. If you wish, you can complement the drawing with contour and stained glass paints, markers and glitter.
Drawing technique:
- Degrease the surface;
- Mix paints on a plate or palette, achieving the desired shades. In order to make the color pastel and delicate, colored paint is mixed with white;
- Now we need to draw the stamens: we put dots with a narrow small brush or a cotton swab with a pointed end. Pollen color can be black, yellow or orange. In our master class, we use yellow to paint the stamens of the lilac Italian aster and black for the sunflowers.
Next, drawing the flower will be layered, so you need to wait until the drawn stamens dry. You can dry them naturally, leaving them for 2 hours, or bake them in the oven at 150-170 degrees for 15 minutes.
- Once the drawn pollen has dried, you need to draw the petals as shown in the photo below. If desired, draw details - veins and color nuances. Then you need to let the paint dry (see point 3).
- The last step is to paint the peduncle and stem in green and bake our glass flower again, but now for 30 minutes - and then the paint will not “peel off” the glass for a very long time.
Well, that's all, the decor of wedding, gift or holiday glasses is complete.
In the photo below you can find other interesting painting ideas with floral and plant motifs (scroll through).
And here are examples of painting on glass with peacock feathers.
The theme of flora and fauna is also very popular.
Glasses for festive serving of themed parties can be decorated brightly and funny.
Glasses as a gift or for a wedding can be additionally decorated with rhinestones, feathers, pearls, sparkles, ribbons and other decor.
Option 5
While creating a magical atmosphere on the eve of the main winter holidays, we do not forget about an important element of interior decor, which is a candlestick. We will make it for the New Year with our own hands from a glass.
We will need:
- wine glass;
- foam ceiling tiles;
- any figurine;
- spruce branch;
- golden ribbon;
- rhinestones, beads;
- glue.
Sequencing:
- Place the vessel upside down on the foam plastic, trace the outline, and cut out a circle with scissors.
- The next step is to decorate the composition that will stand inside. We do it as our imagination dictates. For example, we tie a fir branch around the figure’s neck, or we fix a Christmas tree toy with glue in a free space.
- Glue it to the foam, decorate it with rhinestones and a golden ribbon.
- Place the craft in an inverted transparent vessel. And cover the bottom with a foam circle.
The decorative candlestick is almost ready, all that remains is to complete the final touch - place the candle on the stem and light it.
Interesting: How to make a fireplace with your own hands from boxes: interesting ideas
New Year's composition made of glass candlesticks
The photo shows a composition created from several candlesticks made from glasses.
Make two candlesticks using the magic glass ball technology, choosing the same type of decor for the inverted bowl. Decorate the legs of the improvised candlesticks with fir branches, gluing them with Moment glue and tying them with narrow silk ribbons of a suitable color.
Fill a third glass of the same shape 2/3 with coffee beans and place a candle in it. The stem of this glass can also be decorated with pine branches and ribbon.
Option 7
Just think, thanks to your imagination, a simple glass can easily be turned into a candle stand. Moreover, there are a lot of execution techniques. Let's consider a New Year's example.
We will need:
- wineglass;
- twine;
- for decoration peas, red beans, corn;
- candle.
Sequencing:
- In a clean, dry glass, first pour a layer of peas, then beans, and corn.
- We put a candle in the middle.
- We tie a rope on the glass with a bow.