Collecting and decorating a herbarium with your own hands
How to make a herbarium with your own hands? You should study the sequence of actions and follow it exactly. The herbarization algorithm was developed by Carl Linnaeus back in the 18th century. Since then, the rules for collection, drying and storage have not changed.
Bouquet of dried flowers
Dried flowers in the interior
DIY herbarium in glass
Using glass for a herbarium is an original and interesting solution. The easiest option is to buy ready-made glass frames that can be hung or placed on any surface. Special glass for the herbarium has a convenient lock; you just need to place the plant elements and close it.
Let's look at how to prepare plants and secure them between two glasses.
Prepare specimens of plants in accordance with the picture you have in mind. If you insert flowers into glass, the stems need to be cut as short as possible and the leaves removed so that the flower is well compressed.
To create a brighter picture and please the eye, add flowers of different colors.
Place all the elements on a paper towel; the flowers should not touch each other. Next, place under a press and leave for a week. The moisture must leave the flowers, this is important.
Once drying is complete, place the flowers on the glass.
Use glue or a hot glue gun to hold them in place.
Then cover the flowers on top with another piece of glass.
Frame it.
The herbarium under glass fits well into the interior.
How to make a herbarium under glass yourself, see the video below.
How to properly collect plants for a herbarium?
You should clarify which plant species in your geographic region have rare and protected status. You should not collect a herbarium for personal use from protected specimens.
It is better to collect plants in dry weather. To sort by morphological characteristics, specimens are dug up along with the roots. Samples are selected that are healthy and intact. Roots and stems that are too thick and inconvenient for drying are cut lengthwise.
Shoots with buds and greenery are cut from bushes and trees. If the plant had to be dug up, it is cleared of soil residues.
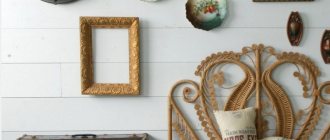
Herbarium in the living room interior
Herbarium in the living room
Master class: herbarium “under glass”
In such articles, more attention is paid to working with epoxy resin, but I want to put emphasis on preparing plants, since I myself often got burned doing this. Although you might think that it’s so difficult to dry the leaves? But I climbed into the botanical jungle, saw their “dryers” and ran away from there. My main problem was the loss of color of some petals. Maybe sometimes there was a problem in the resin, or in the fastening of the plants, but now I have reduced the percentage of dull flowers to a minimum, during drying and then, when they are already in the resin.
After collecting the plants, I place them on rice napkins. Personally, I gave up newspapers completely. Well, I’m not friends with them. Sometimes the petals cannot be separated from it, sometimes the imprints of letters on the petals are visible, this can also be due to a wet plant, but my such “flaws” are hidden by the rice paper. Then I cover the top of the plants with rice pads and place a small magazine on top. The plants remain “in the rice napkins” for several hours.
When the excess moisture is absorbed, I collect the plants in a press. I very rarely use books).
Here's a sandwich: corrugated cardboard, paper, plant, paper, cardboard
I put everything in a press, which is tightened with screws; I bought it by accident in the children's department) And yet it came in handy).
After pressing, I store flowers with petals, especially blue flowers, for several days in a layer of fine sand. I pour a small layer of sand onto a tray, lay out the flowers and cover with a thin stream of sand, also not a large layer.
I store flowers in tightly closed jars
The press is especially good for “dense” plants, so as not to stack stacks of objects on top of each other).
On the left is a leaf dried in a book, on the right in a press.
Now to the decoration itself. I usually cover the workpiece with a white background, it can be polymer clay, but most often it is enamel paint. In finished form, the difference is not significant.
I lightly glue the plants to the base with decoupage glue. I cover flat sheets completely, voluminous ones only the back part.
Next is pouring with epoxy resin. You can read more about working with resin here.
I fill the blanks with thick resin so that it does not spread around the edges. I speed up the thickening process by putting the resin in hot water (not boiling water), also at this time air bubbles that can form while mixing parts of the resin come out faster. Sometimes I get rid of bubbles after pouring using an embossing hair dryer; unlike a regular hair dryer, it heats more than it blows. In the photo he is in the upper right corner.
I pour the base with the flower in a thin stream. I place all the workpieces on a plasticine leg; in case of a resin spill, it is easier to eliminate the consequences. Then I cover the workpiece with a lid, but so that there is access to air. Dust flies onto the resin very readily.
After 48 hours, the plants emerge immortalized in resin, as if in a large drop of dew.
How to properly dry collected samples?
To dry plants correctly, a special device called a herbarium press is used. It consists of two planks, along the edges of which there are holes for strands. Prepared samples are placed in large quantities between planks, which are tied together with ropes. One herbarium press holds about 50 specimen inserts. The result is something like a thick, bound book. The insert sheet (also called a shirt), in which the plant is embedded, along with the label, is placed in a press, lined with sheets of paper on both sides.
Plants that are too juicy are dried after scalding them with boiling water. During the day, the herbarium press is taken out to dry in the sun. At night they are returned to the room. It is recommended to replace the sheets that line the plant inserts with dry ones at least once a day. How can you tell if a plant is already dry? Leaves and flowers should be fragile in appearance and not sag in an upright position.
To obtain a herbarium of mosses or lichens, the sample is dried in the open air in a cardboard box.
Decor from dry leaves for Halloween
Paintings from the herbarium in the interior
Under pressure
Professionals dry the plants using a special botanical press. It consists of two wooden frames. A metal mesh is stretched over them. The frames are held together with straps or screws. A jacketed sample is placed between the grids. The belts are getting tighter every day. The “shirt” needs to be changed regularly.
How to make a herbarium from leaves at home? Instead of frames, you can take a thick book. You should do the following:
- Gently straighten the leaf and place it between the napkins.
- Place this design in a book.
- Put some weight on it.
Napkins are needed in order not to stain the pages with the juice secreted by the plant. This method allows you to obtain a sample in approximately 3 weeks. To speed up the process, you need to change the napkins daily. Then the sample will be ready in 10 days.
Herbarium design
According to the herbarization rules, the folder is placed on a horizontal surface, then the plant is placed in it, trying to preserve its natural shape. Excess leaves that interfere with planting can be carefully removed, but the petioles should remain in place of the removed leaves. A certain number of leaves and flowers are turned with the bottom side towards the observer.
The dried herbarium is prepared in a special cardboard folder. On one page you can place several plants of different shapes and sizes.
Lavender in the interior
Herbarium of leaves in the interior
What is a herbarium
The name of the herbarium comes from the Latin word herba - “grass”. It is a collection of dried plants listed in a special catalog. Italian botanist Luca Ghini became the first person to collect a herbarium using paper. This material is very hygroscopic and allows long-term storage of the collected material.
Nowadays, more than 10 thousand botanists working in 168 countries around the world are engaged in collecting and preparing herbariums. The largest collections of plants are kept in scientific institutes of the USA, France, Russia, and Switzerland. Moreover, modern techniques make it possible to store information not only in the old way - at the moment there are so-called digital herbariums. They are scanned photographs of herbarium sheets with complete information about the specimen. If you can see the largest collections only by visiting a museum or scientific institute, then electronic catalogs are available online.
Related article: Crochet dress for girls: video tutorials for beginners
Anyone can assemble a herbarium at home, because for these purposes special paper, glue, presses for drying samples, and folders for storing them are now on sale. But to create a collection it is not at all necessary to use these materials; it is enough to show a little resourcefulness and use what is at hand. You can see design ideas in the photo:
Involving children
Children will certainly be interested in what you do with herbs and flowers. Doing a herbarium will help your child learn more about the types of plants that he sees during walks.
Kids will have fun decorating dried flowers using coloring paper. Grasses with small veins and details are suitable. To prevent thin ink paper from becoming wrinkled, it is placed on thick cardboard. The child places the dried leaf on dyeing paper, covers it with glass and takes it out into the sun. After a few minutes, the emerging imprint of the plant will become clearly visible on the blue leaf.
You can invite your child to make an unusual herbarium: an imprint of a plant on salt dough or modeling clay.
Wild onion herbarium
Autumn leaves decor
Leaves panel
Drying leaves
The simplest method of drying in natural conditions is considered to be drying between the pages of a book. If the foliage was not wet and too juicy, this option is ideal.
In order not to spoil an expensive publication, first place a layer of paper between its sheets and the sample.
The collected specimens are placed to dry in one layer. They are aired daily and transferred to other sheets of the book to avoid mold. The top of the book can be pressed down with a press so that the samples do not bulge. After 5-10 days you can start creating a collection.
Related article: Sunflower made of beads: master class with diagrams and video
The next common drying method involves using an iron. The collected samples are placed between two sheets of white paper and ironed at medium temperature. You need to be prepared for the fact that the exicate (dried sample) will lose its natural color.
Compositions of dried flowers in the interior
A beautiful herbarium on the wall in a frame or vase can completely transform your home. The herbarium will fit into any interior. The room in the style of strict minimalism will be decorated with paintings of “experimental samples” taken from the botanical collection.
On the walls of the children's room, the child will be delighted with paintings in wooden frames with children's appliqués. Dry compositions made from spices or ears of corn are suitable for the kitchen. You can place dried gifts of autumn in the living room. Delicate bouquets of green ears in decorative vases, romantic and sensual flowers under glass will complement the bedroom interior.
DIY lamps are covered with paper with a painted herbarium. Dried flower arrangements in glass bowls and candlesticks are interesting.
Ceiling decor with dried flowers
Pressing plants for herbarium
How to make a herbarium from flowers, how to dry flowers for a herbarium
Immediately after collecting flowers, you need to start preparing for the drying process. Lay it out on paper, straightening each petal.
Drying should take place under pressure. If there is no special herbarium, you can use books. It is important to lay paper on both sides of the plant; if the flowers are large, there should be several sheets. The paper should be changed every day. The entire drying process takes from 7 to 14 days.
Herbarium of leaves
A leaf herbarium is obtained by drying shoots with leaves in the open air. When the deciduous herbarium has dried well, it can be covered with glass and framed. The paper on which the foliage herbarium is pasted should be of medium density.
Dry leaves under glass
Herbarium in the dining room
Herbarium of flowers
A herbarium of flowers is dried in the open air. A neatly formed bundle is tied with thread or wire, hung or placed in a dry low vase. Wheat spikelets and poppy heads are formed in a vertical position.
Herbarium in Provence interior
Creation of a herbarium
Floral arrangers know how to make a flower herbarium using a set of simple tools. Before starting to compose a flower arrangement, a novice florist-arranger will need:
- a light porous base on which the composition will be formed (floral sponge, wet sand, placed in a plastic bag and tucked into a vessel);
- metal pins for attaching dried flowers to the base;
- bamboo or straw twigs of various lengths for stability of the composition;
- brown or green colored paper;
- transparent adhesive tape;
- glue, scissors.
When composing a composition, you should remember about color combinations: dried flowers in one bouquet should not contrast too much. It is better to choose colors that are muted rather than bright. Accessories such as ribbons, bows and lacing should not distract attention. Arrangements of dried flowers should be fastened and decorated with cotton or linen ribbons.
Dried flowers in the interior
Wreath of dry leaves
Sometimes dry compositions are placed in openwork bouquets. The shape and size of the vase or bouquet holder are selected based on the dimensions of the composition. Decorative vases made of clay and wood are suitable for dry bouquets.
Herbarium on the mirror
Unusual option
Sometimes the interesting task of compiling a collection of plants begins to be given to children much earlier. To make it interesting for your child to look at the herbarium for kindergarten, we suggest you decorate it using a very interesting technique - casts.
A cast of the sheet can be made on salt dough or plaster. In the first case, the dough is kneaded according to the basic recipe: mix fine salt and flour in equal proportions, carefully add water until a plastic mass is obtained.
Related article: Do-it-yourself origami paper crane: diagram with photos and videos
Roll out small dough medallions. Press the leaves into them using a rolling pin with the side with the veins. Dry the dough, then remove the leaf and paint the surface of the print.
The second version of the cast is made of plaster. This technique is not that difficult, but the result will be a beautiful and durable picture. To make it, you will need:
- plastic bag;
- plastic plate;
- plasticine (can be old);
- gypsum, water;
- collected leaves;
- dye.
The process is very simple, the photo instructions will allow you to see it in detail.
Please note that the print should be positioned with the design facing you.
Pour in and leave until completely dry.
We take out the plasticine.
We paint and varnish.
Such a panel will take its rightful place in the interior and will become the real pride of the baby.