Each of us associates absolutely any holiday with something bright, spectacular and certainly unforgettable.
In order to accomplish all this, it is necessary to create a truly festive atmosphere, as if in a cozy city apartment, country house, cottage, cozy cafe, school classroom or noisy office. In this article, the News portal “Vtemu.by” has prepared especially for you several simple and very original ways to create garlands with your own hands from colored, decorative or corrugated paper.
With ready-made garlands you can decorate anything: rooms, offices, shops and offices, entrances, assembly halls, etc. Any holiday or party will become much brighter and more fun if the room in which it is held is festive and beautifully decorated.
So let's get started...
To make your own garlands you will need the following materials:
- Colored paper, decorative paper or corrugated paper;
- Scissors;
- Strong thread;
- Glue.
Since our article contains a large number of all kinds of paper garlands, we will describe the production of each separately.
DIY garland “Spiral”
You will need to cut out circles from colored or decorative paper. Then, using scissors, cut a strip of the same width in a circle, thereby obtaining a kind of spiral. To make the garland long, glue the resulting spirals together with glue.
How to make a heart-shaped garland
Homemade heart pendants are best suited for decorating a Valentine's Day party or wedding anniversary, but they can also be used for other family celebrations. There are a lot of options for garlands of hearts, we offer the simplest and cutest one.
INTERESTING: Making a cube out of paper
You will need:
- colored paper (sheets from a school creativity kit are quite suitable);
- decorative twine;
- scissors;
- stapler;
- hole puncher.
Traditionally, hearts are made of pink paper, however, if desired, you can cut them out in different colors.
- Cut the paper into strips. For one heart you will need two strips 17 x 2.5 cm long, two 14 x 2.5 cm, two 11 x 2.5 cm and one strip 9 x 2.5 cm.
- Alternately fold each strip in half, and without bending, insert into each other according to the “matryoshka” principle according to the diagram in Fig. 2-4.
- Connect the ends of the strips with a stapler. Half the heart is ready. Form the second half in the same way.
- Connect the halves with a stapler, inserting a “tail” (the shortest strip of paper) between them. Using a hole punch, make holes in the top of the “tails” (Fig. 5).
- All you have to do is string the hearts onto a string and secure them with a knot. An elegant garland made of colored paper is ready.
DIY garland “Zig-zags”
A very interesting and effective garland that is very easy to make. Fold a standard sheet of colored paper in half and cut it into two parts. Then make cuts on each part, not reaching the edge of the sheet (see photo). To make the garland long, glue the fragments of the homemade paper garland together using glue.
Garland - paper fan
Paper fans are a universal and budget-friendly holiday decor. They are made very simply and do not require much time. All you need is colored paper and glue. Well, you can’t do without patience and the desire to see things through to the end.
So, from the materials prepare:
- colored paper;
- scissors;
- glue;
- ruler;
- pencil.
You can buy such paper at any stationery store, hypermarket, or hobby market. There is another option - if you have a printer, print the background you like on office paper. There are no special requirements for the quality of paper: it can be A4 format, 80 m3 (or more) thick, double-sided. You can also use one-sided - this is not so important, the wrong side will still be attached to the wall.
The first thing you need to decide on is the color. In this case, blue. Now take a ruler and mark every centimeter along the entire length on the sheet. Using the blunt side of the scissors, draw lines along them. In this case, you cannot press too hard, and the surface to work on must be hard.
Based on the width of the sheet, determine the middle and cut into two parts. You can do three, then the diameter of the circle will be a little smaller.
Bend the resulting parts along the lines, that is, make accordions. For one fan you will need three such halves. Connect the halves and glue. Wait for it to dry completely.
You can make the same fan with a smaller diameter and a different color in the middle, or stick a simple circle. It is important to secure the center as the fan may curl up and lose its shape.
Fans can be used to decorate doors, walls, or hang on ceilings. Such paper crafts are attached with regular or double-sided tape or pins.
Our fan-shaped paper garland is ready!
Haunted Halloween Garland
DIY garland “Tinsel”
This homemade paper garland looks very much like the New Year's tinsel that is usually used to decorate New Year's trees.
To make this type of garland you will need corrugated paper. Cut strips of corrugated paper of equal width. Cut the edges of each strip into narrow strips. Then fold the two finished strips together and twist them together.
As a result, you should end up with a fluffy homemade paper garland.
Manufacturing technology
Tools and materials
Step-by-step instructions on how to make a corrugated paper garland quickly and easily. Necessary materials:
- Corrugated or crepe paper;
- Scissors and glue.
Step by Step Actions
Step one. Cut one piece 2-4 cm wide from two paper rolls of different colors. The result will be two small rolls.
Step two. Glue the ends of the rolls perpendicular to each other.
Step three. Throw one tape over the gluing area and align it. Then fold the second tape in the same way. Continue layering the paper strips crosswise.
Step four. Intertwine both ribbons until the end. The result will be a stack of multi-colored layers. Glue the ends of the ribbons and unfold the creation.
That's all. The decoration is ready.
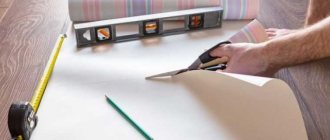
DIY garland “Triangles”
To make such a cheerful multi-colored paper garland you will have to work a little. After all, you will need to cut out a large number of triangles of different colors, but of the same size.
Glue the finished triangles with double-sided tape to a thick thread or sew the triangles on a sewing machine.
DIY paper umbrella garland
Such a paper garland will become a bright decor for a birthday, anniversary, wedding and will create a festive mood. And doing it is not so difficult, especially in good company and with the participation of children.
To create such a garland we will need:
- A4 colored paper;
- scissors;
- Double-sided tape;
- wire, thread.
One A4 sheet will make one umbrella. Fold the sheets in half.
Again.
Once again. The result should be 8 layers.
Then we select the circle according to size, for me it is the lid of the teapot. We trace with a pencil.
Using nail scissors, cut out circles.
These circles can be of a variety of colors and in any quantity.
Fold the circles in half.
Once again.
Then we take double-sided tape and cut off such a strip.
Glue the strip as shown in the photo.
Glue it together.
On the outside we glue strips of tape to secure the circles together.
If you, like me, love to use a glue gun, then by replacing the tape with glue, you can speed up this process much.
Connect all the circles together.
As a result, we will get a circle like this.
Take the white wires.
And attach a paper umbrella.
Apply a drop of hot glue to the base of the craft.
Our DIY umbrellas for the garland are ready.
We take a thin wire and begin to attach the umbrellas.
To make umbrellas swirl and shimmer, you can attach them with thread.
DIY paper Easter garlands
\
How to make detailed master classes here - crafts for Easter.
A simple DIY paper chain garland
DIY garland “Circles”
A very cute and original garland in the shape of circles is very easy to make. Cut out identical circles from colored or decorative thick paper of the same color or different colors.
And then string them on a strong thread. Make some kind of paper beads.
Paper garlands
New Year's garlands do not have to be LED. Beautiful, bright and original garlands can be made from paper. We offer you three very popular, but by no means banal, jewelry options. Step-by-step instructions will help you easily make a craft with your own hands.
Paper garlands can be hung on the Christmas tree, under the ceiling, stretched across the entire room, or placed in a gift bag. They are also good for decorating offices for the holidays.
Option one: rainbow garland made of colored paper
This garland will be useful to you after the New Year. It can be used to decorate any room and at normal times. In addition, it will look great at themed photo shoots.
What do we need?
- several sheets of colored paper
- very strong thread (preferably silk)
- scotch
How to do it?
We cut the paper into equal small rectangles. Don't make them too wide or long. The aspect ratio is approximately 1:2.
Fold the paper like an accordion.
Fold it exactly in half. We fasten the loose ends with tape.
We string them on a thread. In this case, we alternate the parts: leave one sticking up, the other down.
If you like traditional New Year's colors, make the garland two-color or combine 3-4 colors. For example, you can assemble it from white, blue and dark blue sheets; or in traditional Christmas red and green shades.
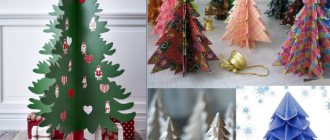
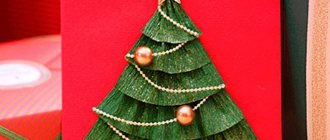
Option two: Christmas tree garland
This is another version of a beautiful, almost lace New Year's garland. This New Year's decoration looks especially nice on the window.
What do we need?
- sheets of bright paper (preferably one that is colored on both sides)
- beautiful rope or regular fishing line
- scissors with thin tips
- hole puncher
How to do it?
First, draw equilateral triangles (Christmas trees) on paper and make markings. They can be the same or different - your choice.
Then we cut out the triangles and fold them in half.
We make cuts as shown in the photo.
All that remains is to make holes at the top of each Christmas tree and pass the lace through them. If you don’t want the Christmas trees to “ride” too much on the thread, make a hole with an awl or the end of scissors.
A great idea is to use corrugated or packaging paper with a beautiful print instead of regular colored paper.
See also: New Year's paper decorations
Option three: corrugated paper garland
This airy garland will not leave anyone indifferent! It looks like a snow wall. And if you make the craft green, it will look like a coniferous forest. Despite its impressive size, the garland is very easy to assemble.
What do we need?
- corrugated paper
- thread of the same color as the paper
- sharp scissors
How to do it?
Fold the paper into a stack. As thick as your scissors will allow you to cut.
Draw a circle on the first sheet and cut out several parts at once.
Take a long thread and thread a needle. Then we roll each element into a cone and “sew” the side edge with two large stitches. In this way we string as many cones as will fit on the measured thread.
Make as many garlands as your patience allows.
You can secure the elements on one tape. At the same time, it is better to assemble the curtain immediately in the place where it will be located, so that the threads do not get tangled with each other. If desired, corrugated paper can be replaced with packaging or even regular colored paper.
If you like to make New Year's garlands from paper with your own hands, try replacing the standard “chains” with any of the three proposed ones. These decorations are a win-win. They look beautiful and are very easy to make.
Other crafts for the New Year
4+
DIY garland “Geometric”
Cut out a large number of strips from colored thick paper and fold them into squares. Then thread each square onto a strong thread.
You should end up with a very fun and playful garland that will be a delightful decoration for any holiday.
We sew garlands on... a sewing machine!
If for a holiday you need to make as many garlands as possible, but time is short, just sew them on a sewing machine! You will get simple and effective decorations that are convenient for decorating windows and ceilings.
- Cut out more blanks for the garland using stencils. The figures can be anything: stars, men, circles, trefoils, etc. Only thick paper is suitable for cutting, preferably so-called velor paper.
- Pull 20-30 cm of thread from the eye of the sewing machine needle (for the ends of the garland).
- In the sewing machine settings, set the stitching pitch to the widest possible (since the paper is thinner than the fabric, it is better not to overuse the number of holes.
- When you reach the edge of the first piece, do not cut the thread. Gently pull it, releasing 7-10 cm of thread. Then place another piece under the needle and stitch it. Thus, you can make a garland of any length. Don't forget to leave 20-30 cm of free thread after the last stitched workpiece.
INTERESTING: We make crafts for May 1st with our own hands
DIY garland “Rain”
Small children will really like this homemade paper garland, because it resembles real rain.
Make a large number of small caps from blue and light blue colored paper. Thread each cap onto a strong thread.
Attach the finished garlands to the ceiling, because they should hang freely to look like rain.
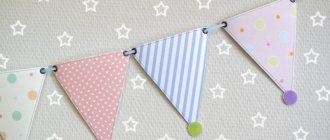
How to make a garland of flags
A garland made of ordinary colored paper is a classic of the genre. Decorating a room according to new trends is a task that requires a lot of effort.
Read here DIY balls: master class on creating original New Year's tree decorations (115 photos and videos)
For a festive event, you can decorate your house in an original way. For any children's party or for the interior of a school room, you can make a garland of paper flags.
Initially, you need to prepare all the constituent elements of the paper counterfeit. Before making rectangles, you need to consider their size. After cutting out the shapes, they are folded in half, and then the flags are strung on a rope. To firmly fix the paper figures, use glue or tape.
It would be better if the color of the flags differed. This way the product will look more beautiful and bright.
- DIY decorative candles: master classes with photos
Decorating a vase: ideas and master classes on how to make a vase with your own hands (80+ photos)
DIY hats for newborns. Several types of knitted winter hats for every occasion in a baby’s life
DIY garland “Snake”
To make a luxurious homemade “Snake” garland, you will need decorative paper ribbon (it is often used to decorate gifts). Thread a decorative paper ribbon onto a strong thread and pull it together to form an accordion (see photo).
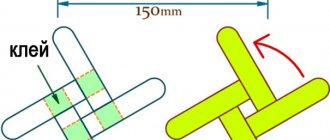
DIY garland “Eights”
You can create a stylish and unusual garland if you form eights from strips of colored paper using a stapler. Then string the finished eights onto two strong threads.
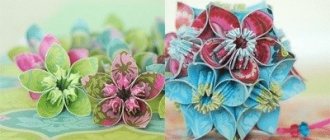
Luxurious flower garland
Ceiling pendants in the form of exotic inflorescences look very impressive. Making these paper garlands with your own hands is not at all difficult. We need:
- paper (multi-colored thin paper for flowers and thicker green paper for leaves);
- stapler;
- hole puncher;
- decorative twine.
- Fold a sheet of colored paper into an accordion shape. We fix the middle of the accordion with a stapler.
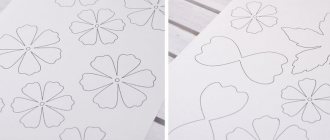
- Give the edges a triangular shape (for flowers with pointed petals) or any other shape.
- Using sharp scissors, we give the petals a concave shape.
- We cut out stencils for the leaves and for the core of the flowers. We glue the cores on both sides of each inflorescence, punch 2 holes in the leaves with a hole punch and string them on string.
- Alternating inflorescences with leaves, we form our garland. Instead of leaves, you can cut out patterns of butterflies, stars, suns from paper - it all depends on your imagination.