The benefits of creating your own packaging
It would seem that the easiest way is to go to any store and shop and buy a bright box. But even in the current age of rapid decisions, people strive, as before, to make something with their own hands. And, if a gift is bought in advance, then, as a rule, they do the packaging themselves.
And there are several reasons for this.
- By creating a box with their own hands, people add something of their own to the prepared gift, thereby emphasizing the importance of the person to the giver.
- Looking at photos of beautiful boxes on the Internet or in printed publications, you can get ideas for your creativity.
- In this case, the packaging will be not only convenient, but also unique - even if you select identical materials, it will be impossible to arrange them in exactly the same way.
- In addition, they are often purchased exclusively for a specific event. Thanks to this, the created boxes become unique.
- It often turns out that a store-bought item looks bulky. When making it yourself, this problem disappears by itself.
- Having measured the necessary parameters, you can create a box according to individual dimensions. And then the gift will look stylish and neat.
DIY gift boxes made of cardboard - master class
The first thing that comes to most people's minds is to make a box out of thick cardboard. The material is inexpensive and if something goes wrong, you can always try again. This material is also easy to use and does not require any special skills. All you need is the cardboard itself, scissors or something sharp and capable of cutting, and of course, glue.
Photo instructions
DIY gift boxes made of cardboard - instructions:
- First of all, we take thick packaging cardboard and cut out 4 circles, two of which should be slightly smaller in size - these are blanks for the bottom and lid.
- We cut out two strips from beer cardboard, one wide, the other narrow. Slightly larger than the circles themselves
- Now, using glue or double-sided tape, we glue our circles to each other
- Those smaller mugs will be the basis of our future box. We take glue and apply it to the side edges of this blank, and glue a strip of cardboard. If you are not entirely sure of the strength of this structure, you can glue another strip
- We do the same with a circle of larger diameter, this will be our lid.
- You can decorate such a miracle using different ribbons, for example, to make a bow. To ensure that the tapes hold well, you can glue the two ends to the inside of the lid
Creative materials
How to make a box with your own hands? First, you will need to go through your bins and see what is available and what will need to be purchased.
To create the packaging you will need:
- Cardboard, preferably white;
- Knives, scissors, pencils and ruler;
- Packaging material – bows, ribbons, braid;
- Glue for fixing elements; beads, beads, rhinestones, sequins - any decorative elements that may be needed during the work process.
DIY gift box for a guy, man
DIY gift box for a guy, men
Men love gifts no less than everyone else, although some of them try to show with all their appearance that this is not at all the case. Therefore, you need to carry out at least minimal preparation. For example, consider a pillow box. The pillow-type box has an unusual shape, and it is not that difficult to make. Although it is small in size, something like an unusual lighter or a wristwatch can easily fit in it, since its shape strongly resembles a case.
DIY pillow box - instructions:
- The first step is to prepare the material; pastel paper is best.
- We need to draw our template, and use a separate non-writing pen to outline all the places that need to be bent. This is necessary so that the product comes out even; without this, the rounded sides will be almost impossible to roll
- We cut out our template and begin to form our case
- It is best to tie this box with a ribbon, since it is almost impossible to secure it with glue.
Templates
In some cases, it is convenient to use ready-made printouts of templates made on a color printer.
But to add gloss and sophistication, experienced craftsmen recommend the use of decorative elements.
Box with a surprise
Small trinkets, packed in beautiful boxes, made and decorated with your own hands, are sometimes valued much higher than regular bouquets and sweets
To show attention and respect, it is better to spend more time than money
This is one of the most wonderful gift ideas. The box opens on its own, you just have to lift the lid. There is some small surprise attached to the bottom: a cake, a folded banknote, an ornament or a decorative composition.
Several parts for the box are cut out (the internal ones are slightly smaller). The ribs are not connected by anything, only the lid is glued. Since the product will be quite fragile, the lid should be easy to remove. You should take this into account when decorating the box.
A bow or picture is glued to the top. Three-dimensional decorative elements, photographs, and cards with wishes can be attached to multi-layer walls. Even tea bags will come in handy if there is a sweet present inside. You can place small decorations in the center on springs or strips of hard plastic. Flowers, butterflies or confetti will fly up and out when the lid is lifted.
Popular articles Wood for decorations
This box is called a magic box, it is a bright representative of products using the scrapbooking technique. The magic box can be themed for any holiday
The main thing in this work is attention to detail and maintaining the overall style. And, of course, a sense of proportion
Algorithm for working with templates
To create a designer box using a template, you need to perform a series of sequential steps. It is not necessary to carefully adhere to the list, but it is worth studying carefully - even such a seemingly simple job has its secrets and subtleties.
The first thing to do is print out the version you like. Please note: there are several tricks that will help your packaging acquire a signature style.
- One of them reflects the well-known saying: “Measure seven times, cut once.” The fact is that it is very important to carefully measure the distances of the sides of the future packaging and carefully check them with the existing dimensions in the figure.
- If necessary, you can slightly increase or decrease the proportions of the template photo to change the length and width of the box. Once you cut and discover an error, nothing can be changed.
- The second little trick is to use already colored templates. All that remains is to cut and glue, and the packaging will be ready in the best possible way. But there is a nuance here - it is best to print such a template on a color inkjet printer.
- This will ensure your drawing is as crisp and clear as a photograph, regardless of the print size.
The second step is cutting out the template. This must be done slowly and carefully, with sharp scissors, so that the edges of the cut remain smooth and do not bend to the sides.
- The next stage is gluing. Any glue that is convenient to work with will be suitable for these purposes.
- It is important to carefully coat the edges of the box so that when they touch tightly, they grip tightly.
- As a rule, fold lines and seam taping lines are indicated by dotted lines.
The final step is decorating the box.
- You can use ribbons and braid to create a flirty or formal bow.
- It is good to use additional materials - beads or rhinestones can be placed in the center of the bow or glued to the corners of the package.
- Then it will become truly original and unique.
We make a beautiful gift box-cradle with our own hands
This box cannot maintain its shape without gluing. Apply glue to the valves indicated in the template.
- Transfer the template drawing onto thick paper. Cut out the template along the outline.
- Place the template on paper of your chosen color and trace it.
- Press the fold lines with dots.
- Cut out the box blank along the contour.
- Bend and fold the box as shown in the photo.
- Glue the box together by applying glue to the flaps.
- Apply glue to the tops of the long sides and close the glue by folding them inward.
Look at the photo on how to make a cradle box with your own hands:
If you think the box doesn’t look festive enough, follow these instructions:
- Cut and fold a box of raspberry paper.
- Cover the bottom and side walls inside the box with decorative tape. Trim off any excess tape along the top edges of the side walls.
- Glue the box together.
- Cover the top of the box with decorative tape. Glue paper lace along the edges of the strip of tape.
- Attach angel figures to the inner surface of the side walls.
- Using a gold acrylic outline, place dots on the surface of the box. Using the same outline, draw lines along the edges of the strips of tape and the top edge of the sides of the box.
Advice. Instead of metal figures, you can use stickers made of golden paper or simply cut out silhouettes of angels from such paper.
Below you can find instructions on how to make a pillow box with your own hands.
Types of templates
There are many types of ready-made packaging box templates. They differ from each other not only in size, but also in shape. For example, you can package a gift in the shape of a flower or make a complex design in the form of origami.
Children will definitely be delighted with boxes of candy or carrots. And lovely women will be surprised to receive a gift in an incredible box, stylized as a dress or a diamond. Strict men will be delighted by the laconic beauty of square or round packaging.
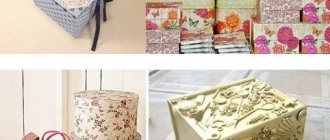
DIY gift box - gift box designs
Gift boxes
A gift is a thing that every person will be happy about. And it is not particularly important whether it was received during some holiday or just like that. But what is most important in this case? Of course, this is an exciting feeling of the unknown. After all, a person will be happy with even a small trinket if everything is prepared properly. And a box in which you can hide your little surprise can help in this matter. You can always buy a box, but it’s better to make it yourself, because this way you can put a piece of your soul into this product. Below you will see several options for patterns for your future gift wrapping.
Gift box designs:
Gift box diagram
Gift box diagram
Gift box diagram Gift box diagrams
Cute butterfly idea Imitation cake pieces
Craft in the form of candy Spacious box
Another great gift idea
Master classes
There are any options for creating packaging on the Internet. But what to do if time is short? Pay attention to step-by-step master classes on creating universal boxes with your own hands. They are suitable for gifts of almost any shape.
DIY wedding gift box - instructions
DIY Wedding Gift Box
Wedding gifts are a bit of a challenge. After all, you need to please the new unit of society. And if you can most likely make one person happy, then the tastes of another person may not be so well known to you. Of course, you can hold the couple financially, but a small gift will also not be superfluous. And you can improve the opinion of others about yourself by coming up with an unusual form of your gift.
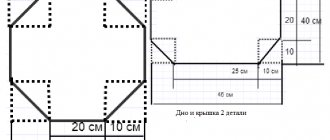
DIY hexagonal box for wedding gifts - instructions:
Box diagram No. 1
Box diagram No. 2 Photo instructions
- We print the template we need, or draw it ourselves
- Cut out this blank
- We first bend all the places for future gluing, they are highlighted with a dotted line
- Now we wrap the necessary parts and fasten them with glue
Box with lid
A square-shaped box with a lid will look very impressive as a gift. Despite the simplicity of the forms, it allows you to show imagination and creativity by creating unique packaging.
- First you need to print ready-made templates. In this version there will be 2 types of template - for the bottom and top of the box. At the same stage, it is worth marking the fold lines with a dotted line - from one valve to another, located strictly along vertical and horizontal lines.
- Carefully cut along the outer contours with sharp scissors.
- Bend the bottom piece along the dotted lines.
- Tip: Before bending, move the back of the scissors along the fold lines - this will allow the workpiece to be folded without problems or unevenness.
- Coat the valves well with glue and press for a few seconds.
- Tip: when using even the best glue, it is important to properly coat the edges of the workpiece. To do this, it is better to run over them two to three times.
- Lid. To fold it, repeat steps 3 and 4.
- At this stage, everyone can feel like a designer. You can decorate the finished box, giving it a unique author's style.
To do this, you can use any available materials:
- Lace and ribbons;
- Rhinestones and cabochons;
- Beads and seed beads.
Original boxes
If you want to make the packaging unusual, you can show your imagination and make a stylized container for a gift.
Cake box
A good idea would be to design the packaging for a gift in the form of its contents. For example, you can make a box in the shape of a cake.
For work you need to stock up on satin ribbons, velvet paper, fabric braid, and various decorative elements.
- In this case, the dimensions and shape of the blanks are copied from the finished cake container.
- To attach parts of blanks and decorative elements, it is more convenient to use double-sided tape.
Particular attention must be paid to the design of the lid. You can copy the design of a real cake or a suitable picture from the Internet.
It is important to make the packaging durable so that the contents are not damaged.
You can decorate packaging for other gifts in a similar way.
Decor of ready-made boxes
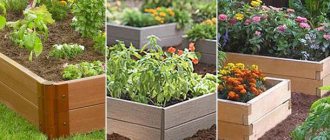
If you want to make an unusual box with your own hands for gifts or storing items, you can use the finished product as a basis. Shoe boxes are a good basis for decoration; they are durable and comfortable in shape.
For decoration, you can use gift paper, lace or thick fabric, such as linen or denim.
In addition, you need to stock up on PVA glue, scissors, measuring tape, a ruler and finishing elements.
The parts for gluing are cut out based on the shape and size of the base. They are glued using PVA glue. In this case, it is important to apply the glue in an even layer and carefully smooth the glued fabric onto the surface of the base, otherwise bubbles may form.
After the product has dried, you can start decorating. Depending on the idea or theme of the gift, you can decorate the box in a New Year's or folk style.
Penoplex box
Unusual materials can also be used to make original packaging boxes. For example, a building material for thermal insulation called penoplex. It does not absorb moisture, is durable, but easy to process and glues well.
Heart-shaped box
To work, first of all you need to make paper patterns. You will need a heart-shaped bottom and two pieces for the sides. After cutting out the parts from paper, it’s a good idea to “try on” to ensure that the sizes of the bottom and sides match.
- After this, parts are cut out of the foam sheet using a sharp knife.
- The edges of the parts are treated with sandpaper.
- It is better to glue the parts together with hot glue.
Making boxes for gifts and storing items is a simple but fun creative process. Original design will make any gift more enjoyable, and homemade boxes for storing small items will not only decorate the interior, but will also help save the family budget.
You can make a lid with a “window”
To do this, in addition to cardboard and decorative elements, you will also need transparent plastic sheets.
When forming a lid in this case, the steps become more complicated:
- To form a window, you need to mark a space in the lid according to its width and height. As a rule, it is enough to step back from the edges a couple of centimeters to make the “window” look organic and stylish.
- Cut out the “glass” for the lid. Please note - it should be 5-6 mm wider than the marked place on the lid itself.
- We glue the “glass” from plastic. It is better to take glue for these purposes with strong fixation. After gluing, you can cover the edges with tape or adhesive tape with a pattern that matches the overall design of the package.
- At this stage, you can start decorating the packaging itself. Any materials that you deem appropriate are suitable for this.
In such packaging, the gift will look bright and impressive.
How to decorate a gift box: tips, photos
Gift Box Decorations
- After the craft is done, many people face a new dilemma on how to decorate this man-made miracle. And the main thing in this matter is not to be afraid to experiment.
- There is nothing stopping you from simply adding a multi-colored ribbon, but it is better to add something personal so that it is clear that you have invested your positive emotions in this product. If you are good at fine arts, you can paint your craft.
- In case this is a gift to a fairly close person, you can highlight your entire journey with him by simply adding a few memorable photographs that mean a lot to both of you. For example, you can attach a small toy or origami to the same ribbon.
- And in the end, you can write a small congratulation on the lid or attach it on a small piece of paper to the box itself.
How to decorate a gift box - photo:
Laconic decoration
Knitted decor
A bow is always cute
Another idea with a voluminous bow Imitation gilding
Self-closing box
In addition to the box with a separate lid, resealable packaging also looks stylish. To create a box, the first thing to do is print and cut out the template.
Tip: These boxes look especially beautiful if the template is printed on colored cardboard. You can also use thick matte photo paper.
In addition, the template can be enlarged to the desired size yourself.
- For especially large packages, it is worth dividing the template into several parts: bottom, sides.
- In this case, it is necessary to cut, stepping back from the edge by 4-5 mm - this distance will be needed to glue the workpiece into a single whole.
- At this stage you need to make slots for the closing valve. It is very important to do this with a sharp knife so that the edges of the slits are neat.
- It is necessary to bend the workpiece along the dotted lines - they are marked on the template.
- Tip: Before bending, use the back of the scissors to forcefully draw along the dotted lines. This will allow you to bend the workpiece without damaging it.
- It is necessary to glue the workpiece. If the printout consists of parts, you should first connect them. Just as in the case of making any other packaging, the edges must be carefully coated with glue.
At this stage you can decorate the box. Especially if the template was printed on white cardboard or photo paper. Satin ribbons, lace or velvet braid look good as design elements. These materials will add a special shine to gift packaging.
DIY box of sweets as a gift: step by step
A box of sweets as a gift with your own hands
Almost all people in this world love sweets, but if a small edible product does not seem like a very presentable gift to you, you can always change your attitude towards the gift itself with the help of beautiful and original packaging. And in this case, even ordinary sweets will become the reason for someone’s joy.
DIY box of sweets as a gift - instructions:
- We print the blank, or draw it out and cut it out of thick paper
- Now we cut out the longitudinal strips, which are marked with lines on the template; it is best to do this using a stationery knife
- We bend our “leaves” to the center of the future box
- Now we take two petals with small flowers on them and press them to the center. We do everything as shown in Figure 3. This is done in order to round off part of the box.
- Now we take our sweets and put them in the center of our structure. We take the rounded petals and insert the flowers into the early slits made
Storage box
In addition to packaging for gifts, self-made boxes are also suitable for storing things. They look especially impressive with jewelry.
Also convenient to use for storing lipstick, mascara, pencils and other cosmetics. Men can store watches or cufflinks in them.
What templates are suitable for making your own storage box?
- In this case, a box in the shape of a rectangle or hexagon will look impressive. Making is available for needlewomen of any level of preparedness - from masters to those starting to take their first steps in creativity.
- Storage boxes made of thick felt look interesting. You can decorate them with any available material that matches the overall style of the idea.
- The versatility of the form allows you to experiment with styles: both shabby and steampunk will look equally impressive.
DIY boxes will always be the center of attention. They add soulfulness to gifts for dear and close people. With the help of designer packaging, you can enhance the surprise effect of a surprise for employees and colleagues. And storage boxes, made according to an individual sketch in any style, will complement the interior of apartments and houses.
DIY wooden gift box
At first glance, any box you make will bring joy to someone dear to you. And it doesn’t really matter that it is made from scrap materials. But you can always move away from ordinary paper and cardboard to something more premium. For example, if you have enough time and perseverance is in your blood, you can take a chance and try your hand at woodworking. Such a product will be stronger, and the wood will help pass off your creation as something solid.
DIY wooden gift box - instructions:
- First you need to choose the material. It's best to get plywood somewhere.
- We draw out future details on a piece of wood and cut them out.
- Next we need to fasten our parts together; in the upper parts of each part we need to make indentations for the lid using a chisel.
- You need to connect the walls, this can be done in several ways. Of course, you can always use glue, but you can also cut out small grooves and assemble our box like a construction set.
- Next, it remains to deal with the lid. It should open easily if you calculated everything correctly. If the lid moves too tightly or cannot fit at all, do not be discouraged. You just need to remove a little material from the edges and everything will fall into place.
You will learn more about making such a craft from the video below.
Photo of a homemade box
Clamshell box
This type of packaging allows you to create intrigue during the process of opening it and gives many vivid impressions. Thanks to the impressive size of the box, a person gets the impression that a huge gift is waiting for him inside.
First of all, you need to determine the dimensions of the craft. This should be done from the largest container, since it requires the use of the largest number of consumables. It is best to make a square-shaped product. The easiest way is to calculate dimensions. The size of each craft will be 3 cm smaller than the previous one.
The box is made of cardboard. You will need to take 5 identical corrugated sheets. They are laid out on the table surface as follows: one sheet in the center and others on the sides. There should be small gaps between them.
All sheet joints are glued together using tape. A square is cut out of wrapping paper to cover the outer bottom of the product. It is securely attached with double-sided tape. Next, cuts are made in the corners of the protruding parts of the wrapper and glued with glue.
Then the outer and inner sides of the craft are pasted over. The lid is made 1 cm larger than the base. It is done in the same way as a container, only the parts are glued together.
The gift is hidden in a small box. After this, everything is assembled according to the matryoshka principle. To secure them, you can fasten them with a colored ribbon and decorate them with a bow or a cute card with wishes.
A box in a box is a gift that will suit anyone, regardless of age and gender.
Varieties
Depending on the type of material, gift filling can be made from different raw materials. For example it could be:
- paper (parchment, corrugated, craft, office);
- decorative tape;
- thin spiral rain of short length;
- foil rain for decorating the Christmas tree;
- a scattering of pink petals;
- sisal, mesh or regular sugar bag;
- translucent organza or decorative napkins;
- film for packaging flower bouquets;
- foil, silence, packing tape.
Each type of filler has its own characteristics. For example, thick paper holds the gift well, and therefore the item inside the box will not move spontaneously. Thin – good for lighter and smaller items. Craft wine is unique in that, with all its simplicity, it allows even the simplest gift to be made expensive at a moment’s notice.
Popular articles Lava lamp
Organza is a sheer fabric with glitter that holds its shape well. It doesn't take much to fill the empty space of the box. The colors of this filler are varied; it also differs in the degree of softness.
As for the most common packaging option, paper is in great demand when decorating gifts. It can become a backing and decoration for a gift; it can be used to fill empty spaces to secure the position of the gift. To do this, you can combine colors, choosing shades of a related or contrasting range.
How to pack a gift in gift paper without a box - video instructions and master class with photos
When choosing gifts, the last thing we pay attention to is their packaging. Therefore, it is not surprising that many things that people prepare as gifts may not have packaging at all - for example, clothing, jewelry and jewelry, useful household items, etc.
Of course, you can put them in the first box or bag you come across, but such packaging can hardly be called beautiful. And taking into account the fact that wrapping paper is inexpensive and is sold in many stores, a much better solution would be to spend 10-30 minutes of time, following the instructions on how to pack a gift in gift paper without a box, to wrap your present beautifully.
To make gift packaging without a box, in most cases you will need the following:
- Wrapping paper of any kind (label paper, corrugated paper, craft paper, vegetable parchment or just paid colored paper)
- Scissors
- Glue or needle and thread to secure the packaging shape
- Ribbons, sparkles, appliques and other decorative elements.
By the way, a great idea for those who are not good at arts and crafts and doubt their ability to beautifully decorate gift wrapping would be to buy wrapping paper with a pattern. On the eve of all major holidays, stationery stores sell wrapping paper with appropriate designs and even greetings, from which you can quickly and easily make gift wrapping using the instructions below.
Step-by-step instructions for packing a gift without a box with a photo
A beautiful DIY paper gift bag is a great idea for wrapping any gift without a box. The main advantage of such packaging is the ease of its manufacture and many options for decorating it. To make such packaging, you need to take a sheet of A4 or A3 paper (depending on the size of the gift), fold it in a certain way, and then decorate it with appliqués, bows or even a design.
To make the packaging you will need: a sheet of wrapping paper of any color, ribbons, a pin or glue and, if desired, glitter and appliqués for decoration. On a piece of paper you need to draw lines with a pencil in accordance with the template.
Then you should gradually fold the paper into a box (there is no need to cut and glue the paper).
A handbag folded from paper should be secured along the side folds with glue or thread, and a gift should be placed in it. Then wrap the top of the bag with ribbon and tie a beautiful bow. If desired, you can add glitter or a holiday-themed applique to the packaging.
Interesting gift packaging idea without a box on video
The video below shows step-by-step instructions for another option for gift wrapping without a box. Moreover, if packaging in the form of a paper bag is suitable for small gifts, then the packaging option in the video is almost universal. In this way you can beautifully wrap a gift of both small and fairly large sizes.
Bonbonniere
Perhaps this is the most common type of gift boxes. Translated from French, its name means candy bowl. In tall, voluminous ones they give loose sweets, like glazed nuts. The flat ones contain fragile candies with filling.
Traditionally, such bonbonnieres are given to guests at a wedding. Although, as a sign of gratitude, this gift is always appropriate. You can put any pleasant surprise in such a cute box. The following diagram will show you how to make a gift box in the form of a bonbonniere.
If you bend the workpiece along the fold lines and insert the rounded parts of the heart with the slits into each other, you will not need glue. To make the ribbon look neater, it is glued not along its entire length, but in two or three places.
Another themed bonbonniere, decorated with a snowflake, consists of two parts - the bottom and the main part.
Parts of the snowflake can be immediately painted with silver paint on both sides. The workpiece is rolled along vertical ribs. One side is glued. For such a small area, it is better to use a glue stick rather than a liquid one. The hexagon bottom is glued on all sides. The top gathers into an openwork snowflake.