Decor plays an important role in interior design. It has a great influence on style and emphasizes the dignity and character of the room. Taking into account the style decision, accessories should be selected, thought out to the smallest detail. The most popular items for wall decoration include paintings. Now everyone has the opportunity to choose an image to their taste, be it a graphic drawing, photo or classic oil painting. To give the canvas a finished look, picture frames are often used. Fortunately, it is possible to buy a ready-made version in a store, choosing its appearance, size, material yourself, or even making it yourself.
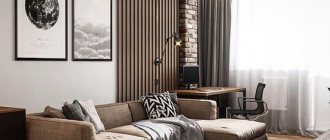
There are many types of picture frames to suit every taste. For connoisseurs of a laconic interior, you can decorate the image with a simple baguette without unnecessary decor. The classic style involves decorating walls with paintings with massive carved frames made of wood. A high-tech kitchen does not accept unnecessary decor, but it may well allow you to place a couple of posters or photos in a metal frame on the wall.
Baguette for wooden paintings
Natural wood is the most popular and traditional material for making frames of various thicknesses, shapes, with or without decoration. Wood has a number of advantages, among which the most significant are: attractive appearance, even in an untreated state, strength, durability and environmental safety.
A wooden frame for a picture can be bought in a store, made to order in a workshop, or made with your own hands using photos and instructions found on the Internet or magazines. This natural material is ideal for hand-made paintings, tapestry, embroidery, watercolor or pastel drawings.
Products made from plastic
A good alternative to a wooden frame can be a plastic picture frame. Unlike wood, it is lighter in weight, and its cost is significantly lower than the previous option. If the painting is not of particular material value, is not a work of art or an antique, then plastic is quite suitable for framing a painting canvas, photo or poster.
Plastic frames, like wooden ones, can have carved decor, various shapes and sizes. If desired, you can order their production in a variety of shades, in accordance with the interior design. Such options are easy to buy in a store, made to order in a framing workshop, or made with your own hands.
Baguette for metal paintings
A modern technological option is the use of metal elements in interior decoration. This also affected the design of images. You must understand that an aluminum frame is not appropriate for classical oil or pastel painting, but a poster, poster or photo can be designed in a similar way.
Most often, metal frames are used in offices or exhibition halls for various types of advertisements, posters, and presentation materials. But for techno lovers, this option is also appropriate in the interior of an apartment.
Types of baguettes
Picture frames are available for sale in several profile options. You can choose the one you need based on your interior style, taste preferences, as well as the type of image you plan to design.
- Classic profile look. This baguette creates a visual effect of “internal” volume. The shape of the frame has differences in height: at the edge it is thicker, and at the canvas it is thinner. Thus, the viewer's gaze is concentrated on the image, as if he were looking through a window.
- Reverse profile view. In this case, on the contrary, differences in thickness occur from the inner edge of the frame to the outer, thereby creating the effect of “pushing out” the image. In such a baguette you can decorate not only paintings on canvas, but also mirrors.
- Flat profile view. The frame has virtually no differences in thickness and no pronounced surface relief. Unlike the previous two options, the flat profile does not take much attention, but allows the viewer to enjoy the image. A simple painting baguette can be used to decorate paintings in a modern style, abstraction and other works in bright, contrasting shades.
Combining profiles of different shapes and types, both wooden and plastic, is also welcome; for example, you can combine a flat wide frame with a classic one.
Some paintings can be additionally decorated with edging - a thin strip with or without a carved pattern. This will give an additional effect to the image.
Product options
First, let's figure out what a picture frame is: any frame that is made of slats, slats and other similar elements made to fit the size of the element belongs to the group of products under consideration.
We will look at several of the most popular solutions that are most often chosen for implementation at home. We will study only those types for which it is easy to find raw materials and which can be made even without experience in carrying out such work.
Wood frames
Making a picture frame with your own hands using wood is a classic solution that has been used for more than one century, so the process has already been worked out and there are no problems with its implementation.
First, let's tell you what materials can be used:
- Plinth is an excellent solution for decorating a wide variety of compositions; of course, this is not a chic option that is suitable for real works of art, but it can and should be used for sketches, sketches, handicrafts and simple paintings;
When assembled, even without coating, few people recognize the design as an ordinary plinth
- You can also use platband, options with a width of 50-70 mm are best; they are great for options when pretentiousness is not needed. Such solutions are ideal for minimalist and modern interiors, where simplicity and precision of lines are important;
- Wooden carved baguette is one of the most beautiful options that generally exist, this is due to the fact that this group of products has a very skillful finish. Of course, their price will be noticeably higher, but the appearance is also quite different.
Carved elements themselves look very good, so it is better not to use them with simple compositions
Now we’ll tell you how to frame a picture with your own hands.
This process consists of several steps:
- First of all, you need to take measurements of the composition in order to understand what size the frame will be;
- Sometimes, especially when it comes to handicrafts and other similar options, it is necessary to place glass on the outside; accordingly, the depth of the groove will noticeably increase, this should also not be overlooked;
- If you have the workpieces, then you can start cutting the elements according to previously determined measurements; the easiest and best way is to use a miter box - this is a device that allows you to cut elements at an ideal angle of 45 degrees, which guarantees excellent joints;
The use of such a device allows even a novice craftsman to make perfect joints
- To make a durable picture frame with your own hands, you need to very securely connect the elements together. To do this, firstly, you need to use an adhesive composition for wood, and secondly, after the composition has dried, you can strengthen the frame using a stapler. The individual parts are fixed using an angle clamp, it presses them and provides an ideal angle of 90 degrees;
Advice! If you don’t have corner clamps, you can use another option: grooves are made at the joints, and when gluing the parts, thin plywood elements coated with glue are inserted into them; after drying, the excess parts are cut off - and you get a smooth product.
This is what this option looks like, the grooves are selected with a router or circular saw
- Next, you need to apply a decorative coating to the product, this can be either impregnation or paint, it all depends on which option fits more organically into the interior.
DIY wooden picture frame
To frame a painting, watercolor or pencil drawing, as well as embroidery, photography or children's crafts, you can make a wooden frame with your own hands. To do this, you do not need to have any special skills, just stock up on the necessary materials and study the instructions in detail. Manufacturing begins with the selection of a suitable profile. It can be simple, straight or with carved decoration. Using a wood jigsaw, you need to cut out four parts, and saw off their ends at an angle of 45 degrees. The edges must be smooth and perfectly even, otherwise it will be impossible to properly glue the frame.
Next, apply wood glue to the ends and connect all the elements together, firmly fastening them with clamps. After complete drying, you can begin decorating the surface of the baguette or leave it in its original form if it is sufficiently attractive and neat.
For decoration, it is better to use paint, varnish or original design in the form of patina, gilding, craquelure. If the image is made on paper using graphic materials, it is a photo or a poster, then glass can be used for additional protection on the front side.
The product is cut out with your own hands using a glass cutter or you can order its production in a workshop. To install the glass in the frame, you need to make grooves of the required depth on the back side of the profile. Glass is inserted into a baguette that is well dried from glue and paint, and an image or drawing is placed on it. To cover the picture from the inside out, you should cut out a piece of suitable size from thick cardboard or fiberboard and secure it with small nails.
How to make a picture frame from wood
What you will need:
- Wooden frame or baguette
- Miter box
- Fine-tooth cross-cut saw
- Fitting device
- Clamps
- Carpenter's corner
- Chisel
- Plane
- Roulette
- Sandpaper
- PVA glue
- Rope for tying the frame and bars for tension.
It is best to carry out work on a workbench, or, if one is not available, on a table.
How to choose platband and baguette
The width of the baguette should be proportionate to the picture. An element that is too narrow or, conversely, wide can deprive the painting of some of its artistic merits. The tree must be dry, smooth, without large knots. You should also take into account the texture, which depends on the type of wood: in larch the structure of the longitudinal cut is slightly twisted with a screw, in oak the fibers have different widths and sinuous bends, in pine they are long and even, but different in color.
Instructions for making a wooden baguette
It is very important to measure the picture correctly and transfer the dimensions to the blank parts of the future frame. The starting point for the marking, which is made according to the internal size of the baguette groove, is the vertex of the right angle. Vertical and horizontal parts must be cut at an angle of 45°. Remember that the picture should fit into the frame freely, without effort, so when choosing the size on the baguette markings, allow for a small gap.
How to properly cut at 45°? A miter box is used for this purpose. It can be factory-made (metal) or homemade (wooden). Pressing the baguette rail against the wall of the miter box with your left hand, insert the hacksaw into the groove of the miter box with your right hand and saw down the baguette. File the next part so that it forms a right angle with the first. Beginning craftsmen often make a common mistake: they file the mating parts in the same way, when they should be done mirrored in relation to each other.
Markings for guide cuts are applied along a square, two sides of which are the outer planes of the miter box. The corners of the square are connected by diagonals. Using a carpenter's corner, vertical lines are also drawn from the corners of the square on the outside of the miter box.
The cut with a hacksaw is made diagonally exactly according to the applied horizontal and vertical markings.
The detailed process is shown in the video.
Instructions for making from a wooden frame
To form an internal groove on the reverse side, a strip is glued to the platband (with its wide side), the width of which corresponds to the thickness of the picture stretcher, and the thickness is 15-20 mm narrower than its width. The parts to be glued are tightened with clamps, and excess glue is removed with a clean cloth. In order not to wait for the glue to dry and not to delay subsequent operations, the planks can be connected from the inside with small nails. The platband improved in this way is sawn in the same way as an industrial molding.
Making a plastic baguette
A plastic baguette is a smooth or profiled strip made of polyvinyl chloride (PVC). This frame has many positive qualities. Among them are: low cost, in contrast to wood, a wide choice of surface decor and profile sizes, ease of machining and assembly, low weight, and the possibility of use in various fields.
Assembling a plastic frame with your own hands is not particularly difficult. The process is similar to making a wooden frame for a painting or photo. First of all, you need to take measurements of the work being designed and mark them on the bar.
Next, you should cut the plastic baguette along the marks with a hacksaw and clean the ends with sandpaper. Using glue, you need to fasten the frame parts together. After complete drying, sand the surface of the planks to remove excess dried glue. Before painting the plastic frame, it must be wiped with a solvent.
To make the interior look harmonious and complete, it needs well-chosen accessories in style. Among the decor, paintings, photos, posters, embroidery, etc. are especially popular. To make the work look attractive, it is best to frame the picture in a baguette, wooden or plastic, which you can buy inexpensively in a store or make it yourself.
Manufacturing of frames and other structures
Parts prepared as we described above can be used to solve a wide range of problems. Today, classic hoods with wooden baguettes, baguette frames for paintings and photographs, decorative frames made of shaped and carved planks, etc. are popular.
Wooden picture frame profile - shaped strip made of solid oak
Similar designs are made according to a single scheme, and below we will look at it using the example of a picture frame:
Scheme for using a miter box
Advice! For a profile of complex shape with numerous shaped protrusions, it is very important to trim the corner correctly, so this operation should be performed extremely carefully. It is better to leave about a millimeter in reserve, and then adjust the parts by sanding the edges with sandpaper.
Correctly designed corner connection