How to attach PVC panels to the wall and ceiling surface: main points
PVC plates are used to decorate walls and ceilings, as they are characterized by a long service life and practicality. This material is distinguished by a variety of shades, shapes and textures, which allows you to create a stylish and beautiful interior.
This material is distinguished by a variety of design solutions
Plastic plates have the following advantages:
- ease of installation;
- moisture resistance;
- long service life;
- resistance to fungal infections and fire safety;
- ease of cleaning and maintenance;
- acceptable price.
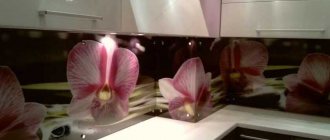
You can not only finish the bathtub with PVC panels yourself, but also use this material for the kitchen. It is used instead of tiles, and the price will be lower. The disadvantages include a low level of strength against mechanical damage.
To work with plastic material, you will need tape measures, hacksaws, building levels, plastic profiles, sets of fixing parts, sealants, as well as skirting boards for ceilings.
Easy installation of plastic sheets
It is important to choose the right material. Surfaces can be glossy or matte. There are also different technologies for applying patterns.
Helpful information! PVC panels are considered an ideal option for rooms with high humidity, as they are not afraid of water. They can be used even in rooms where other materials cannot be used. They are used for finishing loggias, toilets, kitchens and saunas.
How to choose PVC panels for wall cladding?
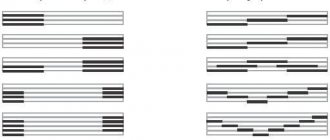
Different brands of material have different characteristics. When selecting options, you need to pay attention to quality indicators. It is not recommended to purchase products if:
- the drawing is blurry and has fuzzy lines;
- the ends are damaged and deformed;
- the slats vary in shade;
- coating with scratches;
- The dimensions of individual elements do not match.
The balcony cladding option is used as room insulation
Related article:
Decorating a balcony with your own hands: step-by-step instructions. A step-by-step guide to finishing balconies with various materials in a separate review.
Nuances of calculations for fastening PVC panels
When deciding how to attach PVC panels to the wall, you need to make accurate calculations of the material. This will prevent the need for additional purchases and unnecessary expenses.
Features of the loggia cladding
Installation is carried out in different directions: horizontal and vertical.
For vertical design, the calculation is made as follows:
- measurements are taken of the length of the room along the perimeter;
- the width of doors and windows is subtracted from this number;
- the remaining number is divided by the width of the plate element.
The result is the number of parts that will be needed for finishing. It is recommended to add several elements to this figure.
Types of moldings for PVC plates
For horizontal cladding, a different calculation is used:
- the area is calculated;
- the sum of the areas of the openings is subtracted;
- this number is divided by the area of one element.
At least 10% of sheets in reserve are added to the resulting value. This is necessary, since when installing PVC panels horizontally on walls, cutting of the material is necessary.
How to calculate the material for lathing under PVC panels
If the plates are installed on top of the sheathing, then additional calculations are required. Wood or metal parts are used as lathing raw materials.
Frame guides
To perform calculations, you need to measure the height of the walls. This indicator is then divided by the rack pitch. The calculation result is multiplied by the perimeter of the room. You also need to measure the height of the corners in the room, and then the resulting number is multiplied by their number. This results in the footage of corner type elements.
Installation of sheathing
Varieties and sizes
What are PVC panels? These are products intended for cladding surfaces, for the purposes of decoration and protection of the base. Depending on the type of model and its purpose, different parameters are offered, with different decorative possibilities.
- Standard panels, with a two-layer structure, connected by jumpers. They have a lock, a tenon and a niche to insert one panel into another. Width, from 100 mm to 370 mm, length, from 2700 mm to 3000 mm, thickness, from 4 mm to 15 mm. Manufacturers offer varieties for ceilings, the strength and thickness of the walls of which are lower, and for wall cladding, the durability of which is increased by greater thickness. Canvases for walls have a width from 8 mm to 12 mm, and for ceilings up to 5-8 mm. You can learn more about the subtype of panel models by following this link.
- Sheet models. Single-layer with a thickness of 3 mm, and having a rectangular shape, such models are applied only to a leveled surface using glue, without a frame, and strength is acquired due to a tight fit to the wall. Length 980-1200 mm, width 480-1200 mm.
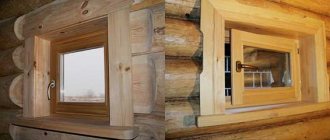
- The next standard size, which you are familiar with, is called plastic lining. With a width of 10 cm and a thickness of 10 mm, reaching a length of up to 6 meters. The structure of the structure is the same as that of a panel, two layers connected by ribs. A relief surface is created, similar to wooden lining.
When choosing, you should pay attention to the method of applying the engraving to the product, which determines the durability of the background image of the front part.
- Panels with a pattern that is applied first to the film and then glued to the product are considered a more expensive type (laminated). Durability is achieved thanks to a protective film with various patterns and relief. This technology preserves the design for up to ten years or more, but is much more expensive, directly affecting the cost of the product.
- The design immediately applied to the panel, using the offset method with printed frieze and decorative lower part, treated with varnish, are quite durable and resistant to sunlight. They have a small variety of illustrations (available in the form of marble, a type of tile), and an average cost, in comparison with laminated ones.
- The most common and inexpensive models are produced by thermal printing, by transferring paint to the outer part of the canvas, with a large selection of patterns. They have a less durable appearance and fade when exposed to direct sunlight. Such panels quickly lose color and the main pattern.
- Undecorated panels are also produced; these are white; due to the lack of varnish, they quickly get dirty and turn yellow. Varnished, can be glossy or matte, more durable due to varnish. Models painted in a specific color, blue, yellow, green, etc., the color is acquired by adding a coloring pigment at the production stage, and they are not subject to fading, since the entire mass is painted.
Also read: Leveling walls with plasterboard
Characteristics
The variety of products is so great that it will be difficult for a beginner and inexperienced buyer to understand among the entire range presented, but they have common properties. Let us highlight the general parameters of polyvinyl chloride building materials.
Pros.
- Wide variety of textures and colors.
- Hiding communications.
- Long service life.
- Resistance to moisture.
- They do not rot, do not form mold or mildew.
- Light specific gravity.
- Easy to install and dismantle.
- Harmless.
Minuses.
- Low resistance to mechanical and physical influences.
- Low fire safety; when melted, toxic fumes are released.
- A soft covering is created, without the possibility of hanging heavy objects.
- Non-breathable material, not advisable for use in children's rooms and bedrooms.
Purchase of panels
When choosing a canvas, consider the main parameters of the product and the place of application. In the bathroom and kitchen, laminated options and panels with a frieze are better suited. Models with thermal printing are best installed in rooms with the least exposure to ultraviolet radiation, this could be the hallway or utility rooms. In pantries and basements, you can choose the cheapest products, in different shades. Be sure to check the products;
- Are the ribs deformed?
- Is there a blurry picture?
- Is the color tone different?
- Matching size by connecting them together.
- For any mechanical damage.
The strength of a product can be determined by its appearance; cheap ones have a translucent surface. We also pay attention to the number of stiffeners; for high-quality panels they should be at a distance of 1 cm, and the thickness of the front side should be at least 1 mm. By pressing on the front side, if mechanically applied it is easily pressed through, it means it will not be suitable for wall cladding and will not last long. Also, the presence of a strong plastic smell indicates a cheap, low-quality product; such panels are perfect for framing walls in utility rooms.
Choosing a color palette.
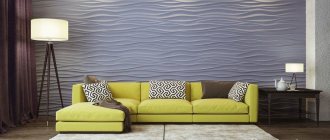
Coloring may affect visual dimensions. In apartments, bathrooms are often small in size, and it is better to choose light colors, with striped prints, deep patterns, which will visually expand the space.
Bright colors, such as red, will quickly become boring over time, and it is more advisable to dilute aggressive colors with soft neutral tones. The black color goes well with red and old shades, and the decorative seam with rustication richly highlights the space.
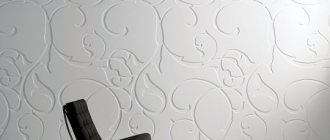
Relief with imitation of different images creates looks that are not inferior to natural materials. Mosaic, marble, brickwork or natural stone, etc. create a unique design.
The products are presented in a huge range, and among the entire range you can easily choose the type that interests you.
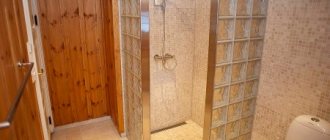
The use of PVC panels for bathroom finishing
When deciding on the option of how to attach PVC panels to the wall, you should consider the following methods:
- using self-tapping screws;
- installation with adhesive mixtures;
- use of clamps.
If the surfaces are level, then the best option is to use glue. You can use the universal composition “Moment”, special glue or liquid nails. Installation using an adhesive solution makes installation easier and cheaper. This does not require the use of lathing.
Using panels in the bathroom
The glue method has some disadvantages. If damaged, damaged parts can be replaced with others. Fixation using self-tapping screws is considered more convenient. A screwdriver is used for the job. This technique requires the use of lathing structures. The clamps are characterized by reliable fixation. In this case, it is recommended to make the structure of the sheathing metal.
Plastic finishing allows you to decorate a variety of interiors and arrange rooms in different styles. PVC panels are produced with different types of material imitation. For example, using products with wood imitation, you can design ecological and rustic interiors. For bathrooms, slabs with imitation tiles are used.
Helpful information! It is not recommended to use plastic plates in combination with expensive materials when decorating. It looks tasteless.
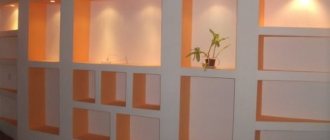
Wall decoration with PVC panels
- First of all, we calculate the number of panels in order to avoid possible unnecessary waste of money. Installation of PVC panels on the wall can be done both vertically and horizontally, with or without lathing.
A diagonal method of attaching panels is also allowed; this method is more often used to create a specific design in fragments, or by completely covering the wall combining a texture pattern. When laying diagonally, material consumption increases significantly due to cutting on both sides. The lathing for PVC panels is assembled perpendicular to the application of the fabric. - We carry out calculations, calculate the total surface area taking into account door and window openings. Based on this data, we purchase building materials in the required quantities, with a small margin.
- We count the required number of bars for the frame. The structure can be assembled with slats or wooden blocks, as well as metal or plastic profiles.
- The sheathing for PVC panels is installed in increments of 40 cm to 60 cm; in the openings for windows and doors, additional reinforcement with lintels will be required. Taking these nuances into account, we calculate the slats for the sheathing.
- Installation of PVC panels on a wall without lathing is carried out when the walls are satisfactorily level, without significant slopes. It can be sheathed without assembling the sheathing, by gluing it to liquid nails or specialized glue. A budget option due to the lack of construction, and less labor-intensive.
Also read: How to apply liquid wallpaper to a wall
Tools
- Screwdriver, hammer drill.
- Hacksaw, utility knife, hammer gun.
- Screwdrivers, hammer, pliers.
- Pencil, level, tape measure.
A simple set of available tools also indicates that covering walls with PVC panels, with your own hands, is a fairly simple and easy way to update the interior of a room. The positive side of saving money while getting an attractive appearance is obvious. As well as the speed of laying the panels, which significantly saves your time.
Mounting methods
Covering walls with PVC panels is implemented using different techniques; we will consider each of them in detail. Here you can use glue and other methods.
Different ways to attach panels
- Wall decoration with PVC panels using glue. More often, this method is used on leveled walls; the panels are immediately glued to the prepared wall. The most simple and easy method, the disadvantage of this option is the difficulty of dismantling; when peeled off, the panel is damaged. Gluing panels to a frame is also a common method.
- Installation using self-tapping screws. Fastening the canvas by screwing along the protruding edges to the finished frame.
- It is also possible to fasten with staples, using a staple nailing gun, to a wooden or plastic sheathing, or to a flat plasterboard wall.
- Using special clamps is the best option. They are conveniently attached to any type of frame, create a tight connection between the panels and are easily dismantled if replacement is necessary during repairs.
Preparation
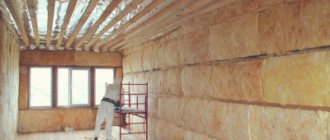
- We remove old coating residues. Check the evenness of the wall with a level. We determine which lathing for PVC panels is suitable, from which profiles, and how the panels will be laid, vertically or horizontally. If the surface is fairly flat, the panels can be mounted without sheathing, an advantage of this method is the preservation of usable area due to the absence of a frame structure, which takes up several centimeters of space.
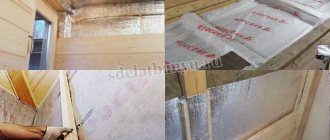
- When sheathing occurs on a balcony or bathroom, it is advisable to impregnate the surface with special antifungal agents and prepare a vapor barrier film. If you want to further insulate the loggia, insulation is used, inserted into the structure.
- The lathing for PVC panels can be selected from wooden slats, metal or plastic profiles.
- The most convenient option for creating a frame structure is to use plastic racks; all possible clamps are attached to them. It does not require any additional processing, unlike wooden slats, and does not corrode over time, as happens when using low-quality metal profiles.
Frame mounting
1. Frame for PVC panels, first performed by measuring the walls. We mark with a pencil a place on the wall with a difference in distance from the floor of up to two centimeters. We draw a line along the entire wall, checking with a level. Then we draw a similar line above the ceiling, and then draw lines parallel to each other along the surface in increments of 40 to 60 centimeters. The drawing is ready.
Also read: Wall decoration with cork; basics of installation of different types of cork products
2. When slats are used, be sure to treat the wood with an antiseptic before harvesting. Along the drawn lines, we drill holes for dowels every fifty centimeters. We bring the slats and secure them with dowels. If there are strong distortions on the wall, we level the frame by placing wedges from the remnants of cut slats under the timber, and check the structure with a level.
The structure is also attached using special metal hangers and in the same increments of 50 centimeters.
Suspensions
In rooms with an aggressive environment, it is first necessary to apply a vapor barrier element and it is advisable to additionally coat the entire surface with an antiseptic.
In a loggia, in addition, it is advisable to insulate the surface by putting insulation into the frame, and on top of it with a heat-insulating film, possibly foil. More often, in bathrooms and loggias, a vertical frame made of slats is used, or with a horizontal frame, some holes are left for better air circulation.
If necessary, we carry out electrical wiring inside the frame. We carry out the necessary replacement of old wires, wrap them in corrugation and fix them to the wall with clamps.
3. We start covering the walls with PVC panels from the corner towards the opening, or from the bottom of the wall, depending on the installation option. We install corner or side molding in the corner and insert the first panel into it, and secure it either with clamps or staples at the joints with the sheathing.
We insert the second panel into the groove of the first, and similarly attach it to the sheathing. The remaining canvases are laid in sequential order. All walls are covered with PVC panels in this order.
In the places of switches and sockets, carefully make holes with a construction knife. Afterwards, these holes are easily hidden with special boxes.
The last panel usually requires cutting to size. We do this using a construction knife, cutting the panel to the required parameters.
If you hit a corner, in order to avoid cutting the panel and not using the corner, you can trim the panel from the back and make a fold. The result will be a monolithic transition without the use of an angular profile and overlays.
Installation without frame
- When the walls are smooth, PVC panels are installed on the wall by gluing them with special glue or liquid nails.
We prepare the surface by cleaning it from old coatings; the wall can be additionally treated with antifungal impurities and degreased. - We start installing PVC on the wall from the corner, in the direction of the doors or windows when applied vertically, from the bottom when applied horizontally. The glue is applied to the panel itself, in waves over the entire plane, in a lattice or pointwise, with a distance of 30-40 cm.
- Apply it and wait some time for gluing. We check the panel by tapping. Each glue has a different setting time, be sure to read the instructions for use.
- The next panel is inserted into the groove first, and is also glued with glue. It has a similar application technology as in the case of the frame. This is how all the material is laid out sequentially.
Fasten with self-tapping screws to drywall
You can also join with self-tapping screws, if the base allows, onto drywall or a plastered surface with gypsum mortars. On concrete planes, you can prepare holes for self-tapping screws with a hammer drill, but this is a labor-intensive operation; the alternative adhesive method is much more convenient.
For many, saving time and money is a fundamental criterion when choosing building materials. Polyvinyl chloride products offer a quick solution for decorating the interior, significantly saving valuable time, and for this reason they have earned great demand.
How to glue PVC panels to walls: practical recommendations
You can watch the video on how to glue decorative PVC panels with mosaics. Before installing the plastic part, you need to prepare the base. At the same time, the old coating is removed, cracks are removed, and the surface is leveled. Differences can be no more than 5 mm. Dirt and grease from the surface of the walls must be cleaned, as this may interfere with the adhesion of the adhesive.
Below are options for decorating walls with PVC panels.
A high-quality adhesive composition is characterized by transparency after drying, quick setting, strong fixation and resistance to sudden temperature changes. Hot melt adhesive cannot be used to fasten plastic.
Gluing sheet elements consists of the following steps:
- cleaning the back side of the plate;
- drying the product before applying glue;
- the glue is distributed in a pointwise manner;
- installation of plates to the wall.
When using liquid nails, the plates must be tapped. For high-quality adhesion, the glue must be aired. At the end of installation, ceiling or floor plinths are attached. To do this, use self-tapping screws.
Installation of plates
It is recommended to use plastic panels for finishing the kitchen. In this case, the assembly is performed with small gaps. The slats should fit under the wall cabinets and press tightly. The lower edges are fixed using skirting boards.
Helpful information! To make installation around the sockets, you need to cut holes in the appropriate places. When carrying out work, you must turn off the electricity.
Secrets of installing PVC sheet panels
- It is necessary to strictly follow the procedure and make calculations in advance.
- Before installation, the panels should be kept for 2-3 days indoors at room temperature.
- Markings for sockets and various accessories must be done in advance.
- The panels should be cut with a jigsaw or hacksaw. Remove irregularities with a plane.
- The basis of the panels can be MDF, fiberboard, plasterboard, polyvinyl chloride, etc.
- Leave gaps for possible expansion of panels. The height of the workpiece should be 1 cm less than the distance from the ceiling to the floor.
- When using a hacksaw to cut panels, make cuts from the side of the decorative covering. When working with a circular saw - from the base side.
The nuances of installation on walls over the sheathing frame
Before covering, it is recommended not only to clean the surface, but also to use waterproofing and coatings based on antiseptic agents. To create the sheathing, wooden blocks are used, but such structures should not be used for rooms with high humidity. Before use, the wood is thoroughly dried and treated with protective compounds.
The construction of sheathing begins with markings. You also need to correctly determine the lower level for installing skirting boards. The most protruding part of the wall is taken as a guide. To control the upper and lower levels, you should use a level.
How to install wall panels in a bathroom
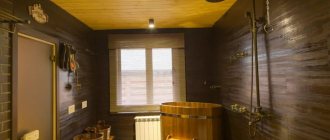
For rooms with high humidity, in particular, bathrooms and bathrooms, PVC panels are best suited because they are not afraid of moisture, mildew and mold. With the help of modern decor options, the design of these rooms can be made stylish and laconic without breaking the bank. To do this, you don’t have to buy expensive collectible tiles - use PVC.
The process can be presented in three options:
- using adhesives;
- using self-tapping screws;
- using clamps.
The adhesive is suitable for perfectly flat and smooth surfaces. Choose any of those sold on the market: liquid nails, universal “Moment” or a specialized composition for PVC panels. Glue will simplify and reduce the cost of bathroom renovation, because there is no need to construct a sheathing. The disadvantage of this option is the difficulty of replacing a damaged panel with a new one, since it will be firmly glued to the wall. It will have to be dismantled along with the outer layer of wall finishing, which will then need to be restored.
It's easier with self-tapping screws. This option is convenient for masking pipes and wires. To speed up the process, it is recommended to use a screwdriver. There is no need to level the surface. The disadvantage is the need to construct a lathing base from wooden slats. This is an additional cost of time and money. Before attaching wall panels to clamps, a metal sheathing must be installed on the wall.
Creating suspended ceilings from PVC panels: photo models and technologies
PVC panels are excellent for suspended structures. This material can be used for kitchens, toilets, and showers. Panels that imitate lining are often used for ceilings.
Below are the ceiling finishing options.
The following design options are used for finishing:
- glossy and matte surfaces;
- imitation of natural stone and wood;
- with ornaments and plain;
- with thermal film and with printing.
Before installing the ceiling, you need to carry out calculations. In this case, there is no need to take into account openings. The material is taken with a margin of 15%. To design suspended ceilings, the lathing parameters are calculated, and the lighting design features are also taken into account.
If you follow the recommendations for installing the panels, you can perform a high-quality finish with your own hands.
Methods for attaching plastic panels to the wall
How to attach PVC panels to the wall correctly
December 16, 2014
How to decorate the walls of your home? This question often arises when it’s time for another renovation or when buying a new apartment. There are many answers in my head: paint or
glue wallpaper, cover it with decorative tiles or apply decorative plaster. Most of these options require preliminary preparation work. Which entail both investment investments and labor costs. And oh, how I don’t want to do this.
There is an alternative method to solve this problem - covering the walls with PVC panels. This is a universal finishing material for balconies and loggias, utility rooms and corridors, hallways and even some areas of the kitchen. Wall cladding with PVC panels is an aesthetically pleasing look at an affordable price. The material is new on the sales market, but is quite suitable for finishing residential and technical premises.
PVC panels as an option for wall cladding
We found out that cladding walls with PVC panels is the easiest and most economical way to cladding the walls of a residential or utility room. With their help you can decorate almost any wall surface including a bath or shower room. They easily lay on brick or plaster, facing tiles.
Moreover, using PVC panels for walls, installation can be done with your own hands. It does not present particularly difficult moments and does not require certain skills. The need to level the surfaces of the walls disappears in principle, which makes renovations in the apartment easy, quick and not labor-intensive.
But still, in order for the repair work to be successful, you need to know exactly how to attach PVC panels to the wall, and in what ways this can be done. Our article can help you with this. In it we will try to give you all the comprehensive instructions and advice on installation, features and characteristics.
Wall cladding with PVC panels is used very often today. And this is not an accident, but, most likely, a pattern. Why do buyers prefer this building material? They have already managed to appreciate a number of undeniable advantages of these panels:
- resistance to the effects of humidity - absolute;
- level of mechanical strength – high;
- susceptibility to the influence of temperature or atmospheric influences on them is zero;
- are not exposed to ultraviolet radiation;
- ease of installation work;
- the ability to use the material for finishing both inside and outside.
Production technology
Manufacturers of PVC panels use two main components as a basis: the first is table salt, and the second is petroleum products. Therefore, the technology must imply environmental friendliness, as well as the purity of the material.
The construction of internal partitions from panels gives them good strength, so their use in houses, apartments or public buildings is acceptable. The use of special seamless technology in production makes it possible to make the joints between them almost invisible. If we talk about the strength of the material, then it is quite sufficient so that various lamps for additional lighting with electrical sockets and switches can be mounted on its surface.
When installing PVC panels, there are locks on one side and grooves on the other. They are provided by the manufacturers so that the panels can be fastened without the use of additional devices and directly onto the frame using self-tapping screws.
As for the thickness of the panels, it varies from 8 ml to 62 ml. This means their scope is wide. If the surface is treated with hot lamination, then their wear resistance increases and the adhesion process between the wall and the panel is enhanced.
Types and classification
PVC panels laminated for walls are divided into three main types:
- Rack and pinion. In the form of strips with tongue-and-groove fastening. They are made in the image of lining or simply seamless.
- Tiled. In the form of square shaped sheets.
- Leafy. This type of panel has the largest linear dimension. With their help, you can cover fairly large areas at once.
- Polyvinyl chloride.
- Chipboard, MDF, fiberboard materials are the result of wood processing.
- Electric drill with a drill and a special tip. Diameter equal to the dowel head.
- Hand-held electric saw.
- Electric screwdriver. You can use a simple screwdriver.
- Correct building level.
- Stapler. Maybe a hammer.
- Marking pencil, chalk, tape measure.
- Metal scissors.
- Hacksaw for carving wood or metal.
- Ladder.
- electric drill;
- wood hacksaw;
- scissors and hacksaw for metal;
- screwdriver or screwdriver;
- tape measure, building level, pencil or marker;
- hammer, stapler;
- ladder.
If we consider all types of panels based on materials, they can be divided into two classes:
Features and Properties
Laminated chipboard panels. This class of material is considered one of the worst in terms of mechanical strength; it is not environmentally friendly and hygroscopic. It crumbles very easily and can be easily damaged even during transportation. Moreover, resins of synthetic origin are used in its production. Therefore, it is not advisable to use it in residential premises.
MDF panels. Newer and more modern compared to fiberboard. They are more resistant to stress and less hygroscopic. Manufacturers use the natural polymer lignin, which is obtained from wood. After wood, it is the second most environmentally friendly material. The appearance of the panels imitates various types of wood, which gives them uniqueness and style.
Laminated PVC panels for walls are the most moisture-resistant material of all types. They found their main application as cladding for those rooms in which there is a high level of humidity. Among the disadvantages, we can only note their cold appearance: plain options, granite or marble. But they look good for exterior wall cladding.
Stages of preparatory work
Before attaching PVC panels to the wall, you must carefully take and calculate all measurements of the house or apartment and assess their condition. Only after an assessment can we determine in which direction the fastening process will take place, taking into account the size of the cladding as such and the features of all the walls of the building. If there are openings and other non-standard structural elements, then there is a possibility of additional costs and amounts of material.
Before attaching PVC panels to the wall, experienced specialists recommend keeping them in any room at room temperature for at least half an hour. The surfaces where you plan to mount the panels must be thoroughly cleaned of dust, dirt and other debris.
Before attaching the PVC panels to the wall, the surface of the facing tiles must be sanded, the wallpaper must be cleaned and any residues removed if your panels are attached with glue. Each panel is covered with a protective film on top; it is better not to remove it during installation work, so you can preserve the presentation of the material.
Tools
Before you begin installing PVC panels, prepare the necessary tools:
Methods for attaching PVC panels to the wall
PVC panels are fastened to the wall using staples, mounting profiles, nails or gluing. These are the most basic types of panel fastening when finishing walls.
Fastening with staples or nails
Installing PVC panels on the wall using staples or nails is the most commonly used method. To use this technology, the construction of sheathing is required. To build the sheathing, you will need wooden beams with a cross-section of 40x25 cm.
With their help, a frame is created on the surface of the wall. The beams are attached perpendicular to the panel surface 50 cm from one another to the wall with screws. One point you need to pay attention to.
In this option, the walls are leveled using the panels. This means that the sheathing must be erected perfectly evenly, strictly according to the level. Next, it is advisable to start attaching PVC panels to the wall from the corner of the building structure, securing the finishing element in it with a bracket or nail. The direction does not matter, just make sure that the comb of the PVC panel is directed in the direction where the installation movement is directed.
If you start attaching PVC panels to the wall, then make sure that the panels are pressed more tightly to each other. To make the wall cladding look neater in the corners or where PVC panels adjoin window, door or other openings, use special starting and end moldings.
They are on sale, you won't have any problems finding them. When laying the last strip of the panel, you need to apply a little force to push it into the finishing element or corner, as well as into the previous strip.
Fastening panels with mounting profile
The technology for installing panels in this way involves the use of profiles special for plastic panels. They are made of either plastic or galvanized steel. During
For installation, they must be attached to the wall as in the first method.
Then you need to insert the corner profile; it is snapped to the rail with special clips. This is also where you need to insert the first piece of PVC panel and attach it to the rail using a clip. Next, all subsequent strips of material are inserted into all previous ones and are also attached.
Fastening PVC panels with glue
To use this cladding method, the wall must be perfectly flat, clean and dry. If this is not the case, but you have chosen this particular method of cladding, then before gluing you need to prepare all surfaces of the walls. Next, the panel is smeared with glue evenly and thoroughly, then attached to the wall.
The panels can also be glued to the frame. Then there is no need to level the walls; the slats or wooden bars of the sheathing are covered with a layer of glue. In order to glue PVC panels to the wall, only specially designed glue is used. It is otherwise called “liquid nails”.
Under no circumstances should you use glue that contains a cleaner or solvent. When adjusting the height of PVC panels, do not forget that they can expand in winter and summer.
Therefore, you need to leave small gaps. In a room with high humidity, using slats as sheathing, make small cuts for air circulation.
Shape and dimensions
PVC slatted panels for walls have the following dimensions: the width of each of them is 10÷30 centimeters, the length is 2.5÷6 meters and the thickness is 8÷25 millimeters.
Sheet panels. Their typical dimensions are: 122÷244 cm, 260÷100 cm, 200÷100 cm, 130÷100 cm, 260÷490 cm, 130÷49 cm, 128÷98 cm, 260÷98 cm. Thickness 3÷6 mm .
Square PVC panels for walls have the following sizes: 30÷30 cm, 30÷60 cm, 15÷60 cm, 98÷98 cm, 98÷49 cm.
Wall decoration with PVC panels
Plastic panels are a material of non-natural origin. They contain polyvinyl chloride and a minimal amount of softener. The structure of the material is cellular, thanks to which it has good sound insulation. Various textures or patterns are applied to the surface of the panels using printing. On top they are covered with a special antistatic layer, which increases wear resistance and protects against ultraviolet radiation.
On top they can be coated with varnish or a matte-silky coating. You can cover the walls with PVC panels in rooms with direct moisture on their surface, for example, in a bathroom or shower. The material is absolutely waterproof and easy to clean. Sheathing walls with PVC panels is much simpler and lighter than with plasterboard.
What is it like to be heir to the royal throne? 7 Surprising Facts Royal heirs are entitled to a range of benefits, but until recently these were also limited by ancient traditions formed over time.
How to tell your daughter or son that there will be another child in the family. Are you expecting another child? Congratulations! You might want to share this joy with your family and friends, but what about your older children? When
Top 10 Broke Stars It turns out that sometimes even the biggest fame ends in failure, as is the case with these celebrities.
10 mysterious photographs that will shock Long before the advent of the Internet and the masters of Photoshop, the vast majority of photos taken were genuine. Sometimes the pictures captured were truly incredible.
Terrifyingly beautiful: 15 shocking plastic surgeries that ended in failure Plastic surgery among celebrities remains incredibly popular to this day. But the problem is that in the past the result was not always ideal.
Our ancestors slept differently than we do. What are we doing wrong? It’s hard to believe, but scientists and many historians are inclined to believe that modern man sleeps completely differently than his ancient ancestors. Initially.
How to attach plastic panels - step-by-step instructions
When thinking about renovation, we always want to get an excellent result, without unnecessary expenses and within the minimum time frame. Another important point is that repair work does not cause a lot of trouble, does not leave behind dirt and does not greatly disturb the neighbors.
An excellent solution in this case would be to install plastic panels. Our instructions will help you understand how to attach plastic panels. They are easily mounted on walls or ceilings and do not require leveling the surface in advance.
Plastic panels are easy to clean and ideal for rooms with high humidity (bathroom, sauna, boiler room). A variety of colors and textures will help create a unique and cozy interior. To install such panels, it is enough to have several tools on hand.
Necessary tools and preliminary preparation
The tools necessary for attaching plastic panels can be found in almost every home:
First, use a tape measure to measure the working surface, this will allow you to correctly calculate the required amount of materials.
The surface must be cleared of wallpaper. If the panels stick, be sure to clean the walls or tiles of paint and dust.
Before installation, it is recommended to keep the plastic panels for at least half an hour at room temperature. Do not rush to remove the protective film before completing installation work; it will help preserve the presentation of the panels.
Installation features and procedure
The panels are fastened either directly to the wall or to a pre-prepared sheathing. To mount it on the wall, it must be perfectly flat. Lathing is wooden beams or slats that are screwed to the surface at a certain distance from each other. For walls, the width between the slats should not exceed 30 - 40 cm, for the ceiling - no more than 30 cm. Lathing slats are attached to the wall perpendicularly to the direction of the panels.
If the wall to which the slats are attached is wooden or any other into which self-tapping screws can be easily screwed, then it is best to use them to attach the bars. If the wall is concrete or brick, then it is best to fasten the bars using dowel-nails or using ordinary dowels and self-tapping screws.
An example of fastening sheathing under plastic panels.
Before you get started, you must understand how to properly attach plastic panels to the wall.
- If you decide to fasten the panels to the sheathing with nails, then keep in mind that reusing the material will be impossible, since, most likely, the integrity of the panel will be damaged during dismantling.
- The best method of fastening is with clamps.
- But using staples that are driven in using a special stapler is also a good option.
- Another good option for fastening panels is self-tapping screws.
The most common methods of fastening plastic panels.
Once you have decided on the method of attaching the panels, you need to do the following:
First install the fittings: finishing element, external or internal corner. If the panel covers the wall to the ceiling, then attach the ceiling plinth to the top beam.
Available types of fittings for plastic panels.
Insert the panel into the fastening element using the narrow fastening flange. The panel is secured on the side of the wide mounting shelf using nails or brackets.
After making sure that the first panel is installed level, insert the next one with the narrow end into the groove of the previous panel. Try to mount the panels tightly to each other.
Installation of the necessary fittings and the first plastic panel.
The last plastic panel that completes the row must be inserted with force between the final element and the previous panel. If the panel needs to be reduced in width, cut off the excess using a knife, moving along the panel.
Video: Installation of lathing, fittings and PVC panels
Features of installing plastic panels on walls
If the room is dry and the walls are smooth, then the panels can be mounted directly on the wall without using lathing.
Fastening panels with glue directly to the walls without using lathing.
In rooms with high humidity, a plastic or metal mounting profile should be used as lathing. In this case, the panels are attached to the slats with special clips, which greatly facilitates the installation and dismantling of the structure.
Fastening panels using a plastic profile using special clips.
You should take into account the expansion of the material when the temperature changes, so when adjusting the panels in height, leave a small gap. If you use a wide beam for the sheathing, then insulation or soundproofing material can be placed in the resulting space between the wall and the panels.
Features of installing plastic panels on the ceiling
Now let's look at ways to attach plastic panels to the ceiling. Before installation, you need to determine the distance between the panels and the ceiling. This gap will depend on the type of lighting. If you plan to install built-in lamps, then the distance should be at least 10-15 cm, so you can completely hide the wiring. Mark the locations of the lamps in advance with a pencil, cut out the holes and install the lamp bases.
Metal lathing for mounting plastic panels on the ceiling in the bathroom.
Next, you perform the same steps as when installing the panels on the walls. In a room with a flat ceiling, you can do without lathing. Install the ceiling plinth on three walls before starting work. Use a building level to position the panels evenly.
When installing plastic panels in a room with high humidity, fill the ceiling gaps with silicone sealant to achieve complete waterproofness.
Useful tips for installing plastic panels:
1. Cut and drill panels with the right side facing up. Use a hacksaw, handsaw, or utility knife to cut. Always wear special glasses to protect your eyes.
2. Apply the glue directly to the wall. Draw a grid using even lines, leaving no empty areas. Use only special construction adhesive “liquid nails”.
3. When driving nails into the panel during installation, be careful not to hit the surface with a hammer, otherwise dents will remain.
4. Plastic panels should be cleaned with soapy water. Do not use abrasive cleaners, rough scourers or solvent-based products for cleaning.
Now you know how to attach plastic panels to the wall and how to care for them. Installing plastic panels does not require much time and can be done by any beginner. By choosing this easy-to-install material, you can create a unique interior with your own hands. Among the variety of panels imitating stone, wood, paper of various colors, you are sure to find an option to your liking.
Be sure to watch the video below, it very clearly shows the process of installing plastic panels.
Video: Finishing bathroom walls and ceilings with PVC panels
How to properly attach plastic panels to the wall?
Plastic panel is a decorative finishing material made of polyvinyl chloride (plastic). Used for interior and exterior work. Used for finishing walls and ceilings.
The finishing material looks like a board. If you make a structural cross-section, you will see that the panel is a “sandwich”: 2 plates connected to each other by transverse stiffening ribs. The panels are joined to each other using a “groove-tenon” connection.
Typical average panel sizes are:
- length - 2600, 2700, 2800, 3000, .... 6000mm;
- width - 80, 100, 110, 150, 200, 250, 300, 375, 500, .... 1220mm;
- thickness - 5, 6, 8, 10mm;
Decorative coating on the panel itself is performed in several ways:
If you build an economic chain based on cost, it will look like this: dyeing - thermal transfer - offset printing - lamination. In other words, the most expensive, but with high-quality coating, are laminated panels, the simpler ones are offset printing, the most inexpensive for interior decoration are products with thermal transfer coating.
Fastening methods Fastening to sheathing
Recommended by all manufacturers. It is a series of longitudinal slats made of wood or PVC profiles, attached to the surface in several rows (up to 4...6). If a wooden grate is used in a bathroom, it must first be treated with an antiseptic composition against rot, mold and mildew.
The panels are fastened to the sheathing:
When attaching panels to a plastic profile using staples, it is advisable to additionally use “liquid nails” glue. This is due to the fact that the brackets have low strength - during installation they are deformed, the fastening becomes unstable, this is especially evident when installing panels on a ceiling surface.
A type of sheathing is a metal frame made of metal profiles. The main advantages are greater rigidity and strength, moisture resistance. The panels are fastened to it using metal screws with a large head. Fixation is possible using glue with the general name “liquid nails”.
Note: If the panels are installed in a damp room, the glue must be based on chemical solvents - the acrylic base is not resistant to moisture.
Fastening directly to the surface
Available in several ways:
Tip: When choosing this type of adhesive, it is not at all necessary to choose a highly specialized composition - most of these adhesives have a wide range of applications. What is more important is the initial grip strength; the higher the number, the better. Measured in kg/m².
The use of double-sided tape on a foam base will provide reliable instant fixation, is easy to use, and is moisture resistant.
Note: all these types of “fixing directly to the surface” have a significant drawback - they require a flat surface without drops.
If the surface is uneven, the above methods are used with wooden sheathing or PVC profile, as well as using a metal frame.
Fastening with polyurethane foam
Note: it is advisable to use professional foam, and one that is marked “65” and the time for the formation of a surface “crust” is 10...15 minutes.
To use foam, you can buy an inexpensive “disposable” plastic gun - it will pay for itself on the first use, and its performance will be enough to produce up to 10 cylinders.
Advantages when installing panels in the bathroom
The most common practice is finishing with ceramic tiles, but this costs time and money. A good alternative is lining the walls and ceiling with plastic panels.
This method has a number of advantages:
Tools used, general list:
The list of tools determines the chosen method of installing the panels, for example, a hammer drill, which will be needed when installing a PVC profile or metal frame, but will not be used at all when installing on foam; a gun is required for it.
Surface preparation consists of:
The surface should always be cleaned, especially if work is to be done in the bathroom.
Helpful installation tips:
Types of wall panels
According to implementation, the main types are divided:
The most common type. Externally they look like boards of different lengths (up to 3 meters) and widths (up to 500 mm). The “narrowest” - up to 110 mm wide - have a colloquial name: “plastic lining”. The color range includes hundreds of colors and is constantly updated.
Tile, “under tile”
Made in the form of rectangular sheets resembling tiles with dimensions:
Small sizes allow you to lay the panels in a vertical, horizontal, checkerboard pattern or give the general direction a slope. In addition to traditional “tiled” designs, various fantasy designs are used, for example, in the form of large panels depicting parts of the city landscape.
Sheet structures
They are sheets with a width of up to 1220mm and a length of up to 3000mm. Due to their size, they are very convenient for installation - they allow you to immediately cover a significant area. At the same time, this type of panel has a small design palette.
Main properties and characteristics
Plastic panels have a number of undoubted positive consumer and technical properties:
- Affordable price.
At the same time, plastic finishing materials are not without disadvantages:
- The panels should not be used near heating devices with temperatures above +50°C, for example, infrared heaters or gas stoves.
Tips for determining the quality of panels:
- Guides for plastic panels February 26, 2013 at 08:50 Do-it-yourself installation of PVC panels Installation of PVC panels takes…
- Sandwich panels for slopes of plastic windows Everything about window sandwich panels: installation, characteristics and dimensions When replacing windows, you always want to perform installation…
- Photos of plastic balconies Recently, finishing balconies with plastic panels has become very popular. In addition, while renovating the balcony...
- How to glue plastic panels to a wall Glue for PVC panels - how to glue plastic panels to a wall Before starting repairs, many...
Installation of glass panels
The installation of the skinal is carried out after the kitchen has been completely finished, the furniture has been assembled and the electrical wiring has been installed. How to attach an apron in a kitchen of this kind is demonstrated in the following video.
You can install only small skins (and only straight ones) yourself, or fix glass panels. Only specialists can install a wall-length or corner model.
There are 3 types of fasteners:
- hinged - allows you to join panels and form a single protective screen. This method hides the condition of the wall, since the material appears at a distance of 4 mm from the surface;
- for silicone glue – allowed for small element sizes;
- with the help of Velcro - essentially wall mounting. Possible only if the latter is in perfect condition.
The most popular, despite the complexity, is wall-mounted installation.
- Mark the wall for the future apron.
- Holes with a diameter of 6 mm are drilled for the fasteners - the standard size of plastic dowels included in the kit.
- They drive dowels into the walls. The panel is freed from the protective film and placed on the fasteners. The holes in the glass are made by the manufacturer. However, the hole for the socket and switch is either made to order or made independently.
- A silicone damper is inserted into the hole in the glass - it prevents contact between glass and metal. Then install the threaded bushing and screw in the self-tapping screw. The fasteners must be reliable, but not excessive; the glass must be hung on the fasteners, and not pressed between the screw and the wall.
Self-tapping screws are masked with decorative caps.
What sizes are there?
Decorative panels for walls vary depending on the size of the sheets. They come in the following types:
- Tile products. They are produced in the form of square sheets. Their standard size is 30x30 cm or 90x90 cm. Having these dimensions, they are suitable for laying out mosaics or panels. They come in a variety of colors and patterns. This square is equipped with special mounting grooves to simplify the installation process. Square carved panels (gypsum, plastic, etc.) are used to decorate various rooms;
- Rack (typesetting) sheets. They are produced in the form of slats or planks. They are characterized by different sizes: length from 0.9 to 3.7 m, width up to 30 cm, thickness does not exceed 12 mm. The slatted panels are attached to a pre-prepared sheathing; fastening to the frame is carried out using clamps (special metal brackets). Lath panels (gypsum, plastic, etc.) are installed close to each other. Visually, this cladding is very similar to lining;
- Sheet panels. Such sheet panels have the form of sheets. They are characterized by a width of 122 cm, a height of 244 cm, and a thickness of no more than 6 mm. Sheet products are convenient in situations where it is necessary to avoid the formation of a large number of seams and joints. Due to their size, carved sheet panels are quickly installed. Sheet products are made from recycled wood (for example, fiberboard, MDF), aluminum, PVC, plasterboard, and polystyrene. Such sheets have a decorated front side, which has water-repellent properties. Installation here is also carried out on a specially prepared sheathing.
Related article: Choosing a gun for polyurethane foam. Gun device
Types of decorative panels
Decorative wall panels today are made from a wide variety of materials, which ensures their wide range. Thanks to innovative technologies, such panels used for wall cladding are made from the following materials:
- wood (the material used is laminated wood, as well as solid wood);
- gypsum vinyl;
- chipboard;
- plastic (polyvinyl chloride);
- aluminum;
- fibreboard, which has different densities (such products are made from MDF, fiberboard and HDF);
- cork;
- acrylic glass;
- polystyrene;
- textiles and leather.
Let's consider each type separately.
Panels based on wood. Such wooden products for wall decoration are made from various types of wood. The most commonly used types of wood are: cherry, ash, oak, beech, pine, alder, and cedar. This is an environmentally friendly material, so wooden panels are suitable for finishing walls in any residential premises (for example, a bedroom, an office).
Gypsum sheet products. They are based on plasterboard and gypsum vinyl. Such gypsum products are often used for cladding internal partitions and walls. Gypsum panels are not afraid of moisture, so they can even be installed in the bathroom. In addition, gypsum sheets are resistant to mechanical stress. You can use different detergents to wash them.
Decorative panels made of composite materials containing aluminum have a beautiful holographic appearance. To create them, special processing technology is used. They have the form of a structure that consists of two layers of aluminum sheathing and a sheet of monolithic polyethylene located between them. This design is similar to plasterboard sheets, but with a different filling.
Chipboard. Here the base contains wood, or rather sawdust. The binder in this case is resin. Such products are obtained by using the hot pressing method. The material is less reliable than wooden boards. Used for finishing walls in insulated and dry rooms. These carved panels come in different varieties. They have different densities: MDF (medium density) and HDF (high density).
Article on the topic: Do-it-yourself self-leveling floor: device and how to make it yourself in an apartment, video, correct self-leveling floor
Plastic panels. They are made from polyvinyl chloride. They are in greatest demand. These plastic products have a long service life, high humidity (suitable for finishing bathrooms), easy maintenance and excellent hygienic properties. Plastic panels can be installed in any room: bathroom, living room and even in offices.
Decorative cork. Cork, like wood, is a natural material with a long service life and easy maintenance. Such sheets are not subject to deformation, do not absorb moisture (suitable for installation in the bathroom), odors and dust, and do not burn. Any dirt can be easily washed off from them.
Acrylic glass products are made from synthetic resins. Various methods and approaches are used to decorate them. The surface of acrylic slabs can even be decorated with semi-precious stones.
Polystyrene. This is a type of plastic sheet. They have a special protective film layer. Their surface can be mirror-like, rough or smooth. Carved panels have different thickness parameters. They also produce products made from foamed polystyrene. This type of sheet has a rigid base and a reinforced layer. They have a high degree of noise, hydro, and thermal insulation. In addition, they are characterized by moisture resistance, so they are suitable for finishing the bathroom.
Fabric and leather panels. These products have different parameters of shape, texture and degree of softness. They are used to create a bright and unusual accent in rooms. You can even print photos with various images on such decorative sheets.
As you can see, there is a huge variety of decorative panels for wall decoration. The choice from the available variety (gypsum, plastic, etc.) must be made based on what properties of the finish you need, as well as where it will be used (in the bathroom, kitchen, bedroom or office).