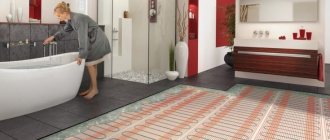
A country estate occupies a special place in the life of a modern person. Here you can take a break from the daily hustle and bustle and constant stress. Most of us often ask the question: “How to build a bathhouse in the country?” Modern tools and materials help to cope with the task.
Our material provides detailed instructions for a turnkey bathhouse. All the nuances of the work process are taken into account here. Recommendations from experienced specialists will help you choose the right materials and components for the ideal construction.
The initial stage of any construction is:
- detailed design of the structure;
- choice of terrain;
- purchase of construction materials;
- construction of a bathhouse;
- interior decoration and communication connections.
How to choose the location of the bathhouse?
Before starting construction work, you need to decide on the location where the bathhouse will be located.
Experienced specialists recommend taking into account a number of criteria that play an important role in the construction of this facility:
- It is best to choose elevated areas. There will be no problems with drainage of wastewater;
- for aesthetic purposes, it is recommended to choose a place where there is a river or pond nearby;
- To save land, an extension is being made to the house. Proper hydro and vapor barrier will prevent the appearance of mold.
Device
To get the maximum effect and pleasure from visiting the steam room, it is important to build the building correctly and zone the interior space. A classic country bathhouse is characterized by three functional rooms:
- Dressing room - rest room, locker room. There can be a closet for things, a table and benches for visitors to rest here. Often a furnace duct with a firebox is located in the dressing room.
- The washing room is an intermediate room in which you can wash yourself before visiting the steam room or rinse your body after bathing procedures. Here you can install a shower stall, a plunge pool, or a swimming pool.
- Steam room - a room for bathing procedures. Here a certain temperature regime and humidity level are achieved. The inside is finished with clapboard, and shelves for visitors are installed along the walls.
Additional zones:
- An attic is an inferior second floor, inside of which a recreation room or living space is located.
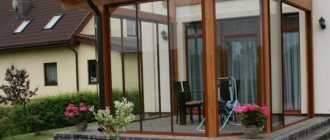
- A terrace or veranda is an addition to the main building. Here you can make an additional recreation area or kitchen. To protect against precipitation and cold, the verandas are completely glazed.
- Additional room for visitors to relax.
It is recommended to make a small vestibule in front of the dressing room.
Steam room (Photo: Instagram / ideiipodelkidliadachi)
Wooden building
Such buildings are made from natural solid wood. The surface of the walls and ceiling is treated with a special fire-resistant compound. It protects against fire and has a protective effect against insect attacks.
How to build a bathhouse from timber? For this purpose, dense wood species are used. They retain heat well and have a beautiful appearance. To build a small building you will need more than 150 beams of different lengths.
Material
A classic country bathhouse is a wooden frame with a gable roof. Wood is considered the best material for construction. Previously, bathhouses were built from solid logs, but now they are built from different types of logs:
- solid non-profiled and profiled;
- glued profiled;
- thermal timber;
- rounded.
Each of the lumber has its own pros and cons.
Rounded log
Advantages:
- Attractive view.
- The ability to quickly assemble a log house if the corner grooves for connecting individual logs are already ready.
- Good thermal insulation.
- High strength, durability.
Flaws:
- High price.
- Problems with finding quality products.
- Construction of buildings only in the Russian style, without a bias towards European bath complexes.
Rounded log (Photo: Instagram / dobryles43)
Solid non-profiled timber
Advantages:
- Sold ready-made. This is due to the simple cross-section of the timber (square or rectangular).
- Low price.
- Environmental friendliness, reliability, durability.
Flaws:
- Difficult leveling of wall surfaces. Non-profiled beams easily move to the side during installation and unevenness appears on the walls.
- Long-term shrinkage of the log house due to the high natural humidity of the timber. Until the shrinkage is completed, you cannot install windows, doors, or begin interior decoration.
- Twisting the timber. Large cracks appear on its surface, which spoil the appearance.
- Carrying out additional work to eliminate defects.
Solid profiled timber
Advantages:
- High installation speed.
- Low heat loss.
- Environmentally friendly.
- Low finishing costs.
- Low price.
Flaws:
- Long-term shrinkage at high natural humidity.
- The appearance of cracks during shrinkage. They are sealed with tow or wood plaster.
Solid profiled timber (Photo: Instagram / alternativa__nsk)
Maple profiled timber
Advantages:
- There is no need to wait for shrinkage, which reduces the period of construction work.
- Geometric characteristics do not change over time, since laminated veneer lumber is made from dried wood.
- There is no need to carry out additional processing of finished walls before starting finishing work.
- No cracks appear. The timber does not twist due to temperature changes, since it is made of individual lamellas.
- The material is characterized by high strength, reliability, and thermal insulation.
Flaws:
- Reduced wood's ability to transmit oxygen due to the use of adhesives to connect individual lamellas.
- High price, low availability.
Thermobeam
A special type of lumber, which consists of two lamellas connected by jumpers. The space between them is filled with insulation. Advantages:
- Low price.
- High thermal insulation.
- No shrinkage. Construction work is carried out faster.
- High strength.
Flaws:
- Thermal beams do not allow air to pass through, which leads to disruption of oxygen microcirculation.
- Lumber is difficult to purchase because it is considered relatively new.
The choice of lumber depends on financial capabilities and climate zone.
Thermobeam (Photo: Instagram / termo.derevo)
Arbottle structure
This type of material has good heat and waterproofing. For construction, blocks or monolithic slabs are used.
The finished product is neat and durable. This bathhouse is ideal for a small summer cottage.
Bathroom layout: recommendations
At the very beginning, make drawings of the bathhouse in which the ideal bathhouse area will be located.
View this post on Instagram
Publication from Sergey Bogachev (@serj_bogachev)
The ideal area per person is approximately 5 sq.m. Approximately 4 people will visit the bathhouse, then the total area should be at least 20 sq.m.
The minimum number of rooms for a bath is recommended: steam room, washing room, relaxation room and dressing room. Determine for yourself the location of all the rooms and how convenient they will be.
View this post on Instagram
Publication from ► DACHA, HOUSE, BATH in MOSCOW ↗ (@zakazdom)
Make some diagrams and drawings:
- General plan of the building.
- Foundation diagram.
- Drawing of each room.
- Roofing diagram.
- Plan of the floor and ceiling of the bathhouse.
- Fastening plan and timber laying.
- Installation diagram of the furnace, taking into account its structural features.
View this post on Instagram
Publication from HOUSE BANYA BRUS LOG OTSB (@domavashi)
You can create all the drawings that you may need yourself, but you can also find ready-made drawings that are provided below or find them in the public domain, choose the one that suits your needs. You can also pay an architect or builder and commission a unique design from them.
View this post on Instagram
Publication from ► DACHA, HOUSE, BATH in MOSCOW ↗ (@zakazdom)
Boiler
The boiler model for a sauna will largely depend on your financial capabilities and the fuel you will use for heating. If you know how to use welding, then you can make a simple boiler yourself from thick sheet iron. If you prefer more advanced colas with gas or electricity, you can purchase them from specialized companies.
The boiler in the steam room is installed in such a way that the combustion chamber is loaded with fuel either from the street or from the rest room (dressing room). The boiler itself, for fire safety purposes, is located 10-15 centimeters from the nearest walls. The walls are as high as the boiler and covered with iron sheets. A good solution would be to line the boiler with bricks, thereby reducing its cooling time and protecting the walls from fire.
When installing a chimney for a boiler, pay special attention to the place where the pipe comes into contact with the ceiling. The opening for the chimney should be insulated with refractory material. Also, pay attention to the place where the chimney pipe exits through the roof. This area is usually prone to leakage, so it should be sealed thoroughly. Below are the options for boilers for baths:
- Homemade boiler made from metal sheets.
- A gas boiler.
- Electric boiler.
- Solid fuel boiler.
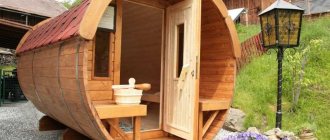
Options for beautiful and unusual baths
In addition to traditional materials and design for a bath, there are many alternative solutions. Below we present photographs of the most unusual baths:
- Mobile sauna made of clapboard, built on a car trailer.
- Bath in a huge wine barrel.
- Bathhouse made of plastic bottles.
- The dugout bathhouse was built directly into the ground.
- A sauna housed in an iron container.
- Forest sauna made of untreated logs.
- A beautiful bathhouse made from a gun carriage.
- Bathhouse made of unedged boards.
At the end of the article, I would like to remind you that heating a bath is associated with fire and high temperatures. Therefore, when building a bathhouse from bricks, logs, cinder blocks or boards, pay great attention to fire safety. This warning also applies to electrical wiring, since the rooms inside the bathhouse have high air humidity and the risk of a short circuit due to condensation is very high.
We hope that reading our article will encourage you to build a bathhouse yourself!
Plan and classic project of a rustic bathhouse with your own hands with photos
Do-it-yourself village baths have a classic layout of premises:
Of course, the bathhouse can be “equipped” with a shower, a terrace, and a swimming pool can be located next to or inside. We invite you to view the drawings and photos that will help you design and build a bathhouse in the village with your own hands:
Scheme of a stove for a bath.
Important! The main feature of the bathhouse for the village is the pouring floor, which ensures unimpeded drainage of water at any time of the year.
Choosing a place to build a bathhouse
The correct place for a bath should be at some distance from other objects:
It is worth considering some more nuances:
In general, the site must comply with the requirements of regulations and legislation.
Foundation: which one to choose
In our case, we can do without a foundation, because the bathhouse promises to be light. But without it, the walls will be exposed to dampness, which, of course, you wouldn’t want. Based on this, we draw the following conclusion: the basis will still have to be made.
Just as a bathhouse can be different, so the foundation has its own diversity. A separate type of foundation is suitable for each specific house. Now we will take a closer look at them.
So, the following types of foundations are suitable for frame baths:
- wooden beam. Suitable for 3x4 baths. All that is needed here is a beam and pegs with which it is secured;
- columnar. An option for those whose groundwater is close to the surface. Here you will already need some skills - for example, mixing cement. But it’s still not difficult to build such a foundation;
- blocky. This type of foundation is chosen by those who are building a medium-sized sauna that can withstand a stove and many visitors. But, if the depth of soil freezing at the construction site exceeds a meter, then such a foundation will not be built, since this is prohibited;
- pile-screw. If you are not allowed to choose the previous option, you can take screw-in piles, install and secure the harness on them. In order to carry out the necessary work, four workers may be enough;
- tape Well suited for soils with great reliability - for example, for heaving ones. If your bathhouse is huge in size, you can build a prefabricated strip foundation.
Phased construction of the structure
In order to give readers a more complete understanding of construction, below is a description of the construction of a bathhouse on a summer cottage - from the foundation to the installation of the stove and finishing.
- Choosing a location. Before starting construction, carefully consider the location of the structure. It should not interfere with free movement around the site, vehicle access and gardening work;
- You should pay special attention to the design of the bathhouse . First, decide what you would like it to be like, how many rooms there should be in the building, what size the bathhouse in the country house will be. Think about what decorative elements will make the building attractive in your eyes, study the projects offered in the catalogs. The layout of the bathhouse is of great importance - after all, the convenient location of the premises determines the comfortable operation of the building. Also, when designing, you should remember the building codes and regulations;
- The first step is to take care of the foundation . As a base, you can choose one of three common types, all of which can be installed with your own hands, even in the absence of professional skills:
- Shallow strip (country bathhouse, small structure and does not require massive types of foundation);
- Columnar - great for ready-made transport products, which the owner only needs to install in place and connect to communications;
- Pile-screw - will be a guarantor of reliability in unstable soils and in swampy soil conditions.
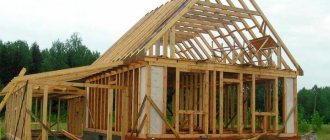
- The next stage will be the construction of bathhouse walls on the site. Regardless of what material you decide to build your country bathhouse from, the main thing in this operation is strict adherence to the technology. Also, do not forget that when using wood as a building material, you need to properly carry out waterproofing work at the junction of the walls with the foundation, and impregnate the wood itself with antiseptics or at least oil treatment, especially the lower crowns. At this stage, future openings for windows and doors are also cut out, and the installation of a casing in a wooden bathhouse is mandatory.
- Installation of the rafter system and roof is the last operation in the construction of the main structure. Depending on the project that you have drawn up, purchased or selected on the website, the rafter system may have a different shape. For example, in a bathhouse with an attic floor, where a rest room is most often located, it will be most convenient to install a so-called sloping roof. But if your choice is a small structure designed for one or two people, then you can limit yourself to a single-pitched rafter system. It is very important to correctly calculate the loads and use chamber-drying timber and boards in the work. In this way, the possibility of the ridge sagging can be completely prevented;
- Finishing work and installation of equipment are carried out last. If timber or logs of natural moisture were used for construction, it is necessary to wait from 6 months to 3 years. During the allotted time, the processes of shrinkage and shrinkage of the log house will occur, after which, if necessary, the walls will be re-caulked.
The finishing can be anything you like, but its main stages will be:
- Flooring;
- Wall cladding (if required - when building from laminated timber, interior finishing is not needed, only in the steam room you can cover the walls with clapboard made of aspen, linden and other types of wood that do not emit resins);
- Ceiling cladding and chimney removal (if you do not plan to have an electric stove in the bathhouse);
- Installation of benches, shelves, doors between rooms (door handles in the steam room are always made of wood to avoid burns);
- Installation of windows and entrance door.
Photo examples of ready-made baths in the country
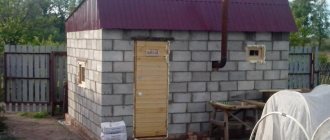
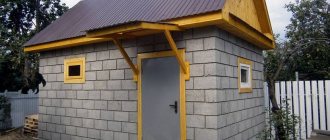
Before you build a budget sauna for your dacha, you need to decide on the material for the wall structures. As a rule, natural wood is used to build a private steam room - timber, a simple or rounded log, but increasingly, in order to save money, site owners prefer simpler and cheaper materials. The most popular of them are:
- Brick.
- Foam blocks and gas blocks.
- Wooden beam.
- Edged board.
- Steel frame with wood cladding.
- Plastic corrugated sheet.
Each material has its own strengths and weaknesses, which can be used to advantage when building a compact steam room.
b) floorboard (edged board 150x50 mm 4 meters long is excellent);
c) hardwood boards for ceiling construction (usually lining with a width of 100 mm and a thickness of 20 mm or more is used);
d) material for wall decoration (as a rule, the same lining is used);
e) material for vapor barrier (an excellent option would be to use a vapor barrier film);
e) waterproofing (it is advisable to use penofol, although polyethylene film is suitable);
g) ceiling insulation (mineral wool materials are a good option);
h) sheet asbestos for insulating wooden structures from temperature influences, including for walls near the stove and elements located next to the chimney;
j) roofing material for the roof, which can be selected based on personal preferences and the main thing is that it fits seamlessly into the surrounding roofs of other buildings;
Thatched roof is comfortable unusual and cheap
l) insulation for the inter-crown space (it is better to use jute, although moss or tow are perfect).
The best time to start construction is spring, since after completion of the main construction work it is necessary for the timber to dry and shrink. This requires at least 6 months.
Interior decoration of the bath
If the bathhouse is built of wood, the walls can be left unfinished. The authentic atmosphere with exposed logs will allow you to enjoy the essential oils that are released from the heated wood every time. But the recreation area can be arranged to suit your taste.
Due to the large selection of colors and textures, choosing an option that is as close as possible to the overall palette of the bath will not be difficult. Building a sauna with your own hands is possible and even profitable.
The main thing is to know exactly what result you want to get and choose the materials wisely. And for inspiration, you can use photos of bathhouses made by yourself from the Internet. Happy construction!