The final stage of work
Let's move on to making millstones.
For minimalists, you can simply screw 2 boards to a wooden plate, drill a hole and thread a shaft for the blades. But in order for the blades to rotate during the wind, it is necessary to install bearings. To do this, we will need the same 2 wooden plates, but we need to drill large holes in them, to suit the size of the bearings, maybe 1 mm smaller. Then we saw it in half and make small holes at the top for the screws so that they can be connected and disassembled if the bearings become unusable. Then we glue a small board on the bottom so that the shaft is at a slight angle and the blades do not rub against the mill; you need to place a small block in front of the board. The resulting structure must be secured to the plate to which the roof will be attached, after which we insert the bearings into the structure.
Now we need a threaded shaft and 4 nuts. We insert the shaft into the bearings and secure it with nuts. We glue/screw the wood lining to the roof and our millstones are almost ready. Then we place the millstones and the roof opposite each other at the same level (place bars under the roof), mark the point of contact of the shaft in the roof and make a hole. Then we lubricate it with glue and fasten the plate with the shaft to the mill, and then the roof to the plate with screws from below (so it should protrude beyond the mill).
Making blades is similar. You can cut large blades from plywood and secure them to the shaft with a nut. A more complex option is to drill holes in the blades and insert threaded shafts onto the glue. Then you need a square, drill a number of holes in it:
- 4 – on the side, in the places where the blades are attached;
- 4 – perpendicular to the existing ones, for securing threaded cylinders into which threaded shafts will be attached;
- central - for securing the blades to a large shaft.
We insert the cylinders into the holes and screw the blades into them until they stop. In this case, you can adjust the angle of inclination and change it depending on the wind. Afterwards, all parts are coated with primer and paint for exterior use.
Now we know how to make a decorative mill for the garden with your own hands. When viewing various photos of garden mills, new ideas and solutions may arise. When manufacturing from metal, we use metal scissors and screws/rivets.
Photo gallery
We present to your attention a successful selection of 30 photo ideas for a do-it-yourself mill.
Construction of a garden mill
Most of these decorative objects consist of the following parts:
- platform;
- base;
- frame;
- roof;
- rotation mechanism;
- blades.
The platform is where the garden mill will be installed. The structure can, of course, simply be placed on the ground in the garden or on a flower bed, but then it will not last long - dampness will do its job and render the decorative object unusable. Therefore, it is advisable to build a platform of concrete or stone. The last option will be more beautiful.
Garden mill with a platform made in the form of flat stones. Some gardeners use plastic pipes instead of a platform, which are attached to the base of the mill and dug into the ground during installation.
The base is the lower part of the mill itself, usually wider for better stability. The most stringent requirements must be met for the quality of base treatment - this part of the structure is in most contact with wet soil and plants.
The frame is the main part of the decorative object, the wall of the mill. It is assembled from boards, plywood, slats, lining, small logs and many other materials. In addition, the frame has a decorative function and is often decorated with windows, doors, balconies and other small elements.
An example of decoration with various decorative elements such as fences and windows
The roof is the upper part of the structure. Usually assembled from slats, planks or lining. In some cases, plastic is used, especially for rounded roofs, which are difficult to make from wood. By its color, this part of the mill should stand out from the frame.
Inside the roof there is a rotation mechanism - an axis on two ball bearings. In most cases, it passes through the entire structure; this arrangement is reliable and stable. The mechanism can be supplemented by connecting the mill roof to the frame on a vertical axis and adding a sail - then the structure will not only rotate the blades, but also turn in the direction of the wind.
An example of a drawing with a simple movable mechanism. The sail on the mill is indicated by a red arrow
The blades, also known as wings, are the second most important decorative element of the mill. Assembled from plywood, planks and thin bars
The main condition is that all blades must have the same mass and be balanced, then the mill will last a long time and without problems. Examples of various design options for mill wings are shown in the pictures below.
Garden mills with beautiful decorative wings Metal is sometimes used to make decorative mills, in which case its shape is different from a wooden one. Do-it-yourself mill for the garden - photo The best environment for wooden crafts will be a green lawn
Table. Types of decorative mills for the garden.
| View | Description |
| With quadrangular walls | Quite a simple design. The walls are quadrangular, straight or inclined. Typically, such a mill is completed with a gable roof, but other designs are also found. An excellent option for those gardeners who do not have much experience working with wood. |
| With hexagonal walls | More complex design. Requires fairly high precision in cutting parts of the required size and giving them bevels. Often the walls of such a hexagonal mill taper towards the top. It ends with a dome or polygonal roof. Compared to the previous option, all other properties being equal, it is more attractive. |
| Windmill | The decorative windmill has the simplest design due to the absence of cladding and a complex roof. In addition to decoration, it helps to determine the direction and strength of the wind on the site. In addition to wood, a windmill can be made from steel profiles, if it is easier and more convenient for you to work with them. |
conclusions
A do-it-yourself windmill is a fairly simple design option for decorating your suburban area. Using unnecessary materials, in a few days you can assemble a rather interesting structure, which, in addition to decorating your site, will perform auxiliary functions, for example, act as a secret warehouse.
Making a wooden structure
A wooden mill will not be as durable as a stone one, however, the product looks completely different and creates a different mood. Some may think that assembling a structure made of wood is much easier, but this is not entirely true. You can't do without carpentry skills.
Wood products do not tolerate high humidity well, so the mill must be brought indoors for the winter. This will help avoid rotting and darkening of the array.
Required materials and tools
You can make a wooden mill from leftover building materials or buy everything you need in a store. Any solid wood scraps and lumber will do.
Materials:
- wooden beam;
- moisture-resistant plywood;
- wood for decoration;
- blade rail;
- roofing material
- nails, bolts, self-tapping screws of different sizes;
- threaded rod;
- wood varnish or drying oil.
Tools:
- saw, hacksaw or jigsaw;
- drill or screwdriver;
- Sander;
- sandpaper;
- hammer;
- brush;
- roulette.
Foundation – is it necessary?
A small wooden mill that serves a decorative function does not need a foundation. The mobility of the structure will allow you to move it to any part of the garden if desired.
In cases where the stability of a future building is in doubt, four legs made of timber with pointed ends are used as a foundation, which are attached to the bottom of the support platform on one side and stuck into the ground on the other.
If you are planning a substantial construction with a utility room or a children's playground inside, then you cannot do without a foundation. This will prevent the mill from tipping over. In this case, a shallow foundation is made along the perimeter of the future walls.
Support platform
The support platform will give the mill stability. A square of the required size is assembled from timber. For rigidity, you can additionally connect the opposite corners crosswise.
If desired, the area of the support platform can be larger than the base of the mill. This will protect the structure from falling in strong winds and can serve as an additional platform for placing decor, such as a wooden fence.
Case manufacturing
The simplest housing for a mill is a box in the form of a trapezoid. Four bars of equal length are vertically attached to the support platform using self-tapping screws. At the top, the edges are additionally connected horizontally by timber
It is important to maintain symmetry when assembling
The edges of the resulting structure are sheathed with wood. Almost any material can be used. Eurolining, block house or imitation timber looks good.
Roof arrangement and blade assembly
The roof can be either gable or hipped. The second option is best used for large structures, and for small ones a gable roof is ideal.
From the timber we knock together two ends in the form of a triangle. Once upon a time, large flour mills were covered with real roofing tiles made of baked clay. A decorative analogue can be the same material that was used for the base, cutting colored corrugated sheets, or modern antique tiles. A plywood slope is first laid under the roofing material.
The finished roof is placed on the mill body and secured from the inside with long self-tapping screws.
The propeller is assembled in the same way as for a stone mill. A pin is installed in one of the faces of the base, only in the case of stone it was embedded in the masonry, but here it is secured with nuts. Similar to the previous version, the blades are put on the other side of the pin and fixed.
Decorative finishing
A wooden mill has a lot of decorative finishing options. Flowers and greenery look good next to her. As an option, turn the building into a flower garden. To do this, its base must contain a box for soil, where marigolds, phlox, petunia or any other annual garden plants are planted in the spring.
The finished mill must be impregnated with a protective solution and painted, or covered with drying oil or varnish. If you first go over the wood with stain, you can emphasize the structure of the wood. Each additional layer will darken the surface of the mill.
Preparing for work. Tools and materials
As a rule, a do-it-yourself mill made of wood is not particularly complex, however, before starting work, it would be useful to make a drawing, a sketch of the future product indicating the main dimensions. This will allow you to evaluate the design of the future structure in advance and help avoid gross mistakes during assembly.
To work you will need a tool. It's worth worrying about in advance. A complete list of everything needed depends on the specific design, but the minimum set will look something like this:
- electric saw or hand saw;
- plane (preferably electric);
- screwdriver;
- Sander;
- sandpaper;
- hammer and nails;
- several brushes of different widths;
- tape measure and pencil.
To assemble the product, you will need wood screws of different sizes. An antiseptic will help protect the wood; in addition, you cannot do without varnish or paint for final finishing.
A lath is suitable as a material for the frame of a future building; for the walls you need thick plywood or wood-based sheet material. A “premium class” designer mill can be created from scraps of clapboard left over from home renovations.
Where is it better to place it and what to combine it with?
Garden mills come in different sizes. An object of this type can be placed slightly back from a high fence, which will create the effect of a fortress. If your garden has a small pond or lake, then the mill structure will perfectly complement this composition. Try not to overload it with large elements.
A mill lined with stone will look great; besides, such structures can be complemented with antique garden wheelbarrows, sophisticated benches, mini-bridges over a pond or tall lanterns. Clay animal figurines can also be used harmoniously to complement the overall composition.
Read how to use amphoras in landscape design.
Artificial nests with chicks, storks on long legs, and herons are perfect. Little gnomes located near the structure or accompanying the stone path to it will be able to transport you into the atmosphere of a fairy-tale forest and will also brighten up this complex.
At the mill itself or nearby, you can place wooden containers in which to plant small flowers of bright colors. This way you can achieve contrast, especially if the structure is dark chocolate color. Shades such as fuchsia, white, yellow are perfect, you can even combine several colors.
Tips before starting work
- Before you begin construction, you need to consider the rules. The first thing you need to do is choose a place. It should be clearly visible and in harmony with the surrounding environment. That is, putting a mill right under the house is not particularly logical, but in the distance, so that you can observe it, that’s what you need.
- Second point: we will make a mill from wood. There will be no problems with the compatibility of this natural material with other elements of landscape design.
Wooden style for decorating the local area
Advice! If you have no idea where exactly to place the mill, you can use a direction such as landscape in the design of the site. It provides for the independent placement of decorative elements on the site, at a certain distance. They may not be connected to each other at all.
A beautiful building in the center of the garden
- The style of the mill on the site perfectly emphasizes the increasingly popular rustic style. The structure can be installed near the gazebo, if it is made in the form of a stylized hut.
- If the design of the site shows an oriental style, then you simply cannot do without a water mill. It can be harmoniously placed near a bench or pagoda. You should not install it in a far corner of the garden, as it will most likely become the central decorative element on the site and should decorate, and not be hidden away.
- You should also choose the placement location very carefully if you plan to have movable blades. This is possible even for a decorative mill, which we plan to create. That is, there is no need to place it too close to trees or any buildings.
Recommendations
The greater the height of the decorative mill, the higher its windage. This means that a building from 120 cm and above must be placed on a foundation, at least the simplest one. Usually, a concrete slab is not poured under wooden boxes; it will be enough to drive a few stakes or reinforcement into the ground at the corners.
If according to the design the blades will rotate, then it will be necessary to make a fence around it. At first glance, this is a trifle, but if children play in the garden and around the house, such a fence will come in handy. In addition, the design of the decorative mill will need to include a locking device; they will be useful for blocking rotation in the event of a storm or very strong wind. You can build a good version of a decorative windmill for the garden with your own hands using the video
Internal mechanism
25. Now we need to make a structure for the mill blades.
As you may have noticed, a decorative windmill for a summer house is not an easy project, but it is worth the effort and time spent.
So, you need to make two flat wooden squares with holes inside, as shown in the photo, and drill holes in the right places.
Next, following the photographs, you need to cut them in half.
Now for the two parts you need to make a base from three pieces of boards (you need to drill two holes on the outer ones) and fasten them with glue, placing them in a vice.
And then place it on a solid base.
Note that it should also have 4 holes for screws.
The last step in making the base for the internal structure of the mill is to install a support, cut at an angle so that the structure resembles a slide.
26. Now you can install the tops of the squares with the hole using screws. But don't fasten them too tightly.
27. Next you will need a stainless steel threaded rod, as well as nuts and washers. Follow the instructions to properly mount the cannon structure.
28. You need to make a hole in the hemisphere through which the rod could rotate freely. But to choose the right place for it, take a support panel, attach a wooden ring to it and install a “gun” inside against the wall (to the ring). Having placed the hemisphere at the same height as the height of the support panel and the ring, on the side where the rod is higher, mark the place where the rod and the hemisphere come into contact and make a hole in it.
29. Now you need to glue the ring to the hemisphere, for strength, rewinding the resulting “helmet” with tape for a while.
30. It’s time to install the support panel (using a screw, attach it in the center to the top cover of the frame), the “gun” in the middle and the “helmet”, having previously removed the tape from it when the glue has dried, so that the rod comes out through the prepared for it there is a hole in the hemisphere.
31. Screw the support panel to the ring from below - the holes for this are already prepared.
Wind blades
The blades are the main part that makes a mill a mill. There is no need to worry about their design; after all, we are making a decorative mill. But simply knocking down a structure made of boards and hanging it on the building will not be enough. You should consider parameters such as the size and width of the blades, their weight and tilt from the axis. These parameters determine how the blades will take on the wind and spin.
Windmill blades must be calculated
It is especially important to pay attention to size and weight. The following materials can be used to create blades:
The following materials can be used to create blades:
- Wooden slats with plywood - considered lightweight and practical at the same time;
- Wooden beams and dense polyethylene film;
- Thin wooden slats are attached to the axis that rotates the blades.
At the last stage, you need to install the axle and reinforced beams inside the structure, then put on and secure the blades.
What elements does the structure consist of?
Almost all models of decorative mills consist of the same parts. They may differ from each other in installation technology, for example: objects made of plywood are constructed according to one scheme, and those made of metal or brick - according to another. List of building parts:
- concrete or brick platform;
- lightweight foundation - elevated above the platform;
- building frame;
- roof of different shapes;
- part for rotation;
- balanced blades.
There are not many structural elements, but they all perform different functions. Therefore, it is necessary to know for what purpose this or that part of the mill serves. Description of the design by details:
- Platform. If you place a decorative object on the ground, then after a short time the structure will collapse, since moisture destroys the wood material. The platform should be made of concrete or brick - this is the launching pad on which the object will be built.
- Foundation. This structural element is made of brick. That is, you need to make a small foundation that will protect the structure from dampness. The base is also intended for good stability of the decorative product.
- Skeleton of a mill. This is an equally important part. The frame is mainly made of timber or logs. The roof skeleton must be done correctly, taking into account the location of windows and doors. Then the structure is sheathed with plywood or other material.
- Roof. Often, owners choose rounded hexagonal roofs since the mill is essentially round in shape. However, any roof option is allowed. Soft roofing is used as a roof covering.
- Rotation detail. Typically, such an element is installed from the inside of the roof and consists of bicycle bearings and an axle. The structure is connected to blades, which begin to rotate due to gusts of wind. The rotation mechanism can also be connected to all elements of the mill, and not only the blades, but the entire structure will rotate. But for this, a sail is mounted on the axis. It is also recommended to use bicycle bearings.
- Wings (blades). The structure can be constructed from any available materials, but it is easier to make it from plywood or planks. When installing the wings on the axle, you need to take care of the balancing and symmetry of all four parts.
Hexagonal mill
If the owner of a summer cottage is familiar with power tools and woodworking, then assembling the structure will not take much time and effort. If a beginner gets down to business, then you should follow the instructions provided. Then no problems will arise.
Platform manufacturing
To complete this step, you need to prepare the material. Typically, the platform is made of concrete or natural stone. The first option is more effective because it will last a long time. And as decoration you can use the same natural stone and cover the platform. A DIY windmill begins with the construction of a platform:
- Initially, a foundation pit of 100*100 cm is made. Its depth is 20 cm. A flat area is first selected; it is also important that the mill in the selected area fits harmoniously into the overall style of the garden.
- After which a concrete platform is made. A grid of reinforcement is installed in the excavation made. You can find it at your dacha or make it from reinforcement using welding or wire. Then the formwork is installed, which should be 15 cm above ground level.
- Next, sand, crushed stone, water and cement are prepared. It is advisable to make the following ratio: 25% cement, 25% crushed stone and 50% sand. The solution is mixed in a concrete mixer, bringing it to a semi-liquid state.
- The prepared solution is poured into the pit. The concrete surface is leveled with a trowel. It is necessary that the poured solution reaches the level of the edge of the formwork.
Finally, you need to wait until the concrete platform hardens.
Foundation construction
After the platform is made, a small foundation is built from bricks or cinder blocks. The base is easy to make. After all, this is not the foundation for a huge multi-story building. Therefore, the requirements for a mini-foundation will be minimal. The work is done in several steps:
- On the platform, it is necessary to mark the perimeter of the foundation and coat it with cement.
- Next, brickwork is done on the mortar.
- The height of the foundation must be at least 3 bricks.
- Masonry always starts from the corners, and the seams of the bottom row are overlapped by half with the bricks of the top row so that the brick covers the seam by 40-50%.
- The evenness of the walls is controlled by the building level.
Upon completion of the masonry, all seams are clogged with mortar so that there are no gaps.
Construction of hexagonal frame and sheathing
And after the construction of the foundation, the construction of the frame will follow - this is the most important part of the entire structure. The importance lies in the symmetry of all sides of the future decorative mill. Therefore, the frame is made smooth, otherwise the skin will turn out crooked, and the entire structure will lose its beautiful appearance. Where to start:
- First you need to prepare 6 bars of the same length and 10 jumpers. Sizes are selected individually. The task is to make a cylinder, but hexagonal in shape. Using a screwdriver, the lower part of the structure is secured, and then the upper part. Take 2 bars and connect them with a jumper, then the next bar is connected with another jumper, and so on.
- After making the frame, you need to start treating the product with antiseptics. The primary layer is applied with a brush. And after drying, a secondary layer is applied. This will help extend the service life.
- At the last stage, the frame is attached to the foundation. It is installed on the base, and marks are made on the lower jumpers - these are the places for the holes. Then, holes are made through the wood and brick using a hammer drill. Anchors are installed in the holes and screwed. This method will significantly strengthen the structure.
- Then 6 rectangular pieces of plywood are cut out. And one by one they are screwed to the frame. Plywood is also treated with an antiseptic.
All wooden elements of the plywood mill are treated with an antiseptic in a few words.
Erection of the roof
You can make a single-pitched, gable, quadrangular roof and so on. But since a wooden mill has 6 corners, it is more logical to build a hip roof, which is also equipped with six corners. Hip roof assembly process:
- Each corner of the roof should extend to the corner of the frame. Rafters of the same length are manufactured in quantities of 6 pieces. 5 jumpers are made. Metal corners and screws are used for fastening. First, one edge of all mini-rafters is cut at a right angle. A hacksaw or jigsaw is used for cutting.
- A pair of rafters are installed perpendicular to each other. Secure with corners and screws. The rest of the beams join them. The top point of the roof should be strictly in the center.
- Now, to strengthen the structure, jumpers are screwed on. They should be installed slightly below the middle of the roof. The beam is inserted between the rafters and the screws are tightened on the sides of the beams. Everything is very simple.
- To secure the top of the roof, it is recommended to cut a strip from a piece of zinc. You need to wrap it around the peak and tighten it with self-tapping screws.
At the end, the structure is tested for strength and sheathed with plywood.
Part for rotating blades
In this step, the internal mechanism for rotating the blades is made. Need an axle and bearings. It's easier to use bicycle bearings. Mechanism manufacturing process:
- A hole is made on the frame, but in the place where the timber is located. The axle is inserted there and secured with nuts and washers.
- Next, the same procedure is performed at the other end of the axis. The nut is screwed on first, and then the washer. There will be a small part of the axle with threads for bearings.
- You need to make a ring out of wood and fit it tightly onto the bicycle bearings. To do this, use a drill with a crown attachment. There are many such nozzles, and they have different diameters. Therefore, a board is taken according to the thickness of the bearings, which are located in a special ring. A circle with a diameter of 10 cm is cut out. Then a hole is made in the cut out part for the outer diameter of the bicycle bearing.
- A cut wooden washer is placed on the bearing. Next, the structure is strung onto the axis. The puck is thrown next. Finally, the nut is tightened.
You can come up with another option. Because not everyone has “crown” attachments, and without them it is difficult to cut an even wooden washer.
Manufacturing of blades
The blades on the mill have another name - “wings”. Their quantity is 4 pieces. For the manufacture of such products, thin-walled plywood sheets are used. It is necessary to make a template on cardboard according to which the “wings” will be made. Step-by-step creation of blades:
- Having come up with the shape of the blades, the template must be transferred to a sheet of plywood. To make the work progress faster, it is advisable to use a jigsaw.
- Having made 4 blades, they must be attached to a wooden washer. It is important to install the “wings” with equal spacing between each other.
- So, the blade is taken and attached to the rotating mechanism. Then the part is secured with self-tapping screws. This work must be done with all the blades. To make the blades more rigid, strips must be attached to each of them.
Finally, natural stone is installed on the foundation and concrete platform. The wooden mill is painted in preferred colors. It is advisable to use a varied palette rather than painting the structure with one color.
If desired, additional decorative objects in the form of flower beds or benches can be made next to the mill. The building can be decorated with windows, doors, and a balcony. It is not necessary to make all this; it is enough to make an imitation using planks.
What is a windmill used for today?
Before you decide to choose a place where your self-made windmill will be installed in the future, you should definitely keep in mind that the structure may have different purposes.
Firstly, a DIY windmill made for your dacha can hide some of the least attractive places in your home, like a manhole.
Secondly, most mills, which can be made without any problems with your own efforts, are quite simply made from lightweight materials, which makes it possible to significantly reduce their size.
Thirdly, many owners of country houses decide to turn the drawings of a mill in real life into a playhouse for their children. True, this requires a slightly enlarged design, but nothing is definitely possible.
The main thing you should pay attention to is that it is as stable as possible and with an open entrance.
Of course, if you decide to make a mill for the garden, you can subsequently find a huge number of different uses for it, as a component of modern landscape design.
Preparation
It is not worth erecting a tall structure, as it will be inappropriate. Therefore, we will opt for an average height of 1 m. Such a decorative mill can succinctly fit even into the landscape of a small garden plot. In order to understand in all the details how to make a mill, you should start from the very beginning, that is, with the selection of the necessary tools and material.
Materials needed
List of materials:
- block house lining (30×90×2000 mm) – 5 pcs.;
- double-sided lining (8 cm) – 6 m;
- self-tapping screws (6–7 cm) – 100 pcs.;
- self-tapping screws (2–2.5 cm) – 100 pcs. (replacement with nails is allowed);
- rail (4x4 cm) – 9 m;
- rail (3x3 cm) – 2.6 m;
- plywood for the circle (18×36 cm);
- layout (wooden slats 4.5×1.5 cm) – 8 m;
- stem with thread for nut (5–7 cm) – 50 cm;
- bearing (inner diameter is 5–7 cm) – 2 pcs.;
- antiseptic;
- paint and varnish material (varnish or paint);
- wooden corner (3×3 cm) – 40 cm;
- nut (diameter 5–7 cm) – 5 pcs.;
- washer – 2 pcs.
Required Tools
List of tools:
- roulette;
- screwdriver;
- hand file (jigsaw);
- drill;
- feather drill;
- sandpaper;
- felt-tip pen;
- square (to create right angles).
Note!
When choosing all lumber, you should pay attention to the available tree species. These include pine, which will go well with other materials.
Frame
Next point. Since the wooden mill will be quite simple in design, it is advisable to lay its frame at the same time. To do this, you need to take into account the scale of the product and install the most massive timber. If there is pine among the prepared stack of logs, it is best to use it. Pine is not so afraid of water.
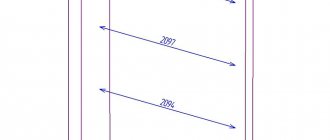
We proceed to the installation of a frame made of reliable wooden beams. Actually, we have two crowns: the bottom one is the base of the body; and the upper one, lighter and smaller in size - the basis of the roof. The ideal ratio of the scale of the lower and upper crowns is 1:1.5, that is, the lower crown is one and a half times higher than the upper one. These dimensions are needed to create a trapezoid - the classic shape of a medieval windmill.
Both frames must be connected with strong vertical boards that act as racks. The boards must be driven at a certain, clearly formed angle, depending on the length of the racks. They will rest against the lower frame. You can use nails or wood glue to strengthen it. Which is better? Mixtures based on regular PVA, such as Titebond II, work well. But it’s cheaper to stick with Moment-Stolyar glue.
The other end must be aligned with the upper frame. The boards should also be strengthened with poles or thin timber. Thus, the frame of the decorative mill will be made.
How to build a mill?
Initially, you must create for yourself drawings of the future mill for your summer cottage. There are many types of mills, but we will show you how to build a log mill with your own hands.
This mill is inexpensive and easy to make. So, we offer you a plan for building a mill:
You need to take two shovel handles, assemble them side by side and tighten them with bolts. Be sure to ensure that the remaining blanks are slightly longer than the future mill. The marked places for the cups should be at an angle of sixty degrees, because now we are talking about a hexagonal mill.
The combined cuttings should be placed on a sloping wedge. Cut the cups under the frame with an electric saw. After that, turn them over and drill again, but this time from the other edge. The base for the mill is ready. Do this procedure until you have the required number of logs for your mill.
Very carefully you need to cut 6 identical logs in half. You will get one with cups, which will be on top of the base, and the other without, which is necessary for the bottom of the base.
The logs need to be connected together with pins. This can also be done using wood glue. Assemble two boards into a hexagonal base and insert studs into the corners of the next frame. Thread the previously prepared halves of logs without cups onto studs.
Gradually place logs on the studs, creating the correct log house. You can make holes inside for windows or doors.
Attach long and thin blocks to the corners, which are the future walls of the mill.
Next, you need to sheathe the walls of the mill with small slats, also varnishing them.
Drill a hole for the axle at the ends of the roof.
Take three bars and cut them out. They will become the frame of the blades - one in the center and two on the sides. On the middle one, form a rounded pin to seat the blade on the axle. Then nail the pieces of the frame onto the slats and cut them into the desired shape.
Sand the wings of the mill and install them on the axle. Place the finished mill on the required area of the dacha.
Video description
How to install the bearings, assemble the rotation unit and make the blades, watch in this video:
Since a windmill operates from the force of the wind, the following rules must be observed when manufacturing the impeller:
- in order for the wings to “catch” the wind, they must be located at a slight angle to the vertical plane;
Note! The larger the angle, the more intense the rotation will be.
- all wings must be absolutely identical in shape and weight, otherwise the impeller will rotate unevenly, with beating.
In addition to the variant of blades made of two crossed slats described in the video, others are also possible. For example, you can make a monocoque base in the form of a cylinder cut from a beam or several glued plywood circles with a hole for the axis in the center. Four more holes for the blades are drilled around the circumference. Holes are also made at the ends of the blades themselves, after which they are connected to the base using glued keys or screws with bushings. In this case, the same angle of rotation of each wing is immediately adjusted.
Advice! Immediately after assembling and installing the impeller, it must be tested by rotating at high speed. If there are beats and vibrations, find the heaviest wing and trim it.
Version of a windmill on a monocoque Source oz90.ru
If the wooden mill has a purely decorative purpose, the windmill does not have to be rotating; it can be rigidly fixed to the roof with bolts or self-tapping screws.
Stone mill
To construct a mill made of stone, a concrete base is first poured or backfill is made from a sand-gravel mixture. Pebbles or other natural stone are laid out on cement mortar in layers, narrowing the diameter of the building with each row.
Sheathing
Now the important task is to carefully sheathe the frame. In this case, you need to make a small decorative window or door. At this stage, the roof and blades are created. At the first stage of sheathing, plywood is used. On top of it is a pre-polished board.
Advice! The block house looks attractive. This imitation log masonry is installed quite easily. Its decorative effect is very attractive.
Sturdy concrete footrest
Scheme of building a garden mill
At this stage, you can paint and varnish the main body, since once the blades are attached, this will be inconvenient.
Construction of a stone mill
The undeniable advantage of a stone mill is its durability. With minimal care, it will last on the site for decades. The disadvantages include the difficulty of moving and dismantling, so the construction should be taken thoroughly.
Required materials and tools
Construction begins with a project. Having decided on the size and appearance of the future structure, you need to draw a plan. This will allow you to calculate the required amount of materials.
Materials:
- brick or broken fragments for the base;
- cement and sand;
- natural stone or tiles for cladding;
- sheet iron or wooden slats for making blades;
- threaded rod; nails, bolts, nuts, self-tapping screws of different sizes.
Tools:
- mixer and bucket for mixing the solution;
- putty knife;
- Master OK;
- roulette;
- level;
- if the blades are made of wood, then you will need a saw, hacksaw or jigsaw.
Foundation
A stone mill will need a foundation; this is the only way to guarantee that the building will not float along with the soil in the spring or during rain.
The depth of the bookmark depends on the overall dimensions. For a small mill 1-1.5 m high, a hole 40 by 40 cm is dug, approximately 30 cm deep, reinforcement is laid inside and filled with cement-sand mortar. The foundation should dry out within a few days, after which construction can continue.
Construction of a house
The finished house will not be empty inside, so you need to prepare the base. It is most convenient to use a brick or its fragments. It is necessary to fold the masonry into the desired shape. The size and proportions can be any, but it is better to make the mill in the form of a trapezoid or cone. The same cement-sand mortar is used for the bond. The structure must be level, therefore, during construction, a level is used.
During the process of laying the brick, a threaded rod is embedded in the base for further fastening of the blades. A plate is welded onto it in advance or a large nut is screwed onto it, with which it will hook onto the brickwork.
At the same stage, other technical holes are provided in the base of the mill, because when the solution hardens, it will no longer be possible to change the design. Of course, you can try to drill through the masonry, but in this case it is possible that the entire base will split.
The shape of the roof depends on the shape of the house. For a cylindrical base in the form of a tower, a traditional cone-shaped roof, the covering of which is made of facing material, is suitable, and for a rectangle, a regular gable roof.
How to decorate
The mill can be decorated with natural or artificial stone. Tiles made in the form of small bricks look best. A building lined with such material will look like a smaller copy of a real antique mill. The outer layer must be laid using moisture-resistant glue, avoiding voids. The better the work is done, the less moisture will penetrate inside, and the mill will retain its good appearance longer.
Making a windmill yourself
Site selection and preparation
A do-it-yourself windmill is made of wood and its construction is a much more important undertaking than it might seem at first glance. It is necessary to take into account many factors in order to obtain a truly worthwhile landscape design element. Ideally, an open space is ideal for installation. Firstly, here the mill blades will almost always rotate, and it is also much easier to assemble such a structure in an open space, because nothing will interfere with you. After you choose a suitable location for installation, you will need to take another site. Remove everything that interferes with the construction - stumps and bushes. If the grass is very tall, you need to cut everything off with a lawn mower. Before installing the structure, the soil must be carefully leveled, and only after that you can begin laying the base, or rather, the platform. To choose the right location, you must have an accurate idea of what your building will look like in the future.
Create a plan
As an example, we suggest taking the simplest structure, which, with the right amount of effort, every person will begin to build. It all starts with creating a plan:
- Draw a sketch of the layout.
- Using the drawing, you need to calculate what dimensions should be for each part in the windmill that you want to make with your own hands.
- It is necessary to select the optimal material from which the main structural elements will be made. The composition is considered an ideal choice, and it has high performance qualities. At the same time, its price is at an acceptable level.
After everything is settled in the drawing plan, you can begin the actual assembly process.
Selecting the materials and tools required for the job
To make a decent structure, you will need the following tools:
- Sandpaper for sanding elements, and you can also use a sanding machine.
- Nails, bolts, screws, washers and screws. The length of the elements will directly depend on the thickness of the board you will use.
- Saw, hammer and electric jigsaw.
- A screwdriver or screwdriver - you can also use a simple drill with a special attachment for this purpose.
- Drill with a set of attachments of different sizes.
- Felt pens, pens, compasses, pencils and markers.
- A ruler for creating angles.
Using these tools, you can make your own beautiful windmill, which will be an excellent addition to your garden landscape concept. To bring your idea to life, you will need the following materials:
- To make your own windmill, clapboard or plywood is most often used. Wide boards are perfect for the body.
- To make walls with your own hands, use bars.
- Any material is suitable for cladding.
- To make blades, use metal pipes or slats.
- Corners.
- The roof can be made of plywood, and use slats as fastening elements.
- To attach the blade propeller yourself, you will need a bearing and a pin.
After you have collected all the tools and materials, you can begin making a windmill with your own hands according to the drawings.
Structural markings
After all the necessary drawings have been made and the required equipment has been collected, you can proceed directly to marking the structure with your own efforts:
- Mark four squares on the base, and the sides of each are equal to 0.25 meters. In this case, each square must be divided into four equal parts, and a hole is made in the middle.
- Draw 4 blocks for all sides, and it is best to cut the pieces from solid pieces of wood. The ratio will be 0.35*0.54 meters.
- Wall surfaces can be easily made in the form of a trapezoid. This will give the windmill a truly decorative look.
- The trapezoidal windmill walls that you will make yourself are made of six parts that must be securely fastened together. Moreover, each new part is smaller than the previous one by a couple of cm, and accordingly, the first will be 0.35 meters, and the last 0.25 meters.
- In order for the structure to be reliable, it is necessary to make a high-strength frame. When using high quality materials, all this can be done with your own hands.
- In order to make a frame with your own hands, you will definitely need bars. In cross-section, such elements will correspond to such parameters as 4 * 4 cm. In order to implement the project, you will need a whole set - 8 pieces of 0.54 and 0.38 meters each, and another 6 pieces of 0.36 meters each.
- To make a frame of high reliability, you will also need 4 pieces per 0.54 meters and 4 pieces per 0.1 meter. The cross-section in each element should be 3*3 cm.
- Making a windmill roof will require you to make markings using a pattern.
- Draw a line at 0.38 meters, indent it 50% and draw another line at 0.3 meters. The length of the seam on the side in the triangle is 0.355 meters. According to this pattern, 10 sheets need to be processed, and in the future they will play the role of slopes.
- The blade propeller for a windmill needs to be made with your own hands as in the diagram from elements 24.5 * 1.5 cm. In total, you will have four parts, and on each of them you need to fasten elements with the following parameters - one for 0.91 meters, 20 pieces for 0.19 meters, two pieces of 0.455 meters, 4 pieces of 0.26 meters and 8 pieces of 0.17 meters.
- Draw both circles, and the diameter of each should be 0.17 meters.
After you have made the markings for the windmill yourself, carefully cut out all the elements, sand them, and also treat them with special compounds, and only after that you can begin the final assembly.
Processing process
For wood impregnation, it is best to use compositions such as Aquatex, Pinotext and Belinka. Each of them is able to establish itself as a reliable composition for protecting wood from insects and atmospheric phenomena. Such substances give you the opportunity not to worry about the safety of a windmill installed and assembled with your own hands.
Please note that impregnation is required in a couple of passes, and this guarantees the stability of the protection. In this case, all layers must have time to dry.
Assembly process. Once you have finished processing all the parts of the windmill, you can start assembling it yourself. You just need to follow these instructions, and you can build a windmill with your own hands:
- Fasten the side elements with slats.
- To make your own windmill base, use a couple of squares that have a center.
- Fasten the base and body of the windmill using self-tapping screws.
- You need to put together a pair of triangles whose bases are 0.38 meters and sides are 0.35 meters.
- Screw the plywood to the triangle on both sides.
- The roof needs to be made from a couple of parts, and each will have 5 pre-prepared elements.
- The windmill spinner needs to be made with your own hands using wooden slats.
- You need to attach short slats to the ends of the blades and screw the circles in the center. After this, drill holes in the center and install studs, and the same must be done with the end.
- Secure the spire, and the entire structure must be fastened with nuts.
At the end, you need to put the lid on the body that you made yourself and attach everything with self-tapping screws. You can see the most detailed assembly process of arranging a windmill in the video below.
Decoration. After the mill is made entirely on your own, you need to give it the appropriate appearance. To do this, you can use a varnish composition, and it gives your building completeness. If the wooden elements are processed poorly, it is better to use paint and varnish material. To give the windmill additional ambiance, its elements can be painted in different shades. You can also add designs like butterflies, flowers or insects. Each of them can be easily made with your own hands if you use a little imagination.