If you have long been wondering how to decorate your apartment or house without spending a lot of money and time, we suggest transforming your light sources, namely making a lampshade for a floor lamp with your own hands. You probably know that a beautiful and unusual chandelier in a store is very expensive, but you don’t have to spend a lot of money to make something amazing. We will use the most common materials that you will definitely find in your household. Any lampshade begins with a frame; if you have a ready-made one, all you have to do is decorate it; if not, don’t worry, we can easily make the base ourselves.
We make a frame
Any of the elements that we will later use as decor must be attached to something. In order to quickly cope with this task we will need : thick wire, pliers, cardboard. Any frame consists of at least two rings connected by spacers. Decide on the desired shape and size of the future lampshade.
Let's consider the simplest type of frame - conical. The lower ring will have a diameter of 30 cm, and the upper one - 20 cm. To find out the length of the wire that needs to be cut, you need to multiply the desired diameter by the number “pi” (3.14), that is, 30 * 3.14 = 94.2 cm The ends of the wire must be connected and bent using pliers. The height of the spacers will determine the height of the lampshade itself. For the reliability of the design, we recommend making at least 4 transverse fasteners, which will be attached to the rings at an equal distance. It should roughly look like this:
If you are preparing a frame for a future fabric lampshade, then you need to wrap it with thick cardboard so that the fabric has something to attach to. To do this, make a pattern. Wrap the frame in newspaper, mark the line where the newspaper makes a full turn, and leave a centimeter of margin for gluing, and a line for the top and bottom. Cut off the excess and transfer the resulting sketch onto cardboard. You can attach it to the frame using a hot-melt gun with glue, do not forget to coat the joint well, and remove excess glue with a piece of cloth. Your frame is ready, you can start decorating.
Paper or cardboard lampshade
Paper is the simplest and cheapest material that can be easily transformed, has many colors and different densities. The frame wrapped in cardboard can already be used as a lampshade if you decorate it a little. It may not be solid, but have holes in the shape of butterflies, flowers, circles, hearts, diamonds and other shapes, which can then be hung from the edge of the lampshade using a thin fishing line. Using cardboard of different colors you can create smooth transitions or a contrasting composition. Such a lamp will look great in a children's room, because when it emits light, small shadows in the form of cut out figures will appear on the walls and ceiling. You can decorate the cardboard frame with corrugated paper or muffin tins . Open one mold wider, drop a little glue into the center and place a second, more closed mold inside. You can connect three or more shapes in this way. You will end up with air outlets that need to be placed as close to each other as possible. As a result, you will have a very delicate and light lampshade, from which a soft, muted light will emanate. Paper figures glued to thin strips and secured to wire frame rings are also suitable as materials. For a more aesthetic look, use paper of different colors, which will form a smooth transition from darker shades at the bottom to lighter shades at the top. Remember that paper is not a durable material, but it is easy to replace if you get bored with the appearance of the lamp and come up with something new.
Paper lampshade
To create a beautiful lampshade, you can use plain paper. Using a stencil, cut out any figures on it and glue it to the frame, wrapping it.
A chandelier with such a lampshade will be an excellent solution for a children's room; emitting light, it will leave light shadows in the form of cut out figures, which will create a magical atmosphere.
Fabric lampshade
The choice of fabric depends on the desired luminous flux. Thicker and darker fabrics will give a muted, soft light. The chosen color of the material is also important . Green and blue shades will create cool lighting, while red, yellow, and orange will create warm lighting. Once the fabric is chosen, a pattern needs to be made. You can use the same piece of newspaper as in step 1. To make the fabric cover look more neat, sew it on a machine, then turn it inside out and put it on the frame. You can simply carefully hem the edges of the pattern, iron it and glue it to the frame with glue. In both cases, do not forget to leave some extra space for the seams.
The cover does not have to be made from a single piece; it can be multi-colored rags or a combination of plain and colored fabric. If desired, you can draw or embroider beautiful patterns on the fabric . A hand-embroidered lampshade will definitely surprise your guests. You can glue a beautiful fringe with beads along the edge or wrap it with ribbon and tie a small bow. This way you can hide minor imperfections. To make such an item look more harmonious in the room, coordinate its color with other interior items. For example, with a touch of curtains or pillows on the sofa.
Threads, yarn, twine
These materials will be useful to us for making a ball lampshade. Even those who are sure that needlework and crafts are not at all their element can make such a lampshade for a floor lamp with their own hands We will use a balloon or an old rubber ball as a base We will also need PVA glue, a deep bowl and a wide brush. The essence of the method is to wind threads around an inflated balloon. The color, thickness and number of threads used are purely individual. If you want to get a more textured and dense shade that will let in little light, use twine and wind until you cover almost the entire surface of the ball.
Before you start wrapping, lubricate the surface of the ball with rich hand cream or oil. You will thank yourself for this when you remove it from its dried-out lampshade. Pre-soak the selected threads in glue, adding a little water to it. Let them lie down and soak up this solution. This must be done so that the layers of wound threads not only adhere to the ball, but also stick together. Inflate the balloon to the desired size and draw a border on it at the top and bottom with a marker. The upper border will serve as a place for the light bulb socket. There should be no threads in these places. Start wrapping from the top edge. First, carefully lay out several turns of thread at the level of the mark. You should end up with a small circle, then bring the thread to the bottom border and do the same. If you don't want to, you can do without the bottom hole. Now that you see your limits, you can wind in different directions, creating as many intersections as possible and pulling the thread a little.
Apply glue
to each layer using a brush. When you reach the desired density, cut the thread and hide its edge under the circle of the upper border. Leave your creation in a warm place until completely dry. Just do not place it near the battery under any circumstances. The flow of hot air will cause the ball to deflate faster than all the layers dry, and you will get a lampshade of any shape, but definitely not round. Once dry, puncture the ball. By the way, using threads of several colors you can achieve very interesting combinations. A composition of several such lampshades of different sizes will look very harmonious.
Lamp made of threads
Even a child can make this original lamp! It will look great in the kitchen or dining area.
Prepare colored threads (twine or thick cotton), PVA glue, a balloon and Vaseline.
- Inflate the balloon to the desired size. It is better to choose a round ball, since the lampshade will repeat its shape. Use a marker to mark the boundaries of thread winding (top and bottom).
- Cover it with a layer of Vaseline.
- Carefully coat the threads with glue. Do this not immediately along the entire length, but as needed.
- Start winding the threads taking into account the drawn boundaries. The appearance of the product depends on the pattern and winding density, so approach the process with an idea.
- Leave it for a day until completely dry.
- Burst the ball and remove it from the resulting lampshade. You can test the strength of a ball of thread: insert another ball into it and inflate it.
- Cut a hole for the cartridge
- Decorate the lampshade with flowers or beads.
Braid, ribbons, lace
This is a very romantic and delicate type of lampshade that will look great in a young girl’s room. In order to make it, a wire frame will be enough. Cover it with fabric and glue beautiful lace on top, or place lace ribbons directly on wire rings. The fabric must be chosen either in a contrasting color or to match the lace. This will look more impressive. The lace may not be located along the entire perimeter, but only along the edge, this will be even more interesting. Tulle and all kinds of ruffles and bows are suitable as additional decoration.
The most interesting thing about such lampshades is the delicate shadows that they will cast. multi-colored ribbons as the main material . To do this, fasten the edge of the first tape to the lower ring and pull it to the upper one, make one turn around it and follow it back to the lower ring. Continue in this manner until you have filled all the empty space. To avoid gaps, overlap the previous tape by at least 1/3 of its width. Carefully glue the edge of the last tape on the inside, and to hide the imperfections, make a turn along the upper and lower edges of the lampshade with a wider tape. Such a bright lampshade will resemble a rainbow and glow in different colors. If you have knitted lace napkins and you don’t know where to put them, you can do the same with them as in point 4. Soak it in glue, place it on the ball and let it dry. They will take the shape of a sphere and will look completely different.
Photos of lampshades for chandeliers
Read here! Types of lighting: what exist, how they are implemented and how ideal lighting is designed (instructions + 75 photos and videos)
Lamp made of beads and artificial flowers
A very beautiful creation that requires painstaking and perseverance. You will need many colors, beads or large beads, fishing line, a needle and thread and glue. It is most convenient to place flowers on a frame with cardboard. It used to be very fashionable to decorate the walls with bouquets of artificial flowers, so you probably have them collecting dust somewhere in your boxes. And in just a few hours, or even earlier, you will look at them completely differently. Separate the buds and some petals from the stems. You can even remove the plastic holders, but then you need to secure the petals with threads so that they do not fall apart. This way the parts will fit most tightly to the cardboard and stick easily. Arrange flowers and petals on the frame, filling the entire space. It's good if there are several varieties of flowers. You can make a beautiful flower arrangement on a lampshade made of plain fabric.
Imagine that you are making a bouquet, and you yourself will understand how best to act. Along the edge of the lampshade, you can add a fringe of several beads on a fishing line, or glue them in different places on the petals. You can glue a few butterflies or a dragonfly, in general, whatever you consider necessary. And large beads strung on a nylon thread can be used as the main material. As in the example with ribbons, it is necessary to fill the entire perimeter of the frame with beads, fixing the thread alternately on the upper and lower ring.
Paper lamps
Despite the fact that paper is not considered the most reliable basis for lampshades, the ease of working with it and its noticeable low cost have made this material very attractive among handicrafts. In addition, with its help you can update your interior at least every month, creating new crafts.
Origami lampshades
Who wasn’t interested in origami as a child, designing little animals or complex modular paper products? Now you can use your skills for more practical purposes. However, even people who have encountered this activity for the first time can also easily master it and make origami lampshades for a chandelier with their own hands.
These are laconic designs of different geometric shapes that will fit perfectly into a modern interior. It is not recommended to use very strong paper, as it does not transmit light well.
Figured products
However, lovers of more varied decor can create lampshades of a wide variety of shapes from paper. For example, surround the lamp with paper houses, butterflies or envelopes.
The appearance of such a lampshade also depends on the surface - plain, patterned, newspaper, and so on. By combining these materials, completely different effects can be achieved.
Chinese lanterns
If you have paper lanterns at home, do not rush to use them as an independent lamp, because this is an excellent basis for other experiments.
It can be covered with anything you like, but to avoid a homemade look, we suggest decorating the ball with small paper flakes or long “feathers” that will gracefully hang down to the bottom.
Knitted lampshade
A very unusual and most comfortable look of our product. If you have the skills to knit various patterns yourself, then this is simply wonderful. Remember that knitting takes a lot of time , so if you want to present such an item as a gift, then start preparing in advance. There are many sets with the required number of threads and pattern patterns, just choose the appropriate size. If you haven't had time to master this skill, don't be upset. Old knitted sweaters and children's sweaters that are too small for your child will come to your aid Depending on the size and shape of the lampshade, you can even use sweater sleeves.
The top and bottom will have to be sheathed to prevent them from unraveling. Place the selected part on the lampshade, you can tie it with a ribbon on top and decorate it with decorative elements, or you can simply sew it. If you wrap yarn in the color of the lampshade and cord , which will be visible, you will get a rather cute and complete composition. Both a dense knitting made with knitting needles and a more delicate version with gaps, made by crochet, are suitable. To secure this option, use glue. Apply it pointwise to the surface of the wire rings and press. Do not neglect fabric or cardboard frames. With their help, the shape of the ceiling will be better conveyed. Complete the composition with small knitted pompoms or large beads tied with thread. Surely all your friends will be surprised to see such an interior element.
Furniture and interior items
0 votes
+
Vote for!
—
Vote against!
Sooner or later, the moment comes when the homeowner is firmly convinced that the interior of his apartment needs adjustments and certain changes that will diversify it and place the necessary accents. What, in your opinion, is the most successful interior detail from the point of view of decorative and functional indicators? Undoubtedly, these are original lighting fixtures. You can realize this by organizing the correct lighting of the room, which sets the tone for the entire interior, an integral element of which are lampshades for lighting fixtures. It is they, being the central element of the interior, that give the room originality and the lighting – unusualness. If you haven’t carried out renovations in the room for a long time and haven’t planned your budget, including the cost of lighting fixtures, you can make shades for the chandelier yourself. To do this, it is enough to develop an interior concept, choose a lamp design and make it yourself from scrap materials. And so that you can implement your plans as efficiently as possible, in our article we will tell you how to make a lampshade for a chandelier with your own hands.
Content
- DIY lampshades for chandeliers: a variety of ideas and materials
- Lampshade for chandelier made from wine bottles
- DIY lampshade for a chandelier made of threads and balloons
- Chandelier shade in shabby chic style
- Shades for chandeliers in minimalist style
- A variety of ideas for decorating chandelier shades with your own hands
- How to dim the lights in a room?
- Original handmade lampshades for sconces
- DIY decorative LED lamps
- Variety of LED lamps
- The procedure for making an LED lamp from LED strip
DIY lampshades for chandeliers: a variety of ideas and materials
At all times, things made with one's own hands have been valued. They will become not only an original interior decoration, but also the best souvenir for your friends, acquaintances and relatives. What is required to create a lamp? The basis of any handmade product is the original idea. If you have already decided on the concept of the future product, all you need to do is make an original frame for the chandelier and stock up on available materials, using which you can realize your ideas. Fortunately, there are enough such materials. You can use the most unexpected materials as decor for a future exclusive product:
- wool threads;
- wire;
- Balloons;
- lace;
- muffin tins;
- paper;
- wine bottles;
- glass jars and many other scrap materials.
If you are faced with difficulties when choosing lamps, cannot choose a shade for a chandelier that matches the style of the interior, or have found the necessary model, but its cost exceeds the cost of a crystal chandelier, we offer you a selection of step-by-step instructions for making designer lamps. As you can see, there are a sufficient number of original ideas, and if you asked the question: “How to update the shades on a chandelier with your own hands?”, We advise you to adopt the ideas proposed by our specialists.
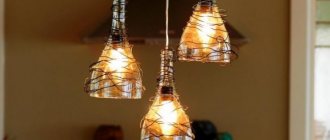
Lampshade for chandelier made from wine bottles
To start implementing some ideas, all you need is desire. A person who has firmly decided to carry out his plans, without fear, crosses the boundaries of the unknown and successfully implements his plans. If you do not have experience in building a frame for lighting fixtures, but you really want to do it yourself, you will need a sufficient amount of information, which you can find in our article. Below you will find step-by-step instructions for creating designer shades for chandeliers, which were made by ordinary people who previously had no idea how to make them from improvised, seemingly unnecessary materials.
So, let's look at how to make a lampshade for a chandelier from wine bottles.
- The first stage involves trimming the bottom of the bottle. To do this, you need to draw a straight line on the bottle. You will need it to use it to cut off the bottle bottom using a glass cutter;
- To avoid injuring your hands with cut glass later, sand the sharp edges with sandpaper;
- Pull the wire through the neck of the bottle. Once it is inside, connect the socket and lamp;
- Select a mounting base and connect the bottles to the selected frame;
- You can decorate the bottle using various materials or leave it in its original form;
- The number of bottles taken for a chandelier is variable and can range from one to five to seven or more bottles.
DIY lampshade for a chandelier made of threads and balloons
The simplest lamp can be made from threads. The instructions for making such a lamp are so simple that even a child can handle it.
To do this you will need the following materials:
- Threads. This can be ordinary jute twine or thick cotton threads, the total length of which is no more than 100 meters. The color selection is carried out taking into account your taste preferences and the color concept of the interior;
- PVA glue and the brush you will use to apply it;
- 2 balloons. You will need one of them for work, and the second for testing. It is recommended to use a round ball, which will ensure the correct shape of the lamp;
- Petrolatum.
To make a lamp from threads, follow the step-by-step instructions below:
- The balloon is inflated to the required size. It is important to remember that the finished thread lampshade will follow the shape of the ball. Using a marker, draw one or two circles (top and bottom). In this case, the circumference at the bottom may be larger. They are necessary in order to delimit the area where the threads are wound;
- PVA glue is poured into a container and the threads are carefully processed. Using a brush, coat the ball with Vaseline.
Important! Do not apply glue along the entire length of the thread. It is better to coat it as it is wound.
- Taking into account the holes created after you drew two circles on the ball, wind the threads. Please note that the appearance of your future lampshade depends on the density of the winding;
- After you have wrapped the ball, leave the future chandelier for at least 24 hours until completely dry;
- After the lampshade made of threads has dried, the ball bursts, and its remains are removed from the lampshade, which has become durable. The result of this work is a lampshade made of solid threads;
- A hole for the cartridge is cut in the upper part of the ball;
- Finally, check the strength of the lampshade. To do this, another balloon is inserted into it and inflated. Using this technique, you can evaluate the flexibility of the design.
By making several lamps in accordance with the step-by-step instructions provided, you can install local lighting in the kitchen or hang a thread lamp in the dining area.
Important! As an additional decor for the chandelier, you can use original painting, artificial flowers or butterflies, and beads. A non-standard idea would be to make several balls, which are held together in such a way that they resemble a bunch of grapes.
Using the considered principle of making lamps, you can create original lampshades decorated with lace.
DIY lampshade for chandelier photo
Chandelier shade in shabby chic style
You can create spectacular room lighting by making a lamp from fabric or beads. The result of your work will be a candelabra chandelier or a shabby chic style lamp.
To do this you will need the following materials:
- Wire, a hanging metal planter, an old hoop or garden basket from which you can make a frame;
- Lamp socket;
- Decorative chains and strong threads;
- Various beads and seed beads.
The lampshade, made using the technology discussed below, is a two- or three-level structure of several rings, which are located one above the other and connected by wire or chains. Depending on the size of the rings you choose, the style in which your lampshade will be made will depend. If you take rings of different sizes, you can create a lampshade in the style of a vintage classic, and if you give preference to rings of the same size, you can become the owner of a lamp in the modern style.
Important! Before you start decorating a lamp that involves stringing beads, paint and wrap the frame with decorative materials.
Let's consider the consumption of beads during the implementation of this project:
- In the process of making the lower part of the lampshade, you will need beads with a diameter of 16 mm in the amount of 15 pieces per thread;
- In the process of making the upper part, you will need beads with a diameter of 12 mm at a consumption of 31-32 pieces per thread.
- When stringing beads onto a thread, you can vary the number of threads and the degree of tension.
Important! Experienced craftsmen recommend carrying out the work after you have hung the chandelier and inserted the socket into it.
Similar to the described method, you can make a lampshade for a chandelier from artificial fruits. To create the effect of dim lighting, thick fabric must be used to cover the frame. A lampshade made using this technique will become an original addition to a kitchen in a country or Provence style.
Shades for chandeliers in minimalist style
A lampshade for a chandelier made from plastic cans or bottles becomes one of the most original lampshades made from waste materials. By making a lampshade in this way, you rely not only on beauty and cheapness, but also on environmental friendliness.
Due to the fact that to make such a lampshade for a chandelier you will not need additional decorations such as beads or threads, it will be made in a high-tech or minimalist style, and you will not be faced with the question: “How to decorate the lampshade of a chandelier with your own hands?” . In order to make such a lampshade, which will become the main element of dim lighting in the room, you only need colored or matte white plastic.
To make it you will need the following materials:
- Base from a 5-liter plastic bottle;
- A large number of disposable spoons;
- Holder with lamp and wire;
- Glue necessary for high-quality fixation of product elements;
To make a lamp from plastic materials in the minimalist style, you need to cut off the bottom of a plastic bottle, and the handles of plastic spoons, and this must be done in such a way that they have a small handle left. Using glue, fix the cut spoons on the bottle that serves as the base. To achieve the greatest attractiveness and organicity of your homemade lampshade, arrange them in an orderly manner, in rows. Each next row must be overlapped, leaving no gaps that could spoil the appearance of the lampshade.
When the chandelier is ready, you will notice that it resembles fish scales. It is important to remember that the design of the lampshade is characterized by a fairly high density, and therefore the lighting will become so dim that you will most likely need to place additional lamps in the room.
The shape of the lamp can be different. One of the options involves a lamp in the shape of a lotus. However, other, no less original decorations can be made from plastic spoons.
Another option for lighting fixtures made, one might say, from waste is a chandelier lampshade made from the bottoms of plastic bottles. It will appear lacy and, at first glance, consist of many small flowers.
Important! A lampshade made from plastic bottles can be not only white, but also colored - therefore, you will need to choose a colored bottle or paint the finished product in the desired color: from gold, copper and steel to pink and black. If you hang the finished lampshade in the kitchen above the table, it will be a great addition to the dining area.
A variety of ideas for decorating chandelier shades with your own hands
How to dim the lights in a room?
One of the “tools” for creating an intimate atmosphere in a room is the organization of dim lighting, and the main way to implement this idea is lampshades, which first appeared more than two hundred years ago and replaced their predecessors - dampers for candles and torches. If previously they were made only from fabric, today the use of crystal and broken glass is common for their decorative design. Today, the art of design has reached the apogee of its development, as a result of which the decorative design of hand-made products can be carried out using almost any materials.
Important! Today, a designer in the process of his work is not limited in the choice of materials for decoration - in the process of making lampshades he can use any details. At the same time, it is important to maintain a sense of proportion and taste by creating harmonious combinations of decorative elements.
A cozy lampshade, decorated with hand knitting, will be the best gift for your mother or grandmother.
Original handmade lampshades for sconces
Sconces are multifunctional wall lamps. Thanks to the diffused and subdued light they create, they can be placed in recreation areas and not be afraid for your vision. Today there are modern sconces that involve regulating the flow of light into the room. Such models must be installed in rooms during the operation of which it is necessary to change the direction of light flows. If you want to become the owner of designer, unusual sconces, create them yourself. Hand-made wall lamps, in the process of creating which you can show your individuality, will most successfully fit into the holistic concept of the interior of your room.
Sconces made from branches are distinguished not only by quick and simple production, but also by their original appearance.
The style of hand-made lampshades can be different and depends on the stylistic concept of the interior in which you plan to place them. In this regard, we can safely say that the answer to the question: “How to paint chandelier shades with your own hands?” strictly individual.
If you add sconces to the interior of a children's room, you can diversify the room, making it bright and playful. By hanging a sconce in your bedroom, you will make it more comfortable, adding a touch of peace. Dinner in a kitchen decorated with sconces will become more romantic.
You can decorate your baby’s room with a sconce in the shape of a birdhouse. To do this, just fix the birdhouse on the wall and place a lamp with a shade in the middle.
DIY decorative LED lamps
Due to the growing popularity of LED lamps, they are used not only in work areas, but also in home areas. One of the advantages of LED lamps is the ability to make them yourself. To make an LED design at home, you will need individual LEDs, which are installed in the body of a faulty lamp equipped with a power supply.
To replace a traditional incandescent lamp with an LED one, you do not need to dismantle the lamp or make adjustments to its design. Self-made LED lamps are most often part of decorative lighting, more often – the central element of ceiling lighting.
To make stylish LED lamps, you can use a variety of materials:
- metal;
- textile;
- beads;
- LED Strip Light;
- old lamps.
Variety of LED lamps
LED lamps made from fabric can be used to decorate rooms and even clothing displayed at fashion shows. The use of LEDs allows you to place the necessary accents on your tapestry.
A DIY beaded LED lamp will become a work of art that will attract attention and delight others. From beads you can make both small table lamps and large-scale decorative panels made of beads with lighting.
If you plan to use a hand-made lamp as a decorative detail when decorating an interior in a classic style, it is recommended to use metal elements for the base during its manufacture.
The procedure for making an LED lamp from LED strip
The LED strip is a flexible board with built-in LEDs and current-limiting resistors. To make a lamp, you can cut a section of tape to the required length. The supply wires are soldered to the contact pads located next to the cut lines. There is an adhesive film on the back of the board. To cut the tape, you can use ordinary scissors.
Important! Experts recommend using 12 V LED strips.
You can use an old, used lamp as a housing for a homemade lamp.
The procedure for making an LED lamp from an old lamp is not difficult.
Disassemble the old lamp by gluing an LED strip to its inner surface. The printed circuit board removed from the old lamp can be used as a power supply for the new lamp. The instructions for making a lamp, presented in our article, assume the use of a transformerless power supply equipped with a ballast capacitor.
A lamp made in accordance with the presented diagram is suitable for illuminating the work area.
After selecting the circuit elements, place them on the board. In this case, excess parts from the old lamp must be removed. After this, connect the tape to the power supply, assemble the lamp and connect it to the network.
LED lamps are more relevant than ever. They can become both the central lighting element of the room and its decorative component. After reading our article, you are convinced that making lamps with your own hands is a fairly simple and, at the same time, creative activity, and as for the use of homemade lamps, you can find it yourself.
Lamp made from old hangers
Broken wooden hangers, or those that are long overdue for renewal, can be found in every home. Finally, you can not just throw them away, but find a more worthy use. By the way, these may not necessarily be hangers. broken slats will also work They are quite thin and have an arched shape. Before assembling such a lampshade, immediately think about its color. If you're into all things natural, simply sand the wood surface to remove any minor imperfections, then finish with a water-based varnish. If you want to make the composition multi-colored, use spray paints. Now it's time to think about how we will arrange the elements on the frame. The simplest option looks like this:
The picture shows that the metal removed , and the hangers themselves were sawn in half and simply glued to the socket. You can do it this way, or you can work a little harder and get a more interesting result. We will need a screwdriver. Remove the hooks, paint the hangers and drill a hole in one edge. Insert the wire into the resulting hole, placing the required number of hangers on it. Now fasten the edges of the wire, and insert the cartridge with the wire into the space that is formed after fastening. Place the hangers evenly with their backs facing each other and secure them in the middle with a metal tie. You will be surprised by the appearance of the finished lampshade. Making a similar lampshade for a chandelier with your own hands is not difficult and does not take long.
Do-it-yourself lampshade for a birch bark lamp
Birch bark is an interesting material for a homemade birch bark lamp. In a duet with a coffee table made of birch logs, you will get a harmonious and consistent corner in style.
You should not strip a living tree for the sake of a craft. Birch bark can be found in the forest from fallen branches or in sawmills. Birch bark is highly flammable, so before using it as a lampshade it must be treated with a water-based sealant. Moreover, the sealant will prevent cracks from appearing and the bark from drying out.
You can secure the bark above the lamp using a rope or fishing line. To keep the lampshade in shape, the edges of the birch bark can be glued, sewn or neatly tied with a rope. The first option is not suitable if the lamp is planned to be used frequently at night. Constantly heating up, the glue will quickly lose its properties.
Plastic bottles, spoons
There are definitely plastic bottles of different colors in every home. So that no one even thinks that this is a product made of this material, we suggest that you take the trouble to cut the bottles into small parts in the form of leaves, flowers, butterflies or any other shapes. We used leaf shapes. Draw several templates of different sizes, trace their outlines and start cutting. When you finish cutting the required number of elements, give them a natural look. Using the blunt nose of small scissors, squeeze out the veins on each leaf. to attach parts to the frame. Either glue a wire to each element and wrap them to the frame at different levels, or glue them to a cardboard frame with glue. We advise you to give preference to the longer, but also more beautiful, first method. This way the lampshade will be more translucent, and all the details will be visible due to placement at different heights. If this is too long and tedious for you, simply cut off the tops of the bottles, leaving 10 cm at the top, cut them into thin strips, bend them outward and secure with glue. Glue the finished flowers
There were no bottles, but there are a couple of sets of plastic spoons from the picnic that will also have a use. Let's make a pineapple lamp. For the frame we need a plastic 5-liter bottle. Carefully cut off the bottom and degrease the walls. Now let's prepare the spoons. You need to separate the handle, leaving about 1 cm. When you have cut all the spoons, start gluing them from the bottom row. Each subsequent row should overlap the previous one by about half a spoon. Try to cover the entire frame in this way, right up to the neck, so that you get neat edges that will be hidden under the cartridge. Your lampshade is ready!
Don't throw away tetrapacks
Yes, you were not mistaken, we will create real miracles, practically, from waste. Not all types of packaging are suitable for us, but only those that have a mirror surface inside. This type of lampshade will perfectly complement the interior, in which the emphasis is on various geometric shapes or where strict linear shapes predominate. You will need a lot of tetrapacks for this venture, so you will have to save up the source material for some time. The packaging should be carefully cut into one solid piece. Now we cut it into strips measuring 130x21 mm, divide it into six equal parts and fold triangles from these strips.
Now comes the most difficult part - the individual elements must somehow be combined into complex shapes. We cut the fastening tapes measuring 75x19 mm, fold them into four parts, unfold them back and use them to fasten two triangles. Next, according to the same scheme, you need to collect 108 hexagons and 12 pentagons. Don’t be alarmed, when you get the hang of it, everything will work out by itself. You can get by with regular glue, this will make things much easier and faster. When all the elements are ready, you can assemble them into a sphere or a regular cylindrical lampshade. In the latter case, pentagons will not be needed. Just glue all the parts together. In the case of a sphere, you will have to tinker. You can inflate the ball and use it as a support when gluing elements, and then burst it and take it out through the hole. Now you can be proud of the work you've done. You definitely won’t see such a lampshade in any store, and when you turn on the lamp, the play of shadows will captivate your whole family.
Lamp made of plastic bottles
It will turn out not only cheap, but also incredibly stylish and effective. It does not require additional decorations, and unnecessary bottles will find a new use. Perfectly complements the interior in the style of minimalism and hi-tech.
You will need: a five-liter plastic bottle and many spoons, glue.
Cut off the bottom of the bottle and the handles of the plastic spoons, leaving a small stem. Glue the spoons to the bottle. To avoid unsightly bald spots, do this in overlapping rows. A characteristic feature of such a lamp will be the dimness of the light provided.
Make a lampshade from spoons in the shape of a lotus or cut out a lot of leaves from a green bottle and create an amazing summer pattern.
- Curtain tiebacks - 150 photos of new exclusive designs
Do-it-yourself tulle - step-by-step instructions on how to sew beautiful tulle. Photos of ready-made ideas and modern design
Curtains for gray wallpaper - options for the ideal combination of curtains in a gray interior (TOP-150 photos of new designs)
Newspaper tubes
Recently, weaving products from newspaper tubes . Skillful housewives make baskets for storing various items, sew covers for them, decorate, paint and even sell them online. We thought that in this way it would be quite possible to make a beautiful lampshade for a chandelier that would look great in the hallway or dining room. We don't even need a frame, but we will need a lot of newspapers.
If you use the pages of glossy magazines, the tubes will come out much stronger. It is necessary to cut a large number of paper strips, then twist the tubes. This is much easier to do using knitting needle. The ends must be coated with PVA glue and then allowed to dry thoroughly. Try to make sure that the length of the tubes is at least 20 cm. We will need about 100 pieces to make a medium-sized lampshade. Take three tubes and cross them together, you will get a six-pointed snowflake.
This is the beginning of our ceiling. To make it more convenient to work, place something heavy on top of the intersection so as not to displace the workpiece. Place the next tube on top of one of the rays peeking out from under the weight. The lower element must be wrapped over the attached one so that it rests on the adjacent vine. Repeat this step with all the twigs sticking out. You will be weaving in a spiral pattern. When you completely go around two circles, you need to expand the diameter. To do this, instead of one twig, use two twigs folded parallel to each other. Continue weaving until you reach the required size. Cut off the excess tails with scissors, secure the edges with clothespins and treat the entire surface with glue.
When the frame is dry, use spray paint to give it the desired color and once dry, seal everything with varnish. On top you will have a cross that can be carefully cut off, thereby freeing up space for the cartridge. Instead of weaving, you can secure the tubes with glue, forming a sphere or other geometric shape.
New life for old cans
In order to make a stylish and unusual lampshade that will perfectly complement the interior with its soft, cozy light, you can use ordinary tin cans of different sizes. It is necessary to remove all labels, remove any remaining glue from the surface, wash and dry well. Next we will use a small hammer and nail to make holes on the walls. Draw the desired pattern with a marker, pour water into the jar and place in the freezer until completely frozen. This is done so that when the holes are made, the can does not become deformed . The second option to preserve the shape is to stuff it tightly with paper. All that remains is to carefully make holes and dip the finished product in hot water to remove ice. You will get small cute lampshades, from which it is recommended to create compositions. The surface can be left unchanged, or it can be painted or wrapped in thin paper.
Glass jars are also suitable for us especially if they have a non-standard shape and color. However, you can give them any color, it’s very simple. Prepare sockets and light bulbs in advance. To place them inside, carefully make holes in the lids using an opening knife. In the future you will need to replace the lamp, so give preference to screw-on cans. The hole should be equal to the diameter of the cartridge, no more. Insert the threaded part into the hole in the lid, and then screw in the light bulb. Now let's start designing the lampshades themselves. Wash and dry the jars thoroughly. Now you can paint them, paint them, cover them with beads or flowers, wrap them with colored threads or lace, in general, whatever you want. Secure the surface painted or covered with small parts with clear varnish and screw on the lids. Your lampshades are ready.
Marine lampshade
There are people who cannot live without the sea and try in every possible way to reflect their love for it in the interior of their apartment. Some people bring photo frames made of seashells, others hang pictures of the sea coast, and others cannot return from vacation without a bag of shells, which they then cannot find a use for. If you recognize yourself in this phrase, then especially for you we have prepared a small master class on making a lampshade from shells , as well as beautiful sea pebbles and everything that you couldn’t pass by. To do this, we need a frame wrapped in thick cardboard, glue and your seafood gifts. Think about the color of the lampshade in advance. If you want to leave natural shades, then simply cover all the elements with transparent varnish; if you want to add a few different shades, then use acrylic paints, and then varnish. You can paint the finished lampshade, but the paint and varnish will flow into the joints between the parts and will not come out very neatly. Now, using a heat gun, cover all or part of the surface of the frame with shells, being careful to leave few gaps as possible . Small pebbles can be glued in places on top of the first layer, this will add volume to the finished product. Such a cute piece of furniture, with a very characteristic mood, will always remind you of pleasant moments spent on the seaside.
DIY lampshade frame made of wire: base and additions
The main types of frames are shown in the figure.
They are based on basic parts that give the product the shape of a circle, oval, square, rectangle, etc., as well as auxiliary ones. They specify the geometry of the side surface - straight lines or convex/concave. Also required are fragments that connect the lampshade to the support - the lamp leg - and do not allow the finishing materials to touch the light source.
To work you need:
- hard steel wire (copper, aluminum) with a diameter of 3...5 mm (depending on the size of the structure and the weight of finishing materials) or a thin metal strip. Individual pieces of wire can be replaced with wire mesh;
- material for decoration - fabric, natural or artificial leather, rope (thread, twine, ribbons), vine (straw, wire, newspaper tubes and other options) for braiding the frame and so on;
- tools - wire cutters, pliers and round nose pliers - for work.
When planning to make a lampshade with your own hands for a round or oval-shaped floor lamp, you must first calculate the size and number of intermediate posts. The smaller the distance between them, the rounder the design will be. Typically, for a base circle with a diameter of 150...200 mm, a step of 50...80 mm is chosen.
Having cut off the necessary pieces of wire (strips, meshes), they are bent and fastened with thinner wire or soldered (welded). For convenience, initial fixation can be done using a cable tie.
Having fastened the frame in this way, you can make sure that the resulting shape is correct and, if necessary, correct it. After this, permanent fastening is carried out.
Interesting: how to check if the wire is suitable for the job? To do this, you need to put the roughly assembled frame on its side, twist it, and throw a piece of heavy fabric over it. If no deformation has occurred, the rigidity is sufficient; if not, it is better to choose a wire with a larger diameter or from a different material. You may need to change the way you attach the parts.
To make it easier to connect the wire fragments, its ends can be bent into a ring using pliers. Treating the joints with fine-grain sandpaper (40...80 grid) will help prevent slipping.
To better understand the principles of working with wire, you should familiarize yourself with the master class on making a simple lampshade for a table lamp with your own hands from wire and fabric.
It is not necessary to use textiles to diffuse and dim the light flux. Masters successfully use the techniques of crocheting and knitting, patchwork, tatting and many others. It is interesting that all the options for braiding the frame help to hide the shortcomings in the connections of its parts.
A low light absorption coefficient is provided by lace or thin fabrics (organza, gauze, chiffon, silk, mesh), a high coefficient is provided by dense ones (velvet, brocade, thick silk, velor, linen, cotton, wool).
Important: if the frame is made not of wire, but of wooden slats (branches), it is not necessary to completely hide it behind the fabric. Carefully connected elements will become part of a unique design.
Fringe, ready-made or homemade, will help decorate the edges of the lampshade (and at the same time hide bad seams and frame). For decoration and masking imperfections on the side surface, braid or ribbon lace is suitable.
Wire braiding with beads or beads looks very impressive.
Another interesting option is to braid the frame with strips of fabric, ribbon or rope.
In addition, on a neatly made frame (wire, wood) you can place any other finishing options - from beads and spoons to chains and clothespins.
You can leave the frame without decorations by choosing lamps with a diffuser body. However, for this it is necessary to ensure maximum quality of assembly of parts and treat their surface.
Forest handsome
A very unusual and spectacular lampshade that will appeal to nature lovers. Fits well into -style interior . Its name speaks for itself, and you were not mistaken if you thought that we would use as material what we brought from the forest. More precisely, we are interested in tree branches of different thicknesses and bizarre shapes . Twigs that are too thin are not suitable; they will break during the fastening process. The length of the branches should correspond to the desired height of the lampshade. Gather enough material, because during the manufacturing process, not all sticks will definitely suit you. The most interesting thing this type of lampshade can boast of is the shadows that will be reflected on the ceiling and walls. They will create the feeling that you are in a real forest. The branches must be washed well under hot water and dried by placing them on paper and providing access to oxygen. Dry sticks need to be refined a little. You can use a knife to cut off what you think are unnecessary knots or thin parts. Cover all elements on all sides with spray paint or just varnish. The gnarlier the branches, the more interesting the lampshade will be. We will need a regular wire frame without cardboard. We will attach the parts to it using thin wire or glue it with a heat gun, whichever is more convenient for you. Not a conical, but a cylindrical base shape . Fill in the gaps very carefully and leave as few empty spaces as possible. You can add gaps in small pieces. After complete drying, the extraordinary lampshade is ready for use. Creating a similar lampshade for a chandelier with your own hands will be fun with your children.
Homemade lampshade - why not?
Many people, not devoid of design inclinations, quite successfully implement their own solutions for the interior of the home in general and lighting in particular, making shades for chandeliers with their own hands.
At the same time, in terms of originality, such lampshades are often superior to any purchased analogues, and are much cheaper, because virtually anything can serve as a manufacturing material for such lampshades, from cardboard to disposable tableware and unnecessary rhinestones.
Space lamp
Many in childhood dreamed of becoming astronauts and raved about distant galaxies. If your child now sleeps and sees himself in this role, we suggest decorating his children's room to match his dreams. Stationery stores sell planet models that we will need. We will make multi-level lampshades in the form of a space system . To do this, we will need sockets with lamps and several models of different planets. The layout must be carefully divided into two parts. Before doing this, draw a circle on top, the diameter of which coincides with the diameter of the cartridge. Then you need to remove this area as well. In its place, place the lamp socket and glue the layout back together. These steps must be done for all layouts. If you haven't found any planets, you can get by with globes of different sizes.
You can use halves, which is much more convenient, because it will be easier for you to replace the light bulb. The halves are good for making lampshades for table lamps. You can use old maps of the world , wrapping them around the frame on top of white, thick cardboard. The spirit of travel will always be present in your home and inspire you to new achievements.
When making any of the above types of lampshades, remember that all materials are fire hazardous . Especially when they are exposed to frequent heat from incandescent lamps. Therefore, place all the parts at a distance of at least 15 cm from the center of the lampshade, that is, the minimum diameter of your product should be at least 30 cm. By following this simple rule, you will protect yourself and your home from unnecessary troubles.
Tags:Lighting systems
Functions and types of ceiling lamps
Lampshades actually have only two functions: decorative and diffusing. And if everything is clear with the first (the lampshade is made as a decorative element), then the second means that the lampshade is designed to create soft, diffused lighting in the room.
That is why the lampshade is also called a diffuser. Online catalogs are currently replete with various photos of shades for chandeliers, so the buyer will not have any problems with the assortment of choices for any design.
Conventionally, all these lampshades can be divided into two categories:- Partially open shades
- Fully enclosed shades
What distinguishes them from each other is the shape of the diffuser.
Closed shades are designed to create softer lighting and are used for general lighting, while partially open shades are great for creating a brightly lit area in the room (for example, a reading area).