Any interior of a room can be made interesting and attractive through the use of original and exclusive furnishings, made both to order and by hand.
Such items may include a table, photo frame, lamp and much more. Moreover, the manufacture of such items does not require expensive materials or any special knowledge; it is enough to have an idea and developed imagination.
You can use anything as materials, whatever is at hand and, of course, your imagination.
This article brings to your attention material that discusses the idea of creating original lamps and chandeliers with your own hands that can decorate any room, be it a bedroom, kitchen or living room.
Visually verify and see in the presented selection of photos how such exclusive luminous accessories look in the interior.
The options for making homemade lamps and chandeliers are endless, as are the ideas themselves.
Decor with paints
With the help of paints you can radically change the appearance of a classic chandelier and fit it harmoniously into any interior. Before you begin the creative process, you need to prepare the materials and tools necessary for the work.
Among them:
- primer (acrylic or intended for metal objects);
- acrylic paints of the desired colors in cans;
- pearlescent aerosols, metallic and fluorescent paints as an alternative to electric lighting;
- clear acrylic varnish. The composition protects the surface from external influences, imparts shine, and makes colors more saturated;
- surface degreasing agent;
- masking tape and other protective materials;
- tools for removing and disassembling chandelier elements;
- protective accessories (respirator, gloves).
Preparing for painting
We will cover the workplace with protective materials; we will unscrew the light bulbs, remove unnecessary elements from the chandelier that we will not work with; Protect non-removable parts with masking tape;
- clean the chandelier from dust and other contaminants and dry it;
- degrease the surface of the lighting fixture.
The process of creating decor with paints
We treat the surfaces using an aerosol primer. Shake the can before starting work and begin spraying the primer from top to bottom at a distance of 20 cm from the chandelier.
For high-quality, uniform coloring, 2-3 layers will be required. Each layer must dry well.
A freshly painted chandelier can be further protected and the color made more expressive by using a layer of acrylic varnish. The composition will dry in 2 hours.
After complete drying, the chandelier elements protected with masking tape can be released, screw in the light bulbs and attach the previously removed parts.
Deciding on a lamp
In the modern world, the variety of lighting fixtures is amazing with its huge range of shapes, sizes and styles. A DIY ceiling chandelier can be made from various materials:
- made of wood. This is the most common material that can be easily processed. With its help you can make chandeliers in any style, shape and size;
Note! If you want to make a ceiling lamp from wood, remember that this material is susceptible to negative influences from humidity and temperature changes. All elements of a chandelier made of wood should be treated with special solutions that prevent damage to the wood and the appearance of insects in it.
- plastic. You can make a housing for a lamp from plastic. But remember that some manufacturers in the production of plastic use harmful substances that are released into the air when it is heated. Therefore, for such a chandelier you should choose those bulbs that do not heat up during operation;
- glass. You can use this material to make a lampshade or other glass inserts. It all depends on the shape of the future lighting fixture. Glass and wood elements look more harmonious with each other. Their combination allows you to slightly soften the atmosphere in the house, especially if soft and light types of wood are used.
Combination of wood and glass
- fabric and rope. Using these materials you can quickly and easily make many wicker balls that will serve as shades for a new chandelier. This is considered the easiest way to make lighting fixtures with your own hands.
Some people can even make their own steel ceiling chandelier. But this requires knowledge of artistic forging and practice in work. Without this, a material like steel will not yield to you.
Therefore, it is best to opt for a wooden structure with glass inserts or a lampshade. In addition to the material, further production is influenced by the location in which the ceiling lamp will be installed. Depending on the installation location, you can choose the optimal type of material.
Decoupage
We paint over the chandelier elements that require updating with white acrylic paint. We take the desired napkin for decoupage, remove the 2 bottom layers and begin gluing it onto the parts that require decoration using a brush. To work, you can take PVA glue and dilute it with water or buy glue for decoupage.
After complete drying, apply a layer of decoupage varnish on top and leave to dry. A plaster rosette can be attached to the top of the chandelier using a special mixture.
Wood decor
Wood is a natural material that is pleasant to work with, and wooden products create a warm, homely atmosphere in the room. Original decor for lighting fixtures can be made using saw cuts, twigs, wooden household items, etc.
With saw cuts
A floor lamp made from wood cuts will ideally complement the interior of a country house or city apartment furnished with eco-friendly wooden furniture.
Materials and tools;
- fragment of a tree trunk - 40 cm;
- LED Strip Light;
- cellulose varnish;
- power adapter;
- electrical wires;
- saw;
- grinding mechanism;
- drill/drill (core, sheet);
- glue.
Let's prepare 10 wooden circles, each 2 cm thick. Let's drill holes in 8 wooden pieces. In the remaining 2 we will only make indentations.
Let's polish the surface of the circles. Apply wood glue to the inner surfaces of the holes. Let's coat the mugs with several layers of varnish and make them matte.
Let's start assembling the lamp: put the circles on the tube and glue the structure. Let's run an LED strip through the tube and connect it to the adapter.
Twigs
A chandelier decorated with natural wood branches can show off in a bedroom or living room, creating a unique style and home comfort.
Dried flexible branches of different tree species are suitable as natural materials.
Materials and tools:
- dry branches;
- shape (rubber ball);
- spray paint;
- varnish;
- wood glue;
- chain for attaching the chandelier to the ceiling;
- film;
- double-sided tape;
- pruner
We will clean the branches and make blanks of 20 cm each from them. Wrap the ball in film and place it on the workspace, securing it with tape. We decorate the ball with branches, connecting them with glue, and drying them. We change the position of the ball, fasten and glue the branches again, bypassing the top through which we will install the socket and screw in the light bulb, and dry it.
We remove the ball that served to give the structure the shape of a ball. After everything has dried, you can begin painting or varnishing the future chandelier.
We insert the socket and an energy-saving light bulb (to avoid overheating), and hang the chandelier on a chain.
Using wooden hangers
Using wooden hangers, you can make a chandelier of complex shape for interior decoration in eco-style.
Materials and tools
- wooden hangers - 50 pcs.;
- steel wire;
- drill.
We make a lampshade consisting of 2 bases - rings of different diameters made of steel wire. We drill holes at the ends of the hangers for the further fastening process.
We connect the hangers with a ring of smaller diameter: we pass the wire through the holes made. We place hangers designed for fastening with a large ring symmetrically. We pass the wire from the opposite end.
If you make holes at an angle of the same degree, the hangers can be hung overlapping. This lampshade can be left “in wood” or painted.
Making a chandelier with your own hands from wood
To make this chandelier you need:
- several wooden planks approximately 40 cm wide.
- several liter jars for making a lampshade.
- paint or varnish for wood.
- small self-cuts necessary for fastening, as well as sanding paper with a fine fraction.
So:
1. To begin with, we sand our planks with sanding paper until the planks become smooth.
2. It is necessary to make a notch on the back side of the slats to install electrical wiring.
Read: How to choose the right decking board?
3. It is necessary to make three holes where the lampshades will be mounted.
4. Paint the planks in the natural color of the wood.
5. The socket itself must be secured into the hole in the lid; screw the light bulb into it.
6. We use a liter jar as a lampshade, having previously painted it in a bright and light color.
Plastic
Every home has plastic bottles of different colors. They can be used to create an exclusive chandelier.
Materials and tools:
- spray paint;
- metal rings of different diameters - 2 pcs.;
- newspapers;
- wire;
- scissors;
- gloves.
Cut the bottle into 2 parts. We cut the upper and lower halves into strips 1 cm wide, these are blanks for future flowers. Bend the petal strips in a circle.
We cover the work surface with newspapers and start painting the flowers: spray the plastic blanks with paint. Let's dry it.
Next, we move on to making a chandelier: take a small hoop, pass the wire into the neck of the bottle, wrap it around the frame, and secure the flowers. We place the flowers as closely as possible to each other. We do the same with a large hoop. We connect the hoops with wire: take 3 pieces, measure the distance between the frames, cut the wire taking into account the winding.
We wrap the wire around one frame, bend it, and wrap the other end around hoop No. 2.
Along the arc of the hoop, mark 1/3 of the circumference and wind the second piece of wire.
Let's measure another 1/3 and connect the hoops with a third piece.
Leaves from plastic bottles on the lampshade
From plastic bottles of different colors you can create an original chandelier decor in the form of leaves, for example, birch leaves.
We cut plastic bottles into small pieces and make leaves out of them. To make the leaves look more neat and natural, melt them with a soldering iron along the contours (a tool with a thick tip and a bevel on one side is suitable).
Using the edge of the sting, we create veins on each leaf. Next, heat up a thick needle and make holes at the bases of the leaves. This is needed for fastening.
We make twigs: we string the leaves onto a wire of small diameter, then wind them onto a base of steel wire.
From disposable spoons
For the kitchen or living room, you can create an original chandelier from disposable plastic spoons. Such an unexpected chandelier is economical, provides a good level of lighting, and creates fantasy projections on surrounding surfaces and objects.
Materials and tools:
- plastic bottle 5 l;
- plastic spoons - 150-170 pcs.;
- energy saving light bulb;
- cartridge;
- copper wire;
- knife/scissors;
- PVA glue.
Manufacturing
First, we will make a base, which will serve as a plastic bottle, and cut the bottom evenly. Pierce the center of the lid with a hot awl. We will pass the cord through this hole and attach it to the cartridge.
Let's move on to the decorating process. To do this, you will only need the deep parts of the spoons; we will cut off the handles. Glue the spoons around the base row by row in a checkerboard pattern, overlapping from bottom to top.
We make a horizontal row on top that will crown the chandelier. We install a cartridge and a plug inside the lampshade.
Chandelier made from music discs
Old CDs can be used to decorate home lighting fixtures: lamps, shades, chandeliers.
The shiny surface of the CD, which includes the entire spectrum of colors, will make the chandelier glow even more
strong and effective. A small chandelier made of music discs in the form of a lantern can be hung to illuminate the corridor.
Materials and tools:
- wooden boards of round shape, thinner and thicker - 2 pcs. Diameter of boards d.b. more than CD;
- stands made of wood or metal;
- magnetic switch;
- fluorescent light bulb;
- disks.
We make a hole in a thick board, mount the starter + switch, and connect it to the lamp. We string the disks onto the lamp. We install racks around the disks and cover the structure with a top plank.
Deciding on a lamp
In the modern world, the variety of lighting fixtures is amazing with its huge range of shapes, sizes and styles. A DIY ceiling chandelier can be made from various materials:
- made of wood. This is the most common material that can be easily processed. With its help you can make chandeliers in any style, shape and size;
Note! If you want to make a ceiling lamp from wood, remember that this material is susceptible to negative influences from humidity and temperature changes. All elements of a chandelier made of wood should be treated with special solutions that prevent damage to the wood and the appearance of insects in it.
- plastic. You can make a housing for a lamp from plastic. But remember that some manufacturers in the production of plastic use harmful substances that are released into the air when it is heated. Therefore, for such a chandelier you should choose those bulbs that do not heat up during operation;
- glass. You can use this material to make a lampshade or other glass inserts. It all depends on the shape of the future lighting fixture. Glass and wood elements look more harmonious with each other. Their combination allows you to slightly soften the atmosphere in the house, especially if soft and light types of wood are used.
Combination of wood and glass
- fabric and rope. Using these materials you can quickly and easily make many wicker balls that will serve as shades for a new chandelier. This is considered the easiest way to make lighting fixtures with your own hands.
Some people can even make their own steel ceiling chandelier. But this requires knowledge of artistic forging and practice in work. Without this, a material like steel will not yield to you.
Therefore, it is best to opt for a wooden structure with glass inserts or a lampshade. In addition to the material, further production is influenced by the location in which the ceiling lamp will be installed. Depending on the installation location, you can choose the optimal type of material.
Paper
A creative lamp with marine motifs can be made using the “Coral Inspiration” master class as a basis.
Materials and tools:
- colored paper;
- colored yarn;
- PVA glue;
- fishing line;
- scissors;
- paper clips;
- compass;
- LED lamp;
- electrical accessories.
On paper of the chosen color, draw semicircles of different diameters. The width of the blanks is 1 cm. We cut them out, and then cut them into pieces 2 to 5 cm long. Next, we roll the pieces into cones and glue each one separately, and then several pieces together, and so on until a ball is formed.
Decorate the wire with colored yarn, then make a holder. We will install the lamp inside and connect it to the wire.
Origami
Using the origami technique, you can create a sconce lamp that is suitable for zone lighting in a bedroom, nursery and any other room.
By choosing a suitable origami pattern, you can quickly make an exclusive lamp. For example, you can take as a basis a diagram according to which a sheet of paper will become voluminous and have a diamond-shaped pattern with fold lines in the center.
Let's roll the workpiece into a tube and get a spherical shape. Glue the free ends together and hang them from the socket.
Butterflies
A chandelier decorated with delicate silhouettes of paper butterflies can be a good option for lighting a nursery.
As a base, you can use an old chandelier or any other round-shaped frame. First we will make paper butterflies. To do this, print out the template you like and cut out insect figures of the same or different sizes. It is better to choose high density paper.
We attach the butterflies to a nylon thread or fishing line. There are 2 methods of fastening: piercing the butterflies or placing them on silicone glue.
We will hang the threads with butterflies on the frame and decorate the composition.
You can also take a wire ball as a base and “plant” butterflies on its surface using a glue gun.
The chandelier can be left white or painted in any other color.
Other methods - cupcake tins, cotton pads, etc.
Paper cupcake tins of different sizes and colors are perfect for decorating a ceiling light.
Materials and tools:
- paper molds - 120 pcs.;
- Chinese paper lantern;
- plate;
- glue;
- electrical accessories.
Let's install a paper lantern and glue the largest shapes onto the top of the lamp in a circle, so we cover 3/4 of the area of the lantern, then turn it over and proceed to the lower part.
Next, we glue small ones inside the large molds. Let it dry, then connect the wire with the LED lamp.
A similar lampshade can be used for a table lamp or sconce. For additional shine, you can attach crystals or large beads to the cores of the molds.
Using the same technology, a lamp is created from cotton pads. The accessory resembles a fluffy dandelion. This lamp can be hung in any room to update the familiar interior.
Here, instead of molds, you will need cotton pads folded diagonally in the form of the English letter “V”. The ends of the blanks can be secured with a stapler or white thread.
You can also decorate paper lanterns with New Year's decor: snowflakes and frosty patterns made of paper, snow flakes made of cotton wool, and other improvised materials.
Textile
The basis of a chandelier with a fabric lampshade will be an old light fixture or any metal frame.
If a light, weightless fabric was used to sew the lampshade, the bottom of the product should be made heavier to avoid loss of shape. To help the master, cardboard, fishing line, braid or fringe.
Next, we will make a fabric pattern according to the dimensions of the frame. The length can be arbitrary, and the width of the fabric is equal to the diameter of the lampshade.
We sew the upper fabric part directly onto the frame. You can also place the frame in a fabric lampshade. In this case, we bend it, then sew and iron the top edge of the pattern, and make a machine seam on the side. A lamp with a fabric lampshade is convenient to use as a tabletop lighting fixture or as a floor lamp.
Beads
The main purpose of decorating with beads is to update an old lighting fixture. To decorate a remodeled chandelier you will need the following materials and tools:
- object for transformation;
- beads;
- glue gun;
- sandpaper.
First, let's tidy up the old chandelier: remove the peeling paint and apply new paint. Then, let's start decorating the candle light bulbs: string the beads onto a long thread, apply silicone glue to the candle legs and tightly wrap them with threads with beads. Let's put the decorated candles in their places. The chandelier will look like new.
Threads
A ceiling chandelier created from threads will fill the living space with comfort and soft, muted light. This unobtrusive lighting device can be hung in the bedroom, living room, nursery or kitchen. Depending on the style of the surrounding interior, threads can be bright colors or calm pastel shades.
Materials and tools:
- high-density threads (wool, cotton fibers, tow) - 1 m;
- balloons - 2 pcs.;
- cartridge;
- bulb;
- PVA glue;
- petrolatum;
- brush;
- marker.
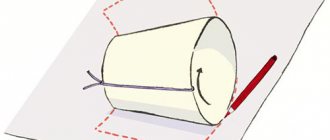
Inflate the balloon to the desired volume. We mark with a marker the upper and lower boundaries of the location of the threads. Take a brush and coat the ball with Vaseline. We wrap the ball with threads, focusing on the markings. During winding, we treat the threads with glue. The level of light output of the product will depend on the winding density. We leave it to dry, then the ball can burst and be pulled out. In the upper part we will cut out a place for installing the cartridge. Let's check the reliability and elasticity of the lamp by inflating a ball inside it.
Next, the lampshade can be painted and/or added with decorations.
Lacy lampshade
An elegant lampshade made of antique lace is suitable for a bright interior in the Provence style, and can also decorate the veranda of a country house. By using lace to create a lighting fixture, we give it new life in a new, more current incarnation.
Materials and tools:
- lace or its fragment;
- balloon;
- PVA glue;
- brush;
- electrical accessories.
Cut out circles of different diameters from the lace. Let's inflate the ball, spread it with a thin layer of glue and begin to overlap the lace elements. Let's think over the beautiful outlines of the lace that will frame the light bulb. Upon completion of the process, leave the product to dry for a day. We pop the ball and make a hole to install the electric cartridge.
The power of such a lamp should be minimal to avoid overheating of the lampshade; for more pronounced outlines and highlights on walls.
Basic manufacturing techniques
To create an exclusive lighting device, it is enough to use the technology or equipment that you own:
- Origami or papier-mâché approach;
- Using carving or embossing;
- Using weaving;
- Macrame or crochet approach;
- Connecting objects of the same shape.
Related article: Sewing patterns for lambrequins: from bow fold to tie
Ultimately, the choice of approach and manufacturing method depends on the materials found at home. Note! How to update a table with your own hands - instructions and master class for beginners (80 photos)
So, having learned about the materials and manufacturing technologies used, let’s use live examples to analyze the entire process of manufacturing original lamps and chandeliers.
From glass jars and bottles
Creating such a lighting source will require the designer's perseverance, patience and skills in working with different tools. A similar chandelier can decorate a kitchen or bar area.
Materials and tools:
- glassware;
- cartridges;
- light bulbs;
- the wire;
- frame;
- rim;
- sandpaper;
- glass cutter
We take bottles and cans one by one, draw straight lines at the bottom of each object with a glass cutter, cut off the bottoms, and grind the sharp edges. We pass electrical wiring inside through the necks of cans and bottles and install cartridges. We fix objects on the surface of the rim in any order. Dark green wine bottles in combination with lighter cans will look most impressive.
From cutlery
Cupronickel and metal cutlery: spoons, forks and even knives can be used not only for their intended purpose, but also to create a unique designer product - a hanging multi-level or single-level chandelier. This is ideal for a kitchen or restaurant space.
Devices can be hung around the light source. Strong wire, hoops made of metal or wood, or bicycle wheels are suitable as a frame. The last option is good because it has ready-made holes.
When making chandeliers with several levels, in addition to cutlery, you can use rows of cups, ladle, etc.
The main rule in the manufacture of such a product is reliable fastening of all structural elements.
Chandeliers made from kitchen utensils and cutlery
Over the years, a lot of extra dishes accumulate in the kitchen, which you feel a pity to throw away and no longer want to use. It turns out that it can be used in unexpected ways.
Lamps made from dishes
Charming bottle chandelier
You don’t have to make lampshades for kitchen lamps yourself, but use various utensils and dishes: tea and coffee cups, bowls, vases, etc.
Examples:
- From tea cups and saucers. In their bottoms, using a ceramic crown, you need to drill round holes for the cartridges and use epoxy glue to glue the cups and saucers together.
Such lampshades can be hung on cords at different heights or mounted on the frame of an old chandelier
- Using the same principle, DIY lamps are made from tin cans painted in the desired color, colanders, saucepans, and even pyramidal graters.
The need for invention is cunning
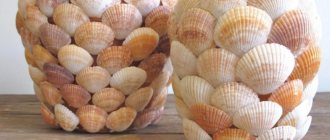
Why isn't a wicker straw basket a lampshade?
- And if you get a little clever, you can make not a pendant chandelier, but a ceiling lamp like this, by placing the wires in grooves cut on the back side of wooden dies.
An interesting idea for a kitchen in the style of a Russian village
- There is a similar option for a modern interior.
This functional shelf with coffee cup lights can be hung above the dining table
Cutlery chandeliers
The easiest way to make them is to use frames from old chandeliers, preferably multi-tier ones. Such, for example:
Soviet chandelier that hung in almost every apartment
I just have a similar rarity stored in the attic, almost all the pendants have been lost. So you can replace them with spoons, forks and other utensils by drilling holes in the upper part of the handles and threading rings into them.
If there is no such treasure, it doesn’t matter. To make similar chandeliers from scrap materials with your own hands, you can take hoops of different diameters or cut circles from plywood with a jigsaw and connect them with chains.
Single row chandelier
The second way to attach cutlery to the frame is to bend them so that the handle of the spoon or fork itself takes the shape of a hook and clings to the base.
Here the opposite is done: the spoons are cling to the frame with the upper part, and the cups are hung from the hook handles
Honestly, these options are a little too... creative for me. But maybe someone will like it.