What is Patchworking
Patchwork is the creation of things from fabric scraps. Initially, the pieces are connected into blocks that look like geometric shapes. After which they are used to sew blankets, pillows, shorts, dresses, chair covers, curtains and much more. For grandmothers, this type was economical. After all, he can give things a second life.
Now many people, using this style, make pillows, bedspreads and other household items with their own hands.
Reasons for doing patchwork:
- Instead of spending money on decorative items, you can create them yourself.
- The need to throw away damaged items and unusable pillowcases is completely eliminated.
- Exclusive and original things are created.
- While sewing, relaxation and rest from everyday work occurs.
Patchwork for beginners requires a certain set of tools. These include: needle, thread, fabric, cutting knife, measuring tape, chalk or pencil, pins, iron, fingertip, ruler, cardboard and mat. For a faster process, it is recommended to use a sewing machine.
Historians claim that this technique was used in ancient times.
To master this type of sewing as correctly as possible, you should listen to the following recommendations:
- Try sewing from a ready-made kit - you can purchase a blank at any craft store. Next, all that remains is to connect all the elements. No cutting or cutting is required.
- Starting with squares is the easiest and simplest option. Connecting them will not cause any difficulties. It is better to leave complex figures for later creation of masterpieces.
- Sewing samples - before making a large product, it is recommended to practice on small pieces. This gives you the opportunity to take into account all the errors and learn how to correct them.
- Use large-sized scraps - small pieces require a large number of stitches. You can quickly get tired of sewing and not finish the product. Thanks to large flaps, much less time will be spent on production.
- Repeat after others - first you should fill your hand. That is, follow the step-by-step lessons that have already been presented. Firstly, you shouldn’t chase originality.
- Learn to combine colors - on special websites they will teach you how to select shades that are in harmony with each other.
Additional Information! Most often, this type of sewing is used to make quilts. In the United States of America this technology is called quilting. Almost every American woman has homemade products.
Patchwork mug program
It’s no news that patchwork has become such a popular type of needlework that you can learn it in childhood, moreover, in your own school or out-of-school educational institution. Many teachers strive to open such a circle at school and pass on the secrets of mastery to children. Teaching children, of course, requires a system. Its basis is the circle program, which outlines each lesson. More precisely, it determines the topics that each lesson will be devoted to.
Related article: How to break down and remove an old cast iron bathtub?
The program might look like this:
- Lesson 1. Introductory lesson . Patchwork is pleasure and beauty. Crafts made by children.
- Lesson 2. Sewing from stripes . Photos of works. Sewing from stripes using potholders as an example.
- Lesson 3. Squares in patchwork . Quick crafts.
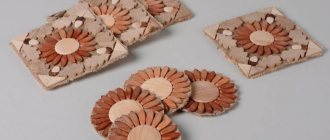
- Lesson 4. Circles in patchwork . Potholders and other crafts with circles.
And so on. Of course, one lesson is not enough to make the same potholders. The lesson usually boils down to a practical explanation of the topic, and subsequent lessons are carried out on the product. The program follows a complication scheme.
The chess technique is the easiest for children to understand.
The teacher, before starting to conduct circle work, must have some methodological reserve. These are at least examples of work, ready-made crafts (even simple potholders), photos and pictures of interesting works (or better yet, a whole collection of them), and the program itself, both on paper and in electronic form.
Schemes and templates for beginners
The template is a pattern made of cardboard or plastic. You can make it yourself or buy it at a specialty store. To create, you should draw the required element on a sheet of paper without any indentations intended for seams. Then make an indent of five millimeters on each side, then mark the second contour (seam allowance). Cut out both contours to make two blanks.
This needlework is simple, but if you don’t know the basics of patterns and sew the pieces of fabric incorrectly, you may end up with a vinaigrette rather than a patchwork.
The following schemes are suitable for beginners:
- Square within a square – triangles, which are isosceles, are connected into individual blocks that have a square shape.
- Russian square - stripes or triangles are sewn around the main figure.
- American square - rectangular shapes of different lengths but the same width are sewn around the base figure.
After the needlewoman has determined a pattern suitable for herself, she can begin sewing. There are also more complex options. But for study, it is recommended to choose a lightweight design and use it in a more bulky product. It is also advised to start by repeating after others, that is, using ready-made hands.
It is best to use cotton fabric; it does not stretch and irons well.
How to make patchworking with your own hands
The patchwork technique will not cause any particular difficulties. The main thing is to choose the right material and tools. It is also desirable to have creative skills and imagination. In this case, you can create masterpieces that will inspire admiration among others. Moreover, production will take little time.
Pillows and bedspreads
To create pillows and bedspreads with your own hands in the patchwork style, you will need scraps of any material. Next, they are laid out according to a certain pattern. To ensure that the drawing remains in its original form, it is recommended to number each piece. Two scraps are pinned together with the right side inward and stitched on a machine. This procedure should be done with all the pieces. The squares are connected into strips, and those, in turn, into a canvas.
The triangles are connected into squares and then into the main product.
From jeans
To work with jeans you need to have special skills. After all, this fabric is denser than cotton. At the same time, there is no need for a lining, which greatly facilitates the work. The methods for making things are no different from other options.
When using denim, be sure to use a thimble. Due to its density, it is difficult to pierce. You will also need an elastic needle, longer and thicker.
Old things are used as consumables: skirts, shorts, vests, etc.
Thanks to this method, you can not throw away your favorite clothes, but give them a new life, make something interesting and unusual out of them.
Patchwork
For this type, you should first decide on the material. Collect all the pieces of fabric that are available, sort them by color and structure. Then you can start drawing up the diagram itself. The joining procedure usually consists of several stages: stitching together individual fragments, combining blocks that are already ready, sewing elements to the finished product.
Even if there is a material of a different texture, the product must be assembled from textiles of the same quality.
Blocks for patchwork
A block represents a detail of a future thing. Some of them are very simple, others are more complex. Let's consider both options.
Jacob's Ladder is difficult - choosing fabric in contrasting colors (for example, blue and red). Make four strips of it measuring 35x7 centimeters and four squares - 13.5x13.5 centimeters. All pieces should be of different shades. Place squares right sides together and strips separately. Sew one of the strips along the long side. Lightly press the seams. Connect it to the other right sides, without separating, cut into pieces of about seven centimeters (you should get five pieces). Do not take the pieces apart, sew them together. You will end up with four squares. Cut large squares at the corners and draw a line diagonally. Make a line at a distance of five centimeters from the line on each side, cut diagonally, but not along the lines. Iron, cut off the resulting corners, do the layout, sew everything.
Templates for patchwork patterns are sold in special stores; you can make it yourself according to the pattern.
An ordinary square is considered simple. To do this, take a flap (you can from a kit or cut it yourself). On the inside, mark a seam allowance of approximately one centimeter. Fold the product in half with the front side inward. From the inside out, sew the two sides along the marks, you should get an envelope. Next, you should turn it out and flatten it to form a rhombus. Now take the filler, cut a square in it to the size of the envelope, leave one centimeter for allowances. Insert the filler into the product, straighten out any irregularities. The open edges of the diamond should be folded inward and pinned together so that they do not stick out in all directions. Begin stitching the folded corners, removing pins as you go.
Each item made in this style is unique, even changing the shade of one of the details transforms it in a new way.
Important! In patchwork, you should not only perform careful sewing, but also try to ensure that the created composition is harmonious. It is allowed to use fabrics with different textures. The choice depends on the flight of fancy of the craftswoman. This is also an excellent opportunity for self-realization and creative development.
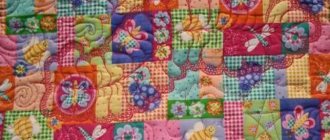
Patchwork: beautiful and easy
The collection of products in the patchwork style includes both very simple works (for example, potholders) and quite complex ones (such as patchwork bedspreads). There is a place for both in the house. In the pictures you can see how a bedroom is transformed if the bed in it is decorated with an elegant and cozy patchwork blanket. And for children, patchwork style decor can perfectly match their room.
What else modern can be done in patchwork style:
- Chair upholstery . One such chair will become a bright interior accent, and if you need to diversify a modest decor, consider not throwing away the old chair, but giving it a new patchwork upholstery. It can be a pattern of triangles, stripes, even a traditional checkerboard pattern. Or maybe a chaotic drawing, or a fantasy picture.
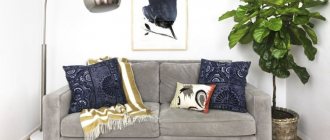
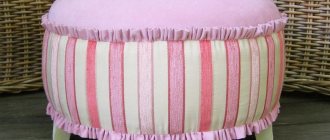
- Pillows . Interior pillows made of triangles especially emphasize home comfort. In the photo you can see a variety of design ideas for such pillows, and, inspired by the photo, make the same product.
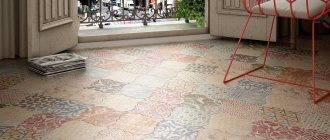
- A patchwork wall is a special interior chic. The most fashionable interior design magazines are now decorated with such patchwork corners. An entire wall in the house is allocated for pasting with patchwork, but usually a separate patchwork fabric is sewn together - patchwork in this case becomes a bright, original wall decor.
- Patchwork rug . Well, what would we do without this classic! Such products are most suitable for a children's room. A patchwork rug would also be appropriate in the kitchen and hallway.
- Stylish oven mitts as a gift for creating a kitchen interior in the Russian style will become your favorite helpers.
Related article: Correctly setting up an outlet with a timer
An unusual quilted napkin to match the kitchen interior will become a favorite tea party attribute
Well, you can start your handicraft journey using this technique with patchwork sewing from strips. Patchwork and patchwork sewing are mastered from this type, thanks to its simplicity.
Types of patchwork
Before you start sewing any product, you should familiarize yourself with the patterns and templates. The activity seems easy and simple only at first glance. In fact, it requires special care and scrupulousness.
The execution technique must be carefully and carefully followed, then you will be convinced of the charm of the product itself.
Japanese
This technique combines the traditions of the West and the East. Silk fabrics and stitches are actively used. Various geometric shapes serve as the basis: squares, triangles, rectangles, rhombuses. In addition to making decorative bedspreads, this type is suitable for panels.
The spread of patchwork in Japan was also caused by the economic situation.
Knitted
Most needlewomen are familiar with it. The difference from traditional patchwork is that the patches are not sewn together, but are knitted or crocheted together. In this case, both fabric and knitting threads are used. The most popular accessory of this type is a woman's bag or a large bedspread.
It is almost universal - any product can be knitted using this technique.
Mill
It is considered the most common option. Consists of two pieces of fabric with contrasting colors. Provides the opportunity to create various figures and achieve original combinations.
Usually made from two fabrics in contrasting colors.
Log hut
The formation of patterns is done from stripes around the main element. Most often square. Laying occurs in a spiral. Another variation of this technique is to move the square into a corner.
You can also find another name for it – “Well”. In the English version it is called Log Cabin.
Note! In order for the pattern to be as clear as possible, the pattern must be assembled from strips of the same color. The collection takes place in pairs. It is worth remembering that everything should be in harmony with each other in color.
Crazy patchwork
Translated it means “crazy shred.” The main feature is the use of figures of various shapes. It may be irregular, crooked, or have the appearance of a non-standard appliqué. The seams are masked using braid or special embroidery. The product itself is decorated with various decorative details: beads, buttons or metal pendants.
Crazy – translated from English means crazy”, “crazy”.
Master class on patchwork for beginners
For this type of sewing, fabrics with bright and colorful colors are used. Before you start cutting, it is recommended to iron and wash it.
An interesting variation of patchwork, which implies the absence of any order in creating the finished fabric.
Step-by-step pattern in patchwork style for beginners - pillowcase with a rose:
- First of all, square-shaped flaps are prepared. The more blanks, the greater the parameters of the finished product.
- Cut a circle from the fabric. Place a bulk filler or piece of material in the center. Fix using machine stitching. The middle of the future masterpiece is ready.
- Fold the square pieces diagonally. Take approximately three to five blanks and sew them to the resulting product (around its middle).
- Now you should choose pieces of a different color and larger size. Continue sewing them until the desired size flower is formed.
- Cut the petals that were sewn in a circle.
- Roses are distributed over the pillowcase and secured with a zigzag or tight stitch. The result was an applique called “voluminous rose”.
- As an addition, you can use a leaf made of fabric of the appropriate color.
Patchworking style gives old items the opportunity to get a completely new look. Any beginning needlewoman can master the technique.
Cutting rules
Before the cutting step, keep the following things in mind:
- Before cutting, new fabric must be washed and then steamed with an iron. This is done in order to prevent possible shrinkage and discoloration of the fabric after washing the finished product.
- Scraps that have already been used before need to be starched and ironed.
- It is recommended to draw fabric with a pencil, chalk or soap, but not with pens (ballpoint or gel), since traces of them may appear on the back of the fabric and cannot be removed from the finished product.
- It is always customary to cut in the direction of the grain thread, then during stitching the patchwork parts will not warp. When using new fabric, use its edge as a guide.
In order to cut out the desired element, attach a template with indents to the back side of the fabric, outline it with chalk, then attach the template on top without allowances and trace it again along the contour.
After you have cut out all the necessary parts, you can sew them according to the chosen patchwork pattern.