The emergence of decoupage technique
The art of decorating surfaces with ready-made designs originated in Europe at the end of the 15th century. It became popular and was widely used to decorate homes.
The word “decoupage” is of French origin and means “to cut out.” The technique involves gluing a pattern printed on a napkin onto any surface, glass, wood, ceramic or metal.
Many creative individuals are passionate about this art. Pictures of decoupage and samples of napkins can be purchased in specialized stores.
What is the secret of the popularity of “application for adults”
What are the features of the technology and why it is so attractive and has remained popular for several centuries:
Firstly, the simplicity of design and the ability to decorate large areas, from small boxes to garden benches. Absolutely any surface can be decorated.
Secondly, the availability of technology. Anyone can learn decoupage from napkins for beginners. There is no need to purchase expensive materials and equipment; all tools can be found at home. This is a great free time activity for adults and children.
Little artists get acquainted and acquire skills in working with various tools, develop artistic taste and spatial imagination.
Thirdly, the ability to create an individual design in any style: Provence, modern, classicism, baroque. Moreover, one or two details are enough and the room is transformed. How easy and simple it is to do this. The answer is simple - decoupage.
Note!
- DIY gifts for February 23rd - a large selection of ideas for creating unusual gifts for Defender of the Fatherland Day
- What to give a 2-year-old boy - a list of the best options for an interesting and useful gift (120 photo ideas)
- Papier-mâché - TOP 120 photo reviews of original products. Detailed instructions for beginners on creating beautiful crafts
Decoupage for beginners step by step on wood
It's best to start with something simple - for example, a cutting board. This thing will serve to train decoupage skills and will be used often in everyday life. So, stock up :
1. The board itself 2. Acrylic paint of white and gray colors 3. Decoupage napkin 4. Acrylic varnish 5. Water in a glass 6. PVA 7. Sponge 8. Brush 9. Toothbrush, which is not used 10. Candle 11. Sandpaper
Here's what you'll need to decoupage the board:
We create beauty:
- Apply white paint to the entire outer surface of the board using a pressing motion . Start application from the top of the board
IMPORTANT: For convenience, the sponge should be cut into 2 or even 3 parts.
Applying white paint for decoupage
- The piece of image that is needed is carefully torn off or cut out from the napkin.
Cutting out the desired piece of design from a decoupage napkin
- The topmost layer with the picture is separated from the desired piece This should be done as carefully as possible
Separating a layer from a napkin for decoupage
- Add PVA to a glass of water in such a ratio that you end up with the consistency of liquid sour cream. Place the required piece of the image on the board. Dip the brush into the glass and drop a little solution into the middle of the drawing
This is how decoupage drawings should lie on the board
- The glue needs to be spread over the design with a brush . The pattern should be carefully smoothed out in order to avoid wrinkles and the effect of bubbles.
The decoupage drawing must be carefully glued to the board.
- Glue other images using a similar principle.
Decoupage pictures are applied according to the same principle
- rub the candle on the edges of the board
A candle can be useful for decoupage
- Next, paint the edges with gray acrylic paint . Apply it with a sponge using pressing but gentle movements.
IMPORTANT: Do not overdo it with the amount of paint - there should be a little of it.
Gray paint for decoupage is applied to the board
- Gray paint should be applied to the rest of the surface , but this time with light rubbing movements
Gray paint for decoupage is applied to the rest of the surface
- Sand the edges . Since they were treated with a candle, they will turn white
Sand the edges of the board during decoupage
- Now gray paint is applied in a small amount to the toothbrush. Swipe the bristles away from you to create splashes
Splashes - another decoupage trick
- Now make splashes like this with white paint.
Splashes of white paint will also come in handy during the decoupage process.
- The final stage is coating the board with varnish.
Apply varnish and the Provence style board is ready
Basics of using decoupage
How to decorate a surface in three steps.
Step 1. Find a beautiful, suitable design and cut it out.
Step 2. Place in place on a pre-treated surface, cleaned and degreased, assemble a composition from different parts and glue them.
Step 3. Cover the surface with glue in several layers. Finishing the composition with varnish.
Decoupage bottles for beginners
Will come in handy:
1. Bottle 2. Acrylic paints and varnishes, special varnish for decoupage 3. Sketch 4. Alcohol 5. Picture of your choice 6. Sponge or sponge. Preferably several pieces - depending on the number of expected colors
These amazing bottles can be created using decoupage
Let's get started:
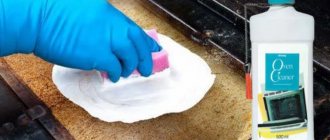
- Using alcohol, as in the case of a plate, we degrease the surface . The surface dries out
- Acrylic paint needs to be poured into some container.
IMPORTANT: Paint is applied to the bottle not with a brush, but with a sponge or sponge using blotting movements.
- Do not skip this point under any circumstances! It is important to wait until each layer of paint is completely dry. It is recommended to apply two of them per bottle
- Fill a deep container with water and dip the sketch into it.
- Try on how the size of the sketch fits the bottle
- The glue should be diluted with water in a ratio of 2 to 3.
- Apply this adhesive mass with a brush to the bottle . Choose directions from the center to the edges
- It is recommended to use a sponge dipped in paint to go over the part of the bottle not occupied by the picture. This way you can achieve smooth transitions
- Dry the bottle thoroughly - only then can you apply a second coat of paint. And let it dry again
- Now you need to coat the product with varnish for durability. You can tie a ribbon around the neck
Decoupage bottles can be anything you want
Necessary tool
To accurately apply and fix the design you will need:
- Small scissors, suitable for manicure, for cutting out small details;
- Stationery knife;
- A set of brushes for priming, painting, varnishing, smoothing. You will need round, flat brushes to adjust the motifs of the composition, smooth it, cover the protective layer of glue and varnish, thin brushes will be needed to draw fuzzy lines on the surface;
- putty. Necessary for eliminating minor defects, irregularities, dents, cracks on wooden surfaces;
- sandpaper to give the surface a smooth, even appearance and for better adhesion to the varnish;
- priming;
- White spirit, acetone, alcohol-containing liquids for surface degreasing;
- Paints, acrylic, gouache, watercolor to give a background to the decorated surface and complete the details;
- The basis. An item made of any material that is decorated;
- Glue, PVA, special for decoupage, construction glue;
- Acrylic varnish, matte, glossy, with various visual effects, “antique”, with patina, sparkles, gilding;
- A design printed on multi-layer napkins, thin rice or newsprint paper, ready-made templates, or printed on a printer.
Decoupage technique: design of wooden and metal surfaces, glass and ceramics, plastic.
We have already said that you can decorate almost any surface with a napkin. But there are peculiarities of working with each material.
- Decoupage on a wooden surface. Before applying a design to wood, it must be prepared:
- Sand and putty if required;
- Apply primer;
- Paint it.
And stick the chosen motif onto the dried workpiece and finish everything with a varnish coating. This technique is suitable both for working with small workpieces and for decorating furniture.
- Decoupage plastic. In order to turn a faceless plastic thing into a unique one, you first need to prepare its surface:
- Degrease with an alcohol solution;
- Clean with sandpaper;
- Apply a layer of gypsum primer;
- Sand again;
- Paint with acrylic paint in light shades.
After all the manipulations, paste the selected pattern (when working with plastic, do not skimp on glue). After complete drying, the work must be coated with several thin layers of varnish.
- Decoupage on glass. Glass is the most difficult to work with, but the result of painstaking work is interesting objects that can delight others. Before you get creative and decorate the glass with a bright motif and fix it with varnish, you need to prepare the product:
- Degrease with alcohol and dry;
- Allocate space for decoration;
- Tint the surface with primer or paint (do not touch the place where the drawing will be located).
- Decoupage of ceramics or porcelain. The technology for working with ceramics is the same as with glass, the only difference is the need to treat the smooth surface with sandpaper.
- Decoupage of metal objects. Buckets, cans and old saucepans will get a new life thanks to applications. But first, before the sacrament of creativity, the metal must be processed:
- Sand the surface;
- Treat with an anti-corrosion agent;
- Prime;
- Paint with construction acrylic paint or car paint in cans.
And, as usual, in decoupage - apply a napkin motif and varnish.
With this knowledge, working with various surfaces will be enjoyable and will remain unchanged for many years.
Decoupage is one of the ancient types of creativity, which, due to its ease of execution and incredible results, has become one of the most popular. There are no restrictions for practicing this type of needlework. Everyone can feel like an artist and a craftsman at the same time by picking up a decorative item, a paper napkin and a little patience.
Using decoupage napkins
Napkins for decoupage are in greatest demand among needlewomen. They are regular paper napkins with multiple layers, usually 2, 4 or 8 layers. For appliqués, only the top layer on which the ornament is applied is used.
Napkins can be found in stores. They come in square, round, rectangular shapes, sizes 21x21 cm, 40x40 cm. Pictures differ in the intensity of the colors, the abundance of elements, and location on the paper.
Typically, decoupage napkins have four, two or one center sketch. Round ones have more decorative elements, from which you can choose different motifs and form interesting compositions.
Napkins for decoupage: what are they?
Napkins for decoupage are the most popular type of material for this type of needlework, the basis of the technology, so it is very important to know what this material is, what it comes in and how to choose it correctly.
Napkins for decoupage differ from serving napkins not only in their bright and unusual designs, but in their texture and material. I would like to warn you right away that some table napkins are not suitable for decoupage, since some of them are: low quality paper ones - too thin; and others: premium cellulose ones are too thick.
So, special napkins for blending, distinguished by an unusual picture or ornament, sometimes even by an entire compositional group, are different depending on the parameters:
- Number of layers. Napkins come from single-layer to four-layer (regardless of the number of layers, we use only the top layer);
- Size. Napkins are available in different sizes:
- In the shape of a square: 21x21 cm, 25x25 cm, 33x33 cm, 40x40 cm;
- Rectangular: 33x42 cm;
- Round, the standard diameter of which is 32 cm.
- Image Location:
- Four identical motifs;
- Four motifs, identical in pairs;
- Four different motifs;
- Two motives;
- One image that occupies the entire area of the napkin.
Designer napkins are small editions made in a specific style.
When choosing napkins for work, you need to pay attention to their properties:
- The top layer is very thin, working with it requires tension, but it is the thinness and transparency that ensures excellent merging of the image with the surface being decorated;
- The paper from which the napkins are made can stretch and form folds. Therefore, before sticking it onto an object, it has to be processed;
- When applied, the napkin blends into the background. This factor must be taken into account when choosing the color on which the image is placed.
Advantages of napkins for decoupage:
- A large assortment range: color, theme, style allows you to choose material for any type of work;
- The small transverse size of the layer, otherwise known as thickness, facilitates the process of implanting the pattern;
- Availability - you can even buy napkins in a supermarket;
- Cost-effective - the price of napkins, especially for beginners, is low.
Minuses:
- A certain size limits work, for example, with large objects;
- An extraneous background that interferes with the harmonious combination with the background of the decorative item.
Compared to other materials for decoupage, a napkin, given its advantages, is the most practical.
How to choose the right drawing
When choosing pictures, pay attention to:
Note!
- Kinusaiga technique - TOP-140 photos of the best ways to create crafts using the Kinusaiga technique with your own hands + instructions for beginners
Do-it-yourself passe-partout - a master class with step-by-step do-it-yourself schemes. Making tips + photos of the best examples
Amigurumi: features of do-it-yourself knitting technique. Step-by-step master class on making toys for beginners + 180 photos
- Stretching paper. Too thin will be easy to tear and inconvenient to work with;
- The top layer of napkins should be easy to separate, have a translucent structure, due to which an organic appliqué is obtained that imitates artistic painting;
- The degree of wetting, the formation of folds, irregularities;
- One of the advantages is the availability of the material and low price.
Decorating wooden surfaces
Decoupage with napkins on wood requires a certain skill and proper surface treatment. Beautiful decor will be created on a flat surface, so wooden surfaces are pre-treated.
- The surface is cleaned of branches, dirt, dust, the bumps from knots are removed with sandpaper until smooth;
- The sanded base is degreased for better adhesion of the paper to the wood, so that the design does not roll or run off;
- If necessary, seal cracks, irregularities and cover with a primer;
- Apply the picture in the usual way. The cut out element is glued onto the glued base, smoothed out and a second layer of glue is applied. After complete drying, coat with varnish.
In this way you can decorate a wooden box and make an excellent souvenir, a kitchen tray. The products can withstand wet wiping, do not fade over time, and are not deformed.
Furniture Conversion for Beginners
Decoupage needlework allows you to continue using old furniture, updating its appearance beyond recognition.
- It is first recommended to disassemble the products into separate fragments. It is advisable to replace or clean the fittings. Glass surfaces must be degreased by treating with alcohol and dishwashing detergent without dyes.
- Metal products must be cleaned with an acidic solution (use vinegar and water in equal proportions). Then the dirt is cleaned off with a wire brush.
- Wooden products are processed with fine sandpaper to smooth out all the unevenness as much as possible.
- A primer is applied to the treated surface; after complete drying, it is recommended to clean the surface with zero-grade sandpaper.
Pictures-images are attached to the furniture surface in various ways:
- With the standard technique, renovation materials are glued to the surface of furniture fragments. After drying, the area is covered with several layers of colorless varnish.
- Reverse decoupage extends to the enhancement of glass surfaces.
- The artistic technique gives the effect of volume to the picture. In this case, manual shading of the colored background is performed, combined with the finishing of parts of the pattern.
- Using fragments torn out with uneven edges for decoration. Napkins, material that imitates the appearance of plastic, and designer paper are used.
- The volumetric technique uses fragments of napkins to create a unique finished picture. After the surface has completely dried, fragments of the image are drawn more clearly.
If polished furniture is being updated, it is recommended to first completely remove the shiny layer with sandpaper.
Getting ready for Easter
On the eve of the Easter holidays, a special theme arises in decorating objects, including Easter eggs. Decoupage of Easter eggs involves applying a beautiful ornament to a pre-boiled egg.
We will not use regular glue, as it penetrates through the porous shell. And for gluing, fresh, raw egg white is perfect. It is tapped a little to break up the fibers and applied with a brush to the base.
Attach the cut out picture, let it dry a little and cover the surface with protein again, but with a picture. The protein reliably fixes the decor, does not fade, does not give off odor and lasts for several days.
Decoupage for beginners: collecting everything you need
First, let’s briefly talk about what you’ll have to work with and what you’ll have to work with. In general, decoupage is fastening on the basis of a material or paper with a printed pattern. To ensure that the design does not wear off longer, it is coated with several layers of varnish. Here is a brief description of the decoupage technique.
Decoupage is a technique that allows you to make something special out of ordinary things.
Base
Any weakly absorbent base is suitable as a base for decoupage. What can this technique be used on? On the following grounds:
- Wood of any degree of processing (without impregnation, with impregnation, sanded or not, painted, varnished). It’s just that preparation requires a special list of work and the time spent on preparation will vary.
- Plywood, treated or not.
- Plastic - painted, transparent, smooth, rough.
- Glass and products made from it.
- Porcelain, faience.
As you can see, the list is substantial. Only very porous substrates with a lot of irregularities are not suitable for decoupage. And this way you can decorate everything: from dishes of any kind to furniture and doors (and you can use both the surface of the doors and glass inserts).
List of tools
You need a few tools:
- Small sharp scissors (you can use good manicure or stationery scissors, medical ones). You can - several pieces with different blade shapes.
- Brushes and Brushes. To work with small products for decoupage, you will need flat brushes with a width of 0.8 to 2.5 cm. The pile is thin artificial. These brushes are convenient for applying glue and varnish.
- To apply acrylic paint when you are painting the base, it is more convenient to use a sponge. But it provides a rough foundation. In order for the surface to be smooth, you need a brush - flat or round, but larger (depending on the size of the product).
- To draw and highlight details, you will need thin artistic brushes.
Everything from tools. Unless you still need stationery - a ruler, a pencil, an eraser.
Consumables
Now we will talk about consumables. We won’t talk about napkins and paper here—they’re a separate item. In addition to them, to make decoupage with your own hands, you will need:
- Water-based acrylic varnish. You can, of course, take another one, but this one is the best. Does not smell, does not darken over time. There are different types of this varnish. It can be transparent or with some kind of effect (with glitter, antique, etc.). The surface can be matte, semi-matte, glossy, semi-gloss. Suitable for both ordinary construction and special ones for decoupage (more expensive).
- Acrylic paints. They are used to complete and tint the drawing so that the picture assembled from pieces is a single whole.
- Sandpaper. Take medium and fine grain, several gradations. Again, it depends on what you are processing. For initial sanding of wood you will need paper with a grain of 250-400, for finishing - with a grain of 600-800 (finer paper only makes sense on sanding machines). After drying, we will also sand off the imperfections of your work with sandpaper.
- Glue. Handicraft stores have special glue for decoupage. But it's expensive. It works just as well if you use PVA glue.
- Priming. Used to reduce the absorbency of wooden surfaces.
- Wood putty. Also a specific material that is used to seal wood defects.
That's all that may be required, so although decoupage requires a financial investment for beginners, it is not very large.
Children's decoupage
Decoupage with napkins on cardboard is suitable for children. A figure is cut out using the template and decorated with an applique of napkins. This creative activity will help develop a child’s imagination, and handmade crafts will be useful to mother and grandmother.
You will need shoe boxes, which make wonderful boxes, large cardboard boxes, from which you can build a house for dolls with beautiful patterns and ornaments.
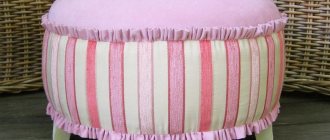
Features of the design of round surfaces
Surfaces with curves and slippery glass or glazed ceramic surfaces require a special approach to the technique. New Year's bottles decorated with appliqués look very elegant.
A gift option for expensive alcohol in a retro style will pleasantly surprise friends and employees. Decoupage of bottles with napkins, just like decoupage of plates with napkins, requires a different approach to application.
Decoupage for beginners from napkins: master class
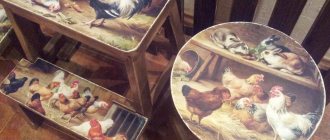
The smooth ceramic surface of the plate is what beginner decoupage artists need. It is still not recommended to eat from such a plate, but as a decorative item it is incomparable. You will need to stock up:
1. Actually, with a plate 2. Alcohol napkin 3. Napkin for decoupage 4. Stationery file 5. Spray bottle with water 6. Glue 7. Acrylic varnish 8. Acrylic paints 9. Brush 10. Roller
Decorative plate made using decoupage method
Let's get started:
- First of all, take alcohol wipes - they will perfectly degrease the plate. After it has dried thoroughly, you need to apply PVA to the entire surface. And leave it to dry again
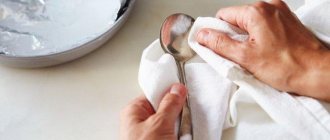
- Now it's time to start making decoupage napkins. You need to carefully separate the first layer with the pattern from it.
IMPORTANT: Many beginners mistakenly believe that the drawing should look up after applying the napkin to the surface. In fact, it is applied with the front part precisely to the surface.
- Place the layer on the file so that it does not tear. Then spray it all with water from a spray bottle.
- That's all - the file can be applied to the surface of the plate
- Next, the roller smoothes it in the direction from the center to the edges. This must be done, otherwise excess moisture and air will interfere with the normal attachment of the image. However, you can do without a roller - a flat brush will serve as a good alternative
- Now the file is removed, and the remaining moisture is removed with an ordinary napkin. You can coat it with varnish or paint, glue three-dimensional elements from colored napkins
Decoupage from napkins can be supplemented with lace glued to the edges
Decoupage from napkins can be complemented with golden paint
Decoupage plates in Victorian style
File method
We will decorate a smooth surface with curves using a file. The method has proven itself when working with thin materials, the top layer of napkins does not tear, it is convenient and easy to use, and the ability to decorate uneven surfaces. For this we need:
- Container with water;
- Stationery plastic file;
- Glue;
- Varnish.
Step-by-step instructions for applying an image to a rounded surface
Step 1. Select a design and carefully cut it out. Place face down on file.
Step 2. Pour a little water so that the napkin is completely wet and floats freely. If necessary, use a brush to straighten the edges. The picture should be smooth, without folds or curled edges.
Step 3. Carefully drain the water, holding the picture and applying it to the surface to be decorated. Press well, drain the water completely and smoothly tear off the file. Using a dry flat brush, smooth the image, smoothing it onto the glass surface.
The surface of the bottle and plate should be degreased beforehand. If the design drags behind the file, press the file with the design again and try to slowly remove the plastic sheet.
Step 4. Coat a tightly fitting image without air bubbles with glue from the middle to the edges. There is no need to wait for the napkin to dry; glue it immediately.
Step 5. After the glue has completely dried, the product is varnished. Apply at least 6-8 layers of transparent acrylic varnish with a glossy effect. Experienced craftswomen advise covering smooth surfaces with varnish in 100 layers, then the decorated product will certainly preserve the design for a long time.
Stages of working with decoupage step by step
The goal of all technology is to decorate a simple surface with a beautiful image. This process is based on a person’s creative vision, so there is no right way to work. Different surface materials can be used as a base, as well as various techniques and techniques. It is better to take the method that seems simpler and works best.
Experts who have been involved in decoupage for a long time recommend starting with gluing large fragments and parts. When this is achieved without flaws and shortcomings, it will be possible to move on to creating a product from smaller parts, and also master the techniques of volumetric decoupage. Below are the steps for working with large parts.
Preparation
The very first stage, before proceeding with the technique itself, is preparing the foundation. Ideally, there should be no irregularities, pits or humps on it; the surface should be smooth and even (only if this was not intended from the very beginning).
To achieve this effect, it is recommended to use putty material or sandpaper. After leveling work, it is necessary to cover the surface with primer and white paint.
How to work with a napkin
There are several options for working with the material. If the base is flat and smooth, then the napkin can be glued as a whole, but if there are any bends on it, then the napkin will have to be joined in fragments. You can use scissors or carefully tear it into pieces.
Bonding techniques
Those who are starting to work with decoupage for the first time prefer to use small parts for work. This is a good approach for beginners, but it is better to choose the simplest possible shape of the product - it is recommended to choose a surface without additional bends.
If you plan to work with small parts, then you can apply the glue either with a thin brush or with your fingers. After application, you can also level the napkin. The type of brush depends on the individual - you need to choose the option that will be most convenient to work with. Some people prefer to do most of the work with their fingers - this way they can feel all the imperfections of the material.
The glue is usually applied to the surface or to the napkin itself, and you can use one of the following methods:
- Glue can be applied to the entire area, and then connect the surfaces from the middle of the napkin. When smoothing, you need to move towards the edges of the product to remove excess air bubbles;
- You can apply glue only to the middle of the fragment, and then also smooth it to the edges of the surface.
Technology using glue and iron
There is another way to avoid wrinkles: smoothing the surface from bubbles. After priming, glue is applied to the base (PVA or a pencil will do). It must be applied evenly so that there are no glue tracks. You need to leave it for some time to dry (you can use a hairdryer).
After this, put a napkin and smooth it with your hand. They also place a piece of paper on top of it and, using an iron, begin to smooth the surface from the edges.
File and water method
This decoupage technique is perfect for beginners: it uses a file, glue and water. It is better to use it if you plan to decorate large fragments of the picture. You need to pour a little water into the middle of the film, and then place the design on it face down. It is carefully smoothed out and air bubbles are removed.
After this, carefully grasp the edges of the file and drain the remaining water. The drawing will not disappear from the film. Then you can start trying the design on the surface. A drawing is applied to the area and carefully smoothed out. The main thing is to do everything carefully and gradually - then you can avoid the appearance of wrinkles and bubbles.
After one edge has stuck, move on to working with PVA glue. It is diluted and applied to a napkin. Finally, a fresh layer of varnish is applied to the product.