How to make salt dough?
You will need: a glass of wheat flour, a glass of extra salt, half a glass of cold water, a bowl.
Recipe
- Take a bowl.
- Pour in a glass of flour.
- Add a glass of extra salt.
- Fill with cold water.
- Knead the dough.
The finished salted dough should not stick to your hands or crumble. It should be cool and easy to sculpt. I recommend watching the video master class!
SALT DOUGH | How to make your own salted play dough | A simple salt dough recipe.
Recipe for salted modeling dough with PVA
Craftsmen have noticed that crafts made from dough mixed according to the following recipe are stronger and more durable. In addition to the usual ingredients, you also need to prepare PVA glue.
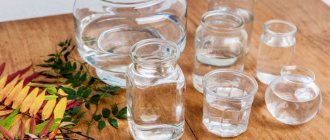
First, dissolve a tablespoon of thick glue in half a glass of cold water. When the solution turns a cloudy white color, like in the photo above, add a glass of fine salt and stir until dissolved. At the end, add a glass of wheat flour and knead the dough. According to reviews from experienced craftsmen, kneading such a dough takes a long time, from 10 to 15 minutes, so be patient. If the dough sticks to your hands, grease the surface of the skin with vegetable oil.
How to dry salt dough?
There are two most common ways to dry salt dough. The first method: the finished craft will dry on its own. The main thing is that it should not be exposed to direct sunlight, otherwise it will crack. The craft can be placed on a flat surface and wait a few days. Second method: dry the finished craft in the oven for 3 to 6 hours (depending on the size of the craft). Drying occurs in batches with breaks. One approach is 1-2 hours. For quick drying in one go, set the oven to 75-100 degrees, and then the craft will dry in an hour. At a temperature of 120 degrees, the craft will dry in 30 minutes, but it is better to dry it naturally.
How to dry salt dough products
Finished crafts are dried in different ways, depending on the time of year and the thickness of the products. If it's summer time, then it's easiest to lay out delicate crafts on the windowsill, but not in the sun. Find a shaded place and place them on a towel at some distance from each other.
In winter, crafts are dried for several days at room temperature. You can place them near central heating radiators or near the fireplace. If you need to dry the products faster, use the oven.
Thin crafts dry faster than bulky ones, which require several stages of drying.
The first part of the process takes place with the door open and a low temperature of 50 degrees for 1 hour. Then it rises to 75 degrees, the doors are closed tightly and the crafts are kept for 1 or 2 hours. Then the products are dried for 1 hour at 100°, and at the end - half an hour at 150°.
This sequence is explained by the fact that you need to act gradually. If you immediately turn on high heat, the craft will quickly dry out on the outside, but the inside may remain damp, and subsequently mold will appear on the work.
If you lengthen the process in time, the product may dry out and crack. And this is also not necessary.
How to color salt dough?
There are two most common ways to color salt dough. The first method: after drying, paint the finished craft with acrylic paints or gouache using a brush. Second method: food coloring is diluted in water, then added while preparing the dough. When the craft is completely painted and dried, it must be coated with transparent manicure or furniture varnish in 2-3 layers. Each layer must dry before applying the next. This way the craft will be preserved
Dough with glycerin
Salted dough for modeling thin products is kneaded with a mixer from the following ingredients:
- 1.5 cups wheat flour.
- A glass of fine salt.
- 4 tablespoons glycerin. It is easy to find in any pharmacy.
- 2 tablespoons dry wallpaper glue.
- Half a glass of cold water.
First, as usual, mix the dry ingredients in a bowl. Separately, dissolve the wallpaper glue in water and add glycerin to the solution. Then combine both parts together and use a mixer to thoroughly knead the dough into a tight dough.
Some craftsmen do not varnish products made from such dough. They say that they already have a pleasant shine from glycerin.
Salt dough figurines
You will need: salt dough, rolling pin, cookie cutters, stars, hearts, etc..., cocktail tube, thread or rope for hanging, acrylic paints or gouache, brush, clear manicure polish.
Master Class
- Roll out the dough into a thin layer using a rolling pin.
- Take the mold and press down on the dough.
- Make a hole for hanging by pressing a cocktail straw into the desired location.
- Dry the craft.
- Paint the craft and wait until it dries completely.
- Apply varnish and wait until completely dry.
- Attach thread for further hanging.
The salt dough figures are ready!
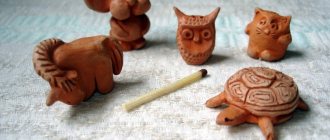
Children's crafts made from salt dough
It is interesting for children to observe what metamorphoses occur with raw materials; the topics understandable to children are very extensive, expanding:
- animals;
- numbers;
- clowns;
- hearts;
- pencil holders;
- medals.
This list can be continued endlessly. You need to start with the simplest types - multi-colored flowers, circles, collected in garlands.
Star
To make a star of any size you will need red composition. Sequencing:
- They roll it into a ball, turning it into a flat cake.
- The contours of a five-pointed figure are cut out with a knife or operated with a special mold.
- The corners are lubricated for smoothness with moistened fingers.
- A toothpick is useful for making dots.
- Represents the eyes and mouth in a smile.
You can attach droplets of a different color as decoration. All that remains is to dry the creation, varnish it and leave it to dry. If you want to hang salt dough crafts for children, then make a hole in them in advance.
Hedgehog
Having sculpted the hedgehog’s body, which has a drop-shaped configuration, they accentuate the nose and eyes using pieces of black dough, beads or peppercorns.
The needles are isolated by cuts running in a row, observing a checkerboard pattern and lifting them upward. To do this you will need nail scissors. By manipulating them, the entire back of the animal is equipped with sharp waves.
Often needles are depicted as matches or skewers on which mushrooms or fruits are strung. It turns out to be a very cute, believable creature.
Caterpillar
I roll out the green material into a sausage shape and cut it into pieces that are rolled into balls. Their number is chosen independently. The parts are glued together, finally attaching the head in a raised state with eyes and nose. The sample must first be pierced for hanging.
Bullseye
A red apple half is molded, the cut of which is covered with a white center. Now the seeds, stalk and leaves are glued.
Full apples can be made by crumpling foil into balls and covering them with flour material. This promises the dough figures lightness and quick drying. All that remains is to paint them in a natural tone by inserting a branch stalk.
Elephant
Having prepared the mixture of the desired color, get to work:
- the body looks like an elongated structure;
- the legs are shaped like columns;
- we connect these blanks;
- the ears are made from flat cakes into which smaller elements of a different color are inserted;
- don't forget about the short ponytail.
Expressive eyes will be the finishing touch.
Owl
Having sculpted an oval body, they add round eyes, to which tubes-pupils are glued for realism. Using a file, draw stripes around them in a circle and rays from below. Use scissors to form feathers. This is a painstaking task, done carefully and without haste.
The bird can be attached to a board or placed on a branch; the finishing touch is massive paws. You can change the image by coming up with funny details.
Lamb made from salt dough
You will need: salt dough, gouache, brush, foil, water, permanent marker, clear manicure polish.
Master Class
- Mold the sheep's feet into 4 balls.
- Make a ball of foil, then roll it in the dough so that it is inside. This will be the body of a sheep.
- Attach the body over the legs using water.
- Make the head, ears, eyes and horn curls. Attach with water.
- Roll small flat balls and attach them as wool using water.
- Dry the craft.
- Paint the sheep with paints and wait until it dries completely.
- Draw eyes, eyelashes and outline the contours of the curls with a marker.
- Cover the craft with varnish and wait until it dries completely.
The salt dough lamb is ready!
Drying salt dough crafts
There are cold and hot methods for drying products. The first case involves natural drying, which is preferable. The samples are laid out on thick paper, placing them in a place hidden from direct sunlight, otherwise inevitable cracking will occur. This will take 2-3 days, depending on the thickness.
Impatient craftsmen use the oven, placing the models on a baking sheet. At the same time, the door does not close, for the fastest evaporation of moisture. The process will brown small and thin elements, but may cause cracks in large ones. The temperature is raised in stages, starting from 50 and increasing to 100 degrees, which will take an hour.
A higher temperature setting of 120 will ensure readiness in half an hour. If tapping on a thick area responds with a ringing sound, the homemade product has reached its standard.
Salt dough house
You will need: salt dough, rolling pin, glass, toothpick, paints, brush, glitter, clear manicure polish, cocktail tube, thread for further hanging.
Master Class
- Roll out the dough into a thin layer using a rolling pin.
- Draw a house on the dough, then cut out with a stack.
- Make dots along the contour of the house, window, chimney with a toothpick.
- Make a hole for further hanging with a cocktail tube.
- Dry the craft.
- Paint the house, decorate it with glitter and wait until it dries completely.
- Apply varnish and wait until completely dry.
- Attach thread for further hanging.
The salt dough house is ready!
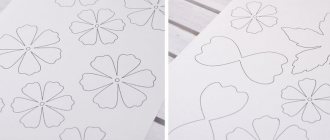
Step-by-step modeling for beginners
The first level for mastering techniques for working with salted dough is creating flower arrangements. Hard work will be rewarded with an abundance of smiles and admiration.
Decorative red rose
To create a beautiful rose for a chic bouquet, you need to have the following devices on hand:
- Rolling pin;
- Knife for plasticine;
- Round shape of small sizes.
Take a medium-sized ball of salty mass. Using a rolling pin, turn it into a layer, the thickness of which does not exceed 1.5 cm. Use a round shape (you can use a table glass) to make several circles. Now bend each petal slightly and insert the remaining circles. Then all that remains is to squeeze them into a bud and unfold the puffy upper petals with gentle movements. Just don’t press the dough too hard to prevent the petals from sticking together, otherwise the volume will disappear.
After the bud is ready, make a stem and decorate with a scattering of small leaves. The flower can be decorated with mother-of-pearl beads and opaque glass beads. A beautiful and neat rose is ready.
Original Christmas tree toys
To spread the New Year's spirit, you don't have to spend a lot of money on a gift. It is enough to present a homemade set of Christmas tree decorations made from a mass that is pleasant to the hands. To do this you will need plastic mass, wire and acrylic paints.
The simplest figurine is considered to be a bell. All toys will look neat if you follow the instructions step by step.
First make a base for the bell - a neat and voluminous skirt, and attach a small stick to the center - it will act as a tongue. Decorate the surface with multi-colored beads or glass beads, use Christmas colors for decoration - bright red and green. You need to make a hole on top of the bell so that you can attach the toy to a spruce branch. Thread the colored ribbon through and tie it with a beautiful bow.
New Year's cookies on pendants are very easy to make; they will bring home comfort and joy. Make round cutouts from the finished dough. It is better to make a through hole closer to the edge for a neat appearance. After this, decorate the cookies with a scattering of New Year's beads: snowflakes, stars, tiny donuts. After the Christmas tree toy has dried, thread a thick thread or multi-colored cord into the hole.
You can make a simple hedgehog by first making a slightly elongated body and highlighting the nose. Needles can be made from matches, and eyes can be made from beads. A beautiful and original hedgehog is ready.
DIY fruit panel
A panel made from this plastic material can be used as a beautiful decoration for the kitchen table or placed on a window in a child’s room. Step-by-step instructions for making a basket of vegetables and fruits from salted dough:
- Cut out a shape from cardboard or paper that will be a basket. Then cut out a similar template from the prepared salt dough.
- You will need a garlic press to make an imitation of three-dimensional weaving. Pass a certain amount of dough through it and roll it into neat flagella. Distribute the flagella where you think they are needed.
- Using a clay knife, make several horizontal and vertical lines on the base of the basket to make it look like wicker.
- Using the template, make several small leaves, do not forget to draw small veins with a stick. Attach leaves to the side of the basket handle.
- Roll several balls of different sizes and make them slightly flattened. Stick a clove (seasoning) into the middle of each. The end result should be apples that look like real ones. In the same way, make a hanging bunch of grapes: slightly press several small balls and attach them one after another, forming a beautiful bunch.
- Now all that remains is to dry the panel and paint it with gouache or acrylic paint. A wonderful still life in volume is ready.
You can decide for yourself what image will be captured in the salt dough painting. This activity perfectly develops imagination in both children and adults.
Crafts made from salt dough
Originally posted 2018-03-19 10:51:42.
Salt dough owl
You will need: salt dough, a cap from a felt-tip pen, a stack, paints, a brush, clear manicure polish.
Master Class
- Roll the dough into a ball.
- Press it down to make a flat circle.
- Make feathering by pressing with the cap.
- Fold the sides of the circle towards the center.
- Fold the upper part of the circle into the center and form ears.
- Make the owl's eyes by pressing with the cap of a felt-tip pen.
- Dry the craft.
- Paint the owl and wait until it dries completely.
- Cover the craft with varnish.
The salt dough owl is ready! I recommend watching the video master class!
Owl made from salt dough / Figures made from salt dough / Owl salt dough
New Year's crafts made from salt dough
Celebrating the New Year in a neighborhood with bright attributes is a great idea. This is a magnificent decor for the room, giving it a festive atmosphere. Not only children, but also grandparents are involved in this exciting activity, which will result in a lot of positive emotions for everyone.
Options are presented:
- Snow Maiden.
- With your own hands in caps.
- A horseshoe for good luck.
- Emoticons with their tongues sticking out.
- Snowflakes.
- Santa Claus.
New Year's crafts made from dough can look like a photo frame, candlesticks, or a magic chest. Confectionery powder, coffee beans, cereals, and pumpkin seeds are used for decoration.
Christmas tree
The forest beauty can be recreated using different methods. A flat variation will be obtained from a rolled out layer. We cut out its outlines, smoothing the edges. From narrow strips, starting from the top, you can lay out garland loops, pressing them with a tassel. We paint the finished Christmas tree and decorate it with sparkles and other decorations.
To create a volumetric version, go the following way. The flatbread is cut into five petals, without touching the center and squeezing their tips. Several such specimens are combined vertically, with the top raised. They decorate based on personal imagination.
Snowman
The rolled foil is placed inside the dough shell, turning it into two koloboks, one of which is slightly smaller. Use a toothpick to connect the elements. They sculpt legs, a carrot nose and eyes. Use a tourniquet to mark a smiling mouth. Put on a hat, attach mitten hands and buttons. Tie a flashy scarf. All that remains is to decorate the homemade product colorfully.
Christmas decorations
Any idea is suitable for decorating a coniferous tree. It can be:
- angels;
- bells;
- garlands of colorful details;
- mittens;
- birds;
- fairy houses.
To give a festive sparkling look, beads, rhinestones, and tinsel are used.
Figured frame made of salt dough
You will need: colored salt dough, cookie cutters, cocktail straw, rolling pin, glass, water, clear nail polish.
Master Class
- Roll out the dough into a thin layer using a rolling pin.
- Cut out the frame using a stack.
- Take the mold and press down on the dough.
- Attach the figures to the frame with water.
- Make a hole on the figures with a cocktail straw.
- Dry the craft.
- Apply varnish.
The salt dough figure frame is ready!
Salt dough bear
You will need: salt dough, stack, pva glue, black and pink paint, brush, transparent manicure polish.
Master Class
- Blind the eyes and nose, paint them black and set aside to dry.
- Make 2 flat circles for the paws, paint them pink and set aside to dry.
- Make an oval shaped body of the bear.
- Roll into a ball for the head.
- Glue the head to the body.
- Make a flat ball, draw a smile with a stack and glue it to the face.
- Blind the paws, then glue them and draw the fingers in a stack.
- Roll the ball and glue it in place of the tail.
- Glue on the eyes and nose.
- Glue pink circles onto the bear's back legs.
- Dry the craft.
- Cover the craft with varnish.
The salt dough bear is ready!
How to make salt dough
Salted dough for sculpting crafts is prepared at home with your own hands from flour, water and salt according to a basic recipe. Depending on the desired product, the mass can be prepared in different densities. Large crafts from salt dough are made from a dense knead using glue.
For beginners and for small fingers, it is better to make a soft, loose dough. Small parts come out well from an elastic knead. If you want to get a more stable or elastic mass, add glue or vegetable oil.
To prepare the mass you need:
- Water - ½ cup;
- Flour – 2 cups (200 gr.);
- Salt – 1 cup (200 gr.).
Mix all ingredients in a bowl, knead the dough like dumplings. You should get a homogeneous, soft mass. Wrap in cling film or put in a bag for 30 minutes so that the dough rests and does not dry out.
After kneading, you can form any crafts from the dough by rolling it out on the table and cutting out figures, or sculpt individual parts and then join them together. Recipes for salt dough for sculpting crafts may vary depending on the purpose of the product and the subtlety of the work performed.
Salt dough pendant
You will need: salt dough, a glass, acrylic paints, glitter, a brush, a ribbon for hanging, a cocktail tube, a dog's paw for imprinting on the dough or your fingers, clear glue, a rolling pin.
Master Class
- Roll out the dough using a rolling pin.
- Cut out circles using a glass.
- Place your paw print on the circles or make them with your fingers.
- Make a hole for hanging a cocktail straw.
- Dry the circles.
- Paint the circle with white paint and the foot with pink. Wait until completely dry.
- Lubricate the circle with transparent glue, sprinkle with glitter and wait for the craft to dry.
- Attach ribbon for hanging.
The salt dough pendant is ready! I recommend watching this interesting video!
How to make a New Year's boot. The symbol of 2021 with your own hands from salt dough. Master class. DIY.
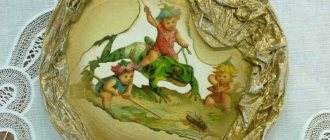
Salt dough panel
Such scenes immediately attract the eye, beneficially enlivening the atmosphere. The hall will be transformed by floral arrangements, the kitchen by culinary images, and the children's room by cartoon characters, fish, and animals. Dough paintings are landscapes, still lifes, plants. The silhouettes are recreated on parchment paper, filled with raw materials, and when dried, glued to a cardboard base. The use of several layers ensures that the picture is convex.
It is not difficult to reproduce the “Pink Bouquet” by molding leaves with a characteristic pattern or making prints of real leaf blades. Roses will appear in ornate buds, irresistible in the lush surrounding of foliage. By the way, you can provide the background surface with waviness by gluing to the base scraps of napkins, painted in the chosen shade.
It will not be difficult to depict a winter forest, a basket of vegetables, a cat, bunches of grapes, sunflowers, a symbol of well-being. The stucco molding is always in the foreground, and the backdrop is drawn.
Salt dough star
You will need: colored salt dough, glass, clear manicure polish, toothpick.
Master Class
- Roll into a ball.
- Make a flatbread out of it.
- Cut out a star using a stack.
- Brush the corners of the sprocket with a wet finger to make them smooth.
- Make dots with a toothpick.
- Make a smile with your eyes.
- Attach small flat balls of a different color using water to decorate the star.
- Dry the craft.
- Apply varnish and wait until completely dry.
The salt dough star is ready!
What's the best way to color salt dough?
There are two common ways to color salt dough for making crafts:
- The first is to paint the finished product with your favorite paints using a brush.
- The second is to dilute food coloring in water and then pour it into flour. With this option, more dyes should be added, because the adze becomes lighter as it dries.
To keep the craft looking beautiful longer, it should be coated with several layers of varnish (manicure or furniture).
Salt dough caterpillar
You will need: colored dough, knife, PVA glue, toothpick, pendant, clear manicure polish.
Master Class
- Roll out the sausage.
- Cut it into 6 equal parts.
- Roll into balls.
- Glue 5 balls together.
- Glue the head.
- Make a nose and eyes, then glue them on.
- Poke a toothpick into the hanging area.
- Dry the craft.
- Apply varnish and wait until completely dry.
- Attach the pendant.
The salt dough caterpillar is ready!
Puff pastry pig as a New Year's decoration
The coming New Year will be ruled by the Yellow Pig, so it is not surprising that all New Year's crafts are related to this funny animal.
Step-by-step instruction:
- Roll the puff pastry into a ball for the heel and use a toothpick to make the nostrils.
- Next, we sculpt a muzzle and glue a snout and eyes to it.
- We make the ears in a triangular shape, glue them on and use a toothpick to apply stripes at the junction of the head and ears.
- We make a heart and attach it to the head in the lower side part.
- We make indentations along the edge of the entire circle, we also make two holes at the top for the threads and two holes at the bottom for the legs.
- Now we make handles and glue them as if a pig is holding a heart.
- We sculpt the hooves and make holes in them for the rope. We sculpt the second pig in the same way.
- We dry the blanks, then cover them with black paint and again wait for them to dry completely.
- We wash off the paint from the convex elements with water, after drying we prime the figures with white paint, paint the piglets, and draw small details with a black helium pen.
We coat the crafts with varnish, you can use woolen threads to make hair for pigs, you can make pendants from strings and you can hang funny pigs on the Christmas tree.
Salt dough apple
You will need: colored salt dough, PVA glue, clear manicure polish.
Master Class
- Make half an apple, make the inside flat, pressing it onto a flat surface.
- Make a thin flat center and glue it to the main part.
- Roll 6 seeds and a stick, then glue to the apple.
- Blind the leaves, then glue them.
- Dry the craft.
- Apply varnish and wait until completely dry.
The salted dough apple is ready!
Materials for making crafts
Kneading the dough is only the first stage of independent creative work. Also, to create original crafts, you need various decorating materials that need to be prepared in advance:
- Paints (you can use acrylic) and clear varnish.
- Glue.
- A sharp knife (stationery) for cutting out shapes.
- Threads, metal wire (if you plan to create New Year's toys).
- For homemade dolls you will need various accessories (eyes, yarn, clothing parts).
You can also prepare instructions in advance for making your own salt dough crafts. Such training schemes and video lessons will help inexperienced craftsmen conduct creative activities correctly.
Salt dough elephant
You will need: colored salt dough, PVA glue, clear manicure polish.
Master Class
- Make the elephant's body by rolling an elongated ball.
- Make 4 legs in the shape of plump sausages.
- Make a proboscis.
- Make the elephant's ears in this way: roll out 2 flat cakes, glue flat cakes of the same shape of a smaller size and a different color to them.
- Make a small ponytail.
- Blind your eyes.
- Assemble the elephant in the following sequence: glue the legs to the body, then glue the proboscis, then the ears, eyes and tail.
- Dry the craft.
- Apply varnish and wait until completely dry.
The salt dough elephant is ready!
How to dry dough crafts correctly
The rules for decorating finished products are quite simple. But you should carefully read the standards for optimal drying of manufactured accessories:
- Small-sized products are dried without an auxiliary increase in temperature.
- Large crafts are dried in the oven at minimum temperature for 4-5 hours.
To avoid cracks on the surface of the toy, do not dry it in direct sunlight. Compliance with the standards for manufacturing and drying homemade souvenirs can significantly extend the service life of the products.
Salt dough dachshund
You will need: salt dough, a simple pencil, scissors, cardboard, paints, a brush, rope, toothpick, foam sponge, clear varnish, PVA glue.
Master Class
- Draw a dachshund on the cardboard as shown in the image.
- Cut out the template.
- Roll out the dough to a thickness of 5 mm and cut out the dachshund according to the template.
- Roll out the oblong eyes, then glue them on.
- Blind the eyelids and glue them onto the eyes.
- Use a toothpick to outline the paws, nose, mouth, ear and body contours.
- Roll out an oval, then glue it onto the ear and smooth the seam with a wet finger. Use the same method to add volume to the dachshund's back and tail.
- Mark stripes in different directions around the entire perimeter of the dachshund, so that the stripes resemble wool.
- Dry the figurine.
- Paint the figurine, then leave to dry.
- Glue a piece of rope to the back of the craft for further hanging.
- Cover the craft with varnish and wait until it dries.
The salt dough dachshund is ready!
Original souvenir - funny dachshund
You can start preparing for the upcoming New Year holidays in advance and make a funny dachshund as a gift for your friends.
To work you will need:
- universal salt dough (see recipe above);
- cardboard, pencil, scissors;
- paints and brush;
- a piece of rope;
- clear nail polish;
- toothpick;
- foam sponge;
- glue "Dragon".
Prepare a drawing of a dachshund. You can sketch it by hand or print it out. Cut out the image of the dog along the outline.
Transfer the template to a piece of cardboard and cut it.
Roll out the dough to approximately 5mm thickness on baking paper. Attach the template and cut out the outline of the dachshund on it
Carefully remove the trimmings so as not to deform the workpiece
Roll two balls and form them into oblong dachshund eyes. Glue them with a drop of water to the head of the workpiece. Moisten all sections of the dog with water and smooth it with your fingers to remove all irregularities.
Use two small pieces of dough to make eyelids and glue them above the eyes. Use a toothpick to outline the ear, paws, mouth, nose and body contours.
Now you need to add volume to the workpiece. Roll the dough into an oval, glue it onto the ear and smooth the joint with a wet finger.
Add volume to the dachshund's back and tail in the same way.
Use a toothpick to press oblong dents around the perimeter of the figure. Make them randomly of different lengths from the edges of the body to the center.
It's time to dry the workpiece in a warm oven. Bake it until it is completely firm.
The dry figurine needs to be painted. Cover all areas where there are bulges and dents with black gouache.
After the first coat of paint has dried, paint the dachshund yellow. Place a little paint on a foam sponge and tint the entire body, but the dents should remain black - do not overdo it.
Draw the eyes of the dried dachshund in white. Make any inscription you wish.
Glue a piece of rope to the back of the craft.
Cover the product with clear varnish and let it dry. The result of the work done is impressive - the mischievous puppy is ready.
photo: Olga Olefirenko
Dog with original coloring:
Boletus mushroom made from salt dough
You will need: salt dough, light bulb, paints, brush, foil, cardboard, masking tape, superglue, PVA glue, paper napkins, clear varnish, stack.
Master Class
- Cover the light bulb with tape, then cover it with dough and dry the workpiece.
- Cut a ring out of cardboard and place it on the light bulb as a base for the hat.
- Form a hat from crumpled napkins, then secure with tape.
- Wrap the hat with foil.
- Roll out the dough to a thickness of 5 mm and stick around the cap.
- Remove the cap from the stem, cover the bottom with dough and make stripes in a stack.
- Glue the hat onto the leg.
- Mold the mushroom's arms, legs and nose, then glue them on PVA.
- Make a caterpillar and glue it to the hat.
- Dry the figurine.
- Paint the figurine, then leave to dry.
- Cover the craft with varnish and wait until it dries.
Boletus mushroom made from salt dough is ready! I recommend watching this video!
Modeling from salt dough: Basket with mushrooms. Master class for adults and children.
New Year's toys
Usually buying Christmas decorations costs a pretty penny. If you want to save money, then use crafts made from salt dough. Find stencils of various shapes on the Internet and print them.
Sequins, rhinestones, beads and other bright details are used as additional decorations. By threading a rope through the toy, you can hang it on the Christmas tree.
Funny salt dough pigs
You will need: salt dough, paints, brush, foam sponge, stack, thin rope, toothpick, black helium pen, PVA glue.
Master Class
- Roll 2 balls for the snout and use a toothpick to make the nostrils.
- Make a muzzle, glue a snout and eyes above it.
- Make triangular ears, glue them, then mark stripes with a stack at the junction of the ears and head.
- Make a heart and glue it to the bottom side.
- Make indentations along the edge of the entire circle.
- Using a toothpick, make 2 holes on the top for attaching the rope and 2 holes on the bottom for the legs.
- Roll up the arms and glue them in such a way that they hold the heart.
- Make the hooves and make holes in them for the rope.
- Dry the workpieces.
- Paint the blanks with black paint and let them dry.
- Wash off the paint from the convex parts of the workpiece under running water with a sponge and wait until it dries.
- Prime the figures with a sponge and white paint.
- Color the piglets.
- Draw small details with a black gel pen.
- Cover the craft with varnish and wait until it dries.
- Glue wool threads as hair.
- Make a pendant out of rope.
Funny salt dough pigs are ready! I recommend watching this video!
Salt dough cat
Funny pig pendants
Beautiful paper crafts with a description of how they were made: a review of the most popular DIY crafts (120 photos)
Such cheerful pendants are an idea for an unusual Christmas tree decoration or a cute souvenir for people dear to you.
To work you will need:
- universal salt dough;
- knife;
- toothpick;
- thin rope;
- paints and brush;
- foam sponge;
- black gel pen;
- Super glue.
Form a flattened circle - a pig's body. Glue a smaller circle - a patch - into its center. Use a toothpick to press down the nostrils.
Roll two small balls and glue them above the patch - these are the eyes. Make ears from small triangles. In the places where they connect to the head, press the grooves with a knife.
Make a heart and glue it to the piglet’s body.
Use a toothpick to press indentations along the contour of the body.
Use a toothpick to make 2 holes on top for hanging and on the bottom for rope legs.
Roll two sausages with thickening at the ends - these are the legs. Attach them to the body so that the heart is in the pig’s hooves.
Make another pair of larger hooves. They will be attached to the body with a rope. Don't forget to make holes in them.
Dry the pieces in a warm oven. Already at this stage it turns out very beautiful.
Cover the blanks with black paint and let it dry.
Wash off the paint from all convex parts with a sponge under running water and leave the product to dry.
This procedure will make the figures more prominent and provide realistic contrast during subsequent painting.
Prime the figures with a sponge and white paint.
Using a sponge or brush, paint the piglets as your imagination tells you (so that the colors are not very bright, but pastel shades, mix the paints with white).
Use a gel pen to draw small details.
Glue the hooves to the body on a string; you can use woolen threads to create a hairstyle for the pigs. The last step is to attach the pendant to the crafts.
photo: Strelnik Lyubov
Hedgehog made from salt dough
You will need: salt dough, nail scissors, PVA glue, acrylic paints or gouache, brush, manicure polish.
Master Class
- Make an oval-shaped hedgehog body.
- Make an elongated tip.
- Make 2 small balls and glue them in place of the eyes.
- Roll the ball a little larger and glue it as a nose.
- Make needles by cutting the dough. The cuts should be made in rows, the needles should be placed in a checkerboard pattern.
- Dry the craft.
- Paint and wait until completely dry.
- Apply varnish and wait until completely dry.
Salt dough hedgehog is ready!
Salt dough is an environmentally friendly and affordable material. You can make your child’s favorite toy, food, fairy-tale character and much more. Have fun with your hands!
Making more complex toys
There are master classes that show that you can create more complex toys, figurines, or even entire compositions with your own hands. For example, try with older children to make a cute hedgehog or the whole hedgehog family.
- Since you will be working on a three-dimensional figure made of salt dough, you will need some kind of ball to create the body of the hedgehog. You can take wood, plastic or even foil, the main thing is that it is very dense.
- Cover it well with dough so that there are no holes anywhere.
- The eyes and nose of the hedgehog can be made from dough or you can use any available means (for example, large peppercorns).
- Using nail scissors, form needles on the back of the hedgehog (do row by row in a checkerboard pattern).
- You can also make fruits that your forest dweller will carry on his back.
- Then you should dry the hedgehog and decorate it. Cover the piece with clear nail polish to prevent the paint from fading and the appearance of the figurine from deteriorating over time.
In the same way you can make a sheep, an owl, and any other three-dimensional toy.
Master classes will help you create even entire paintings from salt dough, which will become not only an excellent decoration for your home, but also a wonderful original souvenir as a gift. It is better to sculpt pictures on fabric, foil or painted cardboard. When the craft is completely dry, paint it and varnish it.