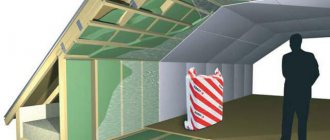
The main stages of laying insulation
The best installation option is to lay the floor insulation along the joists.
These cross boards are used for subsequent flooring. Logs for laying floor insulation
Main stages of work:
- The logs are installed on the finished foundation. The recommended distance between the bars is no more than 1-1.2 m;
- after this, thick plywood or chipboard sheets are installed. They are secured with self-tapping screws. This is how the base is prepared for laying the heat-insulating layer;
- Insulation is laid between the wooden joists. Depending on the material used, the thickness of this layer may vary. In any case, it should not exceed the size of the logs themselves;
- Next, a layer of waterproofing is laid. Although this step is recommended by experts for maximum results, it can be skipped. This is due to the resistance of some materials to moisture;
- Now you can lay the flooring. It may be old. Or it can be replaced with a new one.
Compliance with the specified sequence will allow you to insulate a wooden floor with penoplex or other insulation.
Insulation is placed between the joists
Features of sawdust insulation
Insulating the floor with sawdust is an environmentally friendly and affordable way to keep the house warm. When choosing this insulation, you must adhere to a number of recommendations:
- Broken glass should be added to the prepared mixture of sawdust and cement or clay. This will prevent rodents from appearing. Do not forget about the use of special solutions;
- the mixture consists of five parts sawdust, one part cement (clay) and half water. This proportion must be observed. When mixing a steeper solution, you will get durable insulation, but with a low thermal conductivity coefficient;
- carefully fill the voids between the joists. This will allow you to get an even layer of insulation. If you do not maintain this technology, the thermal insulation will be “leaky” and the floor will remain cold.
When insulating the floor with sawdust, you can save a lot
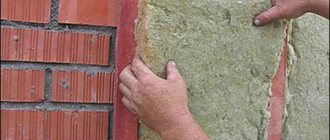
Features of penoplex insulation
Due to its high strength and affordable cost, floor insulation with penoplex in a wooden house is more common than other materials.
Among the installation features of this insulation, we note the following points:
- penoplex is laid between the joists and attached to the floor from below with assembly glue;
- It is necessary to accurately and tightly fit the edges of the slabs. This will prevent cold air from entering;
- the joints are additionally glued for maximum adhesion;
Penoplex must be secured with mounting adhesive
laying a waterproofing layer is required
This is especially important for a private house or cottage in a swampy area; Before laying penoplex, wooden beams and crossbars are treated with a special solution. This will avoid rotting and the appearance of bugs.
Due to its light weight, penoplex is excellent for insulating floors in a frame house. The load on the foundation of the building will be minimal. This will prevent the house from shrinking over time.
The main points of insulation with expanded clay
This insulation is installed according to the technology described above. However, there are a number of features that you need to know. To insulate the floor in a wooden house with expanded clay, you must:
- be sure to lay a cushion of sand. It is poured in an even layer and compacted thoroughly;
- A layer of liquid mastic is applied on top of this pillow. It plays the role of waterproofing;
It is necessary to put a metal mesh on the expanded clay for leveling
- Now expanded clay is poured. To ensure that the layer is as even as possible and without voids, it is recommended to use a material of different fractions. This will allow the granules to fit more tightly to each other;
- a vapor barrier is required. Only after this can the main floor covering be laid.
Due to the noticeable weight of this material, insulating a wooden floor with expanded clay is best done with a solid foundation.
Do-it-yourself options for floor insulation in a private house and country house
The basic technological methods used for floor insulation always apply. But, depending on the location and design of the floor, some additions or special work techniques are used. Let's take a closer look at them:
Insulation of the floor above the low underground
Procedure:
- the rough flooring is dismantled to gain access to the joists
- Supporting bars are hemmed along the lower edge of the lag , on which boards are installed to form the flooring
- a sealed layer of vapor barrier is laid , completely separating the supporting structures from the insulation. The film is laid overlapping, the joints are glued with connecting adhesive tape
A heat insulator is placed tightly in the gaps between the joists. You can use mineral wool, expanded clay, polystyrene foam and other available materials.
- another layer of hydro-vapor barrier is laid on top of the insulation , preventing the penetration of moisture from above
- subfloor decking installed
- finishing coating is being laid
Insulating the floor above a high cellar
Insulation of the floor above the cellar is necessary to prevent condensation of moisture abundantly contained in the basement air. The best option would be to install a moisture-impermeable insulator on the basement side, cutting off the floor material from contact with the cellar air. This method will increase the floor temperature and preserve the performance of the floor materials.
If there is no access to the ceiling from the cellar, or it is limited, then you will have to proceed according to the usual scheme and insulate the floor from above, laying insulation between the joists.
Double floor insulation
A double floor is a two-layer system consisting of a subfloor, a joist system, and a finished tongue-and-groove plank top deck. The owner's task is to fill the gaps between the rough and finishing flooring with a layer of insulation .
To do this, you need to remove the top layer of boards, lay a hydro-vapor barrier film, install a heat insulator tightly in the spaces between the joists, lay a second layer of vapor barrier and re-install the finishing flooring.
How to insulate a house with a basement?
Insulating a house with a basement involves fully insulating the basement itself .
An integrated approach will be required, organizing high-quality supply and exhaust ventilation, insulating walls and ceilings, and, if possible (there is no moisture), organizing heating of the basement.
If you only insulate the floor, the problem will not be solved , since the walls and other surfaces will condense moisture, which will sooner or later penetrate into the floor material. Therefore, complete insulation is required using moisture-impermeable materials (foam plastic, polyurethane foam, polyethylene foam, etc.) and the creation of a ventilation system that removes moist air from the basement.
Insulation of the floor in a house standing on the ground
Important! Insulation of floors laid on the ground must be carried out without fail. According to SNiP standards, for an unheated floor the insulation layer must be at least 10 cm (in a temperate climate), and when using a heated floor system - at least 15 cm.
Before installing the ceiling, you should create a drainage layer of backfill made of fine crushed stone, on top of which clean river sand is poured. If possible, pour a layer of screed 3-5 cm thick. This will help form a flat and rigid platform for laying vapor-waterproofing.
The insulator is laid in . It is not recommended to use one layer of thick material; it is better to take a pack of thin layers with overlapping joints between individual slabs of material.
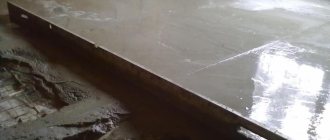
Then a layer of screed is poured, forming the main load-bearing slab . If you plan to make a wooden floor, then the logs are installed on the frame beam along the foundation , and an additional layer of insulation . Then the subfloor boards are laid and the finishing coating is installed.
Errors
If we insulate the floor and ceilings correctly, this will ensure a long service life of all materials used without any unpleasant stories in the form of moisture accumulation or cold penetration. A typical mistake made by beginners is inattention when following the stages of laying materials, which can lead to their premature wear and the need to start all over again.
To prevent this from happening, it is important not to forget which layer of the “pie” follows which, especially if a novice master is doing this for the first time in his life
If you want to provide not only thermal insulation, but also enhance the sound-absorbing properties of the “insulation pie,” it is important not to forget to add two plywood layers to it, which will ensure the creation of a good sound barrier. If expanded clay is used as the main material, during the course of work it will be necessary not to lose sight of an important part of the structure in the form of a concrete screed, which will prevent its premature shrinkage and protect it from excessive moisture absorption
Instructions for organizing installation work
Do you want to know how to insulate the underground in a wooden house? First of all, familiarize yourself with the general rules for performing installation work. Any insulation is fixed in this order:
- creation of a waterproofing layer;
- formation of thermal insulation;
- applying vapor barrier material;
- attaching structural elements of the floor;
- laying decorative floor coverings.
Experts assure that when the layers are formed in this order, the thermal conditions will be optimal and it will be possible to ensure the necessary circulation of moisture in living rooms.
When thinking about thermal insulation on the ground floor, it is necessary to prepare beams with a cross section of 50-100 mm. These elements are attached from below using a layer of insulation, after which the floor is covered with boards.
If there is a wooden floor on the ground floor, the beams are connected to bars, the cross-section of which is 50x50, not more than 50x100. A layer of insulating material is placed between them. After the waterproofing layer, sheathing is done with boards.
Most often, the installation of the heat-insulating layer is carried out along joists:
lay the logs on the finished foundation, maintaining certain gaps between the beams - about one 1 m, maximum 1.2 m; fasten sheets of chipboard or plywood with self-tapping screws, as a result you will have a base for applying a layer of insulation; distribute insulation material between the joists. Determine the appropriate thickness of the insulation taking into account its features, but remember that the insulation material should not be thicker than the log;
form a waterproofing layer. Experts advise going through this stage to achieve the best possible results.
You can skip it, but before abandoning this stage, pay attention to the features of the selected material. If you purchased insulation for installation that is unable to repel moisture, it is still worth forming a layer of waterproofing;
install the flooring
You can use the old version or update the coating with new material.
When insulating the floor from the basement below and in other parts of the house, follow the specified sequence of actions.
Do-it-yourself floor insulation. Step-by-step instruction
When the heat insulator for the floor has been selected, you can begin insulation. The process consists of several stages:
- Removing old flooring.
- Surface treatments.
- Installation of wooden logs.
- Laying waterproofing.
- Installation of heat insulator.
- Laying waterproofing film.
- Installation of wooden boards.
- Finishing flooring.
Work begins with dismantling the old floor covering. This is done in order to properly process the wooden floor. Then the floor is carefully inspected for cracks. If necessary, you need to dilute a small amount of putty and apply it with a spatula to the chips and cracks. After this, the tree is treated with an antiseptic.
After the antiseptic has dried, wooden logs are installed, which also need to be pre-treated. The logs will be attached perpendicular to the narrow side of the room. The distance between them should be equal to the width of the insulation sheets. It is recommended to make a margin of 2 cm, because the waterproofing will still be installed. If it is a bulk material, then a distance of about 80 cm can be provided. The bars are screwed to the floor with wood screws.
Then a layer of roofing material is laid on the floor. It should extend 20 cm onto the wall on all sides. After this, the space between the joists is filled with insulation. If necessary, the material is trimmed with a construction knife.
A vapor barrier film is placed on top of the heat insulator. Thin wooden boards are placed on top of the film in those places where the logs are installed. Due to this, an air gap will be provided, and the film will fit tightly to the heat insulator.
Only after this can you begin installing wooden boards. They are attached to the top of the joists with self-tapping screws. The second floor also requires treatment with an antiseptic.
In some cases, such a floor is left in this form without further covering. Wooden flooring makes the atmosphere in the house more comfortable and homely. But this material is susceptible to rotting, so it is recommended to protect it.
To do this, you need to cover the joints (where the screw heads are recessed) with putty. The color of this material matches the wood. After the material has hardened, the floor is varnished.
Installation of different types of thermal insulation
Options for thermal insulation are offered that differ in the technological process (spraying and laying insulation).
Spraying of polyurethane foam
Before starting work, it is necessary to dismantle the floor covering. The rough foundation and logs should remain.
Step 1. It takes specialists about an hour to prepare the equipment for work. The future foam (polyol) and hardener (isocyanate) are mixed under high pressure (150 atmospheres). To insulate the floor, a closed-cell material is used that is not afraid of moisture (open-cell polyurethane foam is more suitable for insulating interior partitions).
The future foam is mixed with a hardener
Step 2. It is better to cover surfaces that are valuable (to a height of about 0.5 meters from the floor along the entire perimeter), since during work the finely dispersed mass can stain objects and cladding.
Sockets are covered with film
Step 3. The flooring begins. Work must be carried out in protective suits and masks (only half an hour after application the foam becomes completely harmless).
Floor pouring begins
It is necessary to ensure that no open cavities are left. The result is a monolithic base made of foam insulation.
Monolithic PPU coating
Step 4. The room must be ventilated. What needs to be done after the foam has hardened? Clean it off the beams. After this, the finishing coating can be laid. If excess polyurethane foam has formed, it can be removed with a regular stationery knife.
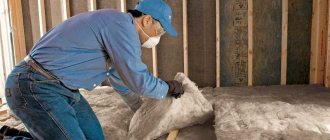
Laying mineral wool insulation
Such work is completely within the capabilities of every home owner. This is the floor that needs to be insulated (there is no finishing coating, but if it is present, it will have to be dismantled).
This floor needs to be insulated
Step 1. All joists and rough boards must be treated with an antiseptic.
Step 2. A vapor barrier is laid on the surface of the rough base. The canvases should be placed overlapping (if there is no moisture penetration from below, you can skip this step). If you attach the material with double-sided tape, this will ensure the tightness of the coating.
Laying vapor barrier material
Step 3. Insulation will be made of mineral wool 5 cm thick, laid in three layers. The first layer is made of rolled material to minimize the number of joints. It needs to be cut using a construction knife so that it fits tightly between the lags (it is recommended when cutting to ensure that the width of the thermal insulation is about a centimeter greater than the distance between the lags). Having straightened out, it will fill the entire space.
Mineral wool is laid between the joists
Step 4. Next, the slab material, cut to width, is laid.
Mineral wool in slabs
During installation, the offset of the slabs of adjacent rows must be observed. This must be done so that the seams are located at a distance from each other. Thus, the thermal insulation characteristics of the coating will be higher.
Thermal insulation boards laid
Of course, it is easier to work with slabs, they are denser, and easier to lay.
Step 5. A vapor-waterproofing membrane is also overlapped on top (smooth side down). A construction stapler is perfect for securing. The coating should extend slightly onto the walls of the building.
The membrane should extend slightly onto the walls
It is recommended to secure the edges of the membrane to the walls with double-sided tape (the protective film is then removed).
The edges of the membrane are fixed with double-sided tape
The floor is ready for finishing.
You can start finishing
Wooden houses are always associated with comfort. However, for your home to be truly comfortable, you need to take care of its insulation. Thermal insulation of the floor is the most important step, which is usually performed immediately after the construction of the structure.
First or basement floors
In principle, the material of the walls does not in any way affect the choice of thermal insulation for the floor, but what matters is the floor on which it is located and the base on which it will be installed. Indeed, in a wooden house there may be a basement floor in which the floors are made either on the ground or on a foundation slab. If the house is built without a basement, then in addition to these two design options, a third one, with a frame-type floor, can be used. It is in accordance with this that the thermal insulation material is selected.
Floor on the ground in a frame house - a semi-dry underlying layer of expanded clay is used as insulation
Structural insulation
Whatever one may say, when the floors of the first floor are poured with concrete, it is always better. The design is more durable, mice do not get in it, and it is easier to seal. As for the thermal efficiency of such a base, it can be achieved not only due to the insulating material laid under the rough screed or mounted on top of it, but due to the composition of the concrete itself.
These can be mixtures with light filler (expanded clay, polystyrene chips), on the basis of which the entire floor slab can be made. Expanded clay concrete is quite heavy (but also more durable) and is usually poured on the ground, but polystyrene concrete can also be poured on a type-cast base made of OSB or DSP boards.
Warm concrete base with polystyrene filling
Filling on polystyrene foam
Screed for underfloor heating pipes
Prices for heating cable and components
Heating cable and accessories
If you use thermal insulating foam concrete, the density of which is not enough for arranging the base, then a screed from it can be poured over a base made of heavy concrete (for example, if the house is built on a slab foundation), and another layer of polystyrene foam can be laid under it.
Note! For pouring on a soil base, porous concrete is taken of a higher grade, and it must be reinforced with polymer or fiberglass fiber.
Fiberglass fiber
In general, due to the high hygroscopicity of wood, in such houses it is better to avoid wet work after the walls have been erected. However, floors on the ground can be completed before the frame begins to be assembled. True, this can only be done if you are sure that the house will be erected and covered with a roof during the summer season.
Floors on a subgrade can be poured before the walls are erected
But the structures of frame houses, which are made of glued or modified material, are not particularly afraid of humidity. In them, rough foundations are most often made of lightweight concrete using the wet method, which is especially important when laying a heating water circuit.
In this case, an additional layer of polymer insulation is laid underneath, as shown in the diagram below. This is perhaps the surest way to achieve a consistently comfortable floor temperature, regardless of the climatic conditions of the area.
Expanded polystyrene, warm screed and heating pipes in the floor pie
Expanded clay and other bulk materials
And yet, if a wooden house is built on a strip foundation, the floors most often begin to be made after the box has been placed under the roof. Bulk materials are often used to insulate them. The leader here is expanded clay, which is granules of expanded clay.
Using the same principle, granular insulation is made from other natural raw materials: clay-containing rocks (agloporite is obtained), mica containing water in its structure (the material is called vermiculite), volcanic glass (an insulation called perlite). All of them can be used both as fillers for concrete and as independent thermal insulation materials.
Expanded clay backfill
Prices for aluminum rule
Aluminum rule
Vermiculite granules
Foam glass
Foamed polystyrene crumbs
Among the bulk insulation materials there are also granulated silicate glass, penoizol crumbs and polystyrene foam balls, which, due to their low weight, are often poured inside floor frame structures. However, expanded clay is cheaper and more accessible for any provincial areas, so we will talk about insulation technology with it in mind.
Combined floor insulation in a frame house
The dry insulation method most often involves combining two types of insulation: fine granular bulk material and expanded polystyrene or mineral wool slabs. We invite you to see what this might look like using a log house as an example.
Table 1. Floor insulation in a frame house.
| Steps, photo | Description of stages |
| Since the decision was made to install frame floors in this house, logs made of edge-mounted boards were immediately installed along the lower crown of the log house. The first thing to do is to thoroughly treat them with an antiseptic. |
| Then, small cross-section bars are mounted on the sides of these boards, on which wood boards will rest - the basis for laying mineral wool insulation. |
| The bars also need to be treated with an antiseptic. |
| There is open ground under the beams. To prevent grass from sprouting, it is covered with an airtight roll material with a slight overlap on the walls. In this case, it is hydroglass insulation. |
| The foundation is quite high and protrudes above the ground surface by no less than 50-60 cm, forming a rather impressive space under the future floor. Part of it (about 10 cm in height) is covered with dry expanded clay. Such a layer will not only prevent grass from sprouting and moles from digging in the ground, but will also serve as an additional thermal insulation layer. |
| At the next stage, the base for laying the slab insulation will be installed. In this case, OSB boards are used for this purpose, which are cut to the size of the cells. |
| The slabs are laid between the lags, resting their side faces on the cranial bars. |
| The bottom of the structure, together with the logs, is covered with rolled waterproofing. |
| Rigid mineral wool slabs are placed in the cells formed by the joists, flush with their upper edge. |
| The next stage is filling in fine-grained expanded clay. But in order to ensure its uniform thickness, beacon profiles are first set... |
| ... after which expanded clay backfill is carried out and distributed according to the rule. |
| GVL sheets are laid on top of the bulk layer. At the ends they have quarters, which are coated with glue, combined, and then connected with self-tapping screws. If desired, GVL can be laid in two layers - and the multilayer insulated subfloor is ready for finishing cladding. |
Prices for expanded clay
Expanded clay
This is just one possible interpretation of the ground floor floor pie. Variations may be different - including other types of rough coatings. It is only important to remember that the more layers of insulation are installed, the more comfortable your floor will be in terms of heat retention.
Find out how to make permanent formwork from polystyrene foam, and also read the assembly instructions in a special article on our portal.
For example, two or even three layers of mineral wool can be laid between the beams, and the subfloor should not be made of floating gypsum plasterboard, but plywood can be mounted directly over the joists.
Find out how to insulate the floor in a wooden house from below, and also check out the insulation options, how and what to insulate, in a special article on our portal.
Three layers of insulation
Video - Dry screed in a wooden house
Video - Installing a floor in a wooden house
What material to choose for insulation?
Before you start studying the properties of existing insulation materials, remember: it is recommended to carry out thermal insulation work only after the wood shrinks, i.e. no earlier than six months after the construction of the structure. Otherwise, shrinkage may damage the insulation.
Insulation for a wooden house
When choosing a material for floor insulation, you need to pay attention to the following insulation characteristics:
- thermal conductivity;
- resistance to moisture;
- installation method;
- thickness;
- weight;
- fire resistance;
- life time;
- environmental friendliness;
- price.
In the case of wooden structures, characteristics such as fire resistance and service life are of greatest importance.
Modernized insulation materials
Mineral wool
Excellent material for floor insulation.
Mineral wool
Advantages:
low thermal conductivity; good fire resistance. Mineral wool successfully prevents the spread of flame; high noise insulation properties; vapor permeability
Mineral wool “breathes,” which is very important when it is used to insulate wooden surfaces; ease of arrangement; good environmental friendliness.
It is produced in the form of mats and rolls, which gives you the opportunity to choose.
Mineral wool
The main disadvantage of mineral wool is its low resistance to water.
When in contact with moisture, the insulation is deformed and loses its quality characteristics, so special attention must be paid to the arrangement of the waterproofing layer
| Those. characteristics of mineral wool | Indicators |
| Density | 115 kg/m3 |
| Water absorption at full immersion, no more | 1% |
| Average fiber diameter, no more | 0.2 µm |
| Content of non-fibrous inclusions in the mass, no more | 4,5% |
| Thermal conductivity at 283+1 K, no more | 0.044 W/m*K |
| Shear strength, not less | 50 kPa |
| Compressive strength, not less | 100 kPa |
| Tensile strength, not less | 150 kPa |
"Dry screed"
Dry screed
An excellent option for floor insulation in a wooden house. It can only be used after the wood has gone through the shrinkage process. The screed is made on the basis of gypsum fiber.
The structure of a dry screed
Key benefits:
- high thermal insulation performance;
- resistance to fire;
- ease of installation;
- Possibility of use in combination with any finishing floor coverings;
- small thickness;
- good noise insulation performance.
The main disadvantage is the relatively high cost. A twenty-kilogram bag of mixture is enough to insulate no more than 1 m2 of surface.
The material also does not tolerate moisture well. Because of it, it is deformed. Such deformation does not affect the thermal insulation properties of the material in any way, but the finishing floor covering may deteriorate.
Glass wool
Glass wool
Popular material for floor insulation. The advantages are as follows:
- non-flammability;
- ease of arrangement;
- environmental Safety.
The main disadvantage is significant shrinkage. In just a year of service, a meter strip of glass wool can decrease by 10-15 cm. As a result, the integrity of the thermal insulation layer is compromised. Disadvantages also include poor resistance to water and not the best thermal insulation properties.
Styrofoam
Structure of polystyrene foam PSB-S 35
One of the most popular insulation materials. It features an optimal ratio of cost and quality.
The material does not deform under the influence of temperature changes and high humidity. Even with a relatively small thickness (up to 10 cm), polystyrene foam provides high-quality thermal insulation.
The main disadvantage is fragility. In order for the material to last as long as possible, the arrangement of the insulating “pie” must be done perfectly.
Characteristics of foam plastic
Expanded polystyrene
Expanded polystyreneTechnical characteristics of extruded polystyrene foam boards
This insulation has many advantages, including:
- resistance to fire, moisture and temperature changes;
- incredibly low thermal conductivity;
- high noise insulation properties;
- excellent strength.
The main disadvantage is the relatively high cost.
Comparison of insulation materials
Rules for floor insulation
Floor insulation is carried out to create a comfortable environment in the house and to increase the service life of the flooring material. Errors made during construction or during design work can lead to the formation of condensation, which quickly destroys wooden and concrete floors and impregnates the backfill of the dry screed and the base underneath it. This circumstance is the real reason for insulation, since the temperature can be increased using simpler methods.
At its core, insulation is stopping the process of moisture condensation by changing physical conditions.
What and how to insulate floors?
Floor insulation is carried out using heat-insulating material . Depending on the design of the floor and the availability of access to one or another side of the slab, one or another insulator is installed. The specific design of floors allows the use of bulk types of insulation, which significantly expands the list of possible materials and installation options.
Most often, only installation from above , but in some cases, insulation is available from the bottom of the slab , which allows you to choose the most suitable method for a given case.
Selection of insulating material
The choice of thermal insulators is influenced by various factors:
- possibility to raise the floor level . A layer of insulation plus a flooring above it - in total the floor level will rise by at least 8 cm, which is quite a lot, especially in small houses. For northern regions, the recommended layer of thermal insulation on the 1st floor is 20 cm, which must be taken into account when choosing material
- installation method . There are slab, roll, and bulk types of insulation. Some home owners use loose insulation mixed into a layer of screed, simultaneously insulating the floor and leveling its surface
- material price . The costs of insulation are quite high, if there is an opportunity to save somehow, it should be used
The choice of material is quite wide; you can use inexpensive, proven types, or purchase modern materials created taking into account accumulated experience and knowledge.
Budget insulation, prices
Budget types of insulation include:
- sawdust - from 250 rub. per m3
- slag - from 400 rub. per ton
- expanded clay - from 1200 rub. per m3
- mineral wool and its varieties - glass wool, slag wool - from 98 rubles. per sq. m
- polystyrene foam - from 360 rub. per sheet
The cost of each material is relatively low; sawdust can be obtained practically for nothing. Polystyrene foam is more expensive, mineral wool is even more expensive. Purchasing expanded clay will require an amount corresponding to the size of the fraction; the larger the granules, the more expensive the material.
Knowledgeable people advise using the cheapest possible insulation, but selecting it in such a way that it ensures the safety of the ceiling and completely solves the problem assigned to it.
Modern high-tech insulation materials, prices
If you decide to fork out the cash but install modern, high-quality material, then you should pay attention to the following options:
- vermiculite - from 5500 rub. per m3
- penoplex - from 1000 rub. per package , 1185*585*50 mm
- Isovent - from 570 rub. per package , 1000*500*50mm (4 m2)(0.2 m3)
- thermolife - from 316 rub. per package , thickness 20 mm
- Ursa - from 306 rub. per package , 1000 mm x 600 mm x 50 mm (6 m2=0.3 m3) (10 pcs)
Attention! It’s worth mentioning polyurethane foam, which is capable of creating a sealed and completely impenetrable layer of insulation for water or steam. The material is expensive and requires the participation of specialists with application equipment, but the result is almost perfect.
When choosing expensive and high-quality material, you should consider only imported types from the most well-known manufacturers. In this matter, it is very easy to encounter deception when, under the guise of high-quality insulation, they try to slip in a cheap junk product. You need to ask the seller for certificates of quality and conformity ; you should not be embarrassed to check his words. The prices for such materials are very high, at least twice as expensive as Russian or Chinese insulation materials.
What is needed for insulation
There are enough options for floor insulation, let’s look at the most popular and inexpensive ones:
Expanded clay
There is quite a lot of controversy about the advisability of its use. Arguments against using it as insulation - it is difficult to obtain a layer of uniform thickness and density. Plus, you will have to spill the backfill with cement mortar, and this will cause dust and dirt.
The first problem is solved automatically if you purchase expanded clay with granules of different sizes. In this case, the heat-insulating layer turns out to be quite dense and durable. It’s difficult to say about the second judgment. It all depends on how and with what you plan to decorate the final coating. Therefore, one cannot deny a priori the possibility of using expanded clay for floor insulation in a private house.
Foam plastics
A whole group of materials, divided into several modifications, depending on the manufacturing technology. Basically, owners focus on the so-called “clean foam.” Even if the finish is hard, then, in the author’s opinion, it is not advisable to use it for several reasons.
First. Second.
To reduce heat loss through the floor, it is worth using polystyrene (extruded). Its slabs practically do not absorb liquids and are durable, so working with it, as those who have encountered this product say, is a pleasure.
Polyurethane foam
Also slab material. Unlike the above insulation, the products are reinforced. Just not with the usual meshes, but by adding some components to the original mass. This is mainly crushed aluminum and fiberglass.
Minerals
So we are talking about insulating floors in a residential building, either ecowool or stone. The range of products is so impressive that you can choose exactly what you need based on size, thickness, design (rolls or slabs). But if the insulation of floors in a private (or in any other) house is done with mineral wool, then you will have to think about a hard finishing, mounted on a special frame - the material is elastic and easily pressed.
How to insulate a concrete floor in a house
If you are wondering how to insulate the floor in an old wooden house where the floor is made of concrete, check out the step-by-step instructions:
- Create a multi-layer base that will provide reliable protection for the insulation. In no case do not abandon the waterproofing layer, since concrete allows moisture to pass through well, and it will gradually transfer to the layer formed for thermal insulation.
- Make a sheathing consisting of metal or wooden slats. Lay the resulting frame (this step is required when implementing the classic version of floor insulation from below using mineral wool).
- Having cut the insulation into strips of the required size, install it into the cells by surprise.
- Next, proceed to organizing work aimed at protecting the heat-insulating layer from fumes.
- Place a counter-lattice and plywood or other material of the same type on top of the vapor barrier film (without the use of lathing, the work process goes faster, but later difficulties arise associated with installing the sheathing).
Sawdust floor insulation technology
Consider an economical option using sawdust. The work is carried out before the flooring is laid.
Before insulation, treat the sawdust with a special antiseptic and dry thoroughly.
By doing this you can protect the material from mold and rodents.
When the insulation is ready for use, use a shovel to evenly distribute slaked lime into it. To determine the required amount of this material, focus on the amount of sawdust (you will need 1/10 of the insulation taken).
At the next stage, be sure to add gypsum, it will add strength to the thermal insulation material. Maintain a ratio of 17:2:1 (sawdust: lime: gypsum). After adding water, prepare a moderately cool solution.
Fill the cells gradually, placing the solution in small portions.
Insulation of floors with mineral wool
Make sure the boards to be treated are dry. If not, dry them thoroughly first.
Create a layer of waterproofing, then lay mineral wool, having previously cut it into pieces of the required size. Use thin stainless steel wire and staples as fasteners. The wire can be replaced with plastic mesh. The thermal insulation layer will protect against steam using a special membrane.
Floor insulation with penofol
Install the insulation so that its reflective side is directed downwards, that is, towards the warm space.
Attach the insulation to the joists, maintaining a small gap between it and the rough surface. Secure the material with slats, filling them in a perpendicular direction, or with construction staples.
Insulation of basement floors
If the house has a basement, the process of increasing the thermal insulation properties of coatings should begin with this room, since heat loss is the highest in it.
If you want to know how to insulate a floor without opening it, consider this procedure:
- prepare small-thick wooden slats and securely attach a film that provides a vapor barrier to the ceiling lining. Make sure that the overlap is 10 cm;
- When filling wooden blocks, keep gaps between them that correspond to the size of the slabs with which you plan to insulate;
- place insulation boards into the cells, secure them securely with slats or wire mesh;
- Attach boards on top of the insulating layer.
The process of insulating the floor is quite simple and can be done independently. The choice of material remains with the consumer. Consider all the options presented and choose the one that suits your case best.
How to properly insulate a concrete floor
Many people think about how to insulate a concrete floor. To choose, you need to take into account:
- type of building - private house, country house or apartment;
- floor location in the building;
- installation method - insulation or installation of a heated floor system (electric, water or infrared);
- technology for carrying out work - in logs or screed;
- estimated price of building materials.
Regarding the method of laying thermal insulation, two fundamentally different methods are used - dry installation and “wet” method. The first is suitable when the installation of concrete on the floor covering has already been carried out. Performed according to the standard scheme. Vapor barrier, insulation, slats, and finishing coating are laid. The second involves installing thermal insulation under the screed during construction.
How to insulate floors in a wooden house from below, depending on the type of foundation
How to insulate the floors in a wooden house from below, the choice of insulation depends on the type of foundation and floors of the first floor. For thermal insulation of the floors of the first floor of houses made of timber, logs, frame panels or other types of lumber, insulation materials that are moisture-resistant, possibly breathable and comply with sanitary and fire safety standards are used. They have the necessary characteristics:
Optimal results are achieved when placing the insulating layer at the bottom. With this design, the height of the ceilings inside the premises is not reduced, the lower crowns, ceilings and beams of the first floor are protected from freezing, and the dew point is shifted to the floor surface.
The latter makes it possible to reduce the risks of developing putrefactive processes to a minimum; with the correct laying of layers of insulating cake, the floors in a wooden house do not need to be updated for decades.
The choice of insulation depending on the type of foundation and floors of the first floor
The technology and materials of insulation primarily depend on the type of foundation of the house or bathhouse. In particular:
• Floors in buildings with hanging grillages of a pile or columnar foundation are insulated exclusively along the beams, using any breathable heat insulators, such as stone or mineral wool, including bulk materials, provided that double flooring is installed and the layer is protected from moisture, the accumulation of internal condensation and blowing out. With an unlimited budget and a high raised grillage, the simplest and fastest way to insulate them is to spray polyurethane foam between the beams.
• Wooden houses with strip foundations are insulated along the ground or along beams. In the first case, preference is given to compacted polystyrene foam or EPS, in the second - mineral wool, stone wool or bulk insulation (foam glass, closed polystyrene foam chips, ecowool, sawdust granules).
• Floors with foundations with a low or recessed grillage are insulated in the same way as strip structures.
• Slab types of foundations are, if possible, insulated with extruded polystyrene foam at the laying stage. Underfloor heating systems (water pipes or cables laid during the concreting stage) and rolled thermal insulation materials (cork, foamed polyethylene) also help to reduce the level of heat loss in such houses.
• Wooden houses with a crawl space are insulated from below using sprayed polyurethane foam, roll insulators, EPS or hydrophobized mineral wool. In such cases, slab materials are held in place by a counter-lattice.
Why do you need to insulate the floor in a wooden house from below?
Insulation of wooden floors in a private house is technically correct to carry out from below, which is due to a number of reasons:
this avoids changing the size of the room in height on the first floor;
Insulation of floors protects the house from freezing
- no need to choose rigid insulation that can withstand the weight of furniture and home appliances;
- in this way the owner protects the entire wooden floor from freezing;
- the line of condensate settling outside the structure is reduced. This helps prevent rotting of the entire house.
Nuances of floor insulation in the house
The choice of materials and methods of floor insulation in a house depends entirely on the design features of the structure, individual capabilities and preferences of the owner. The nuances of installation and the specific operation of the wood itself must be taken into account.
Houses made of wood can be:
- frame type;
- on screw piles;
- on a strip foundation;
- on a pile foundation.
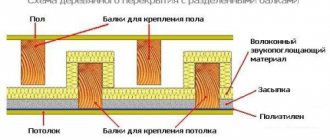
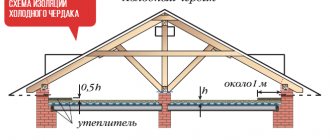
Scheme of floor insulation in a wooden house: 1 - beams (joists), 2 - cranial block, 3 - subfloor boards, 4 - glassine or lutrasil, 5 - backfill of shavings or sawdust, 6 - filling with lime mixture, 7 - finished floor boards
Regardless of what type of structure it has, the insulation of a wooden floor in a private house has common specific nuances:
- the use of waterproofing is a must. This will prevent the boards from swelling. The best material for waterproofing is one-sided fiber;
- To ensure heat in the room, it is necessary to do two-layer insulation of the wooden floor from below in a private house. In such buildings, the flooring consists of boards tightly fitted to each other. This material is constantly exposed to changes in temperature and moisture. Therefore, wood for flooring must be treated with special means;
- the performance characteristics of the insulation should not change upon contact with wood.
All of the above points must be observed when insulating the floor in a country house or in a private country cottage.
Floor insulation in a wooden house
To insulate the floor in a wooden house, in most cases, mineral wool is chosen. To carry out insulating work you will need the following tool:
- hacksaw or parquet saw;
- electric drill;
- building level;
- plane;
- drills of different diameters;
- hammer;
- sharp knife;
- roulette.
The entire list of works boils down to the following:
- Creating a subfloor from chipboards or boards, laying waterproofing.
- Installation of wooden bars (logs).
- Laying the selected insulation, in our case mineral wool.
- Installation of flooring.
At the initial stage of work, it is necessary to remove the old coating and correct unevenness on the base. After leveling the surface, a subfloor is created from waste softwood boards. The croakers are fitted tightly and then treated with an antiseptic. If you do not use the specified impregnation, the joists and wooden boards will rot after 5-7 years of use. All elements are fastened together using screws or nails.
At the next stage of work, a metal mesh with a small mesh size is laid on the rough coating. Next, this structural element is sprinkled with a thin layer of expanded clay (about 4 centimeters). This material will not only press down the mesh, but will also create the necessary ventilation gap between the insulation and the subfloor. Waterproofing, roofing felt or plastic film is also laid underneath.
Bars or joists are laid on the waterproofing of the rough wooden floor. They are attached to the surface every 80-100 centimeters using nails or self-tapping screws. One or several rows of mineral wool are placed in the space formed between these elements. The insulation is installed with overlapping joints, so that no gaps form between the slab and the joists. Next, the waterproofing is installed, which is attached to the base using staplers.
Milled boards are used as the finishing floor covering, connected to each other using a tongue-and-groove system. These elements should have the same thickness within 4...5 centimeters, while their width ranges from 10 to 13 centimeters. A special longitudinal recess is made at the bottom of the boards for air circulation under the floor covering. Where the boards adjoin the walls, a structural gap of 1-1.5 centimeters is left. In the future, this gap will be covered with a plinth.
Thermal insulation of a wooden floor on joists with an underfloor
Buildings and structures designed for constant use in winter require more thorough floor insulation. At the same time, quite often used for thermal insulation purposes:
- mineral wool,
- insulation from waste wood,
- ecowool,
should be reliably protected from moisture. It cannot be placed directly on the ground surface, even using polymer roll waterproofing. In addition to capillary suction of water from below due to temperature differences, condensation can accumulate in it. Drops of moisture, retained in microchannels or pores of the heat-protective layer, significantly reduce its effectiveness.
Therefore, at high groundwater levels, it is recommended to raise the frame structure, including floor insulation on joists, above the ground surface by installing a ventilated subfloor. The supports of the frame can be any sufficiently strong pillars with a height of at least 30-50 cm made of non-rotting materials, as well as wood impregnated with antiseptics and hydrophobes.
To reduce humidity in the underground space, it is advisable to cover the soil surface with plastic film. The panels are laid in an overlap of 10-15 cm, sealed with wide tape at the seams. If the supports are monolithic blocks of porous concrete, it is recommended that they be installed directly on the film. Gaskets under the logs made of 2-3 layers of bitumen-impregnated roofing material are placed on the heads of all types of pillars.
In addition to ground waterproofing, it is necessary to install a barrier of breathable waterproofing (membrane) at the bottom of the wooden floor insulation frame. Vapor-permeable material is laid in such a way as not to prevent moisture from escaping from bulk or fibrous thermal insulation. The underground space receives 2 layers of protection at various levels, not only from moisture, but also the migration of soil radon gas into the living space is reduced.
If you plan to use sealed insulation for a wooden floor - medium or high density polystyrene boards, foil thermal insulation based on foamed polymers (isolon, penofol), then there is no need for a breathable membrane barrier.
Making the base:
- for the base for the supports, you need to choose soil 30-50 cm deep, and the width dimensions are 10-15 cm larger than the column. Fill the pit with sand and gravel mixture and compact it;
- Place supports on the formed pillows. Their step is taken to be no more than 2 m along the span (along the log);
- the heads of the pillars should be leveled in a horizontal plane using patches of cement-sand mortar. If the thickness of the mortar exceeds 3 cm, then it is better to reinforce it with a metal mesh, for example a masonry mesh;
- Lay waterproofing sheets (2-5 cm wider than the posts) on top of the hardened blotches, onto which you already mount the logs. The pitch between the lags depends on the rigidity of the entire structure: the material used for floor insulation, the thickness of the lag, the type of finishing coating, as well as operational loads. For typical floor structures in residential buildings, logs with a cross section of 100-150*50 mm are usually used. Moreover, it is advisable to install them in increments of 600 mm, which corresponds to the width of the mineral wool slabs. With this placement, floor insulation with mineral wool is noticeably simplified, and the amount of its trim is reduced.
Thermal insulation and flooring:
- If you decide to use slab or roll thermal insulation materials, then to lay them it is enough to secure a metal mesh along the bottom plane of the logs. If you choose a loose heat insulator, you will have to assemble a lower subfloor to support it. OSB boards, substandard boards, plywood scraps, etc. are suitable for it. The rough flooring is mounted directly to the bottom plane of the joists or to their side surface through the skull block;
- floor insulation on joists must be reliably protected from above from exposure to both dripping liquid and moist air. Therefore, lay a water vapor barrier film on top of it. For each subsequent strip, ensure an overlap of at least 10-15 cm over the previous one. Glue the seams with tape intended for such work;
- Now, in principle, you can begin to assemble flooring boards, nailing them or screwing them to the joists with self-tapping screws. However, to preserve the wood, it is better to provide a ventilation gap of at least 30 mm under the top flooring. The boards of the appropriate thickness will be used to lift the covering boards above the joists.
Insulation of the floor in an apartment on the first floor
In the case where the apartment on the first floor of a residential building is located above the basement, the best option for floor insulation would be to lay thermal insulation on the basement side. In this case, one important advantage can be achieved - the floor in the apartment does not need to be opened and redone. In this case, the level of the floor covering will remain at the same level as before. Such work can be carried out even by inexperienced builders, since the base surface does not require finishing.
Many people choose affordable mineral wool as insulation, but installing such material requires special knowledge and the availability of construction tools. That is why most property owners use foam floor insulation.
The entire work process consists of several stages:
- Find a plan for the first floor of the house and mark out the basement in such a way that the insulation boundaries slightly exceed the dimensions of the apartment;
- We identify defective areas on the basement ceiling. We repair cracks, holes or chips on the surface using polyurethane foam or cement-sand mortar;
- We lay a vapor barrier and plastic film. This material is overlapped, the sections are glued together using ordinary tape;
- We build a frame from a metal profile or wooden blocks of the required thickness;
- We lay mineral wool slabs and fix plywood sheets.
Installation of foam sheets is carried out somewhat differently. The fact is that the insulation in question does not allow moisture to pass through, so it can be fixed to the surface of the basement walls using a special adhesive solution. For final fastening of products, plastic dowels are used.
The second option, insulating the floor covering in an apartment, is characterized by increased labor intensity. Before carrying out repair work, it is necessary to calculate the possibilities for maximum floor lifting. The higher this indicator, the thicker the insulation layer can be laid. In the case where insulation work will take place after the renovation of the premises, the first step will be to remove the floor covering.
After dismantling the floor structure to the base, the master checks the surface for unevenness, cracks and chips. All defective areas are sealed using cement-sand mortar. Subsequently, the dried and hardened base is treated with a fixing impregnation, a substance called silling. At the next stage, a waterproofing polyethylene film is fixed to the surface, the panels of which are secured with tape.
Next, a layer of roofing felt is laid on the base, a wooden beam is installed, and the logs are fixed. These elements must be securely fixed in concrete. Next, expanded clay granules are poured to the thickness of the lag. The upper part of the insulation is leveled using a cement screed. The joists are not filled to the top, but so that insulation can be laid between the rough and finished floors.
Mineral wool slabs of the required thickness, penoplex or polystyrene foam can be used as additional thermal insulation material . In addition, liquid insulation – penoizol – is often placed in the gap formed. Next, fix the plastic film along the joists using a stapler. At the final stage of the work, a subfloor is constructed from sheets of plywood or boards. Insulation involves laying the selected floor covering.
Heated floors
This system allows the home to be heated evenly. However, it has a significant drawback: high energy consumption. This option is also not suitable for homes with wood floors. Otherwise, they need to be dismantled. Installation sequence for a heated system:
- Clean and level the subfloor.
- Place waterproofing material.
- Place insulation on top, for example, polystyrene foam.
- Lay the cable over the entire surface (in the form of a “snake”).
- Connect the system and screed the floor. Its thickness is approximately 5 cm.
You can use the finished structure only after 3-4 weeks, when the concrete has dried. The heating temperature should be increased little by little and gradually. Infrared heated floors also run on electricity - a special film or rods with wires. Such insulation is installed faster, but costs more than a traditional electrical system.
Another option for underfloor heating is water. Comfort in the house is ensured by pipes laid under the screed. This method requires significant financial investments, but is profitable in operation. It is advisable to install it in a house with autonomous heating. It is better to entrust the installation of water heated floors to professionals.
When insulating floors, we must not forget about other equally important components of the process. For example, if the house has a basement, you need to start with that first. It would be a good idea to insulate the foundation walls so that they do not come into contact with freezing soil and moisture. Only with such an integrated approach can you achieve real warmth and comfort in your home.