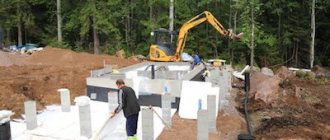
Wooden floors are rarely leveled with concrete. Many experienced builders believe that erecting a heavy monolithic structure on a wood floor makes no sense. Moreover, the concrete layer does not coexist very “friendly” with the wooden base, not only during hardening, but also during operation. In this regard, it is more advisable to use dry leveling schemes. But in cases where it is necessary, for example, to lay tiles in the washing room, you have to look for a way out.
Concrete screed on wooden floor
Let’s immediately say that concrete screed on a wooden floor is a completely feasible task, but here, as in any other matter, there are specific issues.
Description of plank floors
Plank floor - photo
Wood is a special material that has not only a number of technological advantages, but also one significant drawback. It is not static, therefore, even after installation work is completed, it “behaves” according to its own laws, peculiar only to it. Changes in temperature and humidity cause lumber to shrink, increase/decrease in volume, stretch or contract. By the way, it is for this reason that after the construction of the log house, finishing is carried out about 2 years later.
Features of installing a wooden floor
But even after a two-year period of shrinkage, wooden structures are still moving, albeit not as intensely. For example, a wooden floor with underfloor heating moves every time the heating system is turned on.
The graph shows the direction of change in floor dimensions depending on humidity (RH)
Video - Concrete floors in a wooden house
Unlike wood, a monolithic concrete base only slightly changes its geometric parameters when hydrated, and after complete hardening it hardly moves at all.
Concrete floor in the bathhouse
And if this base were tightly connected to an unstable wooden surface, then the slightest movements of the latter would lead to the formation of cracks on the surface of the concrete.
One of the reasons for the appearance of cracks is non-compliance with the technology of pouring concrete on a wooden base.
But the leveling technology described here is intended to ensure that both elements cannot harm each other, and its (technology) distinctive feature is that during pouring the base is not connected to the walls.
Diagram - an example of arranging a screed on a wooden floor
Further care of the screed
In its pure form, a polymer screed with decorative elements - glass, stone, mosaic - can be used on a wooden floor. In other cases, the screed serves as the basis for laying another floor covering. If there is a need to install a concrete screed on wood, then this is usually a damp room. Then an artificial stone or a base under the tiles is laid on the screed.
The screed, prepared independently from cement and sand, is covered in the first days, until complete hardening, with a thin polymer film to avoid cracking. Subsequently, until the concrete gains full strength, which occurs after 25-30 days, the screed is periodically moistened with a spray bottle or with a broom dipped in water.
Design features of plank floors
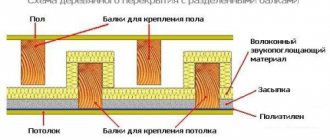
It is hardly advisable to pour a screed on a floor equipped with joists and a floor slab. Such floors often have a thickness of approximately 7-7.8 cm, and the only correct solution in this case may be to dismantle all wooden elements and then pour them over the floor slab. It’s another matter if the logs are high and located on brick pillars. Such pillars have a height of over 0.3-0.4 m, so it is impossible to replace them with a concrete screed. Schemes of such floors are presented in the images below.
1 – base; 2 – waterproofing made of two layers of roofing material; 3 – lower trim; 4 – top trim; 5 – external cladding with tongue and groove boards; b – plate made of non-ferrous metal with holes; 7- outer wall made of boards; 8 – plaster; 9 – plinth; 10 – plank floor; 11 – logs; 12 – brick column; 13 – antiseptic wooden lining; 14 – underground
1 – compacted sand; 2 – concrete preparation; 3 – waterproofing from roll materials; 4 – brick column; 5 – wooden antiseptic lining; c – cladding made of antiseptic boards; 7 – intermediate plank flooring: 8 – thermal insulation; 9 – air gap; 10 – floor; 11 – load-bearing beam
It is precisely such structures that are often filled with screed.
Pouring technology
The essence of pouring a concrete screed on a plank floor is to create a gap between the monolithic surface and unstable wooden elements. For this purpose, the leveling layer is cut off from the walls using a damper tape, and from the plank base - with polyethylene.
Floating screed
This creates a floating floor without connections to any surface. As a result, all lumber elements continue to move in one direction or another, and the screed, which simply lies on top, does not become covered with cracks from permanent changes in the position of the boardwalk.
The technical parameters of the concrete screed, as well as the basic requirements, are found in SNiP 2.03.13-88 and 3.04.01-87.
SNiP 2.03.13-88. Floors. File for download
SNiP 2.03.13–88
SNiP 3.04.01-87. Insulating and finishing coatings. File for download
SNiP 3.04.01-87
Options for installing concrete screed
On the feasibility of using polyethylene
Direct contact with plastic film is known to have a negative effect on wood and leads to the growth of fungus and mold.
Reinforced polyethylene film
Polyethylene film
That is why, instead of film in wooden structures, roofing felt, bitumen-based mastic, glassine, or roll waterproofing with bitumen impregnation are often used. But the cement screed does not stick to the plastic film at all, which is why:
- both plates will be able to move freely along the insulating boundary;
- the screed will not draw moisture from the wood, leading to cracks;
- When moving, the screed will not pull the film, stretch it or tear it.
Important information! Before starting work, care should be taken to minimize the negative consequences of contact of lumber with polyethylene. To do this, all wooden elements must be treated with an antiseptic and the Aquastop primer mixture, which has moisture-repellent properties.
Primer concentrate – AQUASTOP
The filling procedure itself consists of several stages, let’s get acquainted with them.
Prices for reinforced polyethylene film
reinforced polyethylene film
Wooden floor on a concrete base: device capabilities
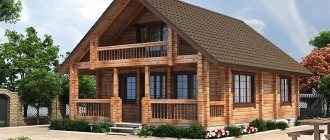
Wood flooring is an indescribable atmosphere, coziness and comfort of your home
In a country house or apartment, trying to create a cozy and environmentally friendly home, many owners come to the question of how to make a wooden floor on a concrete base? Wood is a natural, warm, absolutely harmless material for finishing such surfaces, and thanks to these properties it will never lose its relevance.
But the most common construction technologies offer us concrete interfloor slabs. We will tell you in our article how to lay a wooden floor and what technology is best to use.
Preparation
Such floors are a very common design solution. Warm natural material creates comfort and coziness indoors. But such a move requires preparation of both components for the future surface.
No matter what kind of wood you use or what installation method you choose, the concrete base requires treatment.
Before laying, the concrete base must be put in order
Putting the concrete base in order
The fresh concrete screed must be completely dry by the time the base is laid. If you are making a wooden decorative covering on an old screed, it is necessary to carry out measures for its ongoing repair.
Concrete base required:
- level;
- get rid of cracks;
- remove dust;
- prime.
Concrete should be primed and dust free
At this stage, you should also prepare all the technological holes in the concrete for laying communications. As waterproofing, you can lay polyethylene film or penofol.
If a decision is made to use roll waterproofing, then the material should be laid overlapping, carefully gluing the seams. In this case, the film should extend onto the walls to the entire height of the future surface. It would be a good idea to tape the edges of the film with damper tape.
Important! Before laying wood flooring, check the moisture content of the concrete, it should not exceed 3%.
Experienced builders recommend constructing such floors in the spring, after the central heating system is turned off.
Choosing wood
Which floor is better: wood or concrete? The answer to this question is far from obvious. The wrong tree laid on the floor can bring quite a lot of problems in everyday life.
For flooring you should choose the following types of boards:
| Board name | Short description | Photo |
| Regular sexual | Laying is done using a tongue and groove pattern. It has a front side and a back side with vents. Width ranges from 8.5 to 10 cm, thickness from 2.5 to 3 cm. | |
| Parquet | Consists of 3 perpendicular layers and a varnish (oil) coating. It is laid using a tongue-and-groove or a locking connection. Width from 12 to 20 cm, thickness within 1.8 -2.5 cm. | |
| Engineering | Three-layer glued. The top layer is made of valuable wood. Width 12 - 45 cm, thickness 1.2 -2 cm. |
In addition, a regular board can be planed or unplaned. Unplaned material is used as a rough coating for further finishing. For finishing, planed dry with tongue and groove is used.
Rules when buying a tree:
- The material must be dry. Overdried or wet wood becomes deformed during further processing.
- The board should be flat and smooth.
- The wood must be free of defects.
- For a single coverage area, it is better to purchase material from one batch, with a similar color and texture.
When ordering volume, always buy 10% more material than required by area. The length of the edged tongue-and-groove board should not be less than 2 m. Before starting work, the wood should be treated with antiseptic and fire-retardant impregnation.
Regardless of which material was preferred, before laying the floor, in order to adapt to the microclimate, it is better to let the wood rest for several days in the room where the work will be done.
The tree should be allowed to rest at room temperature.
Flooring methods
Installation of wooden coverings on concrete can be done in one of 3 ways:
- the boards are glued to the screed;
- laying boards along joists;
- device on a substrate made of moisture-resistant plywood.
Important! With any installation method, such a floor on a concrete slab must have a technological gap. The distance between the wall and the board covering along the entire perimeter of the room must be at least 10 mm.
Let's take a closer look at the technologies for carrying out work using each method.
Installation with glue
This technology allows you to lay plank floors on concrete without interlayer material. In order to carry out installation, it is necessary that the screed complies with SNiP 3.04.01 - 87.
The presence of cracks in the base is unacceptable; the structure of the concrete must be dense. If the base does not meet the requirements, you should use a substrate material, or treat the base with a primer to strengthen it.
The wide board is installed using one-component polyurethane glue. Narrow or engineering is laid on a two-component composition.
Instructions for laying boards with glue:
- The boards are cut according to the measurements taken.
- Glue is applied to the concrete using a spatula. The layer thickness should not exceed 3 mm.
- 2-3 boards are laid, which are carefully joined and pressed.
- After the adhesive has set, work continues.
- The width of the last board is adjusted to the desired size.
Installation on joists
The most popular device method. By arranging a wooden base over concrete on joists, it is possible to hide all possible communications and provide additional insulation.
A significant disadvantage is the height of such a coating is at least 10 cm, which greatly complicates its implementation in rooms with low ceilings. When laying boards on joists, the board material should be no thinner than 2 cm, otherwise the floor may sag and creak.
This article will show you how to properly lay boards on joists.
There is a standard step for each board thickness:
- up to 35 mm – step 60 cm;
- 35 – 40 mm – step 80 cm;
- with a board thickness of more than 40 mm - 1 m.
The logs are mounted perpendicular to the direction of daylight, following the following sequence of actions:
- The timber is secured into the concrete with dowels and screws, and the fastener heads are recessed into the wood a couple of millimeters.
- When fixing the beam, it is necessary to control the level. Permissible deviation in height is 2 mm per 2 m of length.
- If necessary, soundproofing material is laid around the perimeter of the walls.
- Insulation and sound insulation material is laid in the niches between the joists.
- Boards are laid and secured perpendicular to the joists.
On a note! It is better to fasten the boards to the timber with screws, and the holes for the screws are drilled in advance, at an angle to the floor. This method, firstly, will prevent cracking of the joists when attaching the board. And secondly, self-tapping screws will not creak - unlike nails.
Plywood base
You can install the floor using moisture-resistant plywood flooring. For such a layer, sheet plywood is used, usually coniferous wood with a thickness of 12 - 18 mm. The plywood is cut into identical squares measuring 40*40 cm or 80*80 cm. They are sanded before laying.
The order of further work is as follows:
- The squares are laid out with a gap of 3 - 4 mm.
- Each next row is placed with the seam shifted by half a square.
- The plywood is laid with glue.
- After laying the row, it is additionally secured with screws.
- The screw caps are recessed into the sheet a couple of millimeters.
- Upon completion of the work, the plywood flooring is cleaned of dust and debris.
- The floor boards are attached to the flooring using self-tapping screws.
These are the three main ways to install a wood floor over a concrete floor. Let's consider special cases when wood-based sheet material plays the main role in the construction of the floor.
We lay plywood sheets on the joists
Sometimes plywood is used not as a layer between concrete and floorboards, but as a finishing floor material. This is a fairly economical way to install a wooden floor on a concrete surface with your own hands.
This plywood floor makes it possible to level and insulate the floor, as well as hide all utility lines. The installation procedure is the same as when laying boards on joists. The only difference is that for reliability, a perpendicular beam should be mounted to increase the load-bearing coefficient.
Plywood floor arranged on joists
Laying wooden floors using sheet plywood:
- The sheets are attached to the joists with a seam shift.
- The gap between the sheets must be at least 2 mm.
- The distance between the fastening screws should be no more than 25 cm.
- For fastening, you should use self-tapping screws with flat heads, and when screwing them in, they should be recessed into the material.
On a note! If bulk thermal insulation material is used, then plywood can be laid without installing a cross beam using liquid nails.
Advice from experienced people
To prevent the plywood sheets from changing their dimensions after laying and flying like a helicopter, perform a few simple operations:
- Keep the sheets in the room planned for flooring for about 7 days.
- Store sheets horizontally only.
- If you plan to use the material in an unheated room, then it is worth impregnating the sheets several times with a polyvinyl acetate-based primer.
Plywood should be stored horizontally
Marking
Not all plywood should be used for floors. Depending on the number of layers, as well as on the composition of the glue and impregnation, the properties of the resulting material vary. What plywood of any grade has in common is the property of uniformly distributing physical load over the entire area of the slab.
When purchasing, pay attention to the markings on the sheets:
| Marking | Designation | Characteristic |
| Variety | E, I, II, III, IV | Indicates the structure of the sheet gluing, the quality of the front and back layers |
| Moisture resistance | FSF | It has an increased level of water resistance, strength and wear resistance. Not for use in residential areas, toxic. |
| FC | It is not highly resistant to moisture, but will remain intact when exposed to water for 24 hours. | |
| FKM | Highly water resistant material | |
| FBA | The most environmentally friendly material. Will not withstand prolonged high humidity. | |
| Surface quality | NSh, Sh1, Sh2 | not polished; polished on one side; polished on both sides. |
| Environmental friendliness | E1, E2, E3 | E1 - up to 10 mg, E2 - from 10 to 30 mg |
Other markings on plywood indicate that the material does not comply with GOST.
Fiberboard concrete floor covering
Fiberboard (fibreboard) is an excellent alternative to concrete flooring. This flooring is installed quickly and easily, and does not require major financial investments.
Hard fiberboard is used for floors. The concrete surface, as in all other cases, will have to be leveled and minor repairs to be made to seal cracks.
Fiberboard sheets are glued with the ribbed side to the concrete surface
Here are some simple tips:
- Before laying the slabs, markings are made.
- Try to cut out the floor in such a way as to create a minimum number of joining seams.
- Do not place seams in high traffic areas.
- It is better to hide the seams from hand cutting the slab under the baseboard.
- To avoid confusion, number the sheets and cutting angles.
- You should not level the sheets against the wall; the density of the joining seam is important.
- You should start laying with large sheets.
- After gluing, the slabs are pressed to the floor with a weight.
- The seams can be filled with casein-cement mastic.
Laying the slab
How to glue fiberboard to a concrete floor? The sheet material is laid on glue or bitumen mastic.
- When using glue, the back side of the sheet is completely covered with the composition and dried for 30 minutes.
- While the glue dries on the sheets, the surface of the base is lubricated. When laying the sheet, it is checked for evenness.
- When using mastic, do the same. In both cases, both mating surfaces are coated.
- The mastic on the surface of the slab is allowed to dry a little, and then pressed tightly onto the base, which has been previously treated with the composition.
Bituminous mastic for fiberboard flooring
Do not lay the sheets in such a way that the seams form an intersection. This place will very quickly lose strength during operation. Move the joints - this will make the coating last longer.
Conclusion
Basically, laying wood on the floor is a very financially expensive process. Wood is a natural material, so its price is always high. And although working with it seems simple, due to the specifics of the material it has some nuances.
Laying a wooden floor on concrete with your own hands is not difficult; you just need to carefully choose the material to lay and properly prepare for the installation process. If you don't overlook the little things, your plank floor will last a long time.
Stage one. Calculations
There is one standard calculation scheme: for every 15 kg/m² of dry mixture there is a thickness of 1 cm. Even if the required amount of materials is known, you still need to buy them with a 10% margin.
Table. Dry cement mixtures - cost
| Name | Manufacturer | Package | Price |
Universal dry mix, M-150 | "VOS Mixtures" | Bag, 50 kg | 95 rub. |
Universal sand-cement mixture, M-150 | UMIX | Bag, 50 kg | 100 rub. |
Dry universal mixture, M-150 | "Stone Flower" | Bag, 25 kg | 75 rub. |
| Floor screed STs-5 | "Polymin" | Bag, 25 kg | 118 rub. |
Screed Kreisel-440 | Kreisel | Bag, 25 kg | 132 rub. |
Floor screed “Moment” | Bag, 25 kg | 160 rub. |
Stage two. Preparing the base
Having understood the technology and calculated the required amount of mixture, you can proceed directly to work. Traditionally, you should start by preparing the base.
Step 1. First, the boardwalk is dismantled and a thorough inspection of all elements is carried out. Lags are checked. If any of them are unsuitable for further use, they must be replaced.
Checking lag
Recommendations
Step 2. If the logs are installed in increments of more than 40 cm, then auxiliary bars are installed between them.
Strengthening joists with crossbars
Step 3. The boards - if they are still usable - are nailed back together. If slightly damaged floorboards are found, they should be turned over.
A floorboard with a slight defect can be turned over
The heads of the nails are recessed by 2-3 mm, otherwise the plastic film laid on top may tear.
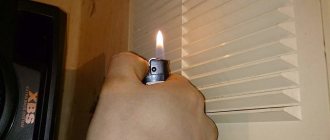
Step 4. The baseboards are removed and thin boards are installed instead (the latter should cover the cracks in the walls). Do not forget that these boards are installed for a certain time, and after pouring the screeds will be dismantled. This will ensure ventilation of the wooden base and prevent it from rotting.
Important information! You also need to seal all the cracks. If they are small, you can fill them with sealant, but large cracks are better sealed with foam.
Sealing cracks with putty
Foam sealed cracks
Instead of sealant, you can use parquet putty made from wood dust, or a homemade putty mixture. To prepare the latter, you need to mix any sawdust with oil paint in a ratio of 4:1.
Sawdust and paint
Mixing repair materials
Stage three. Padding
When the sealant or putty is completely dry, thoroughly vacuum the substrate to remove dust and debris. Sanding can be done if desired, although this is not necessary.
Padding
Next, a moisture-resistant primer is applied in two or three layers: it will prevent the appearance of air bubbles and the absorption of liquid from the cement mortar by the surface. The primer will also serve as additional protection for the wood from mold and mildew.
Apply primer in several layers
Prices for primer for concrete floors
primer for concrete floor
How to lay wooden floors on a concrete base in a private house - laying technology
Laying a wooden floor on a concrete base is a fairly popular technology for arranging the foundation of private and apartment buildings today, which has certain advantages.
This option is suitable in cases where it is impractical to remove the old screed, but you need to create a smooth and warm base for decorative finishing or there is a desire to make a wooden finishing layer.
You can install a wooden floor on a concrete base using different materials and technologies, which are chosen in accordance with operating conditions, the condition of the concrete screed, and personal preferences. Regardless of the technology, all work is performed relatively easily and can be carried out independently, taking into account the availability of knowledge and the necessary tools.
Stage four. Marking
Using an ordinary or laser level, a zero level is marked along the perimeter of the walls. The latter can be at an arbitrary height, but on average it is 35-70 cm from the surface of the base. It is necessary to mark several points of the zero horizontal on each of the walls.
Definition of zero level
Equal distances are laid down from these points, and the thickness of the screed itself must be taken into account.
Zero level marking scheme
Important information! The standard thickness of a concrete floating floor is about 5 cm. Moreover, every centimeter of such a floor will create a load on the plank base of 100-110 kg per square meter. It is for this reason that it is advisable to strengthen the logs, although if possible it is generally better to install metal channels instead of them.
The logs are laid on the channel
Option 2. Installation of a monolithic screed
In general, experts do not recommend leveling wooden floors with a concrete screed. It may be too heavy for the old flooring, which will accelerate its destruction. And this order of arrangement of layers violates the immutable rule of construction: the base must be stronger than the coating in contact with it. Therefore, you need to make sure that they do not contact each other.
Poured concrete base
The most important thing is proper preparation of the base
However, in special cases, sometimes it becomes necessary to pour a screed over a wooden floor. Since these materials have completely different properties, the main task that will have to be solved is to make sure that the mobility of the wood does not interfere with the long-term service of static concrete.
Important! During the first 4-5 years of operation, the boards are most susceptible to shrinkage phenomena, so only old wooden flooring can be poured with concrete. In a new one, as a result of the loss of moisture from the wood, after some time cracks appear and the linearity of the boards changes.
Plank floor
- Such collisions always occur with wood, but to a lesser extent with old trees. Do not forget that a monolithic screed poured onto a wooden base should not be in direct contact with either the flooring or the walls.
- When the wooden covering is made along joists and is the floor of the first floor, under which there is a concrete base, then there is no need to fence the garden - remove all wooden structures and fill in a new concrete screed with light filler.
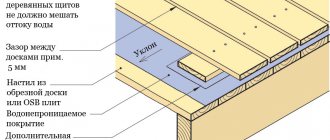
- If the floor structure itself is framed or it is a ceiling on wooden beams, then nothing can be done - you will have to pour a screed under the tiles. In this case, if possible, you need to reduce the number of layers of the floor cake if, for example, it is like the one in the picture below.
Construction of wooden interfloor ceiling
- That is, you need to remove the finishing coating or remove excess lathing, reaching the subfloor, which will reduce the mobility of the base. All elements that remain must be well secured. Here you need maximum rigidity, and if the flooring is loose in certain areas, you will have to open it to install crossbars, as shown in the photo below.
Installing crossbars after opening the deck
The last stage of preparing a wooden base, if it is not a painted floor, will be treatment with a biocidal-hydrophobic primer, which will slow down the process of its destruction and extend its service life.
Calculator for calculating the amount of ingredients of a mortar for floor screed
Go to calculations
Pouring process
Table. Step-by-step instructions for pouring.
| Steps, photo | A comment |
| Step 1. Installation of shock-absorbing tape | Shock-absorbing tape - damper, is mounted along the perimeter of the walls. It will provide the screed with a technological gap for thermal expansion. The tape can be purchased ready-made or cut from a laminate backing. |
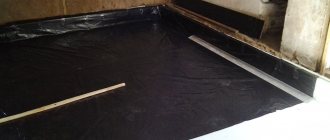
| Step 2. Laying polyethylene | Before you proceed directly to monolithing a wooden floor, it needs to be waterproofed with rolled material overlapping the walls. For this purpose, ordinary polyethylene is used - a film 1.5-2 mm thick. Width - the larger the better, there will be fewer joints. It is only important to handle it carefully so as not to damage it. Note! You can, of course, use bitumen-based materials instead of film. But polyethylene is better in this case, since it is smooth and does not adhere to the solution at all. |
| Step 3. Marking and installation of beacons | Then you need to bring the zero level to the walls, and break off the horizontal top of the screed from it. Instead of beacons, you can use a tightly stretched cord secured to self-tapping screws screwed into the floor. How all this will ultimately look is shown in the picture. On a note! When determining the thickness of the screed, do not forget about the thickness of the tiles and the adhesive layer. The thinner the fill, the better. If you need to raise the floors, say, by 20 mm, then it is better to first install cement-bonded particle boards, and then pour a 1-2 mm screed on top of them. A large thickness of concrete will create unnecessary loads on the wooden base with its weight. |
| Step 4. Selection of reinforcement and calculation of coating layers | To make the structure lighter, there is no need to use a reinforcing mesh, at least a steel one. There are lighter composite meshes on sale. |
| Step 5. Mixing the solution | But it’s even better to simply add polymer fiber to the concrete - it’s better suited for thin screeds. If the room is small, the easiest way is to simply buy a ready-made factory mixture reinforced with fiberglass - for example, BESTO. |
| Step 6. Filling the screed | The finished solution is poured in one layer - the entire room at one time. If metal beacons were installed, then after a day they need to be removed and the recesses sealed. To prevent the screed from losing moisture too quickly, lightly moisten it with a spray bottle and cover it with cellophane. |
Prices for cement M400
cement M400
If you are going to lay tiles, allow the monolith to gain at least 70 percent strength, which for concrete is 19 to 20 days. However, as for the screed, the drying time will depend on its composition and thickness. If it is a 1-2 mm self-leveling floor, you can lay the tiles within a week.
Self-leveling screed
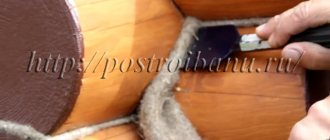
Stage five. Waterproofing
Further actions involve insulating the wooden structural elements, and the result should be a kind of pallet that does not allow moisture to pass through.
Step 1. A damper tape with a thickness of 10-20 mm and a width slightly exceeding the thickness of the screed is attached to the walls along the entire perimeter. This tape will provide not only damping of sound vibrations, but also the possibility of lengthening/expanding the floating slab. Scotch tape is used for fastening.
Edge tape
Fixing the edge tape
Fixation possible using a construction stapler
Installed deformation tape
Important information! Upon completion of the finishing of the floor, the excess tape protruding on the surface will be cut off, and the resulting gap will be covered with a plinth.
Step 2 . Next, polyethylene film is laid. This must be done with an overlap of 10 cm and with an overlap of at least 15-20 cm onto the walls.
Example of laying polyethylene film
Polyethylene film flooring
Important information! There should be no folds or damage to the waterproofing layer. Subsequent steps must be performed with extreme caution so as not to tear or puncture the film. If this cannot be avoided, the holes must be immediately covered with polyethylene patches.
Secure adjacent panels with tape
Step 3 . Ideally, the waterproofing layer should have no joints at all. If there are joints, then they are all firmly taped with tape. The further operation of the leveling layer will largely depend on the tightness of the waterproofing.
Prices for edge tape
edge tape
Features of a wooden base
Due to the non-static nature of wood, installing a concrete screed on a freshly laid wooden floor is strictly prohibited. Despite the abundance of advantages, wood has one significant drawback - it continues to live its own life even after being used in a certain structure. As a result, wooden elements are susceptible to all sorts of changes under the influence of moisture and temperature changes. They may shrink, swell, or bend.
Important: precisely because wood is not static, installing a concrete screed on a freshly laid wooden floor is strictly prohibited.
Even after several years, wood flooring elements continue to shift, warp, and shrink. Hidden floor heating systems made of wood cause characteristic structural changes with each temperature change.
Concrete screed behaves completely differently. It is prone to deformation and shrinkage only during the period of hardening of the mixture. In the future, no special changes occur with the leveling layer. Rigid coupling of moving living wood to a stable screed would lead to cracking and damage to the latter. That is why the technology of unbound screed was invented, allowing each layer to “live according to its own laws.”
Stage six. Reinforcement
If the concrete layer is thick enough, it must be reinforced. There are several methods of reinforcement; only the most common ones are discussed below.
Method No. 1. Reinforcing mesh
Reinforcing mesh
The mesh is laid in parallel rows with an overlap of 10 cm
A very common option, which, however, is not particularly suitable in this case. The fact is that the previous layer is polyethylene, which can be damaged by the mesh. It will be quite difficult to move around the fittings without compromising the integrity of the insulation. In addition, the film, as noted above, must be in direct contact with the concrete, so the mesh must be located in the body of the screed.
For this reason, concrete is poured in two layers:
- the first layer is poured - without beacons;
- the grid is laid, beacons are installed;
- the second layer is poured.
It would seem nothing complicated, but the concrete layer will take a long time to dry - the break between layers can be up to 1 month. Therefore, it is better to resort to the second method.
Method No. 2. Fiber fiber
Fiber fiber
The next reinforcement method involves adding fiberglass directly to the concrete mixture during the preparation stage. The polymer fibers that make up this material are arranged randomly, resulting in maximum bond strength in all directions.
Moreover, the total weight of the screed will be noticeably reduced due to the elimination of metal mesh. Further actions are focused on using this particular method.
Reinforcement of concrete screed
Fiber fiber prices
fiber fiber
Wooden floor on concrete screed without joists
When renovation begins, the question arises: what kind of flooring should I lay? Supporters of the latest technologies opt for self-leveling polymer floors, but there are also those who prefer a wooden floor.
Its popularity has not faded over the centuries, and this is not surprising, since wood is a natural, environmentally friendly material that does not contain any chemical impurities, and most importantly, wooden floors are warm.
Installing such a floor on a concrete base is quite feasible with your own hands; you just need to take into account the nuances of the process and take into account the nature of the room where the installation will take place.
Wooden floor on a concrete base: preparation. Laying on glue, joists, plywood
Today there are many floor coverings, however, time-tested wood has not lost its relevance and is still very popular.
As a result, many home owners decide to install wooden planks on top of a concrete screed.
This procedure is not too complicated, but it requires certain knowledge, so next we will look in detail at how to install a wooden floor over concrete.
Installation of wooden boards
Stage seven. Installation of leveling beacons
Lighthouses need to be built especially carefully; there can be no talk of any screws or nails. The foundations for future “beds” are made from the same mortar that will be used for the screed. “Beds” are formed along the entire length of each of the lighthouses.
Installation of leveling beacons
Important information! The distance between the “beds” must be 10-15 cm shorter than the length of the rule (often about 120 cm). The distance between the wall surfaces and the outer “beds” should be 25-30 cm.
The metal profile is laid on the tops of the “beds” and heated in the solution so that the previously noted height (level of the leveling layer) is reached. The installation of beacons must be completed a maximum of an hour after mixing the solution, otherwise it will set.
Stage eight. Mixing the solution
The mixture for concrete screed can be purchased ready-made or made independently. Factory-made dry mixes are sold in bags of 25 kg and 50 kg and diluted with water (6.5 liters per bag or 13 liters, respectively). If necessary, the amount of water can be increased, but not more than 0.5 liters.
Mixture for mixing
Stirring a mixture, example
All components are mixed with an electric drill with a mixer attachment; the finished mixture should be used for a maximum of 15 minutes.
To prepare the solution yourself, you need to mix cement (at least “four hundredth”) and sifted sand (preferably river sand) in a ratio of 1:3. An electric drill is also used for kneading, but the whole procedure is performed in 2 stages. The prepared solution should be used no later than 1.5 hours after mixing.
Important information! The strength and water resistance of the solution can be increased by adding special plasticizers (the proportions are indicated on the packaging). Although there is a cheaper alternative to plasticizer - regular washing powder (a handful for every 100 liters of water).
Prices for cement-sand mixture
cement-sand mixture
Stage nine. Fill
The filling procedure is carried out traditionally, i.e. continuously. You should start from the far corner relative to the front door. The surface is leveled using a rule.
Filling the screed
24 hours after pouring the screed, the beacons are removed, and the remaining voids are treated with a primer, filled with the same solution and leveled using a trowel.
Illustration of dismantling a lighthouse from a screed
The hollows are filled and rubbed
Trimming the damper tape
Clean the screed from excess mixture using a wide spatula and a rule
Video - Screed on a wooden floor
Preparatory activities
Before you start repair work, you need to learn how to lay a wooden floor with your own hands correctly, so that you don’t have to redo everything later. Professionals recommend laying a wooden floor on a concrete base in the spring after the end of the heating season, since at this time of year the air and trees have optimal humidity.
Before installing the floor covering, it is necessary to prepare the concrete base. If the screed was refilled, it will take about a month for it to dry completely. If there are any defects, they must be eliminated. Holes and potholes are filled with a self-leveling mixture, and the bumps are smoothed out by grinding.
During the preparation process, communication holes are made in the concrete base using a diamond drill for laying utility networks, cables, etc.
Of great importance is the installation of a waterproofing layer, which should protect wooden logs and board flooring from moisture. As a result, the floor will last a long time. The materials most often used for waterproofing are thick polyethylene film or penofol. They are laid with a 20-centimeter overlap. You can also use a polyurethane primer (primer).
A wooden floor can be laid in one of three ways:
- on the adhesive composition;
- on sheets of moisture-resistant plywood;
- on the logs.