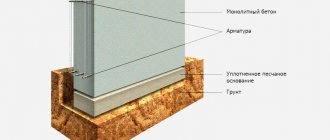
Drilled piles are used in laying particularly deep foundations. This is a building unit. They are a cylindrical structure, which subsequently must strengthen the foundation and evenly distribute the load. Such piles are made by monolithic construction. Using various materials, formwork is installed for bored piles , which are reinforced with reinforcement, and filled with liquid concrete. It must be compacted carefully to prevent the formation of air islands. They weaken the structure and become the Achilles heel of a massive building.
What is cardboard formwork?
This simplest type of formwork consists of a polymer base, as well as paper that wraps around it in several layers.
Then the paper is laminated using a special technology, after which it is coated with polymer waterproof glue. The only drawback of permanent cardboard formwork is that a spiral pattern will be visible on the finished structure. If it is necessary to achieve a better result, you should use formwork coated on the inside with waxed material. Despite the fact that this is also cardboard formwork, the price will be a little more expensive, however, the result will exceed all expectations. For a perfectly smooth and glossy surface, it is recommended to use formwork coated with polymer on the inside.
We build a pile foundation
The construction of the foundation must be taken responsibly. Construction work includes the following stages:
- drilling of the wells;
- installation of formwork forms;
- reinforcement;
- filling molds with solution.
Well preparation
Construction begins with drilling. To perform this work, a manual or electric drill is used. Requirements for the work:
- the size of the wells is determined by the project;
- the depth of piles must exceed the depth of unstable soil layers and the freezing point by at least 0.5 meters;
- the width is also determined by the project, and it must be taken into account that a sand cushion should be made around the concrete pillar.
Installation of formwork
When the wells are ready, formwork is installed in them. Typically, a cardboard, steel or plastic pipe is used. Around the established form it is necessary to pour a layer of sand about 10 cm thick.
This is necessary in order to protect the piles from soil movements during freezing and thawing.
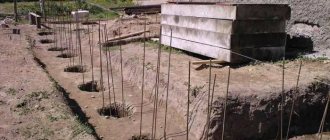
Reinforcement
To increase the strength of structures, it is necessary to perform reinforcement. For each pile it is necessary to prepare 3-4 steel rods with a diameter of 8 mm. Before installing the reinforcement, the rods are tied together. The spacing of the wire fastenings should be 0.5 meters. Installation rules:
- the associated reinforcement should protrude 30 mm above the formwork surface;
- the rod structure is installed so that the gap between the wall of the formwork pipe and the reinforcement is more than 20 mm. This is necessary to prevent the development of metal destruction processes.
Concreting
At the last stage, the solution is poured. Basic rules for carrying out work:
- the solution is poured in layers about 0.5 meters high;
- After pouring the next layer, the solution is slightly compacted. This can be done manually using the bayonet method, but it is more convenient to use a vibrator;
- the next layer is poured while the previous one has not yet begun to harden, otherwise the structure will not be solid.
So, constructing a foundation of piles is advisable when constructing light objects on loose soils. Pipes of the appropriate diameter made of polymer materials, steel or specially treated cardboard are used as formwork forms. The forms can remain part of the piles, or they can be removed after the solution has acquired a given configuration, but has not yet completely hardened.
Installation and dismantling of cardboard formwork
The formwork is mounted along the arrows of the body, which are directed upward. The lower part of the formwork is attached to the floor with a wooden template or crown. If the height of the column exceeds 4 m, installation requires additional fastenings for the upper and lower parts of the formwork, and fastening should be done at intervals of 3-4 m.
The process of installing a column using cardboard formwork
It is recommended to dismantle disposable formwork after 2 days using a cord laid inside the formwork. Simply attach the cord to any instrument and pull it from top to bottom. This way, the formwork will break in two, and you can easily separate the finished columns from it.
The process of dismantling cardboard formwork
Do-it-yourself columnar foundation: materials, instructions
In this article we will describe the process of creating a columnar foundation from bored piles using permanent formwork made of roofing felt.
Article outline:
Advantages and disadvantages of columnar foundations made of bored piles Designing a columnar foundation Materials for making a columnar foundation Tools for making a columnar foundation
Step by step instructions
Marking out the site Drilling wells We make widening at the bottom of the wells We create permanent formwork from roofing felt We create reinforcement cages for our piles with the possibility of reinforcing the heel of the pile Step-by-step instructions for forming a pile in a well with widening A selection of videos on columnar foundations
Advantages and disadvantages of a columnar foundation
Advantages
- Economical. Requires less materials, namely concrete and reinforcement, compared to strip and slab foundations.
- Does not require the manufacture of removable formwork. Permanent formwork is used, the production of which takes a small amount of time.
- A foundation made from bored piles can easily be made independently without the use of special equipment or hired labor.
Flaws
- Unlike a strip one, it is not possible to make a cellar and a basement floor.
- A more detailed design is required in contrast to strip and slab.
Average service life of a columnar foundation made of bored piles: 150 years.
Design of a columnar foundation made of bored piles
- The total weight of the future house is calculated.
- We carry out soil examination (test drilling). We find out the bearing capacity of the soil, the groundwater level (GWL) and the depth of soil freezing (GFD).
- We calculate the number of pillars of our foundation and their location around the perimeter of the house. The calculation will depend on 2 factors:
- The poles must carry the full load of the house. The calculation takes into account the bearing capacity of the soil. In order to increase the area of the surface resting on the ground, a widening is used at the bottom of the post (the average heel diameter is 400-600 mm).
- The distance between the pillars should be within 1-3m (average value 1.5-2m).
Calculator Stolby-Online v.1.0 - design of a columnar foundation.
Materials
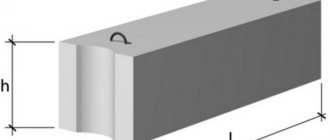
Permanent formwork:
| Ruberoid | PVC pipes | A/C pipes | Chimney pipes |
Materials for a pole with widening. Permanent formwork: roofing felt
- Fittings. D10-D12. For the reinforcement frame, knitting wire.
- Concrete M150-M400. Cement + coarse river sand + crushed stone 5-20 fr (the smaller the crushed stone fraction, the better).
- Permanent formwork: roofing felt.
- Garbage bag (thick 120 l). To form the heel (widening at the bottom of the post).
- Scotch. For fastening a garbage bag and for fastening roofing felt. Stretch film for fastening roofing felt.
Tools
- Boer. You can use garden, TISE or homemade. Instead of a drill, you can use automated equipment or an analogue. The length of the drill should be slightly greater than the freezing depth. If the drill handle is short, then you will need an extension cord, which you can either buy along with the drill or make yourself.
- To create a widening at the bottom we will use a TISE drill or a homemade tool. For example, a bayonet shovel with cut edges. Bayonet 10cm + if you need to extend the shovel handle.
- If we make concrete ourselves, we need the following tools:
- Concrete mixer
- Master OK
- Bucket
- Shovel
| TISE drill with extension | Garden auger with extension |
| Widening with TISE drill | Widening with a bayonet shovel |
| Concrete mixer | Master OK | Construction bucket | Shovel |
Instructions for the construction of a bored pile foundation with widening
Site marking
1. We install a cast-off for pulling the twine, along which we will mark the location of the pillars (piles). Instead of cast-offs, you can simply use pegs or reinforcement firmly fixed in the soil. Before placing the cast-off, we must first draw up a project for the number and location of pillars.
We stretch a string (cord, thick thread or any analogue) to mark the location of future piles. The intersections of the string will be the centers of the wells. In our example, we will make the distance between the centers of the pillars 2 m. Provided that the diameter of the bored pile is 25 cm, therefore, the distance between the piles will be 1.75 m.
2. We outline the centers of future wells. For this task we will use a plumb line, which will be lowered from the intersection of the string.
3. Drive the peg exactly plumb. Instead of a peg, you can use anything, the main thing is that it stays securely in the ground and is visible so as not to accidentally knock it over.
As a result, we get a marked area for future pillars. We remove the cast-offs so that they do not bother us. Only the pegs remain.
More detailed instructions on marking the foundation can be read in the article: Marking for the foundation. Rules for constructing a rectangular foundation. For a columnar foundation: Marking for a columnar foundation with a grillage.
Drilling of the wells
We drill wells for piles. In this example, we will make the diameter of the holes 25 cm to a depth below the freezing depth for the given area. Let’s assume that our freezing depth is 1.5 m, therefore, we will drill to a depth of about 1.7 m.
To calculate the depth of soil freezing, you can use our calculator: Calculation of the depth of soil freezing. © www.gvozdem.ru
For drilling, you can use a TISE drill with a diameter of 25 cm, a garden drill with a diameter of 25 cm, or automated equipment.
Another important point. You can drill all the wells at once. But in some cases, it is advisable to drill one well at a time and immediately pour the concrete mixture (concrete). This is due to weather conditions in the form of rain or high groundwater levels. Water will wash away the soil of the well walls, as a result of which it will crumble, and we do not need this at all.
We make widening at the bottom of the wells
What is it for. By widening the well, a heel of the pillar will be formed, which will perform 2 tasks: increasing the bearing capacity of the pillar and preventing the pile from being pulled out by tangential forces during the freezing of heaving soils.
Work plan. For this task, you can use a TISE drill specially designed for this purpose. It will allow you to make a widening with a diameter of 40-60 cm. But it is worth noting that in dense soil it is very difficult to work with this device. Therefore, it is advisable to check everything during test drilling during the design of a columnar foundation.
There is an alternative and inexpensive way to make the widening using a modernized bayonet shovel. To do this, it is necessary to trim the edges of the shovel blade so that the working area is within 10 cm. Well, lengthen the handle of the shovel if necessary. In order to lift the soil from such a widening, you can use some kind of device, or simply drill deeper and shovel all the soil from our widening into this depression. The main thing is not to forget to compact our “burial” later.
Creation of permanent formwork from roofing felt
1. In this example, we will use the most economical option, namely roofing felt, as formwork for a bored foundation.
We prepare a piece of roofing felt of the length we need. In our example, we need a piece 2 m long (1.7 m underground – 0.3 m widening without roofing felt + 0.3 m above the ground + 0.3 m margin for level trimming). We twist the roofing felt of the diameter we need (25cm) into a pipe. For this task, it is better to use a certain template onto which we will wind the roofing material. In our example we have a metal pipe. You can make the template yourself, showing ingenuity. There are many options.
After the roofing felt has been rolled up (2 layers thick), it is necessary to secure the resulting roofing felt shirt from unwinding. Wide packing tape will help us here. We will fasten it in 4 places (more is possible, the main thing is to secure it). If you have roofing felt with a dusty coating, then the tape will not stick to it. There is an option to wrap the roofing felt sleeve first with stretch film and then with tape. This will also give more rigidity to your formwork.
2. Attach a garbage bag to the bottom of the roofing felt formwork. What is it for. If you have high groundwater or simply standing water from rain, then pouring concrete into water is not recommended. The package will also act as a kind of barrier between the soil environment and concrete. According to TISE technology, the package is not used. Cement laitance enters directly into the ground forming soil concrete, which is an additional reinforcement for support (according to Yakovlev, the author of the TISE technology).
Do not confuse a garbage bag for a garbage can with a 120 liter garbage bag, which is used to collect garbage during cleanup days. It is large and quite dense. This is what we will use. We attach it to the bottom of our formwork with tape. Our roofing felt formwork is movable, so try to use tape so that it really firmly fixes the package (tightly wrap the edge of the package to the roofing felt shirt with tape). © www.gvozdem.ru
3. The part of the package that will be used for widening can be carefully hidden in the formwork pipe. Important! Consider the placement of the package so that when filling the concrete, folds do not form, which could make our widening not a solid structure.
We create reinforcement cages for our piles
For this task we will use reinforcement with a diameter of 10 mm. The reinforcement frame can be manufactured in 2 versions: with reinforcement for the pillar widening and without reinforcement for the widening. How much reinforcement is needed for the widening of a pillar is a controversial issue and can only be resolved as a result of accurate design calculations taking into account all the technical characteristics of materials, loads and taking into account all possible factors. Therefore, in this article we will take the difficult path and consider a more reliable option for reinforcing the heel of the pillar.
Work plan. We prepare 4 rods about 2.4 m long (1.65 m in the ground + 0.3 m above the ground + 0.3 for connection with the grillage + 0.1 m for the heel of the pillar). To reinforce the widening of the pillar, we will bend the ends of the reinforcement so that it looks like the letter L. The length of the bend will depend on the diameter of the heel in the place where its reinforcement will take place (3-5 cm from the bottom of the widening). In our case, the length of the bend is somewhere around 10-13cm. After we have the rods ready, we sew them into a reinforcement frame. Welding, of course, is not suitable here, so we will tie it together using binding wire. At the same time, we make the connection not very strong, so that it is possible to rotate the reinforcement along its axis. It is advisable to make notches at the ends of the top of the reinforcement so that there is a guideline for how much to twist the reinforcement so that it is placed in our widening at the desired angle.
If you decide to make a reinforcement frame without widening reinforcement, then in this case we do everything the same as above, only we make the connection of the reinforcement rigid (by welding or knitting wire).
Work plan for the formation of a pillar with widening
1. We lower our formwork into the well until the end.
2. We will fill the pillar with concrete in two steps. First, we pour a mixture of concrete to create the heel of the bored pile. It is not worth pouring a lot at once, since it will be difficult to lift the formwork and the load on the package will be too great. Adjust the fill to your liking. To calculate the composition of concrete, we suggest using our service: Calculator for calculating the composition of concrete.
3. Raise our roofing felt glass up to the height of the widening. As a result, the poured concrete fills the package and forms the heel of our pillar. Then we press the formwork down a little.
4. We insert the reinforcement cage into the formwork and push it into the concrete solution to the depth we need.
5. We unfold the reinforcement bars along the axis to reinforce the heel of the post. How to do this and how the heel reinforcement will look, see the pictures below.
6. We bring the pillars to one level. When the concrete has set a little and the formwork has already been fixed, we mark the general level of all bored piles using a laser level or hydraulic level. As a mark on roofing felt formwork, you can use a self-tapping screw or a nail inserted into the formwork at the marked level. It is up to this mark that we will pour concrete into our piles.
7. We pour concrete to the level marks with the obligatory compaction of the solution using vibration or bayonet. For bayoneting, you can use conventional reinforcement D10-D12. In order not to damage the above-ground part of the formwork during concrete pouring, you can build a kind of removable rigid frame. A piece of metal pipe with a diameter close to our formwork is suitable for this role. You can simply build formwork from boards, which we will transfer from one pillar to another during pouring.
After pouring, the concrete must mature. To prevent it from drying out in the first days, you can pour wet sawdust on the top of the post and cover it with a bag.
If you are going to build a frame house, then to connect the pillar with the timber frame, use anchors (stud with nut) poured into the concrete of the pillar. Detailed instructions can be found in the article: Installation of an anchor to connect a pole and a timber frame.
8. We cut our formwork to the marked level.
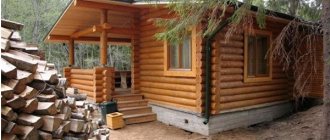
This is what a finished columnar foundation made of bored piles will look like. © www.gvozdem.ru
Conclusion
As we can see, creating a columnar foundation with your own hands is feasible even for one person. This is one of its main advantages, for those who like to do everything with their own hands without hiring hired force and special equipment. Well, we must not forget that there is a significant saving in materials in contrast to a strip foundation and, especially, a monolithic slab.
Similar articles:
www.gvozdem.ru
Types of cardboard formwork
Cardboard formwork has several types of sections: round, square, rectangular, decorative and classic. There are several types of disposable formwork, and the classification is made precisely according to the type of section:
Cardboard formwork for columns with square and rectangular sections
This type is also called folding formwork. Its main advantages are as follows:
- Folding formwork is convenient to move around the construction site;
- Assembling the formwork is quite easy, and the work can be done right on the site;
- This formwork is quite compact, so it is incredibly convenient to transport and store it;
- Columns can be mounted to a height of up to 30 m;
- Thanks to the disposable formwork material, the columns can be concreted with a mixture pressure of 60 kN.
Circular formwork
Disposable round column formwork has the following advantages:
- The design is highly reliable and lightweight;
- It is convenient to install and dismantle;
- The formwork can not be dismantled for a long time, thus maintaining the ideal appearance of the concrete.
Formwork of non-standard section
Construction companies can produce custom formwork of any non-standard configuration and cross-section, and the technical characteristics will not be affected at all:
- This formwork can be installed at a height of up to 30m;
- The formwork material allows concreting with a pressure of up to 60 kN;
- The cross-section of the columns varies from 150x150 to 800x800 mm.
Cardboard formwork for pillars
To erect a concrete pillar, formwork made of glassine is used - durable cardboard impregnated with a bitumen composition. Glassine must be rolled in several layers, thus obtaining cheap and high-quality formwork. The edges of the cardboard must be stapled so that the legs of the staples come out, otherwise the post may be damaged during dismantling.
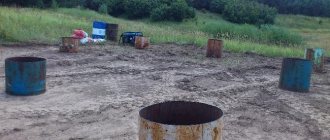
Cardboard formwork for bored piles
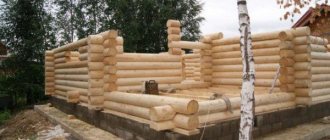
Bored foundations are especially often used for the construction of buildings without a basement, and houses on stilts are widely built in permafrost areas. Such a foundation will support a house made of any material, and heavy houses require piles with a large diameter. For these piles, cardboard formwork is used, which allows the production of piles with a diameter of up to 1 m. During the construction process, cardboard formwork for piles also serves as a waterproofing material.
Features of a pile foundation
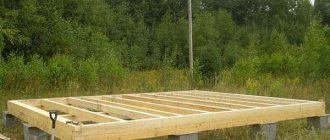
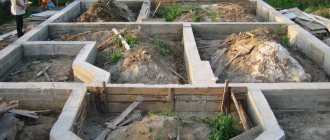
This foundation option can be built if the planned weight of the building does not exceed 150 tons. It is also chosen if the soil on the site is complex, for example, loose. This construction technology can also be used on waterlogged soils; moreover, this is practically the only acceptable construction method. A columnar foundation is made like this:
- a well is drilled, and the drilling depth must exceed the freezing depth of the soil;
- formwork forms are installed in the prepared pits, which can be reusable and stationary;
- the solution is poured.
Advantages of this option:
- reducing the volume of earthworks, this is especially important if the site has dense soil, when digging the earth is a difficult task;
- reduction of material consumption;
- possibility of construction on light soils. Deep piles allow the pressure exerted by the building to be transferred to the layers below, which are more dense.
Advice! Pile installation can be done in different ways. Screw and driven piles are used extremely rarely in private construction, since their installation requires the use of special mechanisms. Therefore, bored technology is more often used, according to which a well is first drilled, then formwork is installed and then a pile is formed from mortar directly on site.
Where to buy cardboard formwork
When choosing any building materials, including formwork, you should adhere to several rules:
- Don't skimp on material. If you are sure that manufacturers produce high-quality products, it is better not to look for cheap analogues;
- High-quality building materials should be stored in perfect packaging: it should not be torn or dented, otherwise the competence of the store and the manufacturer should be doubted;
- Beware of the markets, as you may stumble upon cheap counterfeits.
On our website you will find the most complete and reliable list of manufacturers of formwork and components, which will help you choose suitable materials in your region. Use the convenient search and protect yourself from low-quality products, because in construction every smallest detail is important.
List of companies selling disposable cardboard formwork:
- Trading house Formwork - St. Petersburg, st. Politekhnicheskaya, 24, letter D, building 4-L, room. 7N
- Yasnopolyanskaya Packaging Factory - Tula region, Leninsky district, Sudakovo village, Lesnoy microdistrict, 50.
- Progress - Moscow, st. Bulatnikovskaya, vl. 12
- Alcore - Ukraine, Lviv, st. Kurmanovicha, 9
- and etc.
We build a columnar foundation from plastic pipes with our own hands
- Foundation installation Type selection
- From blocks
- Tape
- Slab
- Pile
- Columnar
- Reinforcement
- Which to choose
- Kinds
Search
Foundations from A to Z.
- Foundation installation All Select type From blocks Tape Slab Pile Column
Foundation for a metalworking machine
Construction of a foundation made of FBS blocks
Pouring the foundation for a house
Characteristics of strip foundation
- AllReinforcementWaterproofingAfter installationRepairMixes and materialsDeviceFormworkInsulation
Repairing cracks in foundation walls
How to reinforce a grillage
The need for formwork
How to waterproof a basement
- AllWhich one to chooseFinishDevice
Finishing the foundation with stone
Choosing plinth tiles for the facade
What is a plinth
How to close screw piles
- All TypesWork ToolsDevice
Dynamic and static tests of piles
Use of reinforced concrete piles
Making screw piles with your own hands
fundamentaya.ru
What kind of foundation pipes: using pipes instead of piles
- Foundation installation Type selection
- From blocks
- Tape
- Slab
- Pile
- Columnar
- Reinforcement
- Which to choose
- Kinds
Search
Foundations from A to Z.
- Foundation installation All Select type From blocks Tape Slab Pile Column
Foundation for a metalworking machine
Construction of a foundation made of FBS blocks
Pouring the foundation for a house
Characteristics of strip foundation
- AllReinforcementWaterproofingAfter installationRepairMixes and materialsDeviceFormworkInsulation
Repairing cracks in foundation walls
How to reinforce a grillage
The need for formwork
How to waterproof a basement
- AllWhich one to chooseFinishDevice
Finishing the foundation with stone
Choosing plinth tiles for the facade
What is a plinth
How to close screw piles
- All TypesWork ToolsDevice
Dynamic and static tests of piles
Use of reinforced concrete piles
Proper making of pipe piles with your own hands
- Foundation installation Type selection
- From blocks
- Tape
- Slab
- Pile
- Columnar
- Reinforcement
- Which to choose
- Kinds
Search
Foundations from A to Z.
- Foundation installation All Select type From blocks Tape Slab Pile Column
Foundation for a metalworking machine
Construction of a foundation made of FBS blocks
Pouring the foundation for a house
Characteristics of strip foundation
- AllReinforcementWaterproofingAfter installationRepairMixes and materialsDeviceFormworkInsulation
Repairing cracks in foundation walls
How to reinforce a grillage
The need for formwork
How to waterproof a basement
- AllWhich one to chooseFinishDevice
Finishing the foundation with stone
Choosing plinth tiles for the facade
What is a plinth
How to close screw piles
- All TypesWork ToolsDevice
Dynamic and static tests of piles
Use of reinforced concrete piles
Making screw piles with your own hands
fundamentaya.ru