How to make large flowers out of paper with your own hands to decorate the hall?
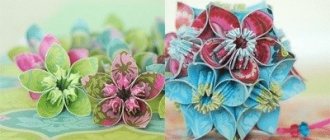
Another flower that always looks beautiful in holiday decor is the fluffy peony. This paper craft can be used to create floor compositions, as well as to make beautiful garlands. There are two ways to make a peony.
A simple way to create a large paper flower to decorate a room:
Fold an accordion out of paper, tie it in the middle, and then fluff it up
How to make large paper flowers with your own hands to decorate the hall:
Materials needed
Print out the petal template - adjust the scale if necessary
Using scissors, cut out all the necessary blanks. Using a hole punch, make a hole in the center of the workpiece
We paint our future petals. You can apply several layers of paint. This will make the peony look brighter
We wait until the paint dries. We take the glue and begin to assemble the bud by connecting individual petals. This is what the intermediate version will look like. When the bud is ready, we begin to make pistils. We bend them so that they only peek out a little from the bud.
Glue a thread to the bottom for stability.
The finished product should dry well
How to make paper flowers?
Making paper flowers is not that difficult, but depending on the type of flowering and the paper chosen, creating decor for the hall takes different times. Flowers can be simple and complex, small and large. The composition is assembled from elements of different sizes.
The most commonly used materials for decorating a room with paper flowers are:
Roses
Paper roses are a favorite decoration element for many holidays. Tables are set with roses, areas for photo sessions are decorated, and various surfaces are decorated.
There are more than 25 ways to make a paper rose. The fastest of them is creating a spiral flower.
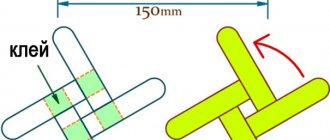
The following master class will help you make a spiral rose. Let's perform all the steps step by step:
Step 1. Prepare materials;
Step 2. Draw a spiral on paper;
Step 3. Cut with scissors;
Step 4. We twist the paper around the stick, start from the end and go to the middle of the drawing;
Step 5. Secure with glue, bend the central circle and make the base.
This model is complicated with the help of additional petals.
Step 6. Cut out additional petals in the amount of 12 pieces - 4 small, 4 medium, 4 large.
Step 7. Make a cut at the bottom of each petal.
Step 8. Make the petals convex by gluing the edges of the cut.
Step 9. Glue the petals to the rose, starting with the smaller ones.
To make the rose look natural, the spiral can be made not only round, but also with rounded, jagged and square edges.
Stencil templates will help you make a rose with your own hands. The petals on such stencils are already drawn; they need to be cut out and assembled onto the base. The assembly begins with large petals and ends with small ones.
More complex in execution are the techniques of individual petals. Petals hand-cut from corrugated paper will look natural and alive.
Carnation
Carnations are used to create a festive abbreviation that is used to decorate a room. Who among us is unfamiliar with compositions of numbers that are used for photo shoots of small children. Letters can be seen at anniversaries and wedding events.
As a rule, small flowers are used to create compositions. You can make a carnation from plain napkins by cutting out circles with different edges and sewing them together. Flowers can be folded from petals using tissue or corrugated paper.
Carnations are used to create a festive abbreviation that is used to decorate a room. Who among us is unfamiliar with compositions of numbers that are used for photo shoots of small children. Letters can be seen at anniversaries and wedding events.
Garlands of carnations also look great in the interior. Garlands are fixed to the ceiling or wall. Flowers of different sizes are taken to create an interesting gradient effect.
Peonies
Peonies are beautiful flowers in shades of pale pink to purple. They fit harmoniously into any room decoration with flowers. They especially like to decorate weddings with them, because peony is a symbol of strong family relationships and brings good luck to the newlyweds.
These flowers are used to decorate various events. A giant peony flower will organically fit into the design of both children's parties at school and birthdays in a restaurant.
Daisies
Daisies are a wall decoration of the hall with paper flowers. They have a flat shape, teardrop-shaped petals and a fluffy center.
The colors of daisies can be very diverse, but in many cases preference is given to the classic version. A flower may have one row of petals or several.
There is nothing easier than cutting out a daisy - to do this, just draw a circle, make cuts towards the center and shape the edges in the form of petals. The fluffy center of the chamomile is glued, and before that the small circle is cut into uniform strips.
To decorate the walls, daisies are made that differ in size to create a feeling of volume in the composition.
Exotic flowers
The holiday will sparkle with new colors if the hall is decorated with exotic flowers. Every person will feel like they are in a magical and vibrant world.
To create exotic flowers, colored crepe paper is used. And the more colors, the better.
The presented master class shows step by step how you can create such a flower:
- Fold each roll like an accordion;
- We cut the paper so that each subsequent roll is shorter than the previous one;
- Let's make the ends triangular in shape;
- We pinch the edge of the roll and cut it;
- Lay the rolls on top of each other;
- We tighten it with a thread in the middle;
- We straighten the flower.
Origami flowers
Interesting paper decorations would be origami. This art originated in Japan and spread throughout the world. The origami technique allows you to make almost any flowers.
To make origami flowers you need to use diagrams. Origami patterns vary in level of complexity; you can create both simple lilies and voluminous flower balls, which will serve as a wonderful decoration at a wedding event.
Decorating the premises where weddings take place allows you to fully express your creative imagination.
DIY flowers made of corrugated paper to decorate the hall - master class with photos
This is what your finished jewelry will look like.
If you wish, you can take material of a different color. DIY flowers made of corrugated paper to decorate the room:
Take paper and cut out the required number of blanks
Using scissors or a pencil, curl the tip of the petal
Give a rounded shape
We lay out the material so that it is convenient to take it and quickly form a bud. We wind the material onto a toothpick, we should get a pestle. We begin to form a bud.
We continue to enlarge the bud Petal by petal - creating layers
It should be so beautiful
Blanks for strengthening the lower tier
Strengthening the bottom of the craft
Glue the petals as shown in the photo
We fix the workpiece on the wire
Cut out additional green leaves
Glue them and let the glue dry
The wire is needed to ultimately fix the bud in the floor composition. The finished result
Large flowers made of foamiran and isolon
Large flowers made of corrugated paper: step-by-step instructions for beginners
Growth large flowers made of fabric - fashionable artificial plants, 1-3 m high.
Foamiran is also called “foam rubber” or “artificial suede”. Products made from such material are original and look as if they were alive, they are not difficult to wash, and the foramiar does not wrinkle. But on the street these flowers fade, unlike products made from isolon.
Conclusion
Textile flowers made from fabric for curtains, furniture, and other interior elements are a memory of your favorite outfit, if you don’t throw it away, but give it a new life. Delicate roses made of thin fabric look original on the new dress. It’s worth trying some floral crafts, and your apartment will be transformed into a garden of Eden.
DIY paper flowers - step-by-step master classes for beginning needlewomen
Making paper decorations is very simple, and most importantly, such work does not require complex skills. Below we bring to your attention three master classes on creating holiday decor for those who will be making crafts for the first time in their lives.
DIY paper flowers - step-by-step master classes for beginning needlewomen:
To make such decorations, it is better to use not very thick paper.
Paint the petals carefully so that the material does not start to tear
In this case, the material for making the decor must be dense
Paper hall decorations
After studying a master class on how to make decorations for your living room using paper, you can make your own flowers without breaking the bank. Very often people start thinking about creating such decor when preparing for a wedding. Nowadays it is no longer fashionable to use balloons, since they have ceased to amaze, but paper decor is something new. Decorating with paper flowers is a modern, and most importantly, alternative way to decorate celebration rooms and just apartments.
To make them you don't need:
- A lot of time;
- Strength;
- Expensive materials;
- Professional skills.
They can be attached to absolutely any surface and even to curtains, since the products are very light. They fit perfectly into any interior and, if necessary, can be removed from view. Such products can please you at any time of the year and do not need to be watered, trimmed or fed.
Advantages of decor
Decorating a room with paper flowers has a certain number of advantages:
- With such products, any celebration will become more vibrant and modern.
- You don’t have to spend money on a florist and create the decor yourself.
- There is no need to purchase a huge amount of natural flowers, which are far from inexpensive.
- Decoration can be an alternative to fresh flowers.
- They are very easy to make.
- You can use pins or double-sided tape for fastening.
In addition, such bouquets and buds will not crumble and will not spoil the order in the room, which causes great discomfort.
Flowers from colored paper for decorating a room - how to make large roses?
Rose is the queen of flowers and is liked by almost all people. Therefore, if you want to give your holiday a special charm, then choose just such a craft as your holiday decor. So, let's learn how to make large roses from colored paper with your own hands.
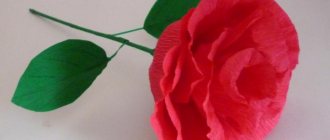
Beautiful rose - decor for any celebration
Flowers made of colored paper for hall decoration:
Blank for the petals We begin to form the bud Making it more voluminous
Adding side petals
Adding side petals
Adding side petals
Adding side petals
The core will look like this
Gradually increase the size of the bud
Gradually increase the size of the bud
Flowers made of colored paper for hall decoration
Making a blank for the bottom layer of petals
Making a blank for the bottom layer of petals
Making a blank for the bottom layer of petals
Connect the bottom and top and you have the perfect rose.
Huge flowers made of corrugated paper
As an example for making a huge flower, let's choose an aster. The main thing is to master the technique of making a flower. Then you can interpret it to invent new forms and styles of room decoration.
The starting material for making aster will be lilac corrugated paper. We will need a whole roll. We wrap the future stem of the flower with dark green ribbon. Now we will make aster petals.
To do this, cut a roll of corrugated paper into small strips of varying lengths. On the resulting strips, indicate the length.
You should get rolls of different widths and lengths. Now we place the ends of these parts on top of each other in layers with strips of different lengths. The lower layers should consist of long tubes.
We use green decorative paper to make five petals. We cut out small oval-shaped leaves according to the template. We connect the leaves together with thread.
We sequentially connect all the details of the aster into a single element and secure it to the trunk. We carefully straighten and align the petals. Some can be slightly bent. The flower is ready.
DIY white paper flower for room decoration
White flowers are always beautiful; they give the holiday a special bright atmosphere. But, perhaps, their main advantage is that such decor can be used for a holiday for people of absolutely all ages.
Narcissus is a great idea for decoration
DIY white paper flower for room decoration:
Instructions for creating decor
Another option for creating a white flower from paper is daisies:
Instructions for creating decor
Simple paper flowers on the wall for room decoration - ideas with photos
If you don’t like to bother, you can always make simple decorations, believe me, such decor will also be very beautiful.
Simple paper flowers on the wall for decorating a room - ideas with photos:
Instructions for creating decor
Instructions for creating decor
Instructions for creating decor
DIY paper hydrangea flower
You will need:
- cardboard,
- pencil,
- scissors,
- ruler,
- double corrugated (creped) paper,
- glue,
- green adhesive tape,
- wire.
Stencils for hydrangea petals
Step-by-step instructions in addition to photographs:
- Draw hydrangea petal shapes onto cardboard as stencils.
- Cut the corrugated paper into strips 10 cm long and 0.5 cm wide.
- Make a stamen at the end of the wire - as shown in the photo.
- Cut out four petals from crepe paper. Apply a little glue to each leaf and glue it around the flower so that they are perpendicular to each other.
- Cut two strips of green crepe paper 15cm long and 1cm wide.
- Cut out two green leaves from crepe paper.
- Glue on the green leaves.
Light DIY paper flowers for room decoration
Fluffy decor
IMPORTANT: The more petals your flower has, the more voluminous it will look. When creating a large flower, it is important to let the glue dry completely when fixing each new row. If you do not pause, the petals will begin to spread under their own weight.
Light DIY paper flowers for decorating a room:
Craft for the holiday
Another option for creating light holiday decor:
Delicate lilac
Do-it-yourself voluminous paper flowers: master class on making dahlias
Ready-made dahlia
Do-it-yourself volumetric paper flowers - master class on making dahlias:
Necessary blanks
Bend the leaf as shown in the photo
Making a cone
We repeat the manipulation until we get the required number of blanks
We fix them on a dense basis We create the required number of balls The craft is almost ready, all that remains is to add the central part
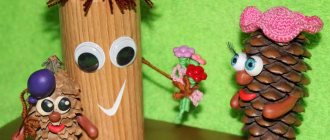
Crafts from fruits and berries
How to make flowers from plastic bottles with your own hands
For wood, you can use dummies of fruits and berries. This craft will look great in the kitchen. A DIY fruit topiary master class is presented below.
To create a fruit and berry tree you need:
- paperclip - 6 pcs. (diameter 3.5 cm);
- foam ball - 8 cm;
- green sisal - 1 p;
- decorative insects (butterfly) - 1 piece;
- pot (400 ml) - 1 piece;
- glue gun and 5 rods;
- wooden sticks for the ladder - 4 pcs. (optional);
- artificial grass;
- dummies of fruits;
- wooden block in the form of a trunk - 35 cm;
- acrylic paints;
- alabaster or plaster.
Fruit tree assembly instructions:
- Paint the trunk in advance in the desired color or leave it as is. Insert it into the ball and secure it with glue for strength.
- Now you need to cover the foam ball with green sisal. To do this, apply glue to the top of the surface and apply the material. Hold for a few seconds.
- After this, do the same work with the remaining ball. Carefully glue the sisal to the surface.
- Carefully secure the sisal in a circular motion around the base of the ball.
- The grapes must be secured with paper clips and must be fixed with glue. Make a hole in the ball with an awl, secure the fruit with a paper clip and push it into the hole. Fix three bunches of grapes on both sides at the base.
- Fill the surface of the ball with fruits: pears, tangerines, cherries and persimmons.
- Now you need to dilute the alabaster with water according to the instructions, fill the mixture into the pot and insert the tree trunk. After a few minutes, it will harden. Leave the pots in this state for 2 days for complete hardening.
- After drying, take a container with frozen alabaster and attach green sisal to the surface with glue.
- The bottom of the pot can be decorated with figurines, artificial grass, berries, decorative insects, and ladders. All this is at your discretion and desire.
Sakura flowers made of paper for decorating the hall with your own hands
Delicate sakura
Sakura flowers made of paper for decorating the hall with your own hands:
Help in creating delicate sakura Help in creating delicate sakura
Help in creating delicate sakura
Help in creating delicate sakura
Help in creating delicate sakura
Help in creating delicate sakura
Bouquet of paper flowers for hall decoration
You can use any paper flowers to create bouquets. When making them, you just need to take into account that the bud of the craft cannot be huge if you end up fixing the bouquet in a vase, basket or box. And of course, such a flower must have a stem - paper, cardboard, wire, cocktail tubes.
Cute tulips with candies inside
A bouquet of paper flowers to decorate the hall:
Bouquet of paper flowers for hall decoration
This flower is also perfect for creating a bouquet:
Bouquet of paper flowers for hall decoration
Bouquet of paper flowers for hall decoration
Bouquet of paper flowers for hall decoration
Wedding decoration with paper flowers
A wedding is an unforgettable and exciting event not only for a couple in love, but also for their friends and relatives.
The wedding begins not only with the choice of a wedding dress by the bride, but also with the determination of her style, the main theme. Weddings can be in Provence style, Russian theme, retro style, and a certain color scheme.
Some of the most interesting in style are handmade and craft paper weddings. Such weddings are decorated with paper accessories and flowers. Even a wedding bouquet, one of the bride’s most important accessories, is made from paper buds.
At weddings, the following areas are decorated with paper flowers:
- arch;
- gazebo;
- floor;
- ceiling;
- presidium;
- walls;
- tables;
- photo zones;
To decorate them, various types of paper flowers are used, ranging from roses to exotic plants. Garlands, flower balls, and even huge flowers are used in decoration.
Large paper flowers for wedding hall decoration are a fashion trend. How to decorate a wedding with decor from large flowers?
Paper flowers with candies: ideas with photos
A ready-made bouquet that can be placed in a vase.
Paper flowers with candies - ideas with photos:
Carefully cut the blanks for decoration
Making a green border
Be sure to curl the ends
We begin to form the base - the sweetness will be placed in it
Paper flowers with candies
We figure out what our bud will be like. We put candy in it. It's better if it comes in a wrapper
We fix everything well - with threads, glue, wire. We make a stem for the flower.
Connecting the stem and bud
We form a bouquet and put it in a vase
The flower can be made in this way:
An easier way to create a bud
Huge rose
You will need: thick cardboard, corrugated paper, a simple pencil, scissors, thick wire, green floral tape, adhesive tape, glue.
Master Class
- Draw or print the templates and transfer them to thick cardboard.
- Cut out 15 heart-shaped petals and 5 droplet-shaped petals from corrugated paper (for one flower).
- Shape the petals: stretch the hearts a little to the sides, and twist the droplets using a pencil.
- Take 2 pieces of thick wire and wrap it with floral tape.
- Glue a piece of crepe paper to the stem as a core.
- Form a bud: glue droplets, then hearts, secure with adhesive tape.
- Cut out a sepal from green crepe paper as shown in the picture.
- Secure the sepal to the base of the flower using duct tape.
- Cut out the leaves and glue them to the stem.
The huge rose is ready! I recommend watching this video!
Origami paper flower for room decoration
If you think that making origami flowers is difficult, then you are very mistaken, making such a craft is easy. Yes, you will have to spend more time, but the result will definitely please you.
Origami paper flower for room decoration:
Origami requires maximum precision, so try to bend as straight lines as possible
It is best to make a lotus from soft paper, so it will look more airy
Origami for experienced needlewomen
Origami for experienced needlewomen
Modular rose
When creating a modular rose, keep in mind that all small parts must be the correct size, otherwise you will not be able to combine them into one composition.
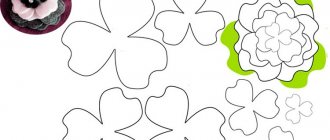
Printable paper flower templates - the best selection of stencils for cutting
For those who like to bring something new to ready-made master classes from popular needlewomen, we offer a selection of cutting stencils with which you can make paper flowers of completely different shapes.
Templates for printable paper flowers:
Petals for cutting Petals for cutting
Petals for cutting
Petals for cutting Petals for cutting
Petals for cutting
Petals for cutting
Petals for cutting
Petals for cutting
Petals for cutting
Features of creating different types of flowers
The techniques for preparing the petal blanks are the same, but to make beautiful flowers from isolon, a master class from a pro is still necessary. After all, creating a realistic model is quite difficult, but florist-decorators have tried many methods and share their secrets.
This master class describes one of the ways to form a flower; you can experiment and assemble your own fantasy rose.
The principle of forming a tulip is radically different - the flower is gathered around the stem, and the petals are glued in a special way. The process is shown in detail in the master class:
The way to create a flower will be determined by its shape:
- a flat and movable poppy with a capsule-core - its petals should not fit tightly to each other;
- an airy peony with a round dense bud in the middle will look like a real one if you make carved edges;
- chrysanthemum looks better with thin and graceful petals;
- the middle of a graceful iris must keep its shape.
Photos of flowers made from paper with your own hands to decorate the room: ideas for inspiration
Photo of DIY paper flowers to decorate the room:
Photo idea Photo idea Photo idea
Photo idea
Photo idea
Photo idea Photo idea
Photo idea
Photo idea
Photo idea
Examples of creating decor with flowers from isolon
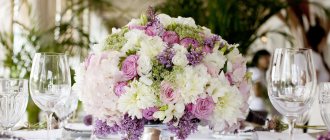
Large flowers are the original decor of a wedding celebration: a hall, a photo zone, a platform for the ceremony. Large-sized flowers will create a festive atmosphere at presentations, decorate a shop window or a birthday party.
The decor in pastel colors is especially delicate.
Flower photo zone will provide unforgettable photos
Large flowers are appropriate not only for wedding photos
Red roses framed in a photo - a spectacular technique
It's impossible to pass by such a display case
However, not only life-size flowers or large-scale compositions can be created from isolon; lamps from it will look quite organic - on a stand or as a replacement for traditional sconces.
The dense petals of ranunculus transmit light very effectively
Sconce or floor lamp - a large flower made of isolon will take a central place in the decor of the room
The process of creating a lamp is described in detail in the master class of craftswoman Marusya DIY.
Part 1. Electrical preparation.
Part 2. Assembling the lamp.
Although a lot of time will pass from mastering the technique to creating a masterpiece and more than one sheet of isolon will be spent, this is not a reason to stop, because handmade decor is more soulful, and each work is unique.
Large paper flowers are perfect for ceremonial decoration. In this article we will look at how to make huge paper flowers with your own hands.
Video: Large flowers made of paper. Master Class
If you like to create with your own hands, you will probably like the following articles on our site:
- Do-it-yourself envelope for “Open when”
- DIY money origami: diagram, video, photo
- DIY phone case - ideas, tips
- Vision board, do-it-yourself visualizations correctly: template, diagram
- How to make a beautiful shelf on the wall with your own hands: instructions
Using corrugated paper
The principle of making such paper flowers for the wall with your own hands is similar to the previously described method of assembling with an accordion, but it is made from the folds of a whole roll of corrugated paper. Each fold is made at a distance of 6-8 cm from the previous one. The ends are rounded with scissors, and in the center, be sure to reduce the size of the paper by making two triangular cuts. After tying with nylon thread, the layers of paper are carefully straightened in all directions.
To place a center in a contrasting color, press the paper down slightly, making a small indentation. The middle is made up of a strip 10 cm wide, one edge of which is cut into “noodles”. After twisting the prepared strip around a rod (knitting needle, wooden skewer or pencil), coat the end with PVA glue and press it to the last turn. Then attach the finished part to the central point of the flower. The craft is ready!