Ways to create paper furniture with your own hands, diagrams and important nuances
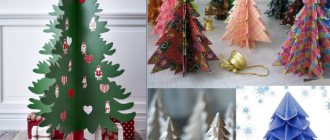
Paper furniture is in demand in interior decoration; you can make simple shapes with your own hands. Another area of application for these items is toys for children. Every child will want to have a dollhouse with beautiful paper furniture made with their own hands. To make such products, you do not need additional origami skills, you just need to follow the instructions provided.
Required tools and materials
Origami furniture is an interesting trend that requires special attention. Making such figures does not take much time, and the resulting result pleases adults and children with its appearance. The main feature of the products is their maximum similarity to real furniture items: sofas, tables, cabinets, armchairs and chests of drawers.
It is unlikely that you will be able to use such furniture in real life, but the items will be a good option for creating a model of a future room or designing a dollhouse. To achieve similarity with real furniture, textured paper is used during construction to imitate various surfaces: stone, leather, fabric, wood and metal. When creating objects, it is better to use paint that does not completely saturate the material, but only gives it color.
The following materials are used for production:
- Material for the base – matchboxes, some corrugated cardboard, colored thick paper;
- Pieces of fabric, decorative film and textured paper for finishing finished items;
- Scissors;
- Black pencil or pen;
- PVA glue or any other for working with paper.
You can work with paper yourself, or you can involve loved ones in the process. Then the resulting products will be diverse, but together they will form a single ensemble.
How to do the following options
You can make anything from paper. You just need to show imagination and perseverance. Let's consider master classes on making popular types of furniture. Based on detailed instructions, you can make other types of interior items. The most popular are:
To find out how to properly construct paper furniture, you need to consider each option separately.
Sofa
A paper sofa will look great both in a dollhouse and in a miniature copy of a real interior. Before you start, pay attention to the paper sizes:
- For miniature options, you should choose colored paper 10x10 cm;
- For execution in medium sizes, you need to give preference to a workpiece of 20x20 cm;
- To create a large-sized sofa, the dimensions of the material increase proportionally.
The color of the paper can be chosen as desired, but it is better that it fits into the future interior or imitates real furniture. Having selected the materials, you can begin manufacturing:
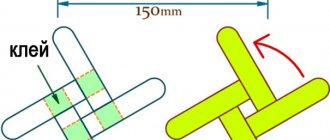
- The square sheet is folded in half, after which it is opened and folded perpendicular to the first one;
- The next step will be an additional hem. The bottom edge is folded to the middle fold line, then folded again. The output is 3 fold lines, not counting the central one;
- The lower thin strip is folded onto the first fold, after which two identical triangles are laid by folding the side parts diagonally;
- The accordion is folded to the end, and the upper part of the workpiece is bent to the middle. The workpiece is turned over;
- The lower corners are folded up in turn, and the upper corners are bent down diagonally;
- The workpiece is turned over again, bending one corner inward. This is how the back is formed.
After turning the product over, you need to form the legs of the sofa and it will be ready. Such a beautiful and original item will become a real decoration for a toy living room or an original art object.
Dresser
The most optimal and profitable way to create a paper chest of drawers is to use matchboxes. They slide out conveniently, so making the item will not be difficult. If you want to make a chest of drawers out of paper, then you should use paper blanks. This chest of drawers is convenient for storing small, lightweight items. This will perfectly include beads, beads, clasps, clips and other little things for creativity and handicrafts. The top of the chest of drawers can be painted with colored markers, giving it an original look.
Creative project “House made of cardboard”
Municipal autonomous educational institution
“Secondary school with. Berdyuzhye"
Creative project
"House of Cardboard"
The work was completed by: Senognoev Ivan Sergeevich, student of grade 6 “b”, MAOU “Secondary School with. Berdyuzhye" Head: Vereshchagina Larisa Nikolaevna, art teacher, MAOU "Secondary School of the village. Berdyuzhye"
Berdyuzhye 2021
Content
1. Introduction
(relevance of the project topic, goal, tasks, stages of work, expected result)………………………………………………………………………………3
2. Main part
……………………………………………………………….4
3. Practical part.
Making and decorating a house from cardboard….7
4. Conclusion
…………………………………..……………………………….12
5. List of used literature
…………………………………………………13
Introduction
Relevance of the project topic:
All children dream of toy houses, which they clumsily try to build from what they have at hand. And sometimes parents don’t even realize that there is material in the house from which they can make a wonderful house for children’s games - this is ordinary cardboard. Without much effort, waste material can turn into a beautiful and comfortable home - a favorite place for children to play. By decorating the house, children will develop their imagination. The toy house can become a spaceship or a princess' castle for them, taking them on an amazing adventure. By tidying up their toy home, children will learn how to clean up the house. Secluded in a house, they can organize a secret society or tell each other horror stories.
Object of study:
cardboard house.
Subject of study:
Features of making a house from cardboard.
Objective of the project:
obtaining first architectural knowledge and skills.
Project objectives:
1. Study the technology of making a house from cardboard.
2. Develop creativity, imagination, taste,
cultivate accuracy in work.
Stages of work on the project:
- Study and selection of material on the project topic.
- Studying the process of making a house from cardboard.
- Making a house out of cardboard.
- Design of work, preparation of presentation.
- Project protection.
Working methods:
collection and analysis of information, making a house.
Expected Result:
a story about the technology of making a cardboard house will attract the attention of my classmates and make me want to make a house with my own hands.
Main part
In every home there are many things that seem to be no longer needed, but it’s a shame to throw them away; one of these things includes cardboard boxes. Boxes of household appliances, electronics, shoes, dishes, and who knows what else.
A rectangular cardboard box is a common item in our everyday life. And today it is difficult to imagine your life without such boxes: they are used to pack various goods and gifts, store things and documents, send parcels and transport goods... Cardboard boxes not only protect the contents from the external environment and deformation, but also perform a decorative function with proper design registration We use cardboard boxes often and in a variety of ways, but we rarely think about where and how they came from.
The history of the origin of cardboard boxes does not go back centuries at all, and they appeared relatively recently. Cardboard boxes were first produced in Europe and the USA at the end of the 18th century. Production technology had not yet been developed, so all work on cutting cardboard was done manually, without the use of machines. It is also worth noting that the first cardboard boxes were not rectangular, but oval and round in shape. This is due to the fact that it was more convenient and practical to bend cardboard. The boxes were in demand mainly among haberdashery dealers and perfumers.
A cardboard box is the perfect material for creativity! You can do so many interesting things with it, and most importantly, it’s easy, fun and doesn’t require any additional investment. Everything you need is already at home!
I present to you a selection of ideas and master classes for crafts that will benefit your home.
1. A convenient box for storing linen, seasonal items, old photographs, postcards, and New Year's toys. It would be better to also make a lid for such a box. Use wide tape to glue parts together, and PVA glue to glue fabric.
2.
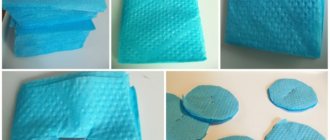
Box-chest for storing jewelry. For gluing we use PVA glue. To give the desired color we use paints and varnish. You can also decorate the chest using decoupage. To do this, dilute the PVA glue a little with water, apply it evenly to the surface to be decorated, take a three-layer napkin, separate one layer with the image and carefully place it on the prepared area. When the surface of the chest dries, coat the top with varnish or PVA glue (the glue will dry and become transparent).
Practical part
Making and decorating a house from cardboard.
I decided to make a house out of a cardboard box with my own hands. A do-it-yourself cardboard house will not require large financial investments. Materials and tools for construction can be found in the household of any family:
Materials and tools:
1. Cardboard boxes of different sizes, Titan glue.
2. Scissors.
3.Two types of fabric, lace, button.
Operating procedure
The sequence of building a cardboard house with your own hands can be different, depending on what kind of architectural structure you want to create. But the general algorithm can be outlined as follows:
1.
When constructing the house, I first created a sketch. I started work with a drawing. You can download the sketch you like from the Internet or draw it yourself if you wish.
2.
I drew out the details of the house I needed, cut them out of a cardboard box and cut out the window openings with scissors.
3.
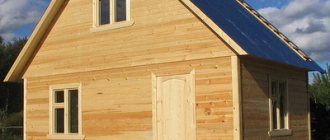
Then I started decorating the house. To do this, I used white fabric, cut out the pieces to size and started gluing the walls.
4.
Next, I covered the roof of the house with colored fabric, also decorated the window openings with lace, and began assembling all the parts of the house.
6.
The next step was to cut out the door and glue it to the end of the house, using a button as a handle.
Conclusion
The result of my work is this wonderful house.
Making a cardboard house with your own hands is not difficult. It's very interesting and exciting! By helping in construction, children will gain their first architectural knowledge and skills. Having created the first simple houses from cardboard with your own hands, you will be able to come up with many other extremely interesting crafts and make them more often with your friends.
List of used literature
- Magazine "Home Hearth".
- https://verdiktor.net/dizain/kreativ-rukodelie/669-podelki-iz-kartonnih-korobok.html
- https://nlp-system.com/istoriya-sozdaniya-kartonnyh-korobok.php
- https://uspehupak.ru/content/istoriya-proishozhdeniya-korobok-iz-kartona
- https://www.toysew.ru/iz-bumagi/sdelat-domik-karton.html
13
Decoration
A separate stage is the decoration of finished products. Do-it-yourself furniture, diagrams of which can be found in this material, is decorated as follows.
| Material | Peculiarities | What is it suitable for? |
| Self-adhesive paper for furniture | This material can be used in the manufacture of any type of furniture. This film is ideal for beginning craftsmen, because it is easy to cut, and the adhesive layer allows you to decorate the surface without any problems. | For tabletops, seats of chairs, sofas and armchairs, for decorating cabinet doors and chest of drawers. |
| Using paints | Paints allow you to show creativity and move away from standards. Using paint you can paint any pattern and design. When choosing a product, make sure that it does not damage the paper base. Acrylic or water-based compositions are preferred. | For all types of crafts, especially for decorating the front parts of products. |
| Application of fabric | The fabric allows you to imitate the structure of furniture as much as possible. | Suitable for sofas, armchairs and chairs. |
If gouache is used for decoration, you need to mix it with PVA glue (1:1). After drying, the paint will not imprint on your hands, and the product will receive additional rigidity.
Do-it-yourself paper furniture will be an excellent option for a dollhouse or designing models of a future interior. Creating miniature objects is a fun activity that you can involve all family members in.
Source
Kindergarten layout. Master Class
Natalya Poshivalova
Model of a kindergarten. Master Class
In our kindergarten , we decided to organize a local history room; one of the exhibits should be a model of our kindergarten .
For the layout you will need a large box (I have it from under my laptop)
.
For convenience, I cut it in half. I gave it the shape of the kindergarten .
Covered it with film. I made verandas out of toothpaste boxes.
They were also covered with self-adhesive tape.
I printed trees and bushes from the Internet and folded them so that the design was on both sides. Laminated and cut out.
. This is what a tree with a stand looks like.
The trees, as well as some equipment at the sites, were glued with double-sided tape. To prevent the tape from being visible, I glued self-adhesive patches on top of the stand.
The hardest thing was to figure out how to make equipment in the areas, since it had to be very small. I solved the problem this way: I walked through the area with a camera. I shrunk the photos, made them double-sided, and laminated them. Placed it on the layout . The equipment turned out to be small, but recognizable.
This is what happened.
"Wild animals". Layout for kindergarten. This layout is suitable as a design for a group or development environment. The model is made by hand from an empty shoe box, too. "Pets". Layout for kindergarten The layout is designed for the cognitive development of children. The model is made from a shoe box. The animal drinking bowl is made from half. "In the meadow." Layout for kindergarten To make the layout “In the Meadow” we needed an empty shoe box, gouache, plasticine, insect figures, PVA glue and adhesive. Kindergarten layout. Photo report As part of the kindergarten project, our group was tasked with making a model of a kindergarten. Of course, we didn’t make it ourselves, it was made for us. Layout for kindergarten “World of Pets” Description of material: the layout is made for young children for the purpose of cognitive development and development of play activities. Layout. Layout "Road" in the senior group of kindergarten This year the furniture in our group was updated and we had to update the traffic corner. We decided to make a mock-up. DIY model “Reptiles” for kindergarten. Master class with step-by-step photos One of the most important factors in the development of a child’s personality is the gaming environment. With a dull, gray, unattractive subject environment or its absence. Master class decoration “Butterflies” for kindergarten To create this decoration we need: 1. 10 colored sheets of A4 size (this can be ordinary double-sided colored paper) 2.Source